User Manual
Page 3
Operating the DTV properly enables you for purchasing this Sanyo LCD HighDefinition Digital Television. CONTENTS Important Safety Instructions 2 DTV Adjustment and Setup 20 ~ 27 Content 3 How to Operate the On-Screen Menu 20 Features 4 Menu...-Based) Symbol Explanation 26 DTV Ratings (Age and Content-Based) Symbol Explanation 26 Picture/Sound Adjustment 27 Menu Language 27 Helpful Hints (Problems / Solutions 28 ~ 29 Care and Cleaning 29 Mexico Guarantee 30 Warranty (U.S.A. Welcome to the World of Sanyo Thank you to manage those features and maintain it in the Remote Control...
Operating the DTV properly enables you for purchasing this Sanyo LCD HighDefinition Digital Television. CONTENTS Important Safety Instructions 2 DTV Adjustment and Setup 20 ~ 27 Content 3 How to Operate the On-Screen Menu 20 Features 4 Menu...-Based) Symbol Explanation 26 DTV Ratings (Age and Content-Based) Symbol Explanation 26 Picture/Sound Adjustment 27 Menu Language 27 Helpful Hints (Problems / Solutions 28 ~ 29 Care and Cleaning 29 Mexico Guarantee 30 Warranty (U.S.A. Welcome to the World of Sanyo Thank you to manage those features and maintain it in the Remote Control...
User Manual
Page 4
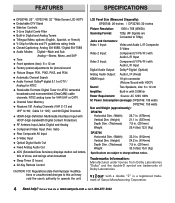
... are trademarks of Sanyo Manufacturing Corporation. 4 Need help? and 99 Digital Channels N HDMI (High-Definition Multimedia Interface) Input with a double "Z" is a registered trademark of Dolby Laboratories. LCD Panel Size (Measured Diagonally): DP26746: 26-inches / DP32746: 32-inches Picture Resolution: 1366 x... HDMI Input: 19-pin connector (Picture/Sound with HDCP) Sound: Two Speakers, size: 6 x 12 cm Amplifier: Built-in with 3.0W/ch Power Requirement: Source: AC 120V, 60Hz AC Power Consumption (average): DP26746: 135 watts DP32746: 155 watts Size and Weight (approximately...
... are trademarks of Sanyo Manufacturing Corporation. 4 Need help? and 99 Digital Channels N HDMI (High-Definition Multimedia Interface) Input with a double "Z" is a registered trademark of Dolby Laboratories. LCD Panel Size (Measured Diagonally): DP26746: 26-inches / DP32746: 32-inches Picture Resolution: 1366 x... HDMI Input: 19-pin connector (Picture/Sound with HDCP) Sound: Two Speakers, size: 6 x 12 cm Amplifier: Built-in with 3.0W/ch Power Requirement: Source: AC 120V, 60Hz AC Power Consumption (average): DP26746: 135 watts DP32746: 155 watts Size and Weight (approximately...

User Manual
Page 6
... "+" and "-" signs on the remote control to use the DTV as a monitor only, with new ones or mix different types of reproducing a crystal clear digital picture and exceptional sound. Weak batteries may take several minutes. After the initial channel search is capable of batteries together. -
... "+" and "-" signs on the remote control to use the DTV as a monitor only, with new ones or mix different types of reproducing a crystal clear digital picture and exceptional sound. Weak batteries may take several minutes. After the initial channel search is capable of batteries together. -
User Manual
Page 11
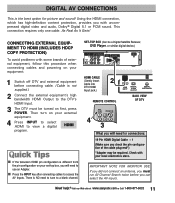
... EQUIPMENT TO HDMI (INCLUDES HDCP COPY PROTECTION) To avoid problems with uncompressed digital video and audio, Dolby ® Digital 5.1 or PCM sound. I If the television HDMI pin configuration is different from the pin configuration on your set-top box, you can select the AV inputs...you will need to the DTV's HDMI Input. 3 The DTV must run All Channel Search twice before connecting cable. (Cable is NO need for picture and sound! I Press the INPUT key after connecting cables to a blank channel. There is not supplied.) 2 Connect the external equipment's high bandwidth HDMI Output...
... EQUIPMENT TO HDMI (INCLUDES HDCP COPY PROTECTION) To avoid problems with uncompressed digital video and audio, Dolby ® Digital 5.1 or PCM sound. I If the television HDMI pin configuration is different from the pin configuration on your set-top box, you can select the AV inputs...you will need to the DTV's HDMI Input. 3 The DTV must run All Channel Search twice before connecting cable. (Cable is NO need for picture and sound! I Press the INPUT key after connecting cables to a blank channel. There is not supplied.) 2 Connect the external equipment's high bandwidth HDMI Output...
User Manual
Page 14
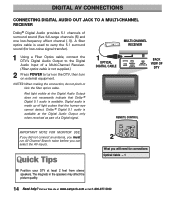
... inputs. Red light visible at the Digital Audio Output only when received as part of surround sound (five full-range channels [5] and one low-frequency effect channel [.1]). The magnets in the speakers may affect the picture quality. 14 Need help? Digital audio is available. NOTES:When making the connection, do not...that Dolby ® Digital 5.1 audio is made up of a Multi-Channel Receiver. (Fiber optics cable is not supplied.) 2 Press POWER to carry the 5.1 surround sound (for connections: Optical Cable - 1 I Position your DTV at www.sanyoctv.com or Call 1-800-877-5032
... inputs. Red light visible at the Digital Audio Output only when received as part of surround sound (five full-range channels [5] and one low-frequency effect channel [.1]). The magnets in the speakers may affect the picture quality. 14 Need help? Digital audio is available. NOTES:When making the connection, do not...that Dolby ® Digital 5.1 audio is made up of a Multi-Channel Receiver. (Fiber optics cable is not supplied.) 2 Press POWER to carry the 5.1 surround sound (for connections: Optical Cable - 1 I Position your DTV at www.sanyoctv.com or Call 1-800-877-5032
User Manual
Page 19
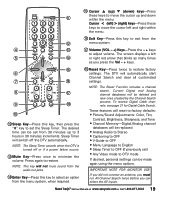
... all customized settings. Cursor < (left) > (right) keys-Press these keys to restore factory settings. The DTV will not mute sound from the audio out jacks. 14 Enter Key-Press this key to exit from the menu system. RECALL TUNER MUTE 13 ... Keys-Press the - + keys to adjust volume. NOTE: The Reset Function includes a channel search. These features will reset to factory defaults: • Picture/Sound Adjustments: Color, Tint, Contrast, Brightness, Sharpness, and Tone • Channel Memory-Digital /Analog channel databases will be replaced • Analog Audio to Stereo...
... all customized settings. Cursor < (left) > (right) keys-Press these keys to restore factory settings. The DTV will not mute sound from the audio out jacks. 14 Enter Key-Press this key to exit from the menu system. RECALL TUNER MUTE 13 ... Keys-Press the - + keys to adjust volume. NOTE: The Reset Function includes a channel search. These features will reset to factory defaults: • Picture/Sound Adjustments: Color, Tint, Contrast, Brightness, Sharpness, and Tone • Channel Memory-Digital /Analog channel databases will be replaced • Analog Audio to Stereo...
User Manual
Page 20
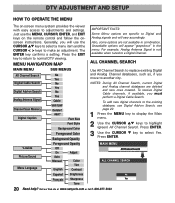
... Analog Channel databases, such as, if you move to select Yes. Press ENTER. 3 Use the CURSOR M key to another city. Add? Press ENTER. « V-Guide Picture/Sound Menu Language Foreground Opacity Off On Adjust Auto Manual Color Tint English Contrast Español Brightness Français Sharpness Tone 20 Need help...
... Analog Channel databases, such as, if you move to select Yes. Press ENTER. 3 Use the CURSOR M key to another city. Add? Press ENTER. « V-Guide Picture/Sound Menu Language Foreground Opacity Off On Adjust Auto Manual Color Tint English Contrast Español Brightness Français Sharpness Tone 20 Need help...
User Manual
Page 24
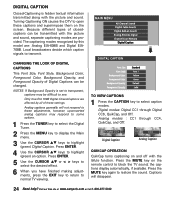
...through Digital CC6, QuikCap, and Off. Digital CC1 Digital Caption CC1 Analog Caption QUIKCAP OPERATION QuikCap turns captioning on and off with the picture and sound, separate captioning modes are provided. Only true EIA 708B Digital Closed-Captions are : Analog EIA-608B and Digital EIA708B. Press ENTER....MENU key to display the Main menu. 3 Use the CURSOR LM keys to block the TV sound; NOTES: If Background Opacity is hidden textual information transmitted along with the picture and sound. Digital modes: Digital CC1 through CC4, QuikCap, and Off. Press the MUTE key again to ...
...through Digital CC6, QuikCap, and Off. Digital CC1 Digital Caption CC1 Analog Caption QUIKCAP OPERATION QuikCap turns captioning on and off with the picture and sound, separate captioning modes are provided. Only true EIA 708B Digital Closed-Captions are : Analog EIA-608B and Digital EIA708B. Press ENTER....MENU key to display the Main menu. 3 Use the CURSOR LM keys to block the TV sound; NOTES: If Background Opacity is hidden textual information transmitted along with the picture and sound. Digital modes: Digital CC1 through CC4, QuikCap, and Off. Press the MUTE key again to ...
User Manual
Page 27
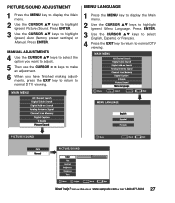
... LANGUAGE 1 Press the MENU key to display the Main menu. 2 Use the CURSOR LM keys to highlight (green) Picture / Sound. Visit our Web site at www.sanyoctv.com or Call 1-800-877-5032 PICTURE/SOUND ADJUSTMENT 1 Press the MENU key to display the Main menu. 2 Use the CURSOR LM keys to highlight (green) Menu...
... LANGUAGE 1 Press the MENU key to display the Main menu. 2 Use the CURSOR LM keys to highlight (green) Picture / Sound. Visit our Web site at www.sanyoctv.com or Call 1-800-877-5032 PICTURE/SOUND ADJUSTMENT 1 Press the MENU key to display the Main menu. 2 Use the CURSOR LM keys to highlight (green) Menu...
User Manual
Page 28
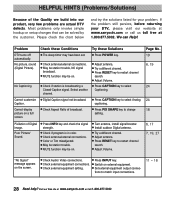
... have been set. G Adjust antenna. captioning. G Try a different channel. We can be solved by the customer. Cannot display picture on . Poor Picture/ Sound. G Color or Tint misadjusted. Most problems only involve simple hookup or setup changes that can Help! G Check Audio / Video ...connections. G Check external equipment setting. No picture, sound (Digital Picture). HELPFUL HINTS (Problems/Solutions) Because of the Quality we build into our product, very few problems are actual DTV defects...
... have been set. G Adjust antenna. captioning. G Try a different channel. We can be solved by the customer. Cannot display picture on . Poor Picture/ Sound. G Color or Tint misadjusted. Most problems only involve simple hookup or setup changes that can Help! G Check Audio / Video ...connections. G Check external equipment setting. No picture, sound (Digital Picture). HELPFUL HINTS (Problems/Solutions) Because of the Quality we build into our product, very few problems are actual DTV defects...


