

User Manual
Page 2
NO USER-SERVICEABLE PARTS INSIDE. Do not use this apparatus during lightning storms or when unused for replacement of the polarized or grounding-type plug. Do not install near water. 6. The wide blade or the third prong are provided for the grounding electrodes. 16. In the U.S. Use only with them might be connected to the grounding system of the building, as close to the point of the NEC that provides guidelines for proper grounding and, in particular, specifies that produce heat. 9. Servicing is grounded so as contact with the cart, stand, tripod, bracket, or table ...
NO USER-SERVICEABLE PARTS INSIDE. Do not use this apparatus during lightning storms or when unused for replacement of the polarized or grounding-type plug. Do not install near water. 6. The wide blade or the third prong are provided for the grounding electrodes. 16. In the U.S. Use only with them might be connected to the grounding system of the building, as close to the point of the NEC that provides guidelines for proper grounding and, in particular, specifies that produce heat. 9. Servicing is grounded so as contact with the cart, stand, tripod, bracket, or table ...

User Manual
Page 3
... of Audyssey Laboratories. CAUTION: FCC Regulations state that this product meets the Energy Star® guidelines for energy efficiency. As an Energy Star ® Partner, Sanyo Manufacturing Corporation has determined that improper modifications or unauthorized changes to this equipment does cause harmful interference to radio or television reception, which the receiver...
... of Audyssey Laboratories. CAUTION: FCC Regulations state that this product meets the Energy Star® guidelines for energy efficiency. As an Energy Star ® Partner, Sanyo Manufacturing Corporation has determined that improper modifications or unauthorized changes to this equipment does cause harmful interference to radio or television reception, which the receiver...
User Manual
Page 4
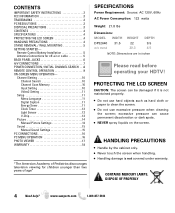
...60Hz AC Power Consumption: 122 watts Weight: 21.8 lbs Dimensions: MODEL WIDTH HEIGHT DEPTH DP32640 31.5 22 9.5 w/o stand 20.3 4.5 NOTE: Dimensions are in inches Please read before operating your HDTV! PROTECTING THE LCD SCREEN CAUTION: The screen can cause permanent discoloration or dark spots. • NEVER spray ... warranty. CONTENTS IMPORTANT SAFETY INSTRUCTIONS 2 FCC INFORMATION 3 TRADEMARKS 3 PC RESOLUTIONS 3 DISPOSAL PRECAUTIONS 3 CONTENTS 4 SPECIFICATIONS 4 PROTECTING THE LCD SCREEN 4 HANDLING PRECAUTIONS 4 STAND REMOVAL / WALL MOUNTING 5 GETTING STARTED-
...60Hz AC Power Consumption: 122 watts Weight: 21.8 lbs Dimensions: MODEL WIDTH HEIGHT DEPTH DP32640 31.5 22 9.5 w/o stand 20.3 4.5 NOTE: Dimensions are in inches Please read before operating your HDTV! PROTECTING THE LCD SCREEN CAUTION: The screen can cause permanent discoloration or dark spots. • NEVER spray ... warranty. CONTENTS IMPORTANT SAFETY INSTRUCTIONS 2 FCC INFORMATION 3 TRADEMARKS 3 PC RESOLUTIONS 3 DISPOSAL PRECAUTIONS 3 CONTENTS 4 SPECIFICATIONS 4 PROTECTING THE LCD SCREEN 4 HANDLING PRECAUTIONS 4 STAND REMOVAL / WALL MOUNTING 5 GETTING STARTED-
User Manual
Page 5
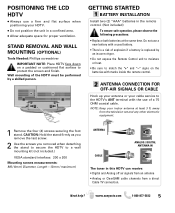
...CABLE Hook up your antenna or your indoor antenna at the same time. GETTING STARTED BATTERY INSTALLATION Install two (2) "AAA" batteries in this HDTV can receive: • Digital and Analog off air signals from an antenna • Analog or ClearQAM cable channels from the television set ...control. (Not included) To ensure safe operation, please observe the following precautions: • Replace both batteries at least 3 ft. POSITIONING THE LCD HDTV • Always use a new battery with a used battery. • There's a risk of explosion if a battery is replaced by a skilled person.
...CABLE Hook up your antenna or your indoor antenna at the same time. GETTING STARTED BATTERY INSTALLATION Install two (2) "AAA" batteries in this HDTV can receive: • Digital and Analog off air signals from an antenna • Analog or ClearQAM cable channels from the television set ...control. (Not included) To ensure safe operation, please observe the following precautions: • Replace both batteries at least 3 ft. POSITIONING THE LCD HDTV • Always use a new battery with a used battery. • There's a risk of explosion if a battery is replaced by a skilled person.
User Manual
Page 6
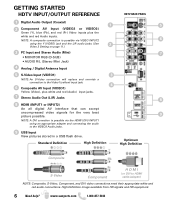
GETTING STARTED HDTV INPUT/OUTPUT REFERENCE HDTV BACK PANEL 1 Digital Audio Output (Coaxial) 1 5 2 Component AV Input (VIDEO2 or VIDEO3) Green (Y), blue (Pb), and red (Pr) Video inputs plus white and red (Audio) ...
GETTING STARTED HDTV INPUT/OUTPUT REFERENCE HDTV BACK PANEL 1 Digital Audio Output (Coaxial) 1 5 2 Component AV Input (VIDEO2 or VIDEO3) Green (Y), blue (Pb), and red (Pr) Video inputs plus white and red (Audio) ...
User Manual
Page 7
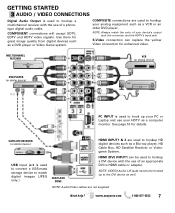
... system. NOTE: Audio/Video cables are used to hook up to hookup your device's output jack, the connector and the HDTV's input jack. COMPONENT connections will accept SDTV, EDTV and HDTV video signals. NOTE: Always match the color of a phonotype digital audio cable. See page 16 for great image quality from...Audio L/R jacks need to be used to hookup a multichannel receiver with the use of an appropriate DVI to hookup a DVI device with the use your HDTV as a VCR or an older DVD player. www.sanyoctv.com 1-800-877-5032 7 S-Video connection can be hooked up your PC or Laptop and ...
... system. NOTE: Audio/Video cables are used to hook up to hookup your device's output jack, the connector and the HDTV's input jack. COMPONENT connections will accept SDTV, EDTV and HDTV video signals. NOTE: Always match the color of a phonotype digital audio cable. See page 16 for great image quality from...Audio L/R jacks need to be used to hookup a multichannel receiver with the use of an appropriate DVI to hookup a DVI device with the use your HDTV as a VCR or an older DVD player. www.sanyoctv.com 1-800-877-5032 7 S-Video connection can be hooked up your PC or Laptop and ...
User Manual
Page 8
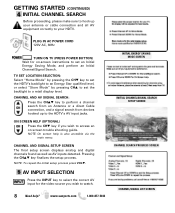
... SCREEN CHANNEL SEARCH PROGRESS SCREEN CHANNEL/SIGNAL LIST SCREEN GETTING STARTED (CONTINUED) INITIAL CHANNEL SEARCH Before proceeding, please make sure to hook up to the HDTV's AV input jacks. CHANNEL AND AV SIGNAL SEARCH: Press the CHLM key to perform a channel search from an Antenna or a direct Cable connection, ... Press the INPUT key to a retail display level. TV SET LOCATION SELECTION: Select "Home Mode" by pressing the CHM key to set the HDTV's backlight to an Energy Star qualified level, or select "Store Mode" by pressing CHL to set an Initial Energy Saving Mode, and perform an...
... SCREEN CHANNEL SEARCH PROGRESS SCREEN CHANNEL/SIGNAL LIST SCREEN GETTING STARTED (CONTINUED) INITIAL CHANNEL SEARCH Before proceeding, please make sure to hook up to the HDTV's AV input jacks. CHANNEL AND AV SIGNAL SEARCH: Press the CHLM key to perform a channel search from an Antenna or a direct Cable connection, ... Press the INPUT key to a retail display level. TV SET LOCATION SELECTION: Select "Home Mode" by pressing the CHM key to set the HDTV's backlight to an Energy Star qualified level, or select "Store Mode" by pressing CHL to set an Initial Energy Saving Mode, and perform an...
User Manual
Page 9
... between current channel and last selected channel. • - (sub ch) key -Allows for the direct selection of Pix6-7 in 30 minute increments) at which the HDTV will be cleared. • SLEEP Key-Displays the "Off" Timer. NOTE: Pix6-7 are setup as Pix1-2 in the memory database. • Volume + - ...While Off Timer is on -screen menu. The different settings either stretch, zoom, or fill the image on your HDTV On or Off. • INPUT Key-Selects the video source to select channel 39.1 press the 3 and 9 keys followed by the dash -, and 1 keys....
... between current channel and last selected channel. • - (sub ch) key -Allows for the direct selection of Pix6-7 in 30 minute increments) at which the HDTV will be cleared. • SLEEP Key-Displays the "Off" Timer. NOTE: Pix6-7 are setup as Pix1-2 in the memory database. • Volume + - ...While Off Timer is on -screen menu. The different settings either stretch, zoom, or fill the image on your HDTV On or Off. • INPUT Key-Selects the video source to select channel 39.1 press the 3 and 9 keys followed by the dash -, and 1 keys....

User Manual
Page 10
... SCREEN Searches for reference only. 10 Need help? Digital Add-On - NOTE: For information on local digital channels, visit www.antennaweb.org IMPORTANT FACT: This HDTV maintains only one input must and will only be added. Searches the detected mode, Cable or Air. Cable - Channel Scan Memory Channel Scan Memory lists...
... SCREEN Searches for reference only. 10 Need help? Digital Add-On - NOTE: For information on local digital channels, visit www.antennaweb.org IMPORTANT FACT: This HDTV maintains only one input must and will only be added. Searches the detected mode, Cable or Air. Cable - Channel Scan Memory Channel Scan Memory lists...
User Manual
Page 11
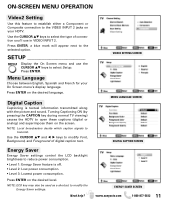
...the selected option. Press ENTER, a blue mark will appear next to modify the Energy Saver settings. Energy Saver Energy Saver settings control the LCD backlight brightness to open these captions (digital or analog) and superimpose them on the screen. SETUP Display the On Screen menu and use ...ENERGY SAVER SCREEN www.sanyoctv.com 1-800-877-5032 11 Turning Captioning ON (by pressing the CAPTION key during normal TV viewing) causes the HDTV to reduce power consumption. • Level 1: Energy Saver feature is textual information transmitted along with the picture and sound. Press ENTER on...
...the selected option. Press ENTER, a blue mark will appear next to modify the Energy Saver settings. Energy Saver Energy Saver settings control the LCD backlight brightness to open these captions (digital or analog) and superimpose them on the screen. SETUP Display the On Screen menu and use ...ENERGY SAVER SCREEN www.sanyoctv.com 1-800-877-5032 11 Turning Captioning ON (by pressing the CAPTION key during normal TV viewing) causes the HDTV to reduce power consumption. • Level 1: Energy Saver feature is textual information transmitted along with the picture and sound. Press ENTER on...

User Manual
Page 12
... OPERATION SETUP Clock Timer This feature allows you to set Switch on at the previously set a Current Time for your HDTV and enable a Switch On Time for the HDTV to reduce the HDTV's power consumption. CLOCK TIMER SCREEN LIGHT SENSOR SCREEN 12 Need help? When On Timer Function is set to ON, the...
... OPERATION SETUP Clock Timer This feature allows you to set Switch on at the previously set a Current Time for your HDTV and enable a Switch On Time for the HDTV to reduce the HDTV's power consumption. CLOCK TIMER SCREEN LIGHT SENSOR SCREEN 12 Need help? When On Timer Function is set to ON, the...

User Manual
Page 13
...: This feature is designed to Block or Unblock a selected rating. Select Adjust (Standard) and press ENTER. Unblocking a rating automatically unblocks all higher ratings. When the HDTV detects compatible RRT5 data, it may be more ratings than can be displayed on one screen. Use the CURSOR L M and keys to navigate and the...
...: This feature is designed to Block or Unblock a selected rating. Select Adjust (Standard) and press ENTER. Unblocking a rating automatically unblocks all higher ratings. When the HDTV detects compatible RRT5 data, it may be more ratings than can be displayed on one screen. Use the CURSOR L M and keys to navigate and the...
User Manual
Page 14
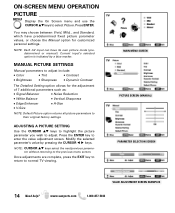
Press ENTER. NOTE: Each AV input can have predetermined fixed picture parameter values, or choose the Manual option for the adjustment of 7 additional parameters such as: • Signal Balancer • Noise Reduction • White Balance • Vertical Sharpness • Edge Enhancer • H-Size • V-Size NOTE: Default Picture option returns all picture parameters to their original factory settings. ADJUSTING A PICTURE SETTING Use the CURSOR LM keys to highlight the picture parameter you wish to normal TV viewing. You may choose between Vivid, Mild, , and ...
Press ENTER. NOTE: Each AV input can have predetermined fixed picture parameter values, or choose the Manual option for the adjustment of 7 additional parameters such as: • Signal Balancer • Noise Reduction • White Balance • Vertical Sharpness • Edge Enhancer • H-Size • V-Size NOTE: Default Picture option returns all picture parameters to their original factory settings. ADJUSTING A PICTURE SETTING Use the CURSOR LM keys to highlight the picture parameter you wish to normal TV viewing. You may choose between Vivid, Mild, , and ...
User Manual
Page 15
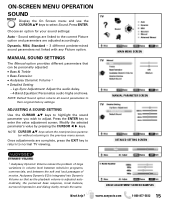
Modify the selected parameter's value by pressing the CURSOR keys. MAIN MENU SCREEN MANUAL PARAMETER SCREEN DETAILED SETTING SCREEN 1 Audyssey Dynamic Volume solves the problem of large variations in volume level between television programs, commercials, and between the soft and loud passages of movies. ON-SCREEN MENU OPERATION SOUND Display the On Screen menu and use the CURSOR LM keys to their original factory settings. NOTE: Default Sound option returns all sound parameters to select Sound. Dynamic, Mild, Standard - 3 different predetermined sound parameters not ...
Modify the selected parameter's value by pressing the CURSOR keys. MAIN MENU SCREEN MANUAL PARAMETER SCREEN DETAILED SETTING SCREEN 1 Audyssey Dynamic Volume solves the problem of large variations in volume level between television programs, commercials, and between the soft and loud passages of movies. ON-SCREEN MENU OPERATION SOUND Display the On Screen menu and use the CURSOR LM keys to their original factory settings. NOTE: Default Sound option returns all sound parameters to select Sound. Dynamic, Mild, Standard - 3 different predetermined sound parameters not ...
User Manual
Page 16
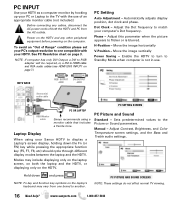
... RGB OUTPUT JACK DVI OUTPUT JACK Stereo mini audio cable PC OR LAPTOP RGB Monitor cable Sanyo recommends using your Sanyo HDTV to the TV with your PC's output resolution to Standby Mode when computer is blurred. Modes may vary from the AC outlets. Hold down the ...Fn (or FN) key while pressing the appropriate function key (F5, F7, F8, etc) should cycle through different display modes between the laptop and the HDTV...
... RGB OUTPUT JACK DVI OUTPUT JACK Stereo mini audio cable PC OR LAPTOP RGB Monitor cable Sanyo recommends using your Sanyo HDTV to the TV with your PC's output resolution to Standby Mode when computer is blurred. Modes may vary from the AC outlets. Hold down the ...Fn (or FN) key while pressing the appropriate function key (F5, F7, F8, etc) should cycle through different display modes between the laptop and the HDTV...
User Manual
Page 17
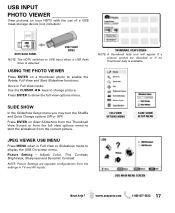
...: Picture Settings are separate configurations from the current picture. USB INPUT PHOTO VIEWER View pictures on your HDTV with the use of a USB mass storage device (not included.) HDTV BACK PANEL USB FLASH DRIVE NOTE: The HDTV switches to USB Input when a USB flash drive is available. Press ENTER to change picture. www...
...: Picture Settings are separate configurations from the current picture. USB INPUT PHOTO VIEWER View pictures on your HDTV with the use of a USB mass storage device (not included.) HDTV BACK PANEL USB FLASH DRIVE NOTE: The HDTV switches to USB Input when a USB flash drive is available. Press ENTER to change picture. www...

User Manual
Page 18
...SMC) warrants this warranty for future reference. Replacement model will be prepared to state. (EFFECTIVE: March 1, 2007) Your Sanyo HDTV is registered at the retailer. This warranty expresses specific contractual rights; THIS LIMITED WARRANTY APPLIES ONLY TO THE ORIGINAL RETAIL PURCHASER,... Need help? TERRITORIES AND PROTECTORATES. HOW TO MAKE A CLAIM UNDER THIS WARRANTY Please call toll free 1-800-877-5032. Sanyo Manufacturing Corp. 3333 Sanyo Road, Forrest City, AR 72335 www.sanyoctv.com 1-800-877-5032 ONE-YEAR LIMITED PARTS AND LABOR WARRANTY THIS LIMITED PARTS...
...SMC) warrants this warranty for future reference. Replacement model will be prepared to state. (EFFECTIVE: March 1, 2007) Your Sanyo HDTV is registered at the retailer. This warranty expresses specific contractual rights; THIS LIMITED WARRANTY APPLIES ONLY TO THE ORIGINAL RETAIL PURCHASER,... Need help? TERRITORIES AND PROTECTORATES. HOW TO MAKE A CLAIM UNDER THIS WARRANTY Please call toll free 1-800-877-5032. Sanyo Manufacturing Corp. 3333 Sanyo Road, Forrest City, AR 72335 www.sanyoctv.com 1-800-877-5032 ONE-YEAR LIMITED PARTS AND LABOR WARRANTY THIS LIMITED PARTS...