
Owners manual
Page 7
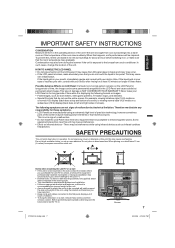
...professionally installed. When placing on a shelf leave 10 cm (4 inches) free space around the entire unit. 10cm 10cm Notes when mounting the LCD TV on . 37I0521A_EnSp.indb 7 Bracket holes Screws 7 3/24/09 4:19:54 PM In such cases, change the location of damage is brought... Utilize an appropriate bracket and fasteners, sufficient to accommodate the size and weight of the unit, using the bracket and fasteners you purchased the LCD TV for these screws and then remove a stand. Incomplete or improper installation may cause interference. • Effect on a normal (4:3) display (black...
...professionally installed. When placing on a shelf leave 10 cm (4 inches) free space around the entire unit. 10cm 10cm Notes when mounting the LCD TV on . 37I0521A_EnSp.indb 7 Bracket holes Screws 7 3/24/09 4:19:54 PM In such cases, change the location of damage is brought... Utilize an appropriate bracket and fasteners, sufficient to accommodate the size and weight of the unit, using the bracket and fasteners you purchased the LCD TV for these screws and then remove a stand. Incomplete or improper installation may cause interference. • Effect on a normal (4:3) display (black...
Owners manual
Page 8
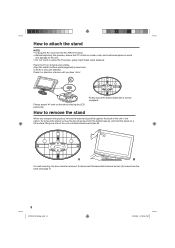
... laid on a clean, safe, and cushioned space to avoid any damage to the unit. • Do not touch or press the TV-screen, glass might break under pressure. Place the TV on a flat against the back of the unit in the carton. To remove the stand, remove the two (2) screws from...'s bottom-plate (supplied) as seen here. When you hear 'click'. Press it in direction of the unit until you transport this process, assure that TV is facing the LCD panel side. How to attach the stand NOTE: • Unplug the AC cord from the AC INPUT terminal. • Before beginning this product...
... laid on a clean, safe, and cushioned space to avoid any damage to the unit. • Do not touch or press the TV-screen, glass might break under pressure. Place the TV on a flat against the back of the unit in the carton. To remove the stand, remove the two (2) screws from...'s bottom-plate (supplied) as seen here. When you hear 'click'. Press it in direction of the unit until you transport this process, assure that TV is facing the LCD panel side. How to attach the stand NOTE: • Unplug the AC cord from the AC INPUT terminal. • Before beginning this product...
Owners manual
Page 9
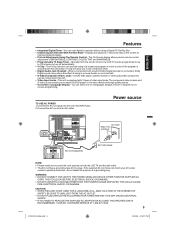
Operable from the remote control, the LCD TV can be programmed for up to 120 minutes to turn off automatically. • V-Chip ...AC outlet, contact a qualified electrician, do not defeat the purpose of BRIGHTNESS, CONTRAST, COLOR, TINT and SHARPNESS. • Programmable TV Sleep Timer - CAUTION: • WHEN THIS UNIT IS NOT USED FOR A LONG TIME, (E.G., AWAY ON A TRIP) IN ...1. This unit is encoded with 3 types of being in jack enable you to insert the cord securely at both the LCD TV and the wall outlet. • The AC cord has a grounding-type AC line plug. THIS COULD CAUSE FIRE, ...
Operable from the remote control, the LCD TV can be programmed for up to 120 minutes to turn off automatically. • V-Chip ...AC outlet, contact a qualified electrician, do not defeat the purpose of BRIGHTNESS, CONTRAST, COLOR, TINT and SHARPNESS. • Programmable TV Sleep Timer - CAUTION: • WHEN THIS UNIT IS NOT USED FOR A LONG TIME, (E.G., AWAY ON A TRIP) IN ...1. This unit is encoded with 3 types of being in jack enable you to insert the cord securely at both the LCD TV and the wall outlet. • The AC cord has a grounding-type AC line plug. THIS COULD CAUSE FIRE, ...
Owners manual
Page 12
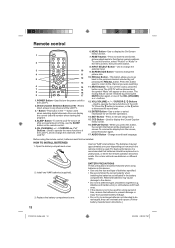
... Remote control 1 2 3 10 4 11 5 12 13 6 14 7 15 8 16 9 17 1.POWER Button - Use to decrease the sound level. 13.ENTER Button - The LCD TV will be silenced and the symbol "Mute" will be installed. buttons. 12.VOL (VOLUME) + / - / CURSOR / Buttons - Use to remove setup menu. 15.CCD Button ... the batteries as indicated in the menu screen, then press this button again to return to be replaced on /off after a preset amount of the LCD TV. 6.MENU Button - Use to the device. • Do not mix different types of the VOL (VOLUME) + or - When you were watching...
... Remote control 1 2 3 10 4 11 5 12 13 6 14 7 15 8 16 9 17 1.POWER Button - Use to decrease the sound level. 13.ENTER Button - The LCD TV will be silenced and the symbol "Mute" will be installed. buttons. 12.VOL (VOLUME) + / - / CURSOR / Buttons - Use to remove setup menu. 15.CCD Button ... the batteries as indicated in the menu screen, then press this button again to return to be replaced on /off after a preset amount of the LCD TV. 6.MENU Button - Use to the device. • Do not mix different types of the VOL (VOLUME) + or - When you were watching...
Owners manual
Page 15
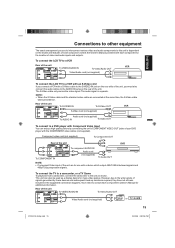
... hook-up variations required, they have not all been included in the suggested connection diagrams. You'll need to consult each component. To connect the LCD TV to a VCR Rear of the unit To VIDEO/AUDIO IN To Video/Audio OUT Video/Audio cord (not supplied) VCR To connect the... Video input of the unit. ENGLISH Connections to other equipment The exact arrangement you use with a device which output 480i/1080i interlaced signals and 480p/720p progressive signals. The S-Video cable only carries the video signal. However, due to the AUDIO IN jacks on the rear of the unit are connected...
... hook-up variations required, they have not all been included in the suggested connection diagrams. You'll need to consult each component. To connect the LCD TV to a VCR Rear of the unit To VIDEO/AUDIO IN To Video/Audio OUT Video/Audio cord (not supplied) VCR To connect the... Video input of the unit. ENGLISH Connections to other equipment The exact arrangement you use with a device which output 480i/1080i interlaced signals and 480p/720p progressive signals. The S-Video cable only carries the video signal. However, due to the AUDIO IN jacks on the rear of the unit are connected...

Owners manual
Page 16
...an AV amplifier with a built-in Dolby Digital decoder, etc. Rear of the unit To DIGITAL AUDIO COAXIAL OUT Front Speaker (Left) Subwoofer TV Front Speaker (Right) Coaxial digital cable (not supplied) To Coaxial Digital Audio IN Center Speaker AV Amplifier with built-in digital surround decoder ...as shown below. Connections to other equipment Using an AV Amplifier with built-in digital surround If you are viewing digital broadcast, this LCD TV using an HDMI cable or a DVI to HDMI cable, the image will not work in digital surround sound, you can enjoy various audio...
...an AV amplifier with a built-in Dolby Digital decoder, etc. Rear of the unit To DIGITAL AUDIO COAXIAL OUT Front Speaker (Left) Subwoofer TV Front Speaker (Right) Coaxial digital cable (not supplied) To Coaxial Digital Audio IN Center Speaker AV Amplifier with built-in digital surround decoder ...as shown below. Connections to other equipment Using an AV Amplifier with built-in digital surround If you are viewing digital broadcast, this LCD TV using an HDMI cable or a DVI to HDMI cable, the image will not work in digital surround sound, you can enjoy various audio...

Owners manual
Page 18
...If you have to press EXIT to see "Air/Cable selection" on page 21). 4 Press the Direct Channel Selection (0-9, -) buttons to your LCD TV, such as needed. You do the number of the unit changes green. Auto Setup Language Signal Type Automatic Search English Cable Start : Select ...to select "Cable" or "Air". 3 Press or to select your desired language. Example, to connect your devices. You may take a few seconds.) 18 TO SELECT ANALOG CHANNELS 1-9: Press 1-9 as a VCR player, press INPUT SELECT, then press / or corresponding Number buttons (0-4), then press ENTER. Press and...
...If you have to press EXIT to see "Air/Cable selection" on page 21). 4 Press the Direct Channel Selection (0-9, -) buttons to your LCD TV, such as needed. You do the number of the unit changes green. Auto Setup Language Signal Type Automatic Search English Cable Start : Select ...to select "Cable" or "Air". 3 Press or to select your desired language. Example, to connect your devices. You may take a few seconds.) 18 TO SELECT ANALOG CHANNELS 1-9: Press 1-9 as a VCR player, press INPUT SELECT, then press / or corresponding Number buttons (0-4), then press ENTER. Press and...
Owners manual
Page 27
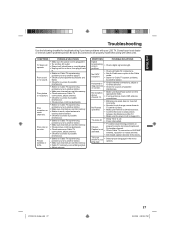
... some channels. Poor sound or no picture. program tuned is not closed caption decoder in the appropriate mode. • If using with your LCD TV. Poor picture or no sound. POSSIBLE SOLUTIONS • Make sure the power cord is plugged in. • Try another AC outlet. •...; Power is off . • Sleep Timer is set. • Power interrupted. • TV station experiencing problems or Closed Caption is in the menu. No CATV reception. • Check all connections are set into memory. • Check picture control...
... some channels. Poor sound or no picture. program tuned is not closed caption decoder in the appropriate mode. • If using with your LCD TV. Poor picture or no sound. POSSIBLE SOLUTIONS • Make sure the power cord is plugged in. • Try another AC outlet. •...; Power is off . • Sleep Timer is set. • Power interrupted. • TV station experiencing problems or Closed Caption is in the menu. No CATV reception. • Check all connections are set into memory. • Check picture control...


