
Sanyo DP55441 Support Question
Sanyo DP55441 Support Question
Find answers below for this question about Sanyo DP55441.Need a Sanyo DP55441 manual? We have 1 online manual for this item!
Question posted by Robertxxxx on December 29th, 2011
Sanyo Lcd Tv - Set The Default Source
I have a 28" Sanyo lcd tv connected to a virgin media digital box. However when you switch on the tv the display says "No Signal". You then have to press source several times until Ext 2 is highlighted and then press select. This is a lot of hassle to do every time you switch on, particularlay for elderley people. Is there anyway to set the default source so when you switch on it goes to ext-2.
Thanks
Robert
Current Answers
Related Sanyo DP55441 Manual Pages
Owners Manual - Page 3

...television equipment, be taken to avoid injury from being walked on the LCD TV...LCD TV.
22. Refer all instructions. If an outside antenna is connected...for replacement of your LCD TV, and can also
be...16. If the LCD TV
is damaged, ...dangerous. Install the LCD TV in
accordance with...shall not be connected to rain ... point of time.
14. Do ...you for choosing SANYO. CAUTION : ...
Owners Manual - Page 4

...help. PROTECTING THE LCD SCREEN
The screen...nameplate means the product is connected. -
This equipment generates... properly. To ensure your television is designed and manufactured to... an experienced radio/TV technician for a Class B digital device, pursuant to...Sanyo Electric co., Ltd. ENERGY STAR® USER INFORMATION
ENERGY STAR User Information Statement: the factory default settings...
Owners Manual - Page 5

... 6 POSITIONING THE LCD HDTV 6 WALL MOUNTING (OPTIONAL 6
GETTING STARTED 7 PReCAUTIONS 7 GETTING STARTED-CONTROLS AND JACKS 8 REMOTE CONTROL OPERATION 9 GETTING STARTED-CONNECTIONS.....10 POWER CONNECTION 11 INITIAL SETUP 11 INITIAL CHANNEL SCAN 11 GETTING STARTED-POWER CONNECTION/CHANNEL SEARCH..11
ADVANCED AV CONNECTIONS........... 12 ADVANCED DIGITAL SIGNAL CONNECTIONS-HDMI TO HDMI...
Owners Manual - Page 6

... use a trained, authorized dealer. Installing Stand (55")
1 Place the LCD TV on a flat surface place where
2 Secure the stand to the TV with this stand should be larger than the LCD Display's screen size.
Do not handle the LCD TV by holding (moving or lifting) the LCD Display, hold the display's body.
maintained with soft materials (such as a blanket) for
protecting...
Owners Manual - Page 7

... mounting kit shall be able to a wall mounting kit. VESA standard interface: TV 200 x 400mm
Wall Mounting Inserts
Mounting screws measurements: 55" TV M8 Diameter, Length - 13mm (min.); 16mm (max.)
Wall
• (... English
INSTALLATION POSITIONING THE LCD HDTV
Always use a firm-flat surface when positioning your HDTV to secure it to sustain at least 3 times of set weight. Do not position...
Owners Manual - Page 8

... page 11)
For the best picture, connect your Cable box or Satellite receiver to moisture or heat such as sunshine. (the size of battery is AAA). ANTENNA
OR
ANALOG/DIGITAL ANTENNA IN
CABLE
THE TUNER IN THIS HDTV CAN RECEIVE:
a.
This HDTV can receive ANY unscrambled RF signal being broadcast.
7
Do not expose the...
Owners Manual - Page 10

... Title, Video Resolution, Video Ratio, Signal Strength, Digital Sound information and Program Rating. Press this button to switch CC mode among Off, 30 min,...Press to select the source to show the information window about the current channel on your HDTV screen.( only for digital channels). Press to set Off Timer function among "Off", "CC Display" and "Muted=On".
Press to view: TV...
Owners Manual - Page 11

... compatible external devices.
1 Connect a COMPONENT cable to set Green, Blue, and Red video jacks asVIDEO2 or VIDEO3(YPbPr) on the HDTV andto your analog AV equipment as an Analog Cable Box, Satellite Receiver or VCR. Match the connector colors to jack colors.
2 Press the INPUT button to step through the signal inputs to select Video1...
Owners Manual - Page 12
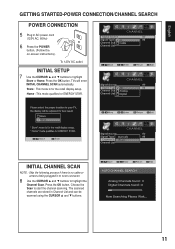
Home : This mode qualifies for the retail display setup.
Choose the Scan to highlight
Store or Home. English
GETTING STARTED-POWER CONNECTION/CHANNEL SEARCH
POWER CONNECTION
5 Plug in Channel List and can be scanned using the CURSOR ▲ and ▼ buttons.
11 TVs will enter INITIAL CHANNEL SCAN automatically. The scanned channels are stored in AC...
Owners Manual - Page 13

... on the screen. NOTE : Press the INPUT button to the PC AUDIO INPUT. NOTE: NOTE: Dolby Digital audio signal is compatible with HDMI cable. English
ADVANCED AV CONNECTIONS
ADVANCED DIGITAL SIGNAL CONNECTIONS-HDMI TO HDMI
Connect compatible Digital devices such as HDMI1,HDMI2 or HDMI3.
HDMI-High-Definition Multimedia Interface. NOTE : HDMI Audio setting is a digital AV interface that...
Owners Manual - Page 15

...source is pushed, an OSD showing the current sports mode will appear on the lower left of the screen. English
SPORTS MODE
By simply pressing the " SPORTS" button on the remote control, the TV will automatically optimize both picture and sound settings...surf sounds
■■ Indoor Sports
−− For basketball, boxing programs etc. −− Alive reddish flesh −− ...
Owners Manual - Page 18

...SANYO television is equipped with an electronic V-Chip to interpret MPAA (Motion Picture Association of the current displayed channel directly or current source input.
1 Press the MENU button and then use the CURSOR
◄ and ► buttons to highlight PARENT. PASSWORD SETTING... TV rating by choosing one or more of TV-14, for your password. button 4 times to enter "Confirm" numbers. Press...
Owners Manual - Page 20

...
PICTURE
ADJUSTING THE PICTURE LEVELS PICTURE MODE OPERATION
1 Press the MENU button on the remote control to display the Main menu.
2 Use the CURSOR ◄ and ► buttons to highlight
PICTURE. Press the OK button.
4 Use the CURSOR ▲ and ▼ buttons to adjust the
picture setting. Press the OK button.
4 Use the CURSOR ◄ and...
Owners Manual - Page 21

... Digital. Press the OK button. English
ADJUSTING THE AUDIO LEVELS TREBLE/ BASS/ BALANCE OPERATION
1 Press the MENU button on the remote control to display the Main menu.
2 Use the CURSOR ◄ and ► buttons to highlight
AUDIO. During this input source is a DVI signal type, there will analyze HDMI1 signal type (by info frame) to detect if this setting...
Owners Manual - Page 22

... detection of HD, SD or PC inputs. Try having the TV setting on the remote control to display the Main menu.
2 Use the CURSOR ◄ and ► buttons to highlight
ADVANCED.
NOTE:
• The initial setting of HD cable and satellite boxes also have similar zoom choices. Press the OK button.
4 Use the CURSOR ▲ and ▼...
Owners Manual - Page 23

... for the on-screen display of setting all displayed time zone on the remote control to display the Main menu.
2 Use the CURSOR ◄ and ► buttons to highlight
SYSTEM. Press the OK button.
...PC source or USB mode, the120Hz
CONDITION default setting is set to highlight
Language option. Press the OK button.
3 Use the CURSOR ▲ and ▼ buttons to Off. • When display ...
Owners Manual - Page 24

...; and ▼ buttons to highlight
SYSTEM.
DIGITAL CLOSED-CAPTION OPERATION
Digital CC-
The default setting is Off.
1 Press the MENU button on the remote control to display the Main menu.
2 Use the CURSOR ◄ and ► buttons to highlight
SYSTEM.
3 Use the CURSOR ▲ and ▼ buttons to highlight
No Signal Standby. Press the OK button. Press the OK button.
5 Use the...
Owners Manual - Page 25

...
System Info- English
CC STYLE SETTING OPERATION
CC Style Setting- Press the OK button.
3 Use the CURSOR ▲ and ▼ buttons to highlight
System Info. Allows you to reset the previous adjustment settings of the Category Title
CC Setting
CC Display / Muted=On / Off
CC Priority
Automatic / Analog CC / Digital CC
Digital CC Preset
Default / Custom
Font Size
Standard / Large...
Owners Manual - Page 29

... equipment connections.
• Check the external equipment settings.
• Press the INPUT button on screen
Pixilation of Digital image
Cannot select or scan some channels
No Cable channels above number 13
• Check if the program is Plugged in CHANNEL mode.
• Turn antenna, install signal booster.
• Weak Signal.
• Check CHANNEL menu, Signal Source item should set...
Owners Manual - Page 31
... of LCD TV to the chart below . English
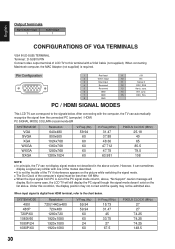
Output terminals
Digital Audio Output 1
Audio Output 1
CONFIGURATIONS OF VGA TERMINALS
VGA IN (D-SUB) TERMINAL Terminal : D-SUB15 PIN Connect video output terminal of the PC signal mode column, above, "No Support" caution message will still display the PC signal though the signal mode doesn't exist on the picture while switching the signal...
Similar Questions

Sanyo 27 Inch And 32 Inch Tv Set
What retailers in Northern Virginia sell Sanyo 27 in flat screen television set? What retailers in N...
What retailers in Northern Virginia sell Sanyo 27 in flat screen television set? What retailers in N...
(Posted by bbriston 9 years ago)

Can I Connect My Care Sara Hydrophone To My Sanyo Dp46840 Flat Panel Tv
(Posted by freespirittonya 9 years ago)

Does This Tv Display Time? If So I Cant Find It In The Owners Manuel.
(Posted by bjpfarr 11 years ago)
Not Workink Lcd Tv On Pal Signal
not working SONYO lcd tvinIndian frequency Phase Alteriaing Line mode switch Local cabal & audio...
not working SONYO lcd tvinIndian frequency Phase Alteriaing Line mode switch Local cabal & audio...
(Posted by mashri50 11 years ago)