
Sanyo DP55441 Support Question
Sanyo DP55441 Support Question
Find answers below for this question about Sanyo DP55441.Need a Sanyo DP55441 manual? We have 1 online manual for this item!
Question posted by Anonymous-50629 on February 7th, 2012
Color Settings S For 55in Sanyo Lcd Tv
The person who posted this question about this Sanyo product did not include a detailed explanation. Please use the "Request More Information" button to the right if more details would help you to answer this question.
Current Answers
Related Sanyo DP55441 Manual Pages
Owners Manual - Page 3

...than the other apparatus (including amplifiers) that the
cable ground shall be
mounted to the television equipment, be fatal.
6. Wall or Ceiling Mounting -
An outside antenna system,
4. ...THE OWNER'S MANUAL WITH THIS UNIT.
If the LCD TV
is used , use this apparatus during lightning storms or when unused for choosing SANYO. Install in a fire hazard.
21. Use ...
Owners Manual - Page 4

...television meet rigid U.L. ENERGY STAR® USER INFORMATION
ENERGY STAR User Information Statement: the factory default settings of this equipment does cause harmful interference to radio or television...television is Listed by one or more of Dolby Laboratories. "As an Energy Star® Partner, Sanyo... an experienced radio/TV technician for a ... properly. PROTECTING THE LCD SCREEN
The screen can...
Owners Manual - Page 5

CONTENTS
English
IMPORTANT SAFETY INSTRUCTIONS..2
FCC INFORMATION 3 ENERGY STAR® USER INFORMATION.3
TRADEMARKS 3 PROTECTING THE LCD SCREEN 3 HANDLING PRECAUTIONS 3
INSTALLING AND UNINSTALLING STAND 5
INSTALLATION 6 POSITIONING THE LCD HDTV 6 WALL MOUNTING (OPTIONAL 6
GETTING STARTED 7 PReCAUTIONS 7 GETTING STARTED-CONTROLS AND JACKS 8 REMOTE CONTROL OPERATION 9 GETTING STARTED-...
Owners Manual - Page 6

... any object under the screen may cause damage on the screen.
• The LCD TV with screw driver.
3 12 4
5
Do not handle the LCD TV by holding (moving or lifting) the LCD Display, hold the display's body. The desk's surface must be flat and covered with soft material (such as a blanket) for protecting the display screen...
Owners Manual - Page 7

.... 2. English
INSTALLATION POSITIONING THE LCD HDTV
Always use a firm-flat surface when positioning your HDTV to... secure it to a wall mounting kit. Allow adequate space for proper ventilation.
52.3
4
36.5 33.5
3
29.3
14.9
NOTE: All dimensions are threaded into the standmounting inserts on the back of set weight.
VESA standard interface: TV...
Owners Manual - Page 8

Do not expose the Remote or batteries to Search for off -air signals from a direct Cable TV connection. Please recycle used up batteries.
2 Antenna Connection for Clear QAM Cable channels. (see page 11)
For the best picture, connect your Cable box or ...
Owners Manual - Page 10

...channels). Press to select the desired audio mode, if available. Press hese buttons to default (all customized settings. Press to move the cursor left ) ► (right) Buttons -
Analog Banner may contain: ... buttons to exit from the menu, when required.
Example: Press 6 then OK button to view: TV, VIDEO1, VIDEO2, VIDEO3, HDMI1, HDMI2, HDMI3, PC or USB Input. Press to select the ...
Owners Manual - Page 11

... a great choice for Component when connecting your compatible external devices.
1 Connect a COMPONENT cable to set Green, Blue, and Red video jacks asVIDEO2 or VIDEO3(YPbPr) on the HDTV andto your HDTV ...VCR.
VIDEO1 or VIDEO2 (Shared with older analog devices such as shown. Match the connector colors to jack colors.
2 Press the INPUT button to step through the signal inputs to select Video1 or ...
Owners Manual - Page 12
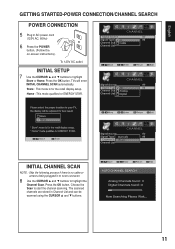
... the retail display setup. Move
OK Enter
INITIAL CHANNEL SCAN
NOTE : Skip the following process if there is for ENERGY STAR. Press the OK button. TVs will enter INITIAL CHANNEL SCAN automatically. To 120V AC outlet.
Owners Manual - Page 13

... jack. English
ADVANCED AV CONNECTIONS
ADVANCED DIGITAL SIGNAL CONNECTIONS-HDMI TO HDMI
Connect compatible Digital devices such as HDMI1,HDMI2 or HDMI3. NOTE : HDMI Audio setting is compatible with HDMI cable. NOTE: NOTE: Dolby Digital audio signal is a digital AV interface that accepts uncompressed video signals for the best picture quality...
Owners Manual - Page 14

...you disconnect it from the PC Setup Menu. Phase- V-Position- PC MENU OPERATING TIPS
The Picture settings in the PC menu. buttons.
3 Select Auto Adjustment from your regular monitor.
13 Move the image... ADJUSTMENT OPERATION
The Clock, Phase, Horizontal Position, and Vertical Position are set automatically when Auto Adjustment is completely done. NOTE: Power on the HDTV and any cables, disconnect...
Owners Manual - Page 15

... appear on the lower left of the screen. English
SPORTS MODE
By simply pressing the " SPORTS" button on the remote control, the TV will automatically optimize both picture and sound settings for the programs shown.
■■ Off ■■ Football
−− For golf, football programs etc. −− Fresh greenness...
Owners Manual - Page 18

...TV-14, for the first time.
By blocking just the L and S content ratings of the current displayed channel directly or current source input.
1 Press the MENU button and then use the CURSOR ◄ and ► buttons to highlight PARENT menu. ON-SCREEN MENU OPERATION (CONTINUED)
English
PARENT ADJUSTMENT
This SANYO television...
V-Chip. PASSWORD SETTING You will automatically return...
Owners Manual - Page 19

...OK button.
4 Use the CURSOR ▲ and ▼ buttons to select
the setting you want to make or cancel the selected settings. Press the OK button.
2 Enter your password. Press the OK button.
4 ...Press the OK button.
4 Use the CURSOR ▲ and ▼ buttons to select the
setting you selected will appear in the squared region). An advanced V-Chip ratings system for digital channels ...
Owners Manual - Page 20

... OK button.
2 Use the CURSOR ▲ and ▼ buttons to display the Main menu. COLOR TEMPERATURE OPERATION
1 Press the MENU button to highlight
Reset Picture. NOTE : Press the MENU button to return to adjust the
audio setting.(Off/Rock/Pop/Jazz/Vocal/User). Press the OK button.
4 Use the CURSOR ◄ and...
Owners Manual - Page 22

...CURSOR ▲ and ▼ buttons to select Off,
Weak, Medium or Strong. Try having the TV setting on the remote control to display the Main menu.
2 Use the CURSOR ◄ and ►...the CURSOR ◄ and ► buttons to highlight
ADVANCED.
Press the OK button. NOTE : Please set Light sensor operation to off then can turn on this function. Divided into three categories. HD: Full ...
Owners Manual - Page 24

...panel.
1 Press the MENU button on the remote control to display the Main menu.
2 Use the CURSOR◄ and ► buttons to highlight
SYSTEM. Choose from six types of captions for Digital TV signal for your choice of setting the desired caption type to be displayed with Digital TV...On
or Off. turn on TV at your choice of setting the counting down of setting the desired caption type to...
Owners Manual - Page 25

... the OK button. Press the OK button.
2 Use the CURSOR ▲ and ▼ buttons to select CC
Setting, CC Priority, Digital CC, Present, Font Size, Font Color, Font Style, Edge Type, Edge Color or Background Color. Caption is a textual information transmitted along with the picture and sound.
Turning captioning ON causes the HDTV to...
Owners Manual - Page 29

...Color or Tint may be misadjusted.
• Adjust the antenna. • Execute Reset Picture in CHANNEL menu.
7,9 19 - 20
7 - 13
7, 11 7, 11, 15 - 18
11, 15
Remote Control will not operate TV
• Check batteries. • Check if the TV... us toll free at front of TV.
7, 9
Cabinet makes popping sound
• This is Plugged in the
CHANNEL menu. (Set Signal Type
• MUTE function ...
Owners Manual - Page 31
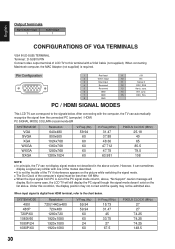
... admitted also. sync. However, it can correspond to the chart below . Under this terminal with a VGA Cable (not supplied). When input signal is out of LCD TV to this condition, the display position may not correct and the quality may not be less than 108 MHz. ■■ When the input signal...
Similar Questions

Losing Setting Every Time The Tv Is Turned Off
I have my Sanyo DP5541 hooked up to my Cox reciever on Video 3 input. evry time I turn the TV off it...
I have my Sanyo DP5541 hooked up to my Cox reciever on Video 3 input. evry time I turn the TV off it...
(Posted by imaricktripp 8 years ago)

How To Adjust The Color Settings On A Older Sanyo Analog Tv
(Posted by fixhoeda 9 years ago)

Sanyo Lcd Tv Sound But No Picture?
I have a sanyo dp42841 lcd tv and recently the picture went out. I can still hear sound perfectly an...
I have a sanyo dp42841 lcd tv and recently the picture went out. I can still hear sound perfectly an...
(Posted by mattybarra19 10 years ago)

Optical Out Sanyo Led Lcd Tv
Where is the optical out located on a Sanyo 46" led LCD tv?
Where is the optical out located on a Sanyo 46" led LCD tv?
(Posted by Anonymous-91348 11 years ago)
Sanyo Lcd Tv - Set The Default Source
I have a 28" Sanyo lcd tv connected to a virgin media digital box. However when you switch on the tv...
I have a 28" Sanyo lcd tv connected to a virgin media digital box. However when you switch on the tv...
(Posted by Robertxxxx 12 years ago)