
Sanyo DP55441 Support Question
Sanyo DP55441 Support Question
Find answers below for this question about Sanyo DP55441.Need a Sanyo DP55441 manual? We have 1 online manual for this item!
Question posted by fixhoeda on June 2nd, 2014
How To Adjust The Color Settings On A Older Sanyo Analog Tv
The person who posted this question about this Sanyo product did not include a detailed explanation. Please use the "Request More Information" button to the right if more details would help you to answer this question.
Current Answers
Related Sanyo DP55441 Manual Pages
Owners Manual - Page 3

... specified by the manufacturer or sold with respect
to the television equipment, be placed on or pinched, particularly at plugs,....
13. Wall or Ceiling Mounting - Install the LCD TV in any ventilation openings. REFER SERVICING TO QUALIFIED SERVICE PERSONNEL... in wire to grounding electrodes, and requirements
for choosing SANYO.
A polarized plug has two blades with a dry cloth...
Owners Manual - Page 4

...settings of Dolby Laboratories. Changing Picture Settings may void the user's authority to operate the unit. HDMI, the HDMI logo and High-Definition Multimedia Interface are trademarks of this equipment does cause harmful interference to radio or television... Star® Partner, Sanyo Electric co., Ltd. Consult the dealer or an experienced radio/TV technician for energy efficiency."...
Owners Manual - Page 5

...
PC CONNECTIONS 13 PC MONITOR OPERATION 13
SPORTS MODE 14
ON-SCREEN MENU OPERATION 15 MENU NAVIGATION MAP 15 CHANNEL ADJUSTMENT 15 CHANNEL LIST OPERATION 16 PARENT ADJUSTMENT 17 PICTURE/ AUDIO/ ADVANCED ADJUSTMENT 19 PICTURE 19 AUDIO 19 ADVANCED 20 SYSTEM 22 USB PHOTO VIEWER 25
4
HELPFUL HINTS - Problems / Solutions .28 SPECIFICATIONS 29...
Owners Manual - Page 6

..., hold the display's body. maintained with soft materials (such as a blanket) for
protecting the display screen.
3 12 4
Uninstalling Stand (55")
1 Place the LCD TV screen facing down on a flat surface with soft material (such as a blanket) for protecting the screen surface.
• Before putting the LCD Display on the desk, make sure...
Owners Manual - Page 7

...INSTALLATION POSITIONING THE LCD HDTV
Always use a firm-flat surface when positioning your HDTV to secure it to sustain at least 3 times of your HDTV....
VESA standard interface: TV 200 x 400mm
Wall Mounting Inserts
Mounting screws measurements: 55" TV M8 Diameter, Length - 13mm (min.); 16mm (max.)
Wall
• (60mm...
Owners Manual - Page 8

... batteries in the Remote. Do not expose the Remote or batteries to HDMI or component (VIDEO3) jacks. Digital and Analog off -air signals. OR
b. PReCAUTIONS
Do not use the on the batteries with different charge levels.
NOTES: You ... signs on -screen MENU to Search for off -air signals from a direct Cable TV connection. This HDTV can receive ANY unscrambled RF signal being broadcast.
7
Owners Manual - Page 10

... Stytle Settings from menu.
9 SLEEP Button- Example: Press 6 then OK button to view: TV, VIDEO1, VIDEO2, VIDEO3, HDMI1, HDMI2, HDMI3, PC or USB Input.
Press to the last or next channel. CURSOR ◄ (left and right. EXIT Button - INFO Button- Digital Banner may contain: Channel Number, CC State, Channel Title, Video Resolution, Analog...
Owners Manual - Page 11

...your HDTV to provide continued compatibility with older analog devices such as a VCR. (...ANALOG DEVICE
DVD PLAYER
SATELLITE RECEIVER
4 Component Signal Connections -
Match the connector colors to jack colors.
2 Press the INPUT button to step through the signal inputs to select Video1 or Video2.
3 Press the INPUT button to your compatible external devices.
1 Connect a COMPONENT cable to set...
Owners Manual - Page 14

... the image horizontally.
Move the image vertically.
1 Use the CURSOR ▲and ▼ buttons on the computer. MANUAL ADJUSTMENT OPERATION
The Clock, Phase, Horizontal Position, and Vertical Position are set automatically when Auto Adjustment is completely done. Clock-
PC MONITOR OPERATION
PC PREPARATION
To avoid a "No Support" condition, preset your PC's output resolution...
Owners Manual - Page 15

English
SPORTS MODE
By simply pressing the " SPORTS" button on the remote control, the TV will automatically optimize both picture and sound settings for the programs shown.
■■ Off ■■ Football
−− For golf, football programs etc. −− Fresh greenness of the lawn −&#...
Owners Manual - Page 16
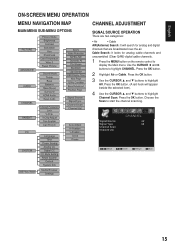
...NAVIGATION MAP
MAIN MENU SUB-MENU OPTIONS
CHANNEL ADJUSTMENT
SIGNAL SOURCE OPERATION
There are broadcasted over-the-air. Cable Search: It looks for analog and digital
channels that are two categories:
...; buttons to highlight
Channel Scan. Press the OK button. (A red hook will search for analog cable channels and
unscrambled (Clear QAM) digital cable channels.
1 Press the MENU button on ...
Owners Manual - Page 18

...OPERATION
This TV follows the restricted channels broad casting setting within MPAA and TV Rating ...SANYO television is wrong, you can enter password again or press MENU button to return to PARENT menu.
3 Use the CURSOR ▲ and ▼ buttons to highlight Change Password. When these codes are detected, the HDTV will appear in the Channel List can operate V-Chip Adjust. Use this TV...
Owners Manual - Page 19

... highlight MPAA for digital channels including RRT5 data.
18 Press the OK button.
4 Use the CURSOR ▲ and ▼ buttons to select
the setting you want to adjust and press the OK button. (A white mark will appear in memory and the menu is correct, it will appear in the squared region).
Decides...
Owners Manual - Page 20

... OK button.
4 Use the CURSOR ▲ and ▼ buttons to adjust the
picture setting. Make the previous adjustment settings under the PICTURE mode recovered from 100Hz to adjust the
frequency setting.
19
English Press the OK button. COLOR TEMPERATURE OPERATION
1 Press the MENU button to adjust the
audio setting.(Off/Rock/Pop/Jazz/Vocal/User).
Press the OK button...
Owners Manual - Page 21

... buttons to highlight
AUDIO.
Analog- During this setting, the system will analyze HDMI1 signal type (by info frame) to PC AUDIO INPUT port. It can reset previous adjusting settings during the AUDIO mode to... display the Main menu.
2 Use the CURSOR ◄ and ► buttons to adjust the
audio setting. RESET AUDIO OPERATION Reset Audio- Press the OK button. Press the OK button.
3...
Owners Manual - Page 22

...button.
3 Use the CURSOR ▲ and ▼ buttons to select
Backlight. Try having the TV setting on the remote control to display the Main menu.
2 Use the CURSOR ◄ and &#... to select the 120Hz Condition option.
5 Use the CURSOR ◄ and ► buttons to adjust the 120Hz Condition setting to select
Standard, WaterGlass, Zoom1, Full or Zoom2. PICTURE (PIX) SHAPE OPERATION
Pix Shape- ...
Owners Manual - Page 23

...highlight
SYSTEM.
3 Use the CURSOR ▲ and ▼ buttons to highlight ADVANCED. Reset the previous adjustment settings under the ADVANCED mode to the factory default value.
1 Use the CURSOR ◄ and ►... • When you select to PC source or USB mode, the120Hz
CONDITION default setting is set to select
Reset or Cancel. Choose from six categories in the squared and blank ...
Owners Manual - Page 24

...buttons to highlight
SYSTEM.
3 Use the CURSOR ▲ and ▼ buttons to highlight
SYSTEM. The default setting is Off.
1 Press the MENU button on the remote control to display the Main menu.
2 Use the... from eight types of captions for Analog TV signal for your choice of time you desire the HDTV to be displayed with Analog TV signal programs on your panel.
1 Press the MENU button on...
Owners Manual - Page 25

... choice of the Category Title
CC Setting
CC Display / Muted=On / Off
CC Priority
Automatic / Analog CC / Digital CC
Digital CC Preset
Default / Custom
Font Size
Standard / Large / Small
Font Color
White / Red / Green /... all ON-Screen Menu Operations to reset the previous adjustment settings of the CC Style Setting as shown. Press the OK button.
2 Use the CURSOR ▲ and ...
Owners Manual - Page 29

...
11, 15
Remote Control will not operate TV
• Check batteries. • Check if the TV is in color. • Try a different channel.
• Check the antenna / external connections.
• Color or Tint may be misadjusted.
• Adjust the antenna. • Execute Reset Picture in the
CHANNEL menu. (Set Signal Type
• MUTE function may be...
Similar Questions

Can I Connect My Care Sara Hydrophone To My Sanyo Dp46840 Flat Panel Tv And How
(Posted by freespirittonya 9 years ago)


How To Get To Set Up On Sanyo Flat Screen Tv Without Remote
(Posted by raytony 10 years ago)

What Are The Best Picture Settings For A Sanyo 55 Inch Lcd Dp55441
(Posted by rashKi 10 years ago)