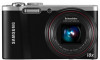
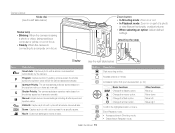
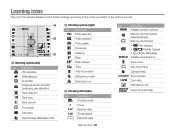
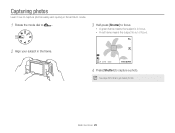
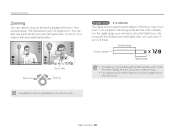
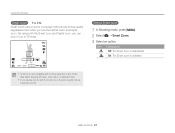
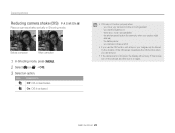
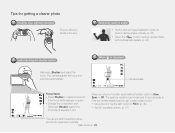
User Manual (user Manual) (ver.1.0) (English)
Page 5
... notice due to upgrade of camera functions. • You are not allowed to your camera's settings. Playback/Editing 71 Learn how to capture a photo, record a video, and voice memo by selecting a mode. Appendixes 102 Get information about your camera's layout, icons, and basic functions for shooting.... Shooting options 45 Learn how to configure your computer, photo printer, TV, or HDTV. Settings 96 Refer to options to set the options in the provided CD-ROM. Outline of this manual may...
User Manual (user Manual) (ver.1.0) (English)
Page 6
... Bracket Auto Focus Digital Image Stabilization Digital Print Order Format Exposure Value International Organization for all scenes. See the example below. for example: Select a Photo Size (represents Select a, and then select...
User Manual (user Manual) (ver.1.0) (English)
Page 7
... in a scene, such as a person, animal, or still life • Background: the objects around the subject • Composition: the combination of light that enters your photos will be darker or lighter.
User Manual (user Manual) (ver.1.0) (English)
Page 8
... dust spots. If dust particles are present in the air, you may capture them in photos when you capture photos in a dusty place. • Set ISO sensitivity options. (p. 51) Photos are blurred when shooting at night. Red eye occurs when the subject's eyes reflect light from shaking. Blurring can make it... the camera incorrectly. • Use the OIS function or half-press [Shutter] to Spot if a bright subject is focused. (p. 29) • Use the d mode. (p. 40) Photos are blurred. This can occur if you use the flash. • Turn off the flash or avoid capturing...
User Manual (user Manual) (ver.1.0) (English)
Page 9
...; s mode > Beauty Shot f 34 • Red-eye/Red-eye Fix (to prevent or correct red-eye) f 49 • Face Detection f 56 Capturing photos at night or in the dark • s mode > Night, Dawn, Sunset f 34 • Flash options f 49 • ISO sensitivity (to adjust the ...sensitivity to light) f 51 Capturing action photos • h mode f 38 • Continuous, Motion Capture f 66 Adjusting the exposure (brightness) • ISO sensitivity (to adjust the sensitivity to light) f 51 ...
User Manual (user Manual) (ver.1.0) (English)
Page 10
... display and sound 23 Setting the display type 23 Setting the sound 24 Setting the user button 24 Capturing photos 25 Zooming 26 Reducing camera shake (OIS 28 Tips for getting a clearer photo 29 Extended functions 31 Using the Smart Auto mode 32 Using the Scene mode 34 Using the Beauty Shot... 40 Using the Movie mode 41 Using the Smart Scene Detection mode 43 Recording voice memos 44 Recording a voice memo 44 Adding a voice memo to a photo 44 9
User Manual (user Manual) (ver.1.0) (English)
Page 11
... metering option 62 Selecting a light source (White balance 63 Using drive modes 66 Applying effects/Adjusting images 67 Applying Smart Filter effects 67 Adjusting your photos 70 10
User Manual (user Manual) (ver.1.0) (English)
Page 12
... videos in Playback mode 72 Starting Playback mode 72 Viewing photos 77 Playing a video 79 Playing a voice memo 80 Editing a photo 82 Resizing photos 82 Rotating a photo 82 Applying Smart Filter effects 83 Adjusting your photos 84 Creating a print order (DPOF 86 Viewing files on a TV ...as a removable disk 92 Disconnecting the camera (for Windows XP 93 Transferring files to your Mac computer 94 Printing photos with a PictBridge photo printer ......... 95 Settings 96 Settings menu 97 Accessing the settings menu 97 Sound 98 Display 98 Settings 99 Appendixes 102 ...
User Manual (user Manual) (ver.1.0) (English)
Page 13
Basic functions Learn about your camera 17 Performing the initial setup 18 Learning icons 20 Selecting options or menus 21 Setting the display and sound 23 Setting the display type 23 Setting the sound 24 Setting the user button 24 Capturing photos 25 Zooming 26 Reducing camera shake (OIS 28 Tips for shooting. Unpacking 13 Camera layout 14 Inserting the battery and memory card ... 16 Charging the battery and turning on your camera 17 Charging the battery 17 Turning on your camera's layout, icons, and basic functions for getting a clearer photo 29
User Manual (user Manual) (ver.1.0) (English)
Page 16
... Move up Move down Move left table below ) y Icon S p A h M d s v Description Smart Auto: Capture a photo with a scene mode selected automatically by the camera. DUAL IS: Capture a photo with options preset for a specific scene. Access an option that reduce camera shake. Change the timer option. Basic functions...Mode dial (see the right table below ) Status lamp • Blinking: When the camera is saving a photo or video, being read by a computer or printer, or out of a photo or view files as thumbnails, or adjust volume • When selecting an option: Adjust defi...
User Manual (user Manual) (ver.1.0) (English)
Page 21
...tone Face retouch Focus area Drive type Optical Image Stabilization (OIS) 2 Shooting options (right) Icon Description Photo resolution Video resolution Photo quality Frame rate Metering Flash Flash intensity Timer Auto focus option Microphone muted Smart zoom on 3 Shooting ...information Icon Description Shooting mode Focus Aperture value Shutter speed Exposure value Basic functions 20 Icon Description Available number of photos Memory card not inserted (Internal memory) Memory card inserted • : Fully charged • : Partially charged •...
User Manual (user Manual) (ver.1.0) (English)
Page 23
...: 1 Rotate the mode dial to Shooting mode. Basic functions 22 White Balance : Daylight Move Adjust 6 Press [o] to save your settings. 7 Press [m] to return to p. 2 Press [m]. Photo Size Quality EV ISO White Balance Smart Filter Face Detection Exit Move 5 Press [F/t] to select White Balance, and then press [t] or...
User Manual (user Manual) (ver.1.0) (English)
Page 24
... functions 23 If the histogram has a high peak on the left, the photo is overexposed and will appear dark. The more of the graph means that illustrates how light is related to color information. See the table below ...Press [D] repeatedly to change the basic display information, sound settings, and user button settings. About histograms A histogram is a graph that the photo is underexposed and will appear washed out. Setting the display type You can select a display type for the Shooting or Playback mode. Setting the display...
User Manual (user Manual) (ver.1.0) (English)
Page 26
Capturing photos Learn how to capture photos easily and quickly in Smart Auto mode. 1 Rotate the mode dial to S. 3 Half-press [Shutter] to focus. • A green frame means the subject is in focus. • A red frame means the subject is out of focus. 2 Align your subject in the frame. 4 Press [Shutter] to get clearer photos. Basic functions 25 See page 29 for tips to capture a photo.
User Manual (user Manual) (ver.1.0) (English)
Page 27
... the Face detection option, Smart Filter effect, Tracking AF option, Drive option, or Manual Focus. • If you capture a photo with less quality deterioration. The available zoom ratio for videos differs from the photo zoom ratio. Zoom out Zoom ratio Zoom in Digital zoom p A h M s The Digital zoom is supported by adjusting the... the Optical zoom and Digital zoom, you can capture close-up to 72 times. If you zoom in on a subject with the Digital zoom, the photo quality may be lower than normal. By using the Digital zoom. Your camera has an 18X Optical zoom and 4X Digital zoom.
User Manual (user Manual) (ver.1.0) (English)
Page 28
... mode, press [m]. 2 Select a Smart Zoom. 3 Select an option. Icon Description Off: The Smart zoom is not available with the Smart zoom, the photo quality may be lower than normal. On: The Smart zoom is activated. • Smart zoom is deactivated. Basic functions 27 By using both the Smart... zoom and Digital zoom, you can zoom in a subject without less picture quality degradation than when you capture a photo with the Face detection option, Smart Filter effect, Tracking AF option, Drive option, or Manual Focus. • If you use the Optical zoom...
User Manual (user Manual) (ver.1.0) (English)
Page 29
the shutter speed is low - you use the OIS function with a tripod, your camera to follow a moving subject - Basic functions 28 Capturing photos Reducing camera shake (OIS) p A h M s v Reduce camera shake optically in Shooting mode. the battery is slow (for example, when you capture night scenes) - On: OIS is ...
User Manual (user Manual) (ver.1.0) (English)
Page 30
...) Half-pressing the shutter button Half-press [Shutter] and adjust the focus. Tips for getting a clearer photo Holding your camera correctly Ensure nothing is displayed Camera shake Focus frame • Press [Shutter] to capture the photo if the focus frame appears in green. • Change the composition and half-press [Shutter] again...
User Manual (user Manual) (ver.1.0) (English)
Page 31
...focus. there is little contrast between the subject and background (for example, when your subject is wearing clothing that is similar in focus, you capture photos in focus when: - the light source behind the subject is shiny or reflective - When the subject is not positioned in the center ...Basic functions 30 the subject is too bright - the subject includes horizontal patterns, such as blinds - When you are ready, press [Shutter] to get your photo. • When you can reposition the frame to the background) - the subject is in color to change the composition.
User Manual (user Manual) (ver.1.0) (English)
Page 32
Using the Smart Auto mode 32 Using the Scene mode 34 Using the Beauty Shot mode 34 Using the Program mode 36 Using the Aperture Priority, Shutter Priority, or Manual mode 37 Using the Aperture Priority mode 38 Using the Shutter Priority mode 38 Using the Manual mode 39 Using the DUAL IS mode 40 Using the Movie mode 41 Using the Smart Scene Detection mode ... 43 Recording voice memos 44 Recording a voice memo 44 Adding a voice memo to capture a photo, record a video, and voice memo by selecting a mode. Extended functions Learn how to a photo 44