User Manual (user Manual) (ver.1.0) (English)
Page 10
... camera ...... 17 Charging the battery 17 Turning on your camera 17 Performing the initial setup 18 Learning icons 20 Selecting options or menus 21 Setting the display and sound 23 Setting the display type 23 Setting the sound 24 Setting the user button 24 Capturing photos 25 Zooming 26 Reducing camera shake (OIS 28 Tips for getting a clearer photo 29 Extended functions 31 Using the Smart Auto mode 32 Using the Scene mode 34 Using the Beauty Shot mode 34 Using...
... camera ...... 17 Charging the battery 17 Turning on your camera 17 Performing the initial setup 18 Learning icons 20 Selecting options or menus 21 Setting the display and sound 23 Setting the display type 23 Setting the sound 24 Setting the user button 24 Capturing photos 25 Zooming 26 Reducing camera shake (OIS 28 Tips for getting a clearer photo 29 Extended functions 31 Using the Smart Auto mode 32 Using the Scene mode 34 Using the Beauty Shot mode 34 Using...

User Manual (user Manual) (ver.1.0) (English)
Page 11
... a resolution 46 Selecting image quality 47 Using the timer 48 Shooting in the dark 49 Preventing red-eye 49 Using the flash 49 Adjusting the ISO sensitivity 51 Changing the camera's focus 52 Using macro 52 Using auto focus 52 Focusing on a selected area 54 Using tracking auto focus 54 Adjusting the focus area 55 Using Face Detection 56 Detecting faces 56 Capturing a self portrait shot 57 Capturing a smile shot 57 Detecting eye blinking 58 Using Smart Face Recognition...
... a resolution 46 Selecting image quality 47 Using the timer 48 Shooting in the dark 49 Preventing red-eye 49 Using the flash 49 Adjusting the ISO sensitivity 51 Changing the camera's focus 52 Using macro 52 Using auto focus 52 Focusing on a selected area 54 Using tracking auto focus 54 Adjusting the focus area 55 Using Face Detection 56 Detecting faces 56 Capturing a self portrait shot 57 Capturing a smile shot 57 Detecting eye blinking 58 Using Smart Face Recognition...
User Manual (user Manual) (ver.1.0) (English)
Page 12
...;les by connecting the camera as a removable disk 92 Disconnecting the camera (for Windows XP 93 Transferring files to your Mac computer 94 Printing photos with a PictBridge photo printer ......... 95 Settings 96 Settings menu 97 Accessing the settings menu 97 Sound 98 Display 98 Settings 99 Appendixes 102 Error messages 103 Camera maintenance 104 Cleaning your camera 104 Using or storing the camera 105 About memory cards 106 About the battery 108 Before contacting a service center 112 Camera specifi...
...;les by connecting the camera as a removable disk 92 Disconnecting the camera (for Windows XP 93 Transferring files to your Mac computer 94 Printing photos with a PictBridge photo printer ......... 95 Settings 96 Settings menu 97 Accessing the settings menu 97 Sound 98 Display 98 Settings 99 Appendixes 102 Error messages 103 Camera maintenance 104 Cleaning your camera 104 Using or storing the camera 105 About memory cards 106 About the battery 108 Before contacting a service center 112 Camera specifi...
User Manual (user Manual) (ver.1.0) (English)
Page 13
Basic functions Learn about your camera 17 Performing the initial setup 18 Learning icons 20 Selecting options or menus 21 Setting the display and sound 23 Setting the display type 23 Setting the sound 24 Setting the user button 24 Capturing photos 25 Zooming 26 Reducing camera shake (OIS 28 Tips for shooting. Unpacking 13 Camera layout 14 Inserting the battery and memory card ... 16 Charging the battery and turning on your camera 17 Charging the battery 17 Turning on your camera's layout, icons, and basic functions for getting a clearer photo 29
Basic functions Learn about your camera 17 Performing the initial setup 18 Learning icons 20 Selecting options or menus 21 Setting the display and sound 23 Setting the display type 23 Setting the sound 24 Setting the user button 24 Capturing photos 25 Zooming 26 Reducing camera shake (OIS 28 Tips for shooting. Unpacking 13 Camera layout 14 Inserting the battery and memory card ... 16 Charging the battery and turning on your camera 17 Charging the battery 17 Turning on your camera's layout, icons, and basic functions for getting a clearer photo 29
User Manual (user Manual) (ver.1.0) (English)
Page 16
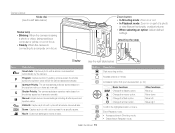
Aperture Priority: The camera selects a shutter speed based on the shutter speed you have set manually. Scene: Capture a photo with options that you have selected. (p. 24) D c F t Basic functions Change the display option. Change the macro option. Enter Playback mode. • Access options in Shooting mode. • Delete files in on part of focus • Steady: When the camera is connecting to record a video. Program: Capture a photo by the camera. Shutter Priority: The camera selects an aperture value based on the...
Aperture Priority: The camera selects a shutter speed based on the shutter speed you have set manually. Scene: Capture a photo with options that you have selected. (p. 24) D c F t Basic functions Change the display option. Change the macro option. Enter Playback mode. • Access options in Shooting mode. • Delete files in on part of focus • Steady: When the camera is connecting to record a video. Program: Capture a photo by the camera. Shutter Priority: The camera selects an aperture value based on the...
User Manual (user Manual) (ver.1.0) (English)
Page 21
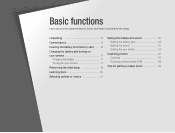
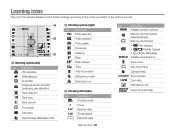
... Video resolution Photo quality Frame rate Metering Flash Flash intensity Timer Auto focus option Microphone muted Smart zoom on 3 Shooting information Icon Description Shooting mode Focus Aperture value Shutter speed Exposure value Basic functions 20 Icon Description Available number of photos Memory card not inserted (Internal memory) Memory card inserted • : Fully charged • : Partially charged • : Empty (Recharge) Available recording time Voice memo Auto focus frame Camera shake Zoom indicator Zoom ratio Histogram (p. 23) Current time and date
... Video resolution Photo quality Frame rate Metering Flash Flash intensity Timer Auto focus option Microphone muted Smart zoom on 3 Shooting information Icon Description Shooting mode Focus Aperture value Shutter speed Exposure value Basic functions 20 Icon Description Available number of photos Memory card not inserted (Internal memory) Memory card inserted • : Fully charged • : Partially charged • : Empty (Recharge) Available recording time Voice memo Auto focus frame Camera shake Zoom indicator Zoom ratio Histogram (p. 23) Current time and date
User Manual (user Manual) (ver.1.0) (English)
Page 30
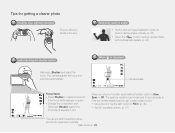
... to reduce camera shake both optically and digitally. (p. 40) Half-pressing the shutter button Half-press [Shutter] and adjust the focus. When you shoot in . (p. 49) • Set ISO sensitivity options. (p. 51) The camera sets the aperture value and shutter speed automatically. Basic functions 29 The camera adjusts the focus and exposure automatically. Reducing camera shake • Set the Optical Image Stabilization option to reduce camera shake optically. (p. 28) • Select the d mode to Slow...
... to reduce camera shake both optically and digitally. (p. 40) Half-pressing the shutter button Half-press [Shutter] and adjust the focus. When you shoot in . (p. 49) • Set ISO sensitivity options. (p. 51) The camera sets the aperture value and shutter speed automatically. Basic functions 29 The camera adjusts the focus and exposure automatically. Reducing camera shake • Set the Optical Image Stabilization option to reduce camera shake optically. (p. 28) • Select the d mode to Slow...
User Manual (user Manual) (ver.1.0) (English)
Page 35
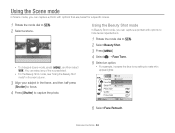
... Beauty Shot mode, see "Using the Beauty Shot mode" in the next column. 3 Align your subject in the frame, and then half-press [Shutter] to focus. 4 Press [Shutter] to capture the photo. Face Tone Off Face Retouch Level 1 Face Detection Level 2 Smart FR Edit Level 3 Photo Size Quality Focus Area Back Set 6 Select Face Retouch. Using the Beauty Shot mode In Beauty Shot mode, you can capture a photo with...
... Beauty Shot mode, see "Using the Beauty Shot mode" in the next column. 3 Align your subject in the frame, and then half-press [Shutter] to focus. 4 Press [Shutter] to capture the photo. Face Tone Off Face Retouch Level 1 Face Detection Level 2 Smart FR Edit Level 3 Photo Size Quality Focus Area Back Set 6 Select Face Retouch. Using the Beauty Shot mode In Beauty Shot mode, you can capture a photo with...
User Manual (user Manual) (ver.1.0) (English)
Page 46
... image quality 47 Using the timer 48 Shooting in Shooting mode. Shooting options Learn how to set the options in the dark 49 Preventing red-eye 49 Using the flash 49 Adjusting the ISO sensitivity 51 Changing the camera's focus 52 Using macro 52 Using auto focus 52 Focusing on a selected area 54 Using tracking auto focus 54 Adjusting the focus area 55 Using Face Detection 56 Detecting faces 56 Capturing a self portrait shot 57 Capturing a smile shot 57 Detecting eye blinking...
... image quality 47 Using the timer 48 Shooting in Shooting mode. Shooting options Learn how to set the options in the dark 49 Preventing red-eye 49 Using the flash 49 Adjusting the ISO sensitivity 51 Changing the camera's focus 52 Using macro 52 Using auto focus 52 Focusing on a selected area 54 Using tracking auto focus 54 Adjusting the focus area 55 Using Face Detection 56 Detecting faces 56 Capturing a self portrait shot 57 Capturing a smile shot 57 Detecting eye blinking...
User Manual (user Manual) (ver.1.0) (English)
Page 54
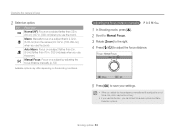
... Shooting mode, press [c]. 2 Scroll to Manual Focus. 3 Rotate [Zoom] to the right. 4 Press [F/t] to save your settings. • When you adjust the focus distance manually and the subject is 2-32 in. (5-80 cm) from the camera (70-137 in . [350 cm] when you use the zoom). Manual Focus: Focus on a subject by adjusting the focus distance manually. (p. 53) Available options may become blurry. • If you use this function, you use the zoom). Focus : Manual Focus...
... Shooting mode, press [c]. 2 Scroll to Manual Focus. 3 Rotate [Zoom] to the right. 4 Press [F/t] to save your settings. • When you adjust the focus distance manually and the subject is 2-32 in. (5-80 cm) from the camera (70-137 in . [350 cm] when you use the zoom). Manual Focus: Focus on a subject by adjusting the focus distance manually. (p. 53) Available options may become blurry. • If you use this function, you use the zoom). Focus : Manual Focus...
User Manual (user Manual) (ver.1.0) (English)
Page 73
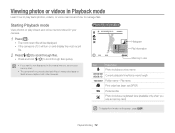
...;les quickly. • If you use Icon Description Photo includes a voice memo Current playback time/Voice memo length Folder name - File name Print order has been set (DPOF) Protected file Photo includes a registered face (available only when you want to manage files. Viewing photos or videos in Playback mode Learn how to play back files of unsupported sizes or files that were captured with other cameras.
...;les quickly. • If you use Icon Description Photo includes a voice memo Current playback time/Voice memo length Folder name - File name Print order has been set (DPOF) Protected file Photo includes a registered face (available only when you want to manage files. Viewing photos or videos in Playback mode Learn how to play back files of unsupported sizes or files that were captured with other cameras.
User Manual (user Manual) (ver.1.0) (English)
Page 87
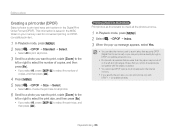
..., press [D/c] to a print shop that supports DPOF (Digital Print Order Format) or you can print photos only with DPOF 1.1-compatible printers. Ensure that your memory card for photos stored in the Digital Print Order Format (DPOF). Editing a photo Creating a print order (DPOF) Select photos to print and save print options in the internal memory. • If you specify the print size, you can print photos directly through a DPOF-compatible printer at home. • Photos with dimensions that are compatible with the paper...
..., press [D/c] to a print shop that supports DPOF (Digital Print Order Format) or you can print photos only with DPOF 1.1-compatible printers. Ensure that your memory card for photos stored in the Digital Print Order Format (DPOF). Editing a photo Creating a print order (DPOF) Select photos to print and save print options in the internal memory. • If you specify the print size, you can print photos directly through a DPOF-compatible printer at home. • Photos with dimensions that are compatible with the paper...
User Manual (user Manual) (ver.1.0) (English)
Page 88
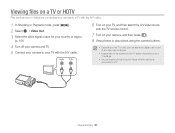
... the TV remote control. 7 Turn on your camera, and then press [P]. 8 View photos or play videos using the camera buttons. • Depending on the TV model, you may see some digital noise or part of an image may not appear. • Images may not be centered on the TV screen depending on a TV or HDTV Play back photos or videos by connecting your camera to a TV with the A/V cable. 1 In Shooting or Playback mode, press [m]. 2 Select...
... the TV remote control. 7 Turn on your camera, and then press [P]. 8 View photos or play videos using the camera buttons. • Depending on the TV model, you may see some digital noise or part of an image may not appear. • Images may not be centered on the TV screen depending on a TV or HDTV Play back photos or videos by connecting your camera to a TV with the A/V cable. 1 In Shooting or Playback mode, press [m]. 2 Select...
User Manual (user Manual) (ver.1.0) (English)
Page 89
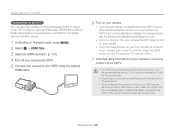
...'s remote control. 7 View files using the buttons on your camera or a remote control of SD or SDHC card you don't have Anynet+ on an HDTV using the optional HDMI cable. 6 Turn on your camera. • If you have an Anynet+ compatible Samsung HDTV, and you have turned the Anynet+ function on in your camera, the HDTV turns on automatically and displays the camera screen, and the camera automatically enters Playback mode. • If you turn...
...'s remote control. 7 View files using the buttons on your camera or a remote control of SD or SDHC card you don't have Anynet+ on an HDTV using the optional HDMI cable. 6 Turn on your camera. • If you have an Anynet+ compatible Samsung HDTV, and you have turned the Anynet+ function on in your camera, the HDTV turns on automatically and displays the camera screen, and the camera automatically enters Playback mode. • If you turn...
User Manual (user Manual) (ver.1.0) (English)
Page 101
...; The folder number increases one folder is connected to a computer or printer, when you are playing a slide show or videos, and when you are recording a voice memo. Settings menu Item File No. * Default Description Specify how to name files. • Reset: Set the file number to start from 0001 when you insert a new memory card, format a memory card, or delete all files. • Series*: Set the file number to resume...
...; The folder number increases one folder is connected to a computer or printer, when you are playing a slide show or videos, and when you are recording a voice memo. Settings menu Item File No. * Default Description Specify how to name files. • Reset: Set the file number to start from 0001 when you insert a new memory card, format a memory card, or delete all files. • Series*: Set the file number to resume...

User Manual (user Manual) (ver.1.0) (English)
Page 102
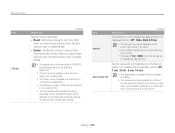
... Size USB PC Software * Default Description Set the resolution of photos when the camera plays back files on to control the camera with a TV remote control when you connect it to an HDTV that supports the Anynet+(CEC) profile. • Off: View files without using an HDTV remote control. • On*: Control the camera with a USB cable. • Computer*: Connect your camera to a computer for transferring files. • Printer: Connect your camera to a printer...
... Size USB PC Software * Default Description Set the resolution of photos when the camera plays back files on to control the camera with a TV remote control when you connect it to an HDTV that supports the Anynet+(CEC) profile. • Off: View files without using an HDTV remote control. • On*: Control the camera with a USB cable. • Computer*: Connect your camera to a computer for transferring files. • Printer: Connect your camera to a printer...
User Manual (user Manual) (ver.1.0) (English)
Page 113
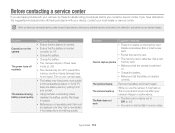
... needed. • Batteries are consumable parts that must be in Power save mode. (p. 99) • The camera may be sure to the malfunction, such as the memory card and battery. The camera freezes Remove the battery and insert it into your pocket. • Using the flash or recording videos depletes the battery quickly. The flash does not work • The flash option may turn off suddenly The camera...
... needed. • Batteries are consumable parts that must be in Power save mode. (p. 99) • The camera may be sure to the malfunction, such as the memory card and battery. The camera freezes Remove the battery and insert it into your pocket. • Using the flash or recording videos depletes the battery quickly. The flash does not work • The flash option may turn off suddenly The camera...

User Manual (user Manual) (ver.1.0) (English)
Page 117
...;cations Flash Mode Range Auto, Red-eye, Fill in, Slow Sync, Off, Red-eye Fix • Wide: 0.3 m-3.6 m (ISO Auto) • Tele: 0.5 m-2 m (ISO Auto) Recharging time Approximately 4 sec. Shake reduction DUAL IS [Optical Image Stabilization (OIS) + Digital Image Stabilization (DIS)] Effect Photo Shooting mode • Smart Filter: Off, Miniature, Vignetting, Soft-Focus, Old Film 1, Old Film 2, Half Tone Dot, Sketch, Fish-eye, Defog, Classic, Retro, Negative, Custom RGB • Image Adjust: Sharpness, Contrast, Saturation Video Shooting mode White Balance...
...;cations Flash Mode Range Auto, Red-eye, Fill in, Slow Sync, Off, Red-eye Fix • Wide: 0.3 m-3.6 m (ISO Auto) • Tele: 0.5 m-2 m (ISO Auto) Recharging time Approximately 4 sec. Shake reduction DUAL IS [Optical Image Stabilization (OIS) + Digital Image Stabilization (DIS)] Effect Photo Shooting mode • Smart Filter: Off, Miniature, Vignetting, Soft-Focus, Old Film 1, Old Film 2, Half Tone Dot, Sketch, Fish-eye, Defog, Classic, Retro, Negative, Custom RGB • Image Adjust: Sharpness, Contrast, Saturation Video Shooting mode White Balance...

User Manual (user Manual) (ver.1.0) (English)
Page 126
... mode 38 Aperture value 37 Auto Exposure Bracket (AEB) 66 A/V port 14 B Battery caution 109 charging 17 inserting 16 Beauty Shot mode 34 Blink Detection 58 Brightness Playback mode 85 Shooting mode 61 C Camera maintenance 104 Camera specifications 115 Capturing an image from video 80 Charging 17 Cleaning camera body 104 display 104 lens 104 Connecting to a computer Mac 94 Windows 89 Contrast Playback mode 85 Shooting mode 70 D Date & Time 99 Deleting files 76 Digital Print Order Format (DOF) 86 Digital zoom...
... mode 38 Aperture value 37 Auto Exposure Bracket (AEB) 66 A/V port 14 B Battery caution 109 charging 17 inserting 16 Beauty Shot mode 34 Blink Detection 58 Brightness Playback mode 85 Shooting mode 61 C Camera maintenance 104 Camera specifications 115 Capturing an image from video 80 Charging 17 Cleaning camera body 104 display 104 lens 104 Connecting to a computer Mac 94 Windows 89 Contrast Playback mode 85 Shooting mode 70 D Date & Time 99 Deleting files 76 Digital Print Order Format (DOF) 86 Digital zoom...
User Manual (user Manual) (ver.1.0) (English)
Page 128
... Blink Detection 58 Face Detection 56 Red-eye 50 Red-eye fix 50 Self portrait 57 Smart Face Recognition 58 Smile Shot 57 Shutter button 14 Shutter Priority mode 38 Slide show 78 Smart Album 74 Smart Auto mode 32 Smart Face Recognition 58 Smart Filter Playback mode 83 Shooting mode 67 Smart Scene Detection mode 43 Smart zoom 27 Smile Shot 57 Sound settings 24 Start image 98 Status lamp 15 T Thumbnails 75 Timer Shooting mode...
... Blink Detection 58 Face Detection 56 Red-eye 50 Red-eye fix 50 Self portrait 57 Smart Face Recognition 58 Smile Shot 57 Shutter button 14 Shutter Priority mode 38 Slide show 78 Smart Album 74 Smart Auto mode 32 Smart Face Recognition 58 Smart Filter Playback mode 83 Shooting mode 67 Smart Scene Detection mode 43 Smart zoom 27 Smile Shot 57 Sound settings 24 Start image 98 Status lamp 15 T Thumbnails 75 Timer Shooting mode...


