
User Manual Ver.1.0 (English)
Page 1
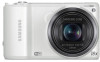
Basic troubleshooting Basic functions Playback/Editing Appendixes Quick reference Extended functions Wireless network Index Contents Shooting options Settings Please read this manual thoroughly. USER MANUAL WB250F/WB251F/WB252F/WB280F Click a topic This user manual includes detailed usage instructions for your camera.
Basic troubleshooting Basic functions Playback/Editing Appendixes Quick reference Extended functions Wireless network Index Contents Shooting options Settings Please read this manual thoroughly. USER MANUAL WB250F/WB251F/WB252F/WB280F Click a topic This user manual includes detailed usage instructions for your camera.
User Manual Ver.1.0 (English)
Page 6
Appendixes 137 Get information about your camera's layout, icons, and basic functions for shooting. Outline of the User Manual Basic functions 19 Learn about error messages, specifications, and maintenance. 5 Extended functions 42 Learn how to wireless local area networks (WLANs) and... Alliance. • Trademarks and trade names used in Shooting mode. Playback/Editing 87 Learn how to reuse or distribute any part of this manual without prior notice due to an upgrade of the camera's functions. • We recommend using your camera within the country where you purchased...
Appendixes 137 Get information about your camera's layout, icons, and basic functions for shooting. Outline of the User Manual Basic functions 19 Learn about error messages, specifications, and maintenance. 5 Extended functions 42 Learn how to wireless local area networks (WLANs) and... Alliance. • Trademarks and trade names used in Shooting mode. Playback/Editing 87 Learn how to reuse or distribute any part of this manual without prior notice due to an upgrade of the camera's functions. • We recommend using your camera within the country where you purchased...
User Manual Ver.1.0 (English)
Page 7
... Best Face Magic Plus Settings Wi-Fi Indicator T p G s i g n w Shooting mode icons These icons appear in the text when a function is available in this manual Icon Function Additional information Safety warnings and precautions [ ] Camera buttons. Indicators used in a mode. Note: The s or g mode may not support functions for “ example: ...
... Best Face Magic Plus Settings Wi-Fi Indicator T p G s i g n w Shooting mode icons These icons appear in the text when a function is available in this manual Icon Function Additional information Safety warnings and precautions [ ] Camera buttons. Indicators used in a mode. Note: The s or g mode may not support functions for “ example: ...

User Manual Ver.1.0 (English)
Page 8
... that enters your photos will be darker or lighter. Half-press [Shutter] Press [Shutter] Subject, background, and composition • Subject: The main object in this manual Pressing the shutter • Half-press [Shutter]: Press the shutter halfway down • Press [Shutter]: Press the shutter all the way down Exposure (Brightness) The...
... that enters your photos will be darker or lighter. Half-press [Shutter] Press [Shutter] Subject, background, and composition • Subject: The main object in this manual Pressing the shutter • Half-press [Shutter]: Press the shutter halfway down • Press [Shutter]: Press the shutter all the way down Exposure (Brightness) The...
User Manual Ver.1.0 (English)
Page 16
... the Smart Auto mode 43 Using the Program mode 45 Using the Aperture Priority, Shutter Priority, or Manual mode 46 Using the Aperture Priority mode 47 Using the Shutter Priority mode 48 Using the Manual mode 49 Using the Smart mode 50 Using the Panorama mode 51 Using the Best Face mode...
... the Smart Auto mode 43 Using the Program mode 45 Using the Aperture Priority, Shutter Priority, or Manual mode 46 Using the Aperture Priority mode 47 Using the Shutter Priority mode 48 Using the Manual mode 49 Using the Smart mode 50 Using the Panorama mode 51 Using the Best Face mode...

User Manual Ver.1.0 (English)
Page 17
... a self portrait shot 75 Capturing a smile shot 76 Detecting eye blinking 76 Tips for detecting faces 77 Adjusting brightness and color 78 Adjusting the exposure manually (EV 78 Compensating for backlighting (ACB 79 Changing the metering option 79 Selecting a White Balance setting 80 Using burst modes 83 Capturing continuous photos 83...
... a self portrait shot 75 Capturing a smile shot 76 Detecting eye blinking 76 Tips for detecting faces 77 Adjusting brightness and color 78 Adjusting the exposure manually (EV 78 Compensating for backlighting (ACB 79 Changing the metering option 79 Selecting a White Balance setting 80 Using burst modes 83 Capturing continuous photos 83...
User Manual Ver.1.0 (English)
Page 30
...Motion Photo Frame Photo Filter 2 Movie Photo Filter Editor ▲ For example: When you have adjusted manually. (p. 45) G Aperture Priority: Set the aperture value manually while the camera automatically selects an appropriate shutter speed. (p. 47) Shutter Priority: Set the shutter speed... manually while the camera automatically selects an appropriate aperture value. (p. 48) Manual: Adjust both the aperture value and the shutter speed manually. (p. 49) s Smart: Capture a photo with settings you select My...
...Motion Photo Frame Photo Filter 2 Movie Photo Filter Editor ▲ For example: When you have adjusted manually. (p. 45) G Aperture Priority: Set the aperture value manually while the camera automatically selects an appropriate shutter speed. (p. 47) Shutter Priority: Set the shutter speed... manually while the camera automatically selects an appropriate aperture value. (p. 48) Manual: Adjust both the aperture value and the shutter speed manually. (p. 49) s Smart: Capture a photo with settings you select My...

User Manual Ver.1.0 (English)
Page 43
... the Smart Auto mode 43 Using the Program mode 45 Using the Aperture Priority, Shutter Priority, or Manual mode 46 Using the Aperture Priority mode 47 Using the Shutter Priority mode 48 Using the Manual mode 49 Using the Smart mode 50 Using the Panorama mode 51 Using the Best Face mode...
... the Smart Auto mode 43 Using the Program mode 45 Using the Aperture Priority, Shutter Priority, or Manual mode 46 Using the Aperture Priority mode 47 Using the Shutter Priority mode 48 Using the Manual mode 49 Using the Smart mode 50 Using the Panorama mode 51 Using the Best Face mode...
User Manual Ver.1.0 (English)
Page 47
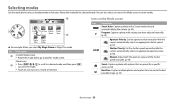
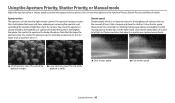
Using the Aperture Priority, Shutter Priority, or Manual mode Adjust the aperture value or shutter speed to control the exposure of light that enters the camera. The aperture housing contains thin, metal plates ... more time to blur. For example, an aperture set to let light in . Photos are brighter, but objects in the Aperture Priority, Shutter Priority, and Manual modes. S Small aperture value (The size of the S Large aperture value (The size of the aperture is large.) aperture is a hole that the larger the...
Using the Aperture Priority, Shutter Priority, or Manual mode Adjust the aperture value or shutter speed to control the exposure of light that enters the camera. The aperture housing contains thin, metal plates ... more time to blur. For example, an aperture set to let light in . Photos are brighter, but objects in the Aperture Priority, Shutter Priority, and Manual modes. S Small aperture value (The size of the S Large aperture value (The size of the aperture is large.) aperture is a hole that the larger the...
User Manual Ver.1.0 (English)
Page 48
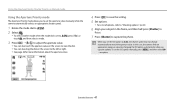
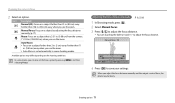
... shutter speed may not change automatically to capture the photo. Using the Aperture Priority, Shutter Priority, or Manual mode Using the Aperture Priority mode The Aperture Priority mode allows you to set the aperture value manually while the camera automatically selects an appropriate shutter speed. 1 Rotate the mode dial to G. 2 Select ...this case, the camera finds an appropriate exposure value by changing the ISO option automatically when you capture a photo. To set the ISO option manually, press [m], and then select ISO “ an option. OK: Change aperture Extended functions 47
... shutter speed may not change automatically to capture the photo. Using the Aperture Priority, Shutter Priority, or Manual mode Using the Aperture Priority mode The Aperture Priority mode allows you to set the aperture value manually while the camera automatically selects an appropriate shutter speed. 1 Rotate the mode dial to G. 2 Select ...this case, the camera finds an appropriate exposure value by changing the ISO option automatically when you capture a photo. To set the ISO option manually, press [m], and then select ISO “ an option. OK: Change aperture Extended functions 47

User Manual Ver.1.0 (English)
Page 49
...Extended functions 48 When you capture a photo. Using the Aperture Priority, Shutter Priority, or Manual mode Using the Shutter Priority mode The Shutter Priority mode allows you to set the shutter speed manually while the camera automatically selects an appropriate aperture value. 1 Rotate the mode dial to G.... 2 Select . • To select another mode when the mode dial is set the ISO option manually, press [m], and then select ISO “...
...Extended functions 48 When you capture a photo. Using the Aperture Priority, Shutter Priority, or Manual mode Using the Shutter Priority mode The Shutter Priority mode allows you to set the shutter speed manually while the camera automatically selects an appropriate aperture value. 1 Rotate the mode dial to G.... 2 Select . • To select another mode when the mode dial is set the ISO option manually, press [m], and then select ISO “...

User Manual Ver.1.0 (English)
Page 50
Using the Aperture Priority, Shutter Priority, or Manual mode Using the Manual mode The Manual mode allows you to adjust both the aperture value and the shutter speed manually. 1 Rotate the mode dial to G. 2 Select . • To select another mode when the mode dial is set to G, press [b] or touch , and then select a mode. 3 ...
Using the Aperture Priority, Shutter Priority, or Manual mode Using the Manual mode The Manual mode allows you to adjust both the aperture value and the shutter speed manually. 1 Rotate the mode dial to G. 2 Select . • To select another mode when the mode dial is set to G, press [b] or touch , and then select a mode. 3 ...
User Manual Ver.1.0 (English)
Page 64
... a self portrait shot 75 Capturing a smile shot 76 Detecting eye blinking 76 Tips for detecting faces 77 Adjusting brightness and color 78 Adjusting the exposure manually (EV 78 Compensating for backlighting (ACB 79 Changing the metering option 79 Selecting a White Balance setting 80 Using burst modes 83 Capturing continuous photos 83...
... a self portrait shot 75 Capturing a smile shot 76 Detecting eye blinking 76 Tips for detecting faces 77 Adjusting brightness and color 78 Adjusting the exposure manually (EV 78 Compensating for backlighting (ACB 79 Changing the metering option 79 Selecting a White Balance setting 80 Using burst modes 83 Capturing continuous photos 83...
User Manual Ver.1.0 (English)
Page 72
...80 cm) from the camera. 71-138 in some modes, you can also drag the slider or touch +/- Adjusting the focus distance manually p A h M 1 In Shooting mode, press [c]. 2 Select Manual Focus. 3 Press [F/t] to adjust the focus distance. • You can also set automatically in . (180-350 cm) when you...: Focus on the shooting conditions. Available options may be blurry. Auto Macro: • Focus on a subject farther than 2 in . (80 cm) away. Manual Focus : 50 Back Set 4 Press [o] to adjust the focus distance. Icon Description Normal (AF): Focus on a subject farther than 31 in . (5 cm...
...80 cm) from the camera. 71-138 in some modes, you can also drag the slider or touch +/- Adjusting the focus distance manually p A h M 1 In Shooting mode, press [c]. 2 Select Manual Focus. 3 Press [F/t] to adjust the focus distance. • You can also set automatically in . (180-350 cm) when you...: Focus on the shooting conditions. Available options may be blurry. Auto Macro: • Focus on a subject farther than 2 in . (80 cm) away. Manual Focus : 50 Back Set 4 Press [o] to adjust the focus distance. Icon Description Normal (AF): Focus on a subject farther than 31 in . (5 cm...

User Manual Ver.1.0 (English)
Page 79
... the adjustment window. EV : 0 S Darker (-) S Neutral (0) S Brighter (+) 1 In Shooting mode, press [m]. 2 Select EV. • You can also drag the slider or touch +/- Adjusting the exposure manually (EV) p A h Depending on the intensity of the ambient light, your settings. • Once you adjust the exposure, the setting will capture 3 consecutive photos, each with...
... the adjustment window. EV : 0 S Darker (-) S Neutral (0) S Brighter (+) 1 In Shooting mode, press [m]. 2 Select EV. • You can also drag the slider or touch +/- Adjusting the exposure manually (EV) p A h Depending on the intensity of the ambient light, your settings. • Once you adjust the exposure, the setting will capture 3 consecutive photos, each with...
User Manual Ver.1.0 (English)
Page 98
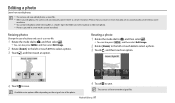
... then touch an option. Playback/Editing 97 Rotate : Right 90˚ 4 Touch to save edited photos as new files. • When you rotate or resize manually are not automatically converted to a lower resolution. • You cannot edit photos while viewing files as a new file. 1 Rotate the mode dial to g, and then...
... then touch an option. Playback/Editing 97 Rotate : Right 90˚ 4 Touch to save edited photos as new files. • When you rotate or resize manually are not automatically converted to a lower resolution. • You cannot edit photos while viewing files as a new file. 1 Rotate the mode dial to g, and then...
User Manual Ver.1.0 (English)
Page 113
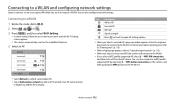
Enter the required passwords to connect to add an AP manually. Back • Select Refresh to refresh connectable APs. • Select Add wireless network to the WLAN. Your AP name must be in a range of a WLAN. ... select Wi-Fi Setting. • In some modes, follow the on the AP device. Connecting to a WLAN 1 Rotate the mode dial to add the AP manually. For information about entering text, refer to "Entering text". (p. 115) • When a login page appears, refer to "Using the login browser". (p. 113) • When you...
Enter the required passwords to connect to add an AP manually. Back • Select Refresh to refresh connectable APs. • Select Add wireless network to the WLAN. Your AP name must be in a range of a WLAN. ... select Wi-Fi Setting. • In some modes, follow the on the AP device. Connecting to a WLAN 1 Rotate the mode dial to add the AP manually. For information about entering text, refer to "Entering text". (p. 115) • When a login page appears, refer to "Using the login browser". (p. 113) • When you...

User Manual Ver.1.0 (English)
Page 114
... information input window appears. Wireless network 113 Button/Icon [D/c/F/t] [o] Description Move to an AP, and then press [t] or touch . 2 Select IP Setting “ Manual. 3 Select each option, and then enter the required information. Reload the page. • You may not close the login browser by pressing [b] or touching ,...1 In the Wi-Fi Setting screen, move to an item or scroll the page. IP Setting Set the IP address automatically or manually. Gateway Enter the gateway. DNS Server Enter the DNS address. Select an item. Move to . Stop loading the page.
... information input window appears. Wireless network 113 Button/Icon [D/c/F/t] [o] Description Move to an AP, and then press [t] or touch . 2 Select IP Setting “ Manual. 3 Select each option, and then enter the required information. Reload the page. • You may not close the login browser by pressing [b] or touching ,...1 In the Wi-Fi Setting screen, move to an item or scroll the page. IP Setting Set the IP address automatically or manually. Gateway Enter the gateway. DNS Server Enter the DNS address. Select an item. Move to . Stop loading the page.
User Manual Ver.1.0 (English)
Page 129
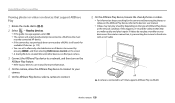
... camera. 3 Connect the AllShare Play device to a network, and then turn on the AllShare Play feature. • Refer to your device's user manual for more information. 4 On the camera, allow only selected devices or all devices to connect by pressing [m], and then selecting DLNA Access Control on ...videos. • For information about searching for the camera and browsing the photos or videos on the AllShare Play device, refer to the device's user manual. • Videos may not play smoothly on the screen. • A sharing file list is connected to a TV that support AllShare Play 1 Rotate...
... camera. 3 Connect the AllShare Play device to a network, and then turn on the AllShare Play feature. • Refer to your device's user manual for more information. 4 On the camera, allow only selected devices or all devices to connect by pressing [m], and then selecting DLNA Access Control on ...videos. • For information about searching for the camera and browsing the photos or videos on the AllShare Play device, refer to the device's user manual. • Videos may not play smoothly on the screen. • A sharing file list is connected to a TV that support AllShare Play 1 Rotate...
User Manual Ver.1.0 (English)
Page 149
..., or electric blankets for a prolonged period. • When the camera is handled carelessly or improperly. Dispose of the battery in this user manual. Guidelines for charging the battery Charge the battery only by the methods described in a fire. • Disposal regulations may differ by country or...center. • Use only authentic, manufacturer-recommend battery chargers and adapters and charge the battery only by the methods described in this user manual. • Do not place the battery near heating devices or expose it to excessively warm environments, such as the inside of an ...
..., or electric blankets for a prolonged period. • When the camera is handled carelessly or improperly. Dispose of the battery in this user manual. Guidelines for charging the battery Charge the battery only by the methods described in a fire. • Disposal regulations may differ by country or...center. • Use only authentic, manufacturer-recommend battery chargers and adapters and charge the battery only by the methods described in this user manual. • Do not place the battery near heating devices or expose it to excessively warm environments, such as the inside of an ...


