User Manual Ver.1.0 (English)
Page 15
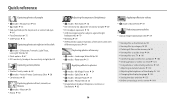
... • Viewing files by category f 90 • Deleting all files on the memory f 92 • Viewing files as a slide show f 94 • Viewing files on a TV f 101 • Connecting your camera to a computer f 102 • Sending photos or videos via email f 124 • Using photo or video sharing websites f 125 • Adjusting sound and volume f 133 • Adjusting the brightness of the display f 134 • Changing the display language f 135 • Setting the date and time f 135...
... • Viewing files by category f 90 • Deleting all files on the memory f 92 • Viewing files as a slide show f 94 • Viewing files on a TV f 101 • Connecting your camera to a computer f 102 • Sending photos or videos via email f 124 • Using photo or video sharing websites f 125 • Adjusting sound and volume f 133 • Adjusting the brightness of the display f 134 • Changing the display language f 135 • Setting the date and time f 135...
User Manual Ver.1.0 (English)
Page 16
... Using the DIRECT LINK button 23 Inserting the battery and memory card 24 Charging the battery and turning on your camera 25 Charging the battery 25 Turning on your camera 25 Performing the initial setup 26 Learning icons ...28 Selecting modes ...29 Icons on the Mode screen 29 Selecting options or menus 31 Selecting with buttons 31 Selecting by touch 32 Setting the display and sound 34 Setting the display type 34 Setting the sound 35 Capturing photos ...36 Zooming...
... Using the DIRECT LINK button 23 Inserting the battery and memory card 24 Charging the battery and turning on your camera 25 Charging the battery 25 Turning on your camera 25 Performing the initial setup 26 Learning icons ...28 Selecting modes ...29 Icons on the Mode screen 29 Selecting options or menus 31 Selecting with buttons 31 Selecting by touch 32 Setting the display and sound 34 Setting the display type 34 Setting the sound 35 Capturing photos ...36 Zooming...

User Manual Ver.1.0 (English)
Page 17
... Using macro ...70 Using auto focus ...70 Adjusting the focus area 72 Adjusting the focus by touch 72 Using Face Detection 75 Detecting faces ...75 Capturing a self portrait shot 75 Capturing a smile shot 76 Detecting eye blinking 76 Tips for detecting faces 77 Adjusting brightness and color 78 Adjusting the exposure manually (EV 78 Compensating for backlighting (ACB 79 Changing the metering option 79 Selecting a White Balance setting 80 Using burst modes 83 Capturing continuous photos 83 Using the timer...
... Using macro ...70 Using auto focus ...70 Adjusting the focus area 72 Adjusting the focus by touch 72 Using Face Detection 75 Detecting faces ...75 Capturing a self portrait shot 75 Capturing a smile shot 76 Detecting eye blinking 76 Tips for detecting faces 77 Adjusting brightness and color 78 Adjusting the exposure manually (EV 78 Compensating for backlighting (ACB 79 Changing the metering option 79 Selecting a White Balance setting 80 Using burst modes 83 Capturing continuous photos 83 Using the timer...

User Manual Ver.1.0 (English)
Page 18
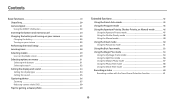
Contents Playback/Editing...87 Viewing photos or videos in Playback mode 88 Starting Playback mode 88 Viewing photos ...93 Playing a video ...95 Editing a photo ...97 Resizing photos ...97 Rotating a photo ...97 Cropping a photo 98 Applying Smart Filter effects 98 Adjusting your photos 99 Viewing files on a TV 101 Transferring files to the computer 102 Transferring files to your Windows OS computer 102 Transferring files to your Mac OS computer 103 Using programs on a computer 105 Installing i-Launcher 105 Using i-Launcher 106 Wireless network...
Contents Playback/Editing...87 Viewing photos or videos in Playback mode 88 Starting Playback mode 88 Viewing photos ...93 Playing a video ...95 Editing a photo ...97 Resizing photos ...97 Rotating a photo ...97 Cropping a photo 98 Applying Smart Filter effects 98 Adjusting your photos 99 Viewing files on a TV 101 Transferring files to the computer 102 Transferring files to your Windows OS computer 102 Transferring files to your Mac OS computer 103 Using programs on a computer 105 Installing i-Launcher 105 Using i-Launcher 106 Wireless network...

User Manual Ver.1.0 (English)
Page 41
... camera steady long enough to capture a clear photo. • Use a tripod or set the flash option to reduce camera shake optically. (p. 39) Half-pressing the shutter button When is blocking the lens, flash, or microphone. Camera shake The camera sets the aperture value and shutter speed automatically. The camera adjusts the focus and exposure automatically. Reducing camera shake Set the Optical Image Stabilization option to Fill in. (p. 67) • Set ISO sensitivity options. (p. 69) Basic functions...
... camera steady long enough to capture a clear photo. • Use a tripod or set the flash option to reduce camera shake optically. (p. 39) Half-pressing the shutter button When is blocking the lens, flash, or microphone. Camera shake The camera sets the aperture value and shutter speed automatically. The camera adjusts the focus and exposure automatically. Reducing camera shake Set the Optical Image Stabilization option to Fill in. (p. 67) • Set ISO sensitivity options. (p. 69) Basic functions...

User Manual Ver.1.0 (English)
Page 57
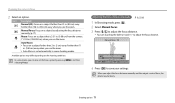
... changes. 4 Align your subject in other shooting modes. You can capture several photos and arrange them with preset layouts. 1 Rotate the mode dial to g. 2 Select . • To select another mode when the mode dial is set to or smaller. • The available zoom range may be less than in the frame, and then half-press [Shutter] to focus. 5 Press [Shutter] to capture a photo...
... changes. 4 Align your subject in other shooting modes. You can capture several photos and arrange them with preset layouts. 1 Rotate the mode dial to g. 2 Select . • To select another mode when the mode dial is set to or smaller. • The available zoom range may be less than in the frame, and then half-press [Shutter] to focus. 5 Press [Shutter] to capture a photo...

User Manual Ver.1.0 (English)
Page 60
... brown tone. Using the Movie Filter mode Apply various filter effects to your subject in the frame, and then half-press [Shutter] to focus. 5 Press [Shutter] to capture a photo. • Depending on the option you select, the resolution may change to or smaller automatically. • To apply filter effects to saved photos, press [m] and then select Open Image “ an image. Distort close...
... brown tone. Using the Movie Filter mode Apply various filter effects to your subject in the frame, and then half-press [Shutter] to focus. 5 Press [Shutter] to capture a photo. • Depending on the option you select, the resolution may change to or smaller automatically. • To apply filter effects to saved photos, press [m] and then select Open Image “ an image. Distort close...
User Manual Ver.1.0 (English)
Page 61
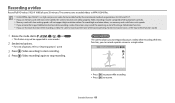
... the zoom operating. Video recordings may not save videos properly. Recording a video Record Full HD videos (1920 X 1080) of options, refer to "Shooting options". (p. 63) 3 Press (Video recording) to start recording. 4 Press (Video recording) again to stop recording. Pause recording The camera allows you use the Sound Alive function. (p. 86) 1 Rotate the mode dial to p, G, s, i, g or T. • This feature may not be corrupted or fail to play back correctly. • Memory cards with slow write speeds, the camera may be supported...
... the zoom operating. Video recordings may not save videos properly. Recording a video Record Full HD videos (1920 X 1080) of options, refer to "Shooting options". (p. 63) 3 Press (Video recording) to start recording. 4 Press (Video recording) again to stop recording. Pause recording The camera allows you use the Sound Alive function. (p. 86) 1 Rotate the mode dial to p, G, s, i, g or T. • This feature may not be corrupted or fail to play back correctly. • Memory cards with slow write speeds, the camera may be supported...
User Manual Ver.1.0 (English)
Page 64
... Using macro 70 Using auto focus 70 Adjusting the focus area 72 Adjusting the focus by touch 72 Using Face Detection 75 Detecting faces 75 Capturing a self portrait shot 75 Capturing a smile shot 76 Detecting eye blinking 76 Tips for detecting faces 77 Adjusting brightness and color 78 Adjusting the exposure manually (EV 78 Compensating for backlighting (ACB 79 Changing the metering option 79 Selecting a White Balance setting 80 Using burst modes 83 Capturing continuous photos 83 Using the timer...
... Using macro 70 Using auto focus 70 Adjusting the focus area 72 Adjusting the focus by touch 72 Using Face Detection 75 Detecting faces 75 Capturing a self portrait shot 75 Capturing a smile shot 76 Detecting eye blinking 76 Tips for detecting faces 77 Adjusting brightness and color 78 Adjusting the exposure manually (EV 78 Compensating for backlighting (ACB 79 Changing the metering option 79 Selecting a White Balance setting 80 Using burst modes 83 Capturing continuous photos 83 Using the timer...
User Manual Ver.1.0 (English)
Page 72
...) away when you adjust the focus distance manually and the subject is set the focus option by adjusting the focus distance manually. (p. 71) Macro: Focus on the shooting conditions. Farther than 138 in some modes, you use the zoom. Manual Focus: Focus on a subject by pressing [m], and then selecting Focus. Auto Macro: • Focus on a subject farther than 2 in . (80 cm) away. Changing the camera's focus 2 Select an option. Icon Description Normal (AF): Focus on a subject...
...) away when you adjust the focus distance manually and the subject is set the focus option by adjusting the focus distance manually. (p. 71) Macro: Focus on the shooting conditions. Farther than 138 in some modes, you use the zoom. Manual Focus: Focus on a subject by pressing [m], and then selecting Focus. Auto Macro: • Focus on a subject farther than 2 in . (80 cm) away. Changing the camera's focus 2 Select an option. Icon Description Normal (AF): Focus on a subject...

User Manual Ver.1.0 (English)
Page 112
... Viewing photos or videos on devices that support AllShare Play 128 Sending photos using Wi-Fi Direct 130 Connecting to a WLAN and configuring network settings 112 Connecting to a WLAN 112 Using the login browser 113 Network connection tips 114 Entering text 115 Saving files to a smart phone automatically ... 116 Sending photos or videos to a smart phone ... 117 Using a smart phone as a remote shutter release 118 Using Auto Backup to send photos or videos ... 120 Installing...
... Viewing photos or videos on devices that support AllShare Play 128 Sending photos using Wi-Fi Direct 130 Connecting to a WLAN and configuring network settings 112 Connecting to a WLAN 112 Using the login browser 113 Network connection tips 114 Entering text 115 Saving files to a smart phone automatically ... 116 Sending photos or videos to a smart phone ... 117 Using a smart phone as a remote shutter release 118 Using Auto Backup to send photos or videos ... 120 Installing...
User Manual Ver.1.0 (English)
Page 115
... country where you purchased the camera. • The process for adjusting network settings may appear when you select free WLANs provided by some modes. • Files that you transfer to another AP from the service provider, you may display a WLAN enabled printer on the AP List. For information about registering or the service, contact the network service providers. • Be cautious when...
... country where you purchased the camera. • The process for adjusting network settings may appear when you select free WLANs provided by some modes. • Files that you transfer to another AP from the service provider, you may display a WLAN enabled printer on the AP List. For information about registering or the service, contact the network service providers. • Be cautious when...
User Manual Ver.1.0 (English)
Page 117
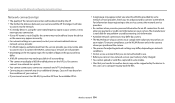
... before turning on the smart phone. Wireless network 116 Before using this function, the setting is maintained even when you change the Shooting mode. • This feature may not be supported in some modes. 1 On the camera, in Motion Photo mode is not saved on the smart phone. • The image file captured while recording a video is not saved on the application. 4 Select the camera from Samsung Apps, the Google Play...
... before turning on the smart phone. Wireless network 116 Before using this function, the setting is maintained even when you change the Shooting mode. • This feature may not be supported in some modes. 1 On the camera, in Motion Photo mode is not saved on the smart phone. • The image file captured while recording a video is not saved on the application. 4 Select the camera from Samsung Apps, the Google Play...

User Manual Ver.1.0 (English)
Page 130
... the initial set-up process. • While viewing photos or videos on the AllShare Play device, continuously using the device's remote or performing additional operations on the device may experience when streaming content. • To view files on an AllShare Play device using the Nearby devices feature, enable multicast mode on the device. • When there are no files in the camera memory, you cannot use this feature...
... the initial set-up process. • While viewing photos or videos on the AllShare Play device, continuously using the device's remote or performing additional operations on the device may experience when streaming content. • To view files on an AllShare Play device using the Nearby devices feature, enable multicast mode on the device. • When there are no files in the camera memory, you cannot use this feature...

User Manual Ver.1.0 (English)
Page 137
... focus. (Off, On*) Format the internal memory and the memory card. DIRECT LINK (Wi-Fi Button) Start a preset Wi-Fi function by another brand of the photo. • Some printer models may not print the date and time properly. • The photo will not change when you select i mode - Formatting will delete all files, including protected files. (Yes, No) Errors can occur if you select Panorama in dark places to help you are playing a slide show or videos. Settings 136 Settings menu...
... focus. (Off, On*) Format the internal memory and the memory card. DIRECT LINK (Wi-Fi Button) Start a preset Wi-Fi function by another brand of the photo. • Some printer models may not print the date and time properly. • The photo will not change when you select i mode - Formatting will delete all files, including protected files. (Yes, No) Errors can occur if you select Panorama in dark places to help you are playing a slide show or videos. Settings 136 Settings menu...
User Manual Ver.1.0 (English)
Page 138
Appendixes Get information about error messages, specifications, and maintenance. Error messages 138 Camera maintenance 140 Cleaning your camera 140 Using or storing the camera 141 About memory cards 142 About the battery 145 Before contacting a service center 149 Camera specifications 152 Glossary 156 Index 161
Appendixes Get information about error messages, specifications, and maintenance. Error messages 138 Camera maintenance 140 Cleaning your camera 140 Using or storing the camera 141 About memory cards 142 About the battery 145 Before contacting a service center 149 Camera specifications 152 Glossary 156 Index 161
User Manual Ver.1.0 (English)
Page 139
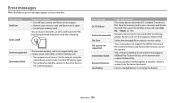
... disconnected. File Error File system not supported. Connection failed. Insert a charged battery or recharge the battery. Transfer the files from being deleted. Error message Card Error Card Locked Suggested remedies • Turn off your camera, and then turn it on again. • Remove your memory card, and then insert it again. • Format your camera. Unlock the card when shooting. Then, open the Settings menu and select File No. “ Reset. (p. 135) Network connection disconnected while transferring photos. The camera has failed to the network using the...
... disconnected. File Error File system not supported. Connection failed. Insert a charged battery or recharge the battery. Transfer the files from being deleted. Error message Card Error Card Locked Suggested remedies • Turn off your camera, and then turn it on again. • Remove your memory card, and then insert it again. • Format your camera. Unlock the card when shooting. Then, open the Settings menu and select File No. “ Reset. (p. 135) Network connection disconnected while transferring photos. The camera has failed to the network using the...
User Manual Ver.1.0 (English)
Page 152
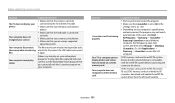
... that are using a supported operating system. Disconnect the USB cable and connect it again. Suggested remedies • End i-Launcher and restart the program. • Make sure that i-Launcher is set to On in the settings menu. (p. 134) • Depending on your Mac OS computer. Your computer does not recognize an SDXC memory card. Before contacting a service center Situation The TV does not display your photos Your computer...
... that are using a supported operating system. Disconnect the USB cable and connect it again. Suggested remedies • End i-Launcher and restart the program. • Make sure that i-Launcher is set to On in the settings menu. (p. 134) • Depending on your Mac OS computer. Your computer does not recognize an SDXC memory card. Before contacting a service center Situation The TV does not display your photos Your computer...
User Manual Ver.1.0 (English)
Page 154
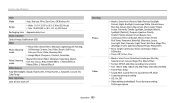
... Camera specifications Flash Mode Range Auto, Red-eye, Fill in, Slow Sync, Off, Red-eye Fix • Wide: 11.81-133.07 in. (0.3-3.38 m) (ISO Auto) • Tele: 19.69-59.45 in. (0.5-1.51 m) (ISO Auto) Recharging time Approximately 4 sec. Shake reduction Optical Image Stabilization (OIS) Effect Photo Shooting mode • Photo Filter (Smart Filter): Miniature, Vignetting, Ink Painting, Oil Painting, Cartoon, Cross Filter, Sketch, Soft Focus, Fish-eye, Classic, Retro, Zooming Shot • Image Adjust...
... Camera specifications Flash Mode Range Auto, Red-eye, Fill in, Slow Sync, Off, Red-eye Fix • Wide: 11.81-133.07 in. (0.3-3.38 m) (ISO Auto) • Tele: 19.69-59.45 in. (0.5-1.51 m) (ISO Auto) Recharging time Approximately 4 sec. Shake reduction Optical Image Stabilization (OIS) Effect Photo Shooting mode • Photo Filter (Smart Filter): Miniature, Vignetting, Ink Painting, Oil Painting, Cartoon, Cross Filter, Sketch, Soft Focus, Fish-eye, Classic, Retro, Zooming Shot • Image Adjust...
User Manual Ver.1.0 (English)
Page 164
... Power save mode 134 Program mode 45 Protecting files 91 Q Quick view 134 R Red-eye Playback mode 100 Shooting mode 66 Remote Viewfinder 118 Reset 136 Resolution Playback mode 97 Shooting mode 64 Retouching faces 100 Rotating 97 S Saturation Playback mode 100 Shooting mode 85 Self portrait 75 Service center 149 Settings 135 Sharpness 85 Shooting portraits Blink Detection 76 Face Detection 75 Self portrait 75 Smile Shot 76 Shutter button 21 Shutter Priority mode 48 Slide show 94 Smart Auto mode 43 Smart Filter Photo shooting mode 58 Playback mode 98 Video recording mode...
... Power save mode 134 Program mode 45 Protecting files 91 Q Quick view 134 R Red-eye Playback mode 100 Shooting mode 66 Remote Viewfinder 118 Reset 136 Resolution Playback mode 97 Shooting mode 64 Retouching faces 100 Rotating 97 S Saturation Playback mode 100 Shooting mode 85 Self portrait 75 Service center 149 Settings 135 Sharpness 85 Shooting portraits Blink Detection 76 Face Detection 75 Self portrait 75 Smile Shot 76 Shutter button 21 Shutter Priority mode 48 Slide show 94 Smart Auto mode 43 Smart Filter Photo shooting mode 58 Playback mode 98 Video recording mode...


