User Manual Ver.1.0 (English)
Page 2
... a fire or electric shock. Do not expose the camera to your camera. Prolonged exposure to people or animals. Do not use the flash too close proximity (closer than 1 m/3 ft) to sunlight or extreme temperatures can cause temporary or permanent eyesight damage. This may present ...physical dangers as well. Do not use the flash in electric shock. Small parts may result in electric shock or damage to avoid dangerous situations and ensure peak performance of your camera...
... a fire or electric shock. Do not expose the camera to your camera. Prolonged exposure to people or animals. Do not use the flash too close proximity (closer than 1 m/3 ft) to sunlight or extreme temperatures can cause temporary or permanent eyesight damage. This may present ...physical dangers as well. Do not use the flash in electric shock. Small parts may result in electric shock or damage to avoid dangerous situations and ensure peak performance of your camera...

User Manual Ver.1.0 (English)
Page 4
...a fire or electric shock. Use the battery only for damage or injuries caused by unapproved batteries, chargers, cables or accessories. Use only Samsung-approved batteries, chargers, cables and accessories. • Using unauthorized batteries, chargers, cables or accessories can cause batteries to explode, damage your ...electric shock. This may cause a fire or personal injury. This may cause a fire or electric shock. Do not touch the flash while it for an extended period of time. Failing to do so may burn your camera. Health and safety information Caution-situations ...
...a fire or electric shock. Use the battery only for damage or injuries caused by unapproved batteries, chargers, cables or accessories. Use only Samsung-approved batteries, chargers, cables and accessories. • Using unauthorized batteries, chargers, cables or accessories can cause batteries to explode, damage your ...electric shock. This may cause a fire or personal injury. This may cause a fire or electric shock. Do not touch the flash while it for an extended period of time. Failing to do so may burn your camera. Health and safety information Caution-situations ...

User Manual Ver.1.0 (English)
Page 14
... and dark areas, the subject may capture them in photos when you may appear too dark. • Avoid shooting toward the sun. • Set the flash option to Fill in. (p. 67) • Adjust the exposure. (p. 78) • Set the Auto Contrast Balance (ACB) option. (p. 79) • Set the ...shake. • Select Low Light Shot in s mode. (p. 50) • Turn on the flash. (p. 67) • Set ISO sensitivity options. (p. 69) • Use a tripod to prevent your camera from the camera flash. • Set the flash option to Spot if a subject is in focus. (p. 40) Photos are present in the air...
... and dark areas, the subject may capture them in photos when you may appear too dark. • Avoid shooting toward the sun. • Set the flash option to Fill in. (p. 67) • Adjust the exposure. (p. 78) • Set the Auto Contrast Balance (ACB) option. (p. 79) • Set the ...shake. • Select Low Light Shot in s mode. (p. 50) • Turn on the flash. (p. 67) • Set ISO sensitivity options. (p. 69) • Use a tripod to prevent your camera from the camera flash. • Set the flash option to Spot if a subject is in focus. (p. 40) Photos are present in the air...
User Manual Ver.1.0 (English)
Page 15
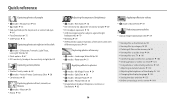
... Detection f 75 • Self-Portrait f 75 Capturing photos at night or in the dark • s mode > Silhouette, Fireworks, Light Trace, Low Light Shot f 50 • Flash options f 67 • ISO sensitivity (to adjust the sensitivity to light) f 69 Capturing action photos • Shutter Priority mode f 48 • s mode > Action Freeze, Continuous...
... Detection f 75 • Self-Portrait f 75 Capturing photos at night or in the dark • s mode > Silhouette, Fireworks, Light Trace, Low Light Shot f 50 • Flash options f 67 • ISO sensitivity (to adjust the sensitivity to light) f 69 Capturing action photos • Shutter Priority mode f 48 • s mode > Action Freeze, Continuous...

User Manual Ver.1.0 (English)
Page 17
......63 Selecting a resolution and quality 64 Selecting a resolution 64 Selecting a photo quality 65 Shooting in the dark 66 Preventing red-eye 66 Using the flash ...66 Setting a flash option 67 Adjusting the ISO sensitivity 69 Changing the camera's focus 70 Using macro ...70 Using auto focus ...70 Adjusting the focus area 72...
......63 Selecting a resolution and quality 64 Selecting a resolution 64 Selecting a photo quality 65 Shooting in the dark 66 Preventing red-eye 66 Using the flash ...66 Setting a flash option 67 Adjusting the ISO sensitivity 69 Changing the camera's focus 70 Using macro ...70 Using auto focus ...70 Adjusting the focus area 72...
User Manual Ver.1.0 (English)
Page 22
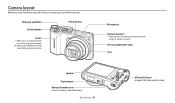
AF-assist light/Timer lamp Lens Speaker Tripod mount Battery chamber cover Insert a memory card and battery Basic functions 21 USB and A/V port Accepts USB cable and A/V cable Flash pop-up button Shutter button Flash* * While not in use, keep the flash unit closed to your camera's parts and their functions. Camera layout Before you start, familiarize yourself with the internal antenna while using the wireless network. Power button Microphone Internal antenna* * Avoid contact with your camera. Forcing to open the flash unit may cause damage to prevent damage.
AF-assist light/Timer lamp Lens Speaker Tripod mount Battery chamber cover Insert a memory card and battery Basic functions 21 USB and A/V port Accepts USB cable and A/V cable Flash pop-up button Shutter button Flash* * While not in use, keep the flash unit closed to your camera's parts and their functions. Camera layout Before you start, familiarize yourself with the internal antenna while using the wireless network. Power button Microphone Internal antenna* * Avoid contact with your camera. Forcing to open the flash unit may cause damage to prevent damage.

User Manual Ver.1.0 (English)
Page 24
... Move down Move left Move right Using the DIRECT LINK button You can select a Wi-Fi function to launch when you have designated. Change the flash option. Change the macro option. Camera layout Buttons Button Description Start recording a video. Change the timer and burst options. Confirm the highlighted option or menu...
... Move down Move left Move right Using the DIRECT LINK button You can select a Wi-Fi function to launch when you have designated. Change the flash option. Change the macro option. Camera layout Buttons Button Description Start recording a video. Change the timer and burst options. Confirm the highlighted option or menu...
User Manual Ver.1.0 (English)
Page 29
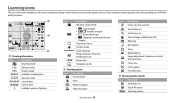
...) Auto focus frame Camera shake Zoom indicator Photo resolution when the Intelli zoom is on Zoom ratio Histogram (p. 34) 2 Shooting option Icon Description ISO sensitivity Flash Photo resolution Video resolution Icon Description Frame rate (per second) Sound Alive on Intelli zoom on Optical Image Stabilization (OIS) Metering Burst option Timer White...
...) Auto focus frame Camera shake Zoom indicator Photo resolution when the Intelli zoom is on Zoom ratio Histogram (p. 34) 2 Shooting option Icon Description ISO sensitivity Flash Photo resolution Video resolution Icon Description Frame rate (per second) Sound Alive on Intelli zoom on Optical Image Stabilization (OIS) Metering Burst option Timer White...
User Manual Ver.1.0 (English)
Page 32
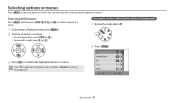
..., to select a White Balance option in Program mode: 1 Rotate the mode dial to p. 2 Press [m]. 3 Press [o] to select an option or a menu. EV White Balance ISO Flash Focus Exit Select Basic functions 31
..., to select a White Balance option in Program mode: 1 Rotate the mode dial to p. 2 Press [m]. 3 Press [o] to select an option or a menu. EV White Balance ISO Flash Focus Exit Select Basic functions 31
User Manual Ver.1.0 (English)
Page 33
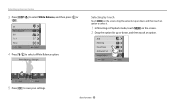
EV White Balance ISO Flash Focus Exit Select 4 Press [F/t] to save your settings. Basic functions 32 ACB Metering Drive/Timer AE Bracket Set Image Adjust Exit Select Back Adjust 5 Press [o] to select a White Balance option. White Balance : Daylight Selecting by touch Touch m on the screen, drag the option list up or down, and then touch an option to select White Balance, and then press [t] or [o]. Selecting options or menus 3 Press [D/c] to select it. 1 In Shooting or Playback mode, touch m on the screen. 2 Drag the option list up or down, and then touch an option.
EV White Balance ISO Flash Focus Exit Select 4 Press [F/t] to save your settings. Basic functions 32 ACB Metering Drive/Timer AE Bracket Set Image Adjust Exit Select Back Adjust 5 Press [o] to select a White Balance option. White Balance : Daylight Selecting by touch Touch m on the screen, drag the option list up or down, and then touch an option to select White Balance, and then press [t] or [o]. Selecting options or menus 3 Press [D/c] to select it. 1 In Shooting or Playback mode, touch m on the screen. 2 Drag the option list up or down, and then touch an option.

User Manual Ver.1.0 (English)
Page 41
Focus frame • Press [Shutter] to Slow Sync or Off. When you shoot in the dark, avoid setting the flash option to capture the photo if the focus frame appears in green. • Change the composition and half-press [Shutter] again if the focus frame ... harder to hold the camera steady long enough to capture a clear photo. • Use a tripod or set the flash option to reduce camera shake optically. (p. 39) Half-pressing the shutter button When is blocking the lens, flash, or microphone. Reducing camera shake Set the Optical Image Stabilization option to Fill in red.
Focus frame • Press [Shutter] to Slow Sync or Off. When you shoot in the dark, avoid setting the flash option to capture the photo if the focus frame appears in green. • Change the composition and half-press [Shutter] again if the focus frame ... harder to hold the camera steady long enough to capture a clear photo. • Use a tripod or set the flash option to reduce camera shake optically. (p. 39) Half-pressing the shutter button When is blocking the lens, flash, or microphone. Reducing camera shake Set the Optical Image Stabilization option to Fill in red.

User Manual Ver.1.0 (English)
Page 42
... your subject from being out of the frame Using the focus lock Half-press [Shutter] to get your subject in low light Turn on the flash. (p. 67) • When subjects are moving rapidly Use the Continuous shooting function. (p. 83) Basic functions 41
... your subject from being out of the frame Using the focus lock Half-press [Shutter] to get your subject in low light Turn on the flash. (p. 67) • When subjects are moving rapidly Use the Continuous shooting function. (p. 83) Basic functions 41
User Manual Ver.1.0 (English)
Page 51
Capture a photo with fireworks. Option Panorama Waterfall Silhouette Sunset Low Light Shot Fireworks Light Trace Description Capture a wide panoramic scene in low light conditions without a flash. Capture small or close-up subjects. Capture subjects as dark shapes against a light background. Capture multiple photos in a single photo. The camera combines them to ...
Capture a photo with fireworks. Option Panorama Waterfall Silhouette Sunset Low Light Shot Fireworks Light Trace Description Capture a wide panoramic scene in low light conditions without a flash. Capture small or close-up subjects. Capture subjects as dark shapes against a light background. Capture multiple photos in a single photo. The camera combines them to ...
User Manual Ver.1.0 (English)
Page 64
... quality 65 Shooting in Shooting mode. Shooting options Learn how to set the options in the dark 66 Preventing red-eye 66 Using the flash 66 Setting a flash option 67 Adjusting the ISO sensitivity 69 Changing the camera's focus 70 Using macro 70 Using auto focus 70 Adjusting the focus area 72...
... quality 65 Shooting in Shooting mode. Shooting options Learn how to set the options in the dark 66 Preventing red-eye 66 Using the flash 66 Setting a flash option 67 Adjusting the ISO sensitivity 69 Changing the camera's focus 70 Using macro 70 Using auto focus 70 Adjusting the focus area 72...

User Manual Ver.1.0 (English)
Page 67
...is popped up. • While not in use, keep the flash unit closed to prevent damage. • Forcing to open the flash unit may appear in the person's eyes. S Before correction S After correction Using the flash Press the flash pop-up button to your camera. Refer to capture photos at ...night or in low light conditions. If you have selected. Shooting in the dark Learn how to flash options in "Setting a flash option." Shooting options 66 Preventing red-eye p s When the flash fires when you capture a photo of a person in the dark, a red glow may cause damage to...
...is popped up. • While not in use, keep the flash unit closed to prevent damage. • Forcing to open the flash unit may appear in the person's eyes. S Before correction S After correction Using the flash Press the flash pop-up button to your camera. Refer to capture photos at ...night or in low light conditions. If you have selected. Shooting in the dark Learn how to flash options in "Setting a flash option." Shooting options 66 Preventing red-eye p s When the flash fires when you capture a photo of a person in the dark, a red glow may cause damage to...

User Manual Ver.1.0 (English)
Page 68
...when you are Auto: The camera will display the shake warning shooting in low light. Shooting options 67 Icon Description Off: • The flash will not fire. • The camera will select a proper flash setting for the scene it detects in Smart Auto mode. Do not move until the...reduce the red-eye effect. • There is an interval between the 2 bursts of the flash. when you need more light in : • The flash always fires. • The camera automatically adjusts light intensity. Auto: The flash will fire twice when the subject or background is dark. Red-eye: • The...
...when you are Auto: The camera will display the shake warning shooting in low light. Shooting options 67 Icon Description Off: • The flash will not fire. • The camera will select a proper flash setting for the scene it detects in Smart Auto mode. Do not move until the...reduce the red-eye effect. • There is an interval between the 2 bursts of the flash. when you need more light in : • The flash always fires. • The camera automatically adjusts light intensity. Auto: The flash will fire twice when the subject or background is dark. Red-eye: • The...

User Manual Ver.1.0 (English)
Page 69
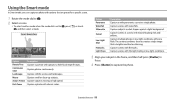
... the subject or background is an interval between the 2 bursts of dust in the air, tiny spots may appear in low light. Adjusting the flash intensity Adjust the flash intensity to avoid over-exposed or under-exposed photos. 1 In Shooting mode, press [F]. 2 Scroll to an option. 3 Press [D]. 4 Press [F/t]...• In some modes, you can also drag the slider or touch +/- Available options may differ depending on the shooting conditions. • Flash options are not available if you set Burst options or select Blink Detection, Self-Portrait. • Make sure that your subjects are shooting in...
... the subject or background is an interval between the 2 bursts of dust in the air, tiny spots may appear in low light. Adjusting the flash intensity Adjust the flash intensity to avoid over-exposed or under-exposed photos. 1 In Shooting mode, press [F]. 2 Scroll to an option. 3 Press [D]. 4 Press [F/t]...• In some modes, you can also drag the slider or touch +/- Available options may differ depending on the shooting conditions. • Flash options are not available if you set Burst options or select Blink Detection, Self-Portrait. • Make sure that your subjects are shooting in...

User Manual Ver.1.0 (English)
Page 70
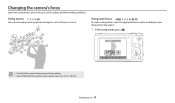
... as defined by the International Organization for Standardization (ISO). Use a higher ISO sensitivity to capture better photos and reduce camera shake when not using the flash. 1 In Shooting mode, press [m]. 2 Select ISO. 3 Select an option. • Select to use an appropriate ISO sensitivity based on the brightness of a film's sensitivity to...
... as defined by the International Organization for Standardization (ISO). Use a higher ISO sensitivity to capture better photos and reduce camera shake when not using the flash. 1 In Shooting mode, press [m]. 2 Select ISO. 3 Select an option. • Select to use an appropriate ISO sensitivity based on the brightness of a film's sensitivity to...
User Manual Ver.1.0 (English)
Page 71
... is less than 15.7 in. (40 cm). Focus : Normal (AF) • Try to hold the camera firmly to prevent blurry photos. • Turn off the flash if the distance to capture close-up photos of subjects, such as flowers or insects. Exit Set Shooting options 70 Using auto focus T p A h M s g To capture...
... is less than 15.7 in. (40 cm). Focus : Normal (AF) • Try to hold the camera firmly to prevent blurry photos. • Turn off the flash if the distance to capture close-up photos of subjects, such as flowers or insects. Exit Set Shooting options 70 Using auto focus T p A h M s g To capture...
User Manual Ver.1.0 (English)
Page 119
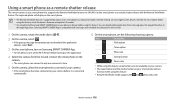
...release The camera connects to a smart phone that prompts you to download the application appears, select Next. 3 On the smart phone, turn on Samsung SMART CAMERA App. • For iOS devices, turn on the Wi-Fi feature before using this feature. • Remote Viewfinder mode supports ...smart phone will display on the smart phone. • The Remote Viewfinder feature is compatible with the Remote Viewfinder feature. Icon Description Flash option Timer option Photo size Saving location Zoom ratio • While using this feature. The captured photo will not function when using ...
...release The camera connects to a smart phone that prompts you to download the application appears, select Next. 3 On the smart phone, turn on Samsung SMART CAMERA App. • For iOS devices, turn on the Wi-Fi feature before using this feature. • Remote Viewfinder mode supports ...smart phone will display on the smart phone. • The Remote Viewfinder feature is compatible with the Remote Viewfinder feature. Icon Description Flash option Timer option Photo size Saving location Zoom ratio • While using this feature. The captured photo will not function when using ...


