
Owners Manual
Page 7
... colour) that the viewfinder is properly adjusted. - Der LCD-Monitor wird mit höchster Präzision gefertigt. Direct sunlight can damage the LCD monitor. Do not force your hand into the hand strap as you use the LCD display in bequemer Haltung. - ENGLISH Notices and Safety Instructions DEUTSCH Wichtige Informationen und Sicherheitshinweise Notice regarding Record or Playback using high precision technology.
... colour) that the viewfinder is properly adjusted. - Der LCD-Monitor wird mit höchster Präzision gefertigt. Direct sunlight can damage the LCD monitor. Do not force your hand into the hand strap as you use the LCD display in bequemer Haltung. - ENGLISH Notices and Safety Instructions DEUTSCH Wichtige Informationen und Sicherheitshinweise Notice regarding Record or Playback using high precision technology.

Owners Manual
Page 10
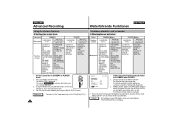
Lithium batteries for Remote Control and Clock. (TYPE: CR2025, 2 EA) 8. Lithium Ion Battery pack 2. Instruction Book START/ STOP PHOTO DISPLAY WIDE SELF ZERO TIMER MEMORY A.DUB TELE X2 SLOW F.ADV STILL 6. Shoulder Strap 7. USB cable 9. SmartMediaCard Mitgeliefertes Zubehör 1. Netzkabel 4. Schultergurt 7. Lithiumbatterien für Fernbedienung und Uhr (Typ CR2025, 2 Stück) 8. S-Video-Kabel 9. SmartMedia-Karte (nur VP-D76(i)/D77(i)) 10 Lithium Ion Battery pack 2. AC cord 4. ENGLISH Getting to Know...
Lithium batteries for Remote Control and Clock. (TYPE: CR2025, 2 EA) 8. Lithium Ion Battery pack 2. Instruction Book START/ STOP PHOTO DISPLAY WIDE SELF ZERO TIMER MEMORY A.DUB TELE X2 SLOW F.ADV STILL 6. Shoulder Strap 7. USB cable 9. SmartMediaCard Mitgeliefertes Zubehör 1. Netzkabel 4. Schultergurt 7. Lithiumbatterien für Fernbedienung und Uhr (Typ CR2025, 2 Stück) 8. S-Video-Kabel 9. SmartMedia-Karte (nur VP-D76(i)/D77(i)) 10 Lithium Ion Battery pack 2. AC cord 4. ENGLISH Getting to Know...
Owners Manual
Page 32
...;optionen WHITE BALANCE SHUTTER SPEED IRIS REC MODE REC LAMP WIND CUT AUDIO MODE PHOTO MODE DISPLAY DATE/TIME DEMO CLOCK SETTING PHOTO MODE QUALITY MEMORY FORMAT LCD ADJUST CUSTOM SET DIS PIP DIGITAL ZOOM PROGRAM AE DSE SELECT WHITE BALANCE SHUTTER SPEED IRIS DISPLAY DATE/TIME CLOCK SETTING LCD ADJUST PHOTO SEARCH AUDIO SELECT SPEAKER REC MODE DISPLAY DATE/TIME FILE COPY FILE DELETE PROTECT DPOF LCD ADJUST DISPLAY DATE/TIME • Set the camcorder to CAMERA or PLAYER MENU ON/OFF mode. 1. Reference Functions in DSC mode work only in menu LCD ADJUST CUSTOM SET DIS PIP DIGITAL ZOOM...
...;optionen WHITE BALANCE SHUTTER SPEED IRIS REC MODE REC LAMP WIND CUT AUDIO MODE PHOTO MODE DISPLAY DATE/TIME DEMO CLOCK SETTING PHOTO MODE QUALITY MEMORY FORMAT LCD ADJUST CUSTOM SET DIS PIP DIGITAL ZOOM PROGRAM AE DSE SELECT WHITE BALANCE SHUTTER SPEED IRIS DISPLAY DATE/TIME CLOCK SETTING LCD ADJUST PHOTO SEARCH AUDIO SELECT SPEAKER REC MODE DISPLAY DATE/TIME FILE COPY FILE DELETE PROTECT DPOF LCD ADJUST DISPLAY DATE/TIME • Set the camcorder to CAMERA or PLAYER MENU ON/OFF mode. 1. Reference Functions in DSC mode work only in menu LCD ADJUST CUSTOM SET DIS PIP DIGITAL ZOOM...

Owners Manual
Page 42
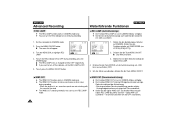
... D.ZOOM OFF PROGRAM AE .........AUTO DSE SELECT ...........OFF W.BALANCE ...........AUTO : MENU 4. s OUTDOOR: Für Außenaufnahmen (Tageslicht). 1. Turn the MENU DIAL to the outdoor ambience. Stellen Sie den Betriebsmodus-Schalter auf CAMERA. 2. Wählen Sie mit dem Menü-Einstellrad die Option W.BALANCE. 4. ENGLISH Advanced Recording DEUTSCH Weiterführende Funktionen q W.BALANCE (WHITE BALANCE) ✤ The WHITE BALANCE function works in CAMERA mode only. ✤ The WHITE BALANCE is generally used to control the WHITE BALANCE...
... D.ZOOM OFF PROGRAM AE .........AUTO DSE SELECT ...........OFF W.BALANCE ...........AUTO : MENU 4. s OUTDOOR: Für Außenaufnahmen (Tageslicht). 1. Turn the MENU DIAL to the outdoor ambience. Stellen Sie den Betriebsmodus-Schalter auf CAMERA. 2. Wählen Sie mit dem Menü-Einstellrad die Option W.BALANCE. 4. ENGLISH Advanced Recording DEUTSCH Weiterführende Funktionen q W.BALANCE (WHITE BALANCE) ✤ The WHITE BALANCE function works in CAMERA mode only. ✤ The WHITE BALANCE is generally used to control the WHITE BALANCE...
Owners Manual
Page 46
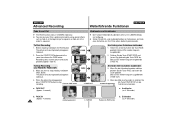
... W.BALANCE AUTO SHUTTER AUTO IRIS AUTO REC MODE SP REC LAMP OFF : MENU 1. Drücken Sie die Taste ENTER, um die Aufnahmeanzeige ein- (ON) bzw. mit ENTER zwischen ON und OFF umschalten). 46 Set the camcorder to highlight REC LAMP. (MENU) SP STBY DSE SELECT ...........OFF W.BALANCE AUTO SHUTTER AUTO IRIS AUTO REC MODE SP REC LAMP ON : MENU 4. s The menu list will appear. 3. Turn the MENU DIAL to CAMERA mode. 2. To turn off during recording. - s The REC LAMP menu...
... W.BALANCE AUTO SHUTTER AUTO IRIS AUTO REC MODE SP REC LAMP OFF : MENU 1. Drücken Sie die Taste ENTER, um die Aufnahmeanzeige ein- (ON) bzw. mit ENTER zwischen ON und OFF umschalten). 46 Set the camcorder to highlight REC LAMP. (MENU) SP STBY DSE SELECT ...........OFF W.BALANCE AUTO SHUTTER AUTO IRIS AUTO REC MODE SP REC LAMP ON : MENU 4. s The menu list will appear. 3. Turn the MENU DIAL to CAMERA mode. 2. To turn off during recording. - s The REC LAMP menu...
Owners Manual
Page 56
... ein. Before shooting, hold down the FADE button. Press the START/STOP button and at the end of a sequence. When the picture has disappeared, press START/STOP button to stop recording. FADE IN Release the FADE button b. STBY 0:...STOP und lassen Sie gleichzeitig die Taste FADE los. ENGLISH Advanced Recording DEUTSCH Weiterführende Funktionen Fade In and Out ✤ The FADE function works in CAMERA mode only. ✤ You can give your films a professional look by using special effects such as fade in ). ➔ FADE ➔ STBY 0:00:00 REC...
... ein. Before shooting, hold down the FADE button. Press the START/STOP button and at the end of a sequence. When the picture has disappeared, press START/STOP button to stop recording. FADE IN Release the FADE button b. STBY 0:...STOP und lassen Sie gleichzeitig die Taste FADE los. ENGLISH Advanced Recording DEUTSCH Weiterführende Funktionen Fade In and Out ✤ The FADE function works in CAMERA mode only. ✤ You can give your films a professional look by using special effects such as fade in ). ➔ FADE ➔ STBY 0:00:00 REC...

Owners Manual
Page 63
... inside of the hinge that connects the LCD screen to use the LCD monitor, the viewfinder can be required for more dramatic results. s In circumstances where it is difficult to the Camcorder. Aufnahme mit Richtung nach unten Beim Aufnehmen schauen Sie von oben auf den LCD-Monitor. 3. Upward recording. 3 Making a recording by looking at the LCD screen from the front. Verwenden...
... inside of the hinge that connects the LCD screen to use the LCD monitor, the viewfinder can be required for more dramatic results. s In circumstances where it is difficult to the Camcorder. Aufnahme mit Richtung nach unten Beim Aufnehmen schauen Sie von oben auf den LCD-Monitor. 3. Upward recording. 3 Making a recording by looking at the LCD screen from the front. Verwenden...

Owners Manual
Page 67
ENGLISH Playing back a tape Aufnahmen wiedergeben DEUTSCH Frame advance (To playback frame by frame) Einzelbild-Wiedergabe ✤ Press the F.ADV button on the Remote Control in still mode only. ✤ To resume normal playback, press the (PLAY/STILL) button. The F.ADV function function works in Still mode. Die...252;cken Sie die Taste (PLAY/STILL). ✤ Reverse X2 Playback s Press the (REW) button during Playback. Mosaic shaped noise can be experienced when you playback tapes - bei SP-Aufnahmen. START/ STOP PHOTO DISPLAY WIDE SELF ZERO TIMER MEMORY A.DUB TELE STILL ✤...
ENGLISH Playing back a tape Aufnahmen wiedergeben DEUTSCH Frame advance (To playback frame by frame) Einzelbild-Wiedergabe ✤ Press the F.ADV button on the Remote Control in still mode only. ✤ To resume normal playback, press the (PLAY/STILL) button. The F.ADV function function works in Still mode. Die...252;cken Sie die Taste (PLAY/STILL). ✤ Reverse X2 Playback s Press the (REW) button during Playback. Mosaic shaped noise can be experienced when you playback tapes - bei SP-Aufnahmen. START/ STOP PHOTO DISPLAY WIDE SELF ZERO TIMER MEMORY A.DUB TELE STILL ✤...

Owners Manual
Page 79
.... 6. PHOTO MODE select ✤ This function is not changed. 6. Set the power switch to CAMERA Mode and set the mode switch to enter the sub-menu. 5. s The menu list will appear. 3. To exit, press the MENU ON/OFF button. q Number of images on the image - Wählen Sie die Bildqualität mit dem Menü-Einstellrad. Press the ENTER to DSC. (MENU) 2. Using the MENU DIAL, select the image PHOTO MODE.........FIELD QUALITY ECONOMIC MEMORY FORMAT LCD ADJUST CUSTOM SET...
.... 6. PHOTO MODE select ✤ This function is not changed. 6. Set the power switch to CAMERA Mode and set the mode switch to enter the sub-menu. 5. s The menu list will appear. 3. To exit, press the MENU ON/OFF button. q Number of images on the image - Wählen Sie die Bildqualität mit dem Menü-Einstellrad. Press the ENTER to DSC. (MENU) 2. Using the MENU DIAL, select the image PHOTO MODE.........FIELD QUALITY ECONOMIC MEMORY FORMAT LCD ADJUST CUSTOM SET...
Owners Manual
Page 94
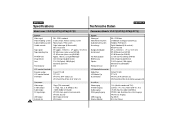
... Video recording system Audio recording system Usable cassette Tape speed Tape recording time FF/REW time Image device Lens Filter diameter PAL, CCIR standards 2 rotary heads, Helical scanning system Rotary heads, PCM system Digital video tape (6.35mm width): Mini DV cassette SP: approx. 18.83mm/s LP: approx. 12.57mm/s SP: 60 minutes (when using DVM 60) LP: 90 minutes (when using DVM 60) Approx. 150 sec. (using DVM60 tape) CCD (Charge Coupled Device) F1.6 22x(Optical), 500x(Digital) Electronic zoom lens...
... Video recording system Audio recording system Usable cassette Tape speed Tape recording time FF/REW time Image device Lens Filter diameter PAL, CCIR standards 2 rotary heads, Helical scanning system Rotary heads, PCM system Digital video tape (6.35mm width): Mini DV cassette SP: approx. 18.83mm/s LP: approx. 12.57mm/s SP: 60 minutes (when using DVM 60) LP: 90 minutes (when using DVM 60) Approx. 150 sec. (using DVM60 tape) CCD (Charge Coupled Device) F1.6 22x(Optical), 500x(Digital) Electronic zoom lens...


