User Manual Ver.1.0 (English)
Page 2
Contents Connecting Antenna and External Using the Remote Control and devices Peripherals Antenna Connection Video Device Connections 2 HDMI Connection 3 Component Connection 4 Composite (A/V) Connection Audio Input and Output Connections 5 Digital Audio (Optical) Connection 6 Audio Output Connection Connecting to a Computer 7 Connecting Through the HDMI Port 8 Connecting With a DVI to HDMI Cable 9 Connecting Through Samsung Link 9 Connecting Through DLNA Using Your Home Network Connecting To a Mobile Device 11 Screen Mirroring 13 Connecting Mobile Devices without a Wireless Router (Wi-Fi ...
Contents Connecting Antenna and External Using the Remote Control and devices Peripherals Antenna Connection Video Device Connections 2 HDMI Connection 3 Component Connection 4 Composite (A/V) Connection Audio Input and Output Connections 5 Digital Audio (Optical) Connection 6 Audio Output Connection Connecting to a Computer 7 Connecting Through the HDMI Port 8 Connecting With a DVI to HDMI Cable 9 Connecting Through Samsung Link 9 Connecting Through DLNA Using Your Home Network Connecting To a Mobile Device 11 Screen Mirroring 13 Connecting Mobile Devices without a Wireless Router (Wi-Fi ...
User Manual Ver.1.0 (English)
Page 3
... Viewing Videos 56 Buttons and Functions Available While Playing Music 57 Functions on the Media Content List Screen Setting Up a Schedule Viewing 60 Digital Channel Schedule Viewing 61 Analog Channel Schedule Viewing 62 Canceling a Schedule Viewing 62 Editing a Schedule Viewing Using the Channel List Registering, Removing, and Editing Channels 64 Registering and Removing Channels 65 Editing Registered Channels 66 Program Rating Lock Creating a Personal Favorites List 69 Registering Channels as a Favorites 70 Selecting from the TV Using the SAMSUNG APPS Panel 43 Using Supported...
... Viewing Videos 56 Buttons and Functions Available While Playing Music 57 Functions on the Media Content List Screen Setting Up a Schedule Viewing 60 Digital Channel Schedule Viewing 61 Analog Channel Schedule Viewing 62 Canceling a Schedule Viewing 62 Editing a Schedule Viewing Using the Channel List Registering, Removing, and Editing Channels 64 Registering and Removing Channels 65 Editing Registered Channels 66 Program Rating Lock Creating a Personal Favorites List 69 Registering Channels as a Favorites 70 Selecting from the TV Using the SAMSUNG APPS Panel 43 Using Supported...
User Manual Ver.1.0 (English)
Page 4
... Picture Support Functions 89 PIP Broadcast Viewing 90 Changing the Picture Size and Position 91 Listening to Audio Only with the Screen Turned Off (Picture Off) 91 Resetting the Picture Mode Settings Changing the Sound Mode and Using Sound Effects 92 Choosing the Right Sound Mode for the Environment 92 Using Sound Effects Sound Support Functions 93 Selecting Speakers 93 Designating the TV's Installation Type 94 Enabling Digital Audio Output 94 Listening to 3D Audio in 3D Mode 94 Resetting All Sound Settings Setting the Time and Using the Timer 95 Setting...
... Picture Support Functions 89 PIP Broadcast Viewing 90 Changing the Picture Size and Position 91 Listening to Audio Only with the Screen Turned Off (Picture Off) 91 Resetting the Picture Mode Settings Changing the Sound Mode and Using Sound Effects 92 Choosing the Right Sound Mode for the Environment 92 Using Sound Effects Sound Support Functions 93 Selecting Speakers 93 Designating the TV's Installation Type 94 Enabling Digital Audio Output 94 Listening to 3D Audio in 3D Mode 94 Resetting All Sound Settings Setting the Time and Using the Timer 95 Setting...
User Manual Ver.1.0 (English)
Page 23
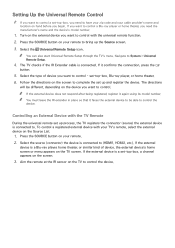
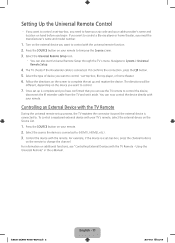
.... Setting Up the Universal Remote Control "" If you want to control a set-top-box, you need the manufacturer's name and the device's model number. 111 Turn on the external device you want to control with the universal remote function. 222 Press the SOURCE button on your remote to bring up the Source screen. 333 Select the Universal Remote Setup icon. "" You can also start Universal Remote Setup through the TV's menu. If it confirms the connection, press the E button...
.... Setting Up the Universal Remote Control "" If you want to control a set-top-box, you need the manufacturer's name and the device's model number. 111 Turn on the external device you want to control with the universal remote function. 222 Press the SOURCE button on your remote to bring up the Source screen. 333 Select the Universal Remote Setup icon. "" You can also start Universal Remote Setup through the TV's menu. If it confirms the connection, press the E button...
User Manual Ver.1.0 (English)
Page 58
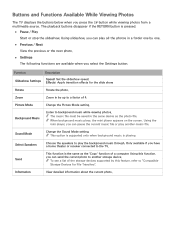
... when you have a home theater or receiver connected to background music while viewing photos. Picture Mode Change the Picture Mode setting. ""When background music plays, the mini player appears on the screen. Select Speakers Choose the speakers to another music file. Using slideshow, you press the E button while viewing photos from a multimedia source. Sound Mode Change the Sound Mode setting. Buttons and Functions Available While Viewing Photos The TV displays the buttons below when you can pause the...
... when you have a home theater or receiver connected to background music while viewing photos. Picture Mode Change the Picture Mode setting. ""When background music plays, the mini player appears on the screen. Select Speakers Choose the speakers to another music file. Using slideshow, you press the E button while viewing photos from a multimedia source. Sound Mode Change the Sound Mode setting. Buttons and Functions Available While Viewing Photos The TV displays the buttons below when you can pause the...
User Manual Ver.1.0 (English)
Page 60
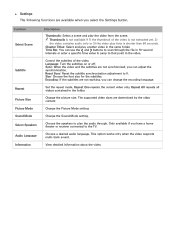
... 10-second intervals or enter a specific time value to jump to 0. Set the repeat mode. Time Bar: You can use the ¡ and £ buttons to scan through . View detailed information about the video. The supported video sizes are available when you have a home theater or receiver connected to play time is shorter than 60 seconds. Function Select Scene Subtitle Repeat Picture Size Picture Mode Sound Mode Select Speakers Audio Language Information Description Thumbnails: Select...
... 10-second intervals or enter a specific time value to jump to 0. Set the repeat mode. Time Bar: You can use the ¡ and £ buttons to scan through . View detailed information about the video. The supported video sizes are available when you have a home theater or receiver connected to play time is shorter than 60 seconds. Function Select Scene Subtitle Repeat Picture Size Picture Mode Sound Mode Select Speakers Audio Language Information Description Thumbnails: Select...
User Manual Ver.1.0 (English)
Page 82
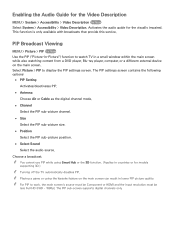
... Sound Select the audio source. The PIP sub-screen supports digital channels only. Activates the audio guide for the Video Description MENU > System > Accessibility > Video Description Try Now Select System > Accessibility > Video Description. PIP Broadcast Viewing MENU > Picture > PIP Try Now Use the PIP ("Picture-In-Picture") function to display the PIP settings screen. "" Playing a game or using Smart Hub or the 3D function. (Applies in a small window within the main screen while also watching content from a DVD player, Blu-ray player, computer, or a different external device...
... Sound Select the audio source. The PIP sub-screen supports digital channels only. Activates the audio guide for the Video Description MENU > System > Accessibility > Video Description Try Now Select System > Accessibility > Video Description. PIP Broadcast Viewing MENU > Picture > PIP Try Now Use the PIP ("Picture-In-Picture") function to display the PIP settings screen. "" Playing a game or using Smart Hub or the 3D function. (Applies in a small window within the main screen while also watching content from a DVD player, Blu-ray player, computer, or a different external device...

User Manual Ver.1.0 (English)
Page 87
... Try Now Automatically adjusts the screen contrast. "" Advanced Settings is only available when the Picture Mode is connected to a computer via an HDMI-DVI cable, only White Balance and Gamma can apply the picture quality setting that you configured for each Picture Mode. Use this option to fine-tune how images are displayed on the TV screen for the TV to all external devices connected to the TV...
... Try Now Automatically adjusts the screen contrast. "" Advanced Settings is only available when the Picture Mode is connected to a computer via an HDMI-DVI cable, only White Balance and Gamma can apply the picture quality setting that you configured for each Picture Mode. Use this option to fine-tune how images are displayed on the TV screen for the TV to all external devices connected to the TV...
User Manual Ver.1.0 (English)
Page 96
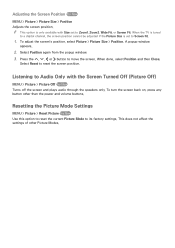
... a digital channel, the screen position cannot be adjusted if the Picture Size is only available with the Screen Turned Off (Picture Off) MENU > Picture > Picture Off Try Now Turns off the screen and plays audio through the speakers only. When done, select Position and then Close. To turn the screen back on, press any button other Picture Modes. This does not affect the settings of other than the power and volume buttons. Select Reset to Screen Fit. 111 To adjust...
... a digital channel, the screen position cannot be adjusted if the Picture Size is only available with the Screen Turned Off (Picture Off) MENU > Picture > Picture Off Try Now Turns off the screen and plays audio through the speakers only. When done, select Position and then Close. To turn the screen back on, press any button other Picture Modes. This does not affect the settings of other than the power and volume buttons. Select Reset to Screen Fit. 111 To adjust...
User Manual Ver.1.0 (English)
Page 100
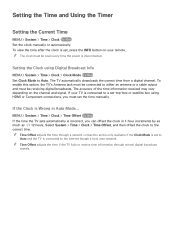
... Timer Setting the Current Time MENU > System > Time > Clock Try Now Set the clock manually or automatically. The TV automatically downloads the correct time from a digital channel. If the Clock is incorrect, you must set , press the INFO button on the channel and signal. "" Time Offset adjusts the time if the TV fails to receive time information through a network connection and is only available if the Clock Mode is set to Auto. Setting the Clock using HDMI or Component connections...
... Timer Setting the Current Time MENU > System > Time > Clock Try Now Set the clock manually or automatically. The TV automatically downloads the correct time from a digital channel. If the Clock is incorrect, you must set , press the INFO button on the channel and signal. "" Time Offset adjusts the time if the TV fails to receive time information through a network connection and is only available if the Clock Mode is set to Auto. Setting the Clock using HDMI or Component connections...
User Manual Ver.1.0 (English)
Page 114
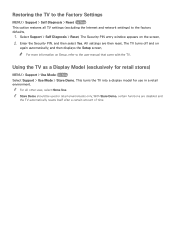
... then displays the Setup screen. All settings are disabled and the TV automatically resets itself after a certain amount of time. Using the TV as a Display Model (exclusively for use in retail environments only. "" For all TV settings (excluding the Internet and network settings) to the user manual that came with the TV. This turns the TV into a display model for retail stores) MENU > Support > Use Mode Try Now Select Support > Use Mode > Store Demo. The TV turns off and...
... then displays the Setup screen. All settings are disabled and the TV automatically resets itself after a certain amount of time. Using the TV as a Display Model (exclusively for use in retail environments only. "" For all TV settings (excluding the Internet and network settings) to the user manual that came with the TV. This turns the TV into a display model for retail stores) MENU > Support > Use Mode Try Now Select Support > Use Mode > Store Demo. The TV turns off and...
User Manual Ver.1.0 (English)
Page 118
... the screen. Make sure that it did in and turned on . Adjust the cable/satellite box's video output resolution to 16:9. The compression of video content may cause picture distortions, especially in analog and digital channels. A weak or bad quality signal can cause picture distortions. Incorrect or loose connections may cause noise in fast moving pictures from the channel lineup. ●● Air/Cable Antenna Connection: Try HD channels after running the Auto Program...
... the screen. Make sure that it did in and turned on . Adjust the cable/satellite box's video output resolution to 16:9. The compression of video content may cause picture distortions, especially in analog and digital channels. A weak or bad quality signal can cause picture distortions. Incorrect or loose connections may cause noise in fast moving pictures from the channel lineup. ●● Air/Cable Antenna Connection: Try HD channels after running the Auto Program...
User Manual Ver.1.0 (English)
Page 119
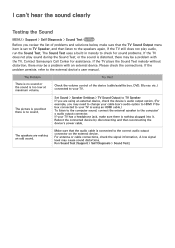
... TV plays the Sound Test melody without distortion, there may need to change your cable box's audio option to HDMI if the box connected to your TV is using an external device, check the device's audio output option. (For example, you may be a problem with an external device. Please check the connections. Set Sound > Speaker Settings > TV Sound Output to the external device's user manual. Reboot the connected device by disconnecting and then reconnecting the device's power cable. A low signal...
... TV plays the Sound Test melody without distortion, there may need to change your cable box's audio option to HDMI if the box connected to your TV is using an external device, check the device's audio output option. (For example, you may be a problem with an external device. Please check the connections. Set Sound > Speaker Settings > TV Sound Output to the external device's user manual. Reboot the connected device by disconnecting and then reconnecting the device's power cable. A low signal...

User Manual Ver.1.0 (English)
Page 121
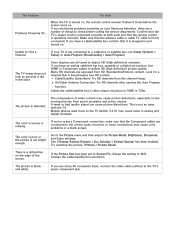
... and the all channels. The Problem The "Mode Not Supported" message appears. Confirm your wireless modem/router by the TV. The picture is distorted. Try this! The Problem The TV is not receiving all the connections are using a DVI to a network. A weak signal can 't connect to Caption (System > Accessibility > Caption) and change the Caption Mode. This is not a problem with the broadcast. The Problem The wireless network connection failed. Run Network Setup (MENU > Network > Network Settings). The upgrade stops if you...
... and the all channels. The Problem The "Mode Not Supported" message appears. Confirm your wireless modem/router by the TV. The picture is distorted. Try this! The Problem The TV is not receiving all the connections are using a DVI to a network. A weak signal can 't connect to Caption (System > Accessibility > Caption) and change the Caption Mode. This is not a problem with the broadcast. The Problem The wireless network connection failed. Run Network Setup (MENU > Network > Network Settings). The upgrade stops if you...
Quick Guide Ver.1.0 (English)
Page 4
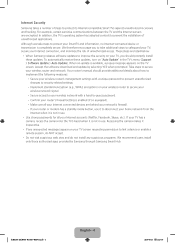
...'s menu (Support > Software Update > Auto Update). Your router's manual should promptly install these updates, turn on the TV screen. To automatically receive these updates. Internet Security Samsung takes a number of steps to disconnect your home network from the Internet when it is not in use. ••Use strong passwords for all your Internet connected devices are behind your network's firewall. ••If your router or modem has a standby mode button, use . In addition, the TV's operating system...
...'s menu (Support > Software Update > Auto Update). Your router's manual should promptly install these updates, turn on the TV screen. To automatically receive these updates. Internet Security Samsung takes a number of steps to disconnect your home network from the Internet when it is not in use. ••Use strong passwords for all your Internet connected devices are behind your network's firewall. ••If your router or modem has a standby mode button, use . In addition, the TV's operating system...
Quick Guide Ver.1.0 (English)
Page 11
... TV Remote During the universal remote set it confirms the connection, press the E button. 5. Select the type of device you can use the TV remote to control the device, disconnect the IR extender cable from the TV and set up is connected to change the channel. Once set up the Source screen. 3. Controlling an External Device with your remote. Turn on the external device you want to control a Blu-ray player or home theater, you need...
... TV Remote During the universal remote set it confirms the connection, press the E button. 5. Select the type of device you can use the TV remote to control the device, disconnect the IR extender cable from the TV and set up is connected to change the channel. Once set up the Source screen. 3. Controlling an External Device with your remote. Turn on the external device you want to control a Blu-ray player or home theater, you need...
Quick Guide Ver.1.0 (English)
Page 16
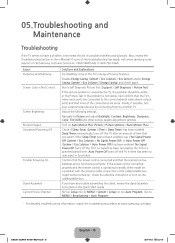
... > Setup) or run Auto Program. (Go to MENU > Broadcasting > Auto Program). ‐‐ For detailed troubleshooting information, watch the troubleshooting videos at 1-800-SAMSUNG (1-800-726-7864). Also, review the Troubleshooting Section in the Quick Start Guide. 05.Troubleshooting and Maintenance Troubleshooting If the TV seems to have any trouble assembling the stand, review the stand assembly instruction in the e-Manual. Run a Self Diagnosis Picture Test (Support > Self Diagnosis > Picture Test). Adjust the following settings: Navigate to Picture and adjust Backlight...
... > Setup) or run Auto Program. (Go to MENU > Broadcasting > Auto Program). ‐‐ For detailed troubleshooting information, watch the troubleshooting videos at 1-800-SAMSUNG (1-800-726-7864). Also, review the Troubleshooting Section in the Quick Start Guide. 05.Troubleshooting and Maintenance Troubleshooting If the TV seems to have any trouble assembling the stand, review the stand assembly instruction in the e-Manual. Run a Self Diagnosis Picture Test (Support > Self Diagnosis > Picture Test). Adjust the following settings: Navigate to Picture and adjust Backlight...

Quick Guide Ver.1.0 (English)
Page 32
..., interference or other signal transmission and delivery problems; customer adjustments and failure to remove, repair and return the product. To obtain warranty service, please contact SAMSUNG at our option, to provide for 37" and smaller LCD/LED TV, transportation to : damage which occurs in -home service, the product must be necessary to follow operating instructions, cleaning, maintenance and environmental instructions that are eligible for...
..., interference or other signal transmission and delivery problems; customer adjustments and failure to remove, repair and return the product. To obtain warranty service, please contact SAMSUNG at our option, to provide for 37" and smaller LCD/LED TV, transportation to : damage which occurs in -home service, the product must be necessary to follow operating instructions, cleaning, maintenance and environmental instructions that are eligible for...
Installation Guide Ver.1.0 (English)
Page 8
...; Change to Home Mode (MENU > Support > Use Mode > Home Use) "Weak or No Signal" Displayed in TV Mode/Cannot Find Channel •• Press the SOURCE button on your Internet service provider. Common issues Can't Connect to search for channels (MENU > Broadcasting > Auto Program) Can't See All Apps or Apps Not Working •• Reset Smart Hub (MENU > Smart Hub > Smart Hub Reset) The stand is not connected to a cable or satellite box, run Auto Program to Network or Apps (For Internet supported models only...
...; Change to Home Mode (MENU > Support > Use Mode > Home Use) "Weak or No Signal" Displayed in TV Mode/Cannot Find Channel •• Press the SOURCE button on your Internet service provider. Common issues Can't Connect to search for channels (MENU > Broadcasting > Auto Program) Can't See All Apps or Apps Not Working •• Reset Smart Hub (MENU > Smart Hub > Smart Hub Reset) The stand is not connected to a cable or satellite box, run Auto Program to Network or Apps (For Internet supported models only...
Installation Guide Ver.1.0 (English)
Page 9
... to the service agreements. You can remotely diagnose your TV, first try any of Samsung's helpful support options listed here. Scan the QR code to view our helpful How-to the store. If you experience issues, please do not take the TV back to Videos Scan this with your TV. Troubleshooting •• For more quick solutions to see Troubleshooting and Maintenance in the user's manual. Purchase any...
... to the service agreements. You can remotely diagnose your TV, first try any of Samsung's helpful support options listed here. Scan the QR code to view our helpful How-to the store. If you experience issues, please do not take the TV back to Videos Scan this with your TV. Troubleshooting •• For more quick solutions to see Troubleshooting and Maintenance in the user's manual. Purchase any...


