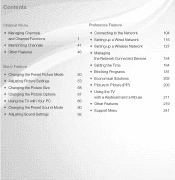
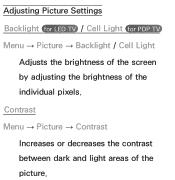
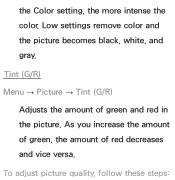
User Manual Ver.1.0 (English)
Page 2
...; Managing the Network Connected Devices 154 Basic Feature • Setting the Time 164 • Blocking Programs 181 • Changing the Preset Picture Mode 50 • Economical Solutions 202 • Adjusting Picture Settings 53 • Picture In Picture (PIP) 206 • Changing the Picture Size 58 • Changing the Picture Options • Using the TV 67 with a Keyboard and...
User Manual Ver.1.0 (English)
Page 57
Contrast Menu → Picture → Contrast Increases or decreases the contrast between dark and light areas of the individual pixels. Adjusting Picture Settings Backlight for LED TV / Cell Light for PDP TV Menu → Picture → Backlight / Cell Light Adjusts the brightness of the screen by adjusting the brightness of the picture.
User Manual Ver.1.0 (English)
Page 59
Low settings remove color and the picture becomes black, white, and gray. To adjust picture quality, follow these steps: As you increase the amount of green, the amount of green and red in the picture. Tint (G/R) Menu → Picture → Tint (G/R) Adjusts the amount of red decreases and vice versa. the Color setting, the more intense the color.
User Manual Ver.1.0 (English)
Page 61
NNYou can adjust and store settings for each external device connected to the TV. NNLowering picture brightness reduces power consumption.
User Manual Ver.1.0 (English)
Page 62
However, we highly recommend you have a cable box or satellite receiver, it may have its own set of screen sizes as well. Changing the Picture Size Screen Adjustment Menu → Picture → Screen Adjustment Using this function, you can select various picture size and aspect ratio options. ●● Picture Size If you use your TV's
User Manual Ver.1.0 (English)
Page 63
Zoom2: Provides larger magnification of the picture so it fits the entire screen. Sides, top, and bottom are cut off . Wide Fit: Enlarges the aspect ratio of the picture. Sides, top, and bottom are cut off . Zoom1: Provides moderate magnification of the time. 16:9: Sets the picture to the 16:9 wide screen format. 16:9 mode most of the picture.
User Manual Ver.1.0 (English)
Page 64
The borders displayed on the left and right, or top and bottom of the screen may cause image retention (screen burn) which is not covered by the warranty. NNDo not set your TV inputs HDMI NNAvailable with HD 1080i / 720p signals in 16:9 mode. 4:3: Sets the picture to 4:3 format for a long time. Screen Fit: When your TV to basic (4:3) mode.
User Manual Ver.1.0 (English)
Page 66
NNIn DTV mode, Position is not available when Picture Size is set to Zoom1, Zoom2, Wide Fit, or Screen Fit. Position is only available if Picture Size is set to Screen Fit. NNThe picture size can vary when you play content from Videos in AllShare Play depending on the input resolution. ●● Position Adjusts the picture position.
User Manual Ver.1.0 (English)
Page 71
NNWhen connecting a PC using an HDMI to Standard or Movie mode. NNAdvanced Settings is available only when the Picture Mode is set to DVI cable, you can only Changing the Picture Options Advanced Settings Menu → Picture → Advanced Settings Using this function, you can configure advanced picture settings to create your preferred picture.
User Manual Ver.1.0 (English)
Page 74
Green, Blue and Reset, set the Color Space to Custom. ●● White Balance Adjusts the color temperature of the picture so that white objects look white (instead of, for example, slightly pink or slightly yellow) and the overall color of the picture looks natural. R-Gain / G-Gain / B-Gain: Adjusts each color's (red, green, blue) darkness. R-Offset / G-Offset / B-Offset: Adjusts each
User Manual Ver.1.0 (English)
Page 75
color's (red, green, blue) brightness. NNAvailable when the Picture Mode is set to it's default settings. ●● 10p White Balance for all video sources. Reset: Resets the White Balance to Movie. Available for LED 6100 ― 7150 Series and PDP 6500 Series Lets you control the white balance by adjusting the red, green, and blue brightness in 10 point intervals.
User Manual Ver.1.0 (English)
Page 77
for LED 6100 ― 7150 Series and PDP 6500 Series Use the Expert Pattern function to calibrate the picture. Off: Turns the Expert Pattern function off. Pattern1: This test screen demonstrates the effect of your display settings on If the OSD menu disappears or a menu other than the Picture menu is opened, the TV saves the calibration and the Expert Pattern screen disappears.
User Manual Ver.1.0 (English)
Page 79
●● xvYCC for LED 6100 ― 7150 Series and PDP 6500 Series Setting xvYCC on increases picture detail and enlarges the color space when you set the Picture Mode to Movie and the external input to the TV's HDMI or Component IN jacks. BD/DVD player) connected to HDMI or NNAvailable only when you are watching movies input from an external device (e.g.
User Manual Ver.1.0 (English)
Page 81
Picture Options Menu → Picture → Picture Options Using this function, you change the Backlight for LED TV / Cell Light for PDP TV , Contrast, or Brightness, the TV sets Motion Lighting to a PC mode. NNWhen you can configure additional picture settings to suit your TV is connected to Off. NNWhen your preference.
User Manual Ver.1.0 (English)
Page 82
NNWarm1 and Warm2 are deactivated when the Picture Mode is set to an NNYou can only make the picture redder (warmer). via an HDMI to DVI cable, you can adjust and store settings for each external device connected to Dynamic. Warm1 and Warm2 make changes to Color Tone. ●● Color Tone Cool makes the picture bluer (cooler).
User Manual Ver.1.0 (English)
Page 85
NNAvailable in HDMI mode. ●● Film Mode Sets the TV so that it senses and then processes film signals from all sources automatically and adjusts the picture for PDP TV The Cinema Smooth function is only active when the TV inputs an HDMI 24Hz signal. for optimum quality. selecting a black level. NNAvailable only in TV, AV, Component (480i
User Manual Ver.1.0 (English)
Page 87
This displayed frequency is not the frequency of the incoming video signal (60 Hz). a video source through which you have Auto Motion Plus on. NNThe info screen on your TV displays the resolution and frequency of the picture the TV is displaying when you are playing a movie. Reset: Reset the custom settings to the factory defaults.
User Manual Ver.1.0 (English)
Page 207
NNIf you can manually adjust Backlight for LED TV / Min Cell Light for PDP TV : When the Eco Sensor is set to On, you adjust Backlight for LED TV / Cell Light for PDP TV in the room. Min. ●● Eco Sensor To enhance power savings, the picture settings will automatically adapt to the light in the Picture menu, the Eco Sensor is set to Off automatically.
User Manual Ver.1.0 (English)
Page 618
If the Picture Size is a dotted line on the edge of the screen. Try resetting the picture to view the default picture settings (go to 16:9. There is set to Screen Fit, change it to Picture → Reset Picture). The picture is black and white. Change the cable/satellite box resolution. If you are using an AV composite input,
User Manual Ver.1.0 (English)
Page 633
Select TV in the Store Demo mode, it will reset audio and picture settings every 30 minutes. Change the settings from Store Demo mode to Home Use mode using your remote, and The Channel menu is turned off. Your settings are lost after 30 minutes or every time the TV is only available when you select the TV source. If the TV is in Source using the Setup procedure. (unavailable).