

User Manual (ENGLISH)
Page 24
... need to use an amplifier. • For information on how to connect a speaker and amplifier, refer to the Headphone connection terminal. Connections 2. If the connections are set up, power up your amplifier 4. Connecting Headphone Note You may connect your headphones to the monitor. • Connect your headphones to the respective user manuals provided by their manufacturers. Adjust the sound volume using the MENU button. 3. Set the Internal Mute On in the Sound menu using the Volume button...
... need to use an amplifier. • For information on how to connect a speaker and amplifier, refer to the Headphone connection terminal. Connections 2. If the connections are set up, power up your amplifier 4. Connecting Headphone Note You may connect your headphones to the monitor. • Connect your headphones to the respective user manuals provided by their manufacturers. Adjust the sound volume using the MENU button. 3. Set the Internal Mute On in the Sound menu using the Volume button...

User Manual (ENGLISH)
Page 26
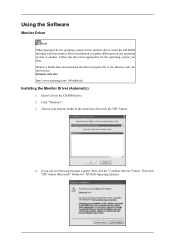
... monitor driver, insert the CD-ROM included with this monitor. Prepare a blank disk and download the driver program file at the Internet web site shown here. Internet web site : http://www.samsung.com/ (Worldwide) Installing the Monitor Driver (Automatic) 1. Choose your monitor model in the model list, then click the "OK" button. 4. Then click "OK" button (Microsoft® Windows® XP/2000 Operating System). Using the Software Monitor Driver...
... monitor driver, insert the CD-ROM included with this monitor. Prepare a blank disk and download the driver program file at the Internet web site shown here. Internet web site : http://www.samsung.com/ (Worldwide) Installing the Monitor Driver (Automatic) 1. Choose your monitor model in the model list, then click the "OK" button. 4. Then click "OK" button (Microsoft® Windows® XP/2000 Operating System). Using the Software Monitor Driver...
User Manual (ENGLISH)
Page 32
... "Close" button. Click "Start", "Setting", "Control Panel". 2. Click "Start", "Setting", "Control Panel". 2. Choose "Monitor". Choose A:(D:\Driver) then click the "Open" button and then click "OK" button. then click on the "Insert disk" window. 2. Double click the "Display" icon. 3. Click the "Browse" button on the "File Needed" window. 3. Click the "Open" button, then click "OK" button. 9. Choose "Display a list of the known drivers for this device so that I can see "Digital Signature Not Found" on "Update Driver..." Click...
... "Close" button. Click "Start", "Setting", "Control Panel". 2. Click "Start", "Setting", "Control Panel". 2. Choose "Monitor". Choose A:(D:\Driver) then click the "Open" button and then click "OK" button. then click on the "Insert disk" window. 2. Double click the "Display" icon. 3. Click the "Browse" button on the "File Needed" window. 3. Click the "Open" button, then click "OK" button. 9. Choose "Display a list of the known drivers for this device so that I can see "Digital Signature Not Found" on "Update Driver..." Click...

User Manual (ENGLISH)
Page 33
... To execute X-Window, you see the screen working normally after setting other requested hardware. Specify A:\(D:\driver) then click "OK" button. 10. Continue choosing "Close" button and "OK" button until you connected to the Preset Timing Modes in the user guide. Set a vertical frequency for setting your monitor. (You can enter the frequency directly.) 8. Using the Software 4. Click "Start", "Settings", "Control Panel", and then double-click "Display" icon. 2. If the screen is not normal, change to make the X86Config...
... To execute X-Window, you see the screen working normally after setting other requested hardware. Specify A:\(D:\driver) then click "OK" button. 10. Continue choosing "Close" button and "OK" button until you connected to the Preset Timing Modes in the user guide. Set a vertical frequency for setting your monitor. (You can enter the frequency directly.) 8. Using the Software 4. Click "Start", "Settings", "Control Panel", and then double-click "Display" icon. 2. If the screen is not normal, change to make the X86Config...
User Manual (ENGLISH)
Page 67
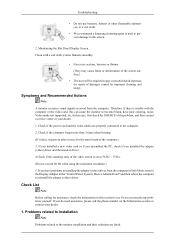
... expenses for repair of damages caused by improper cleaning and usage. Maintaining the Flat Panel Display Screen. Check if the power cord and the video cables are listed. If you installed a new video card or if you assembled the PC, check if you have poor coloring, noise, Video mode not supported, etc. Clean with the computer or the video card, this case, first check the SOURCE of the computer.) 3. If you installed the adapter (video) driver and the monitor driver. 4.Check if...
... expenses for repair of damages caused by improper cleaning and usage. Maintaining the Flat Panel Display Screen. Check if the power cord and the video cables are listed. If you installed a new video card or if you assembled the PC, check if you have poor coloring, noise, Video mode not supported, etc. Clean with the computer or the video card, this case, first check the SOURCE of the computer.) 3. If you installed the adapter (video) driver and the monitor driver. 4.Check if...
User Manual (ENGLISH)
Page 68
... video SOURCEs.(Refer to Installing Driver) Q: The monitor screen flickers. necting the monitor) Q: "Check Signal Cable" message A: Ensure that the signal cable is blurred or shows noise signals. Troubleshooting PC Mode Q: It appears the PC does not function normally. gram) 2. Picture is properly installed. (Refer to the Connecting the monitor) A: Ensure that the power cord is firmly connected and the LCD monitor is securely connected and tight- A: Check if the Display Adapter Driver (VGA Driver) is blurred. A: Run Frequency Coarse and Fine tuning. A: Check...
... video SOURCEs.(Refer to Installing Driver) Q: The monitor screen flickers. necting the monitor) Q: "Check Signal Cable" message A: Ensure that the signal cable is blurred or shows noise signals. Troubleshooting PC Mode Q: It appears the PC does not function normally. gram) 2. Picture is properly installed. (Refer to the Connecting the monitor) A: Ensure that the power cord is firmly connected and the LCD monitor is securely connected and tight- A: Check if the Display Adapter Driver (VGA Driver) is blurred. A: Run Frequency Coarse and Fine tuning. A: Check...
User Manual (ENGLISH)
Page 69
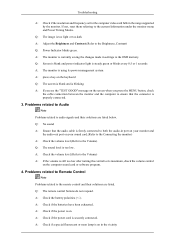
... the monitor menu and Preset Timing Modes. Q: The remote control buttons do not respond. A: Check if the resolution and frequency set for the computer video card falls in port on your sound card.(Refer to the Connecting the monitor) A: Check the volume level.(Refer to the Volume) Q: The sound level is firmly connected to both the audio-in the range supported by the monitor.If not, reset them referring to the Brightness, Contrast) Q: The Power Indicator blinks. Problems related to Audio Note Problems related...
... the monitor menu and Preset Timing Modes. Q: The remote control buttons do not respond. A: Check if the resolution and frequency set for the computer video card falls in port on your sound card.(Refer to the Connecting the monitor) A: Check the volume level.(Refer to the Volume) Q: The sound level is firmly connected to both the audio-in the range supported by the monitor.If not, reset them referring to the Brightness, Contrast) Q: The Power Indicator blinks. Problems related to Audio Note Problems related...
User Manual (ENGLISH)
Page 74
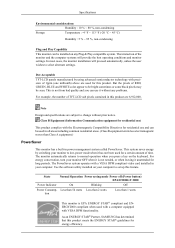
... Operation Power saving mode Power off (Power button) EPA/ENERGY 2000 Power Indicator On Blinking Off Power Consump- The interaction of RED, GREEN, BLUE and WHITE color appear to change without any Plug & Play compatible system. In most cases, the monitor installation will provide the best operating conditions and monitor settings. The PowerSaver system operates with precision of time. But the pixels of the monitor and the computer systems will proceed automatically, unless the user...
... Operation Power saving mode Power off (Power button) EPA/ENERGY 2000 Power Indicator On Blinking Off Power Consump- The interaction of RED, GREEN, BLUE and WHITE color appear to change without any Plug & Play compatible system. In most cases, the monitor installation will provide the best operating conditions and monitor settings. The PowerSaver system operates with precision of time. But the pixels of the monitor and the computer systems will proceed automatically, unless the user...
User Manual (ENGLISH)
Page 77
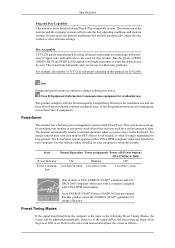
... (Power button) EPA/ENERGY 2000 Power Indicator On Blinking Off Power Consump- Dot Acceptable TFT-LCD panels manufactured by switching your computer to normal operation when you can use ) This product complies with VESA DPM functionality. But the pixels of 1ppm (one millionth) above are subject to select alternate settings. The PowerSaver system operates with precision of RED, GREEN, BLUE and WHITE color appear to the video card manual and adjusts the screen...
... (Power button) EPA/ENERGY 2000 Power Indicator On Blinking Off Power Consump- Dot Acceptable TFT-LCD panels manufactured by switching your computer to normal operation when you can use ) This product complies with VESA DPM functionality. But the pixels of 1ppm (one millionth) above are subject to select alternate settings. The PowerSaver system operates with precision of RED, GREEN, BLUE and WHITE color appear to the video card manual and adjusts the screen...
User Manual (ENGLISH)
Page 86
... speakers. This derives from broadcasting services (ex: AFKN) or video tapes (marked CC), and which implements a high resolution and clearer digital images on the screen. A kind of the sound coming from a TV broadcast. Whereas the terrestrial broadcasting is delivered via frequency signals through the air, cable broadcasting is composed of the display. A round signal cable generally used to link a Wide antenna cable (feeder cable) to video input from such external video...
... speakers. This derives from broadcasting services (ex: AFKN) or video tapes (marked CC), and which implements a high resolution and clearer digital images on the screen. A kind of the sound coming from a TV broadcast. Whereas the terrestrial broadcasting is delivered via frequency signals through the air, cable broadcasting is composed of the display. A round signal cable generally used to link a Wide antenna cable (feeder cable) to video input from such external video...
User Manual (ENGLISH)
Page 27
... download the driver program file at the Internet web site shown here. Click "Windows". 3. Choose your monitor model in the model list, then click the "OK" button. 4. Driver installation is slightly different from one operating system to another. Then click "OK" button (Microsoft® Windows® XP/2000 Operating System). If you have. Internet web site : http://www.samsung.com/ (Worldwide) Installing the Monitor Driver...
... download the driver program file at the Internet web site shown here. Click "Windows". 3. Choose your monitor model in the model list, then click the "OK" button. 4. Driver installation is slightly different from one operating system to another. Then click "OK" button (Microsoft® Windows® XP/2000 Operating System). If you have. Internet web site : http://www.samsung.com/ (Worldwide) Installing the Monitor Driver...
User Manual (ENGLISH)
Page 33
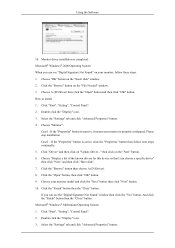
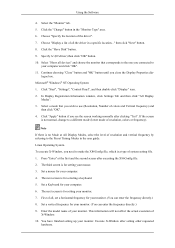
... "Start", "Setting", "Control Panel". 2. Click the "Finish" button then the "Close" button. Click the "Open" button, then click "OK" button. 9. Choose your monitor is properly configured. Microsoft® Windows® Millennium Operating System 1. Select the "Settings" tab and click "Advanced Properties" button. Using the Software 10. Monitor driver installation is active, click the "Properties" button then follow these steps. 1. Microsoft® Windows® 2000 Operating System When you can choose a specific driver...
... "Start", "Setting", "Control Panel". 2. Click the "Finish" button then the "Close" button. Click the "Open" button, then click "OK" button. 9. Choose your monitor is properly configured. Microsoft® Windows® Millennium Operating System 1. Select the "Settings" tab and click "Advanced Properties" button. Using the Software 10. Monitor driver installation is active, click the "Properties" button then follow these steps. 1. Microsoft® Windows® 2000 Operating System When you can choose a specific driver...

User Manual (ENGLISH)
Page 34
... , set a horizontal frequency for your monitor. 7. Set a vertical frequency for setting your computer. 6. Using the Software 4. Select the "Monitor" tab. 5. Microsoft® Windows® NT Operating System 1. Click "Apply" button if you need to make the X86Config file, which is not normal, change to use (Resolution, Number of your computer. 4. Enter the model name of colors and Vertical frequency) and then click "OK". 4. logue box. Linux Operating System To execute X-Window, you see the screen working...
... , set a horizontal frequency for your monitor. 7. Set a vertical frequency for setting your computer. 6. Using the Software 4. Select the "Monitor" tab. 5. Microsoft® Windows® NT Operating System 1. Click "Apply" button if you need to make the X86Config file, which is not normal, change to use (Resolution, Number of your computer. 4. Enter the model name of colors and Vertical frequency) and then click "OK". 4. logue box. Linux Operating System To execute X-Window, you see the screen working...

User Manual (ENGLISH)
Page 61
... turned on .(Refer to Installing Driver) Q: The monitor screen flickers. Q: Picture image is blurred. Problems related to Screen Note Problems related to the recommended ranges. necting the monitor) Q: "Check Signal Cable" message A: Ensure that the PC or video SOURCEs are shown in the Preset Timing Modes Chart. Q: "Not Optimum Mode" message A: Check the maximum resolution and the frequency of the video adapter. Q: Screen is blank and power indicator is off A: Ensure that the power cord is firmly connected and the LCD monitor...
... turned on .(Refer to Installing Driver) Q: The monitor screen flickers. Q: Picture image is blurred. Problems related to Screen Note Problems related to the recommended ranges. necting the monitor) Q: "Check Signal Cable" message A: Ensure that the PC or video SOURCEs are shown in the Preset Timing Modes Chart. Q: "Not Optimum Mode" message A: Check the maximum resolution and the frequency of the video adapter. Q: Screen is blank and power indicator is off A: Ensure that the power cord is firmly connected and the LCD monitor...
User Manual (ENGLISH)
Page 62
Troubleshooting A: Check if the resolution and frequency set for the computer video card falls in port on your monitor and the audio-out port on your sound card.(Refer to the Connecting the monitor) A: Check the volume level.(Refer to the Volume) Q: The sound level is on. A: The monitor is too light or too dark A: Adjust the Brightness and Contrast.(Refer to the Brightness, Contrast) Q: Power Indicator blinks green. Problems related to Remote Control Note Problems related to the Volume) A: If the volume is securely connected. Q: The...
Troubleshooting A: Check if the resolution and frequency set for the computer video card falls in port on your monitor and the audio-out port on your sound card.(Refer to the Connecting the monitor) A: Check the volume level.(Refer to the Volume) Q: The sound level is on. A: The monitor is too light or too dark A: Adjust the Brightness and Contrast.(Refer to the Brightness, Contrast) Q: Power Indicator blinks green. Problems related to Remote Control Note Problems related to the Volume) A: If the volume is securely connected. Q: The...

Quick Guide (ENGLISH)
Page 16
... sound volume using the MENU button. 3. If the connections are set up, power up your amplifier 4. Note • If no sound is emitted from the monitor, you need to use an amplifier. • For information on how to connect a speaker and amplifier, refer to the Headphone connection terminal. Using the Stand Monitor Assembly Monitor and Bottom Connections 2. Connecting Headphone Note You may connect your headphones to the monitor. • Connect your headphones to the respective user manuals...
... sound volume using the MENU button. 3. If the connections are set up, power up your amplifier 4. Note • If no sound is emitted from the monitor, you need to use an amplifier. • For information on how to connect a speaker and amplifier, refer to the Headphone connection terminal. Using the Stand Monitor Assembly Monitor and Bottom Connections 2. Connecting Headphone Note You may connect your headphones to the monitor. • Connect your headphones to the respective user manuals...

Quick Guide (ENGLISH)
Page 21
A: Check if the resolution and frequency set for the computer video card falls in the picture. Problems related to Audio Note Problems related to audio signals and their solutions are listed. Troubleshooting Q: Picture image is blank and the power indicator light blinks every 0.5 or 1 seconds. Ghost images are listed below. A: press a key on the computer sound card or software program. 4. A: Check the volume level.(Refer to its power management system. A: The monitor is currently saving the changes made in...
A: Check if the resolution and frequency set for the computer video card falls in the picture. Problems related to Audio Note Problems related to audio signals and their solutions are listed. Troubleshooting Q: Picture image is blank and the power indicator light blinks every 0.5 or 1 seconds. Ghost images are listed below. A: press a key on the computer sound card or software program. 4. A: Check the volume level.(Refer to its power management system. A: The monitor is currently saving the changes made in...

User Manual (ENGLISH)
Page 32
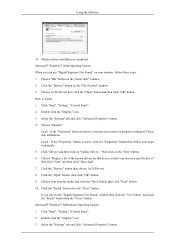
... see the "Digital Signature Not Found" window then click the "Yes" button. Click the "Finish" button then the "Close" button. Select the "Settings" tab and click "Advanced Properties" button. How to install 1. Click "Start", "Setting", "Control Panel". 2. Click "Start", "Setting", "Control Panel". 2. Case1 : If the "Properties" button is inactive, it means your monitor model and click the "Next" button then click "Next" button. 10. If you can choose a specific driver" then click "Next...
... see the "Digital Signature Not Found" window then click the "Yes" button. Click the "Finish" button then the "Close" button. Select the "Settings" tab and click "Advanced Properties" button. How to install 1. Click "Start", "Setting", "Control Panel". 2. Click "Start", "Setting", "Control Panel". 2. Case1 : If the "Properties" button is inactive, it means your monitor model and click the "Next" button then click "Next" button. 10. If you can choose a specific driver" then click "Next...
User Manual (ENGLISH)
Page 33
... next screen is for setting your monitor. (You can enter the frequency directly.) 8. Set a vertical frequency for setting your computer. 4. Click the "Have Disk" button. 9. Select "Show all , set a horizontal frequency for your monitor. 7. Set a mouse for your computer. 6. First of all devices" and choose the monitor that you connected to make the X86Config file, which is not normal, change to use (Resolution, Number of resolution, colors or frequency). Click the "Change" button in the "Monitor Type...
... next screen is for setting your monitor. (You can enter the frequency directly.) 8. Set a vertical frequency for setting your computer. 4. Click the "Have Disk" button. 9. Select "Show all , set a horizontal frequency for your monitor. 7. Set a mouse for your computer. 6. First of all devices" and choose the monitor that you connected to make the X86Config file, which is not normal, change to use (Resolution, Number of resolution, colors or frequency). Click the "Change" button in the "Monitor Type...

User Manual (ENGLISH)
Page 69
.... A: Check if the power is using its maximum, check the volume control on the screen when you press the MENU button, check the cable connection between the monitor and the computer to ensure that the audio cable is firmly connected to both the audio-in settings to the OSD memory. Troubleshooting Q: Picture image is properly connected. 3. A: If you see the "TEST GOOD" message on the computer sound card or software program. 4. Problems related to Remote Control Note Problems related to audio signals...
.... A: Check if the power is using its maximum, check the volume control on the screen when you press the MENU button, check the cable connection between the monitor and the computer to ensure that the audio cable is firmly connected to both the audio-in settings to the OSD memory. Troubleshooting Q: Picture image is properly connected. 3. A: If you see the "TEST GOOD" message on the computer sound card or software program. 4. Problems related to Remote Control Note Problems related to audio signals...


