User Manual
Page 1
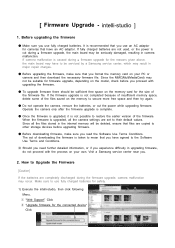
... the camera settings are completely discharged during a firmware upgrade, the main board may occur. intelli-studio ] 1. It is caused during a firmware upgrade for firmware upgrade, depending on the model, check before upgrading firmware. ● Before downloading firmware, make sure that files are copied to the Software Use Terms and Conditions. ※ Should you need further detailed information, or if you format the memory card on your PC or camera and then download the necessary firmware file. [ Firmware Upgrade...
... the camera settings are completely discharged during a firmware upgrade, the main board may occur. intelli-studio ] 1. It is caused during a firmware upgrade for firmware upgrade, depending on the model, check before upgrading firmware. ● Before downloading firmware, make sure that files are copied to the Software Use Terms and Conditions. ※ Should you need further detailed information, or if you format the memory card on your PC or camera and then download the necessary firmware file. [ Firmware Upgrade...
User Manual (user Manual) (ver.1.0) (English)
Page 8
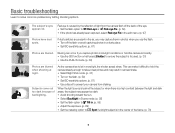
...; Select Night Shot mode. (p. 37) • Turn on the flash. (p. 59) • Set ISO sensitivity options. (p. 61) • Use a tripod to prevent your camera from the camera flash off the flash or avoid capturing photos in the edit menu. (p. 97) Photos have dust spots. Red eye is focused. (p. 30) • Use the DUAL IS mode. (p. 39) Photos are blurred. Blurring can make it diffi...
...; Select Night Shot mode. (p. 37) • Turn on the flash. (p. 59) • Set ISO sensitivity options. (p. 61) • Use a tripod to prevent your camera from the camera flash off the flash or avoid capturing photos in the edit menu. (p. 97) Photos have dust spots. Red eye is focused. (p. 30) • Use the DUAL IS mode. (p. 39) Photos are blurred. Blurring can make it diffi...
User Manual (user Manual) (ver.1.0) (English)
Page 9
... as thumbnails f 86 • Deleting files on the memory card f 88 • Viewing files as a slide show f 90 • Viewing files on a TV or HDTV f 98 • Connecting your camera to a computer f 100 • Adjusting sound and volume f 110 • Adjusting the brightness of the display f 111 • Changing the display language f 112 • Setting the date and time f 112 • Before contacting a service center f 125 8
... as thumbnails f 86 • Deleting files on the memory card f 88 • Viewing files as a slide show f 90 • Viewing files on a TV or HDTV f 98 • Connecting your camera to a computer f 100 • Adjusting sound and volume f 110 • Adjusting the brightness of the display f 111 • Changing the display language f 112 • Setting the date and time f 112 • Before contacting a service center f 125 8
User Manual (user Manual) (ver.1.0) (English)
Page 10
... screen 23 Setting the sound 23 Using the Home screen 24 Accessing the Home screen 24 Icons on the Home screen 24 Rearranging icons 26 Capturing photos 27 Turning on the front display 28 Zooming 28 Reducing camera shake (OIS 30 Tips for getting a clearer photo 31 Extended functions 33 Using shooting modes 34 Using the Smart Auto mode 34 Using the Simple Shot mode 35 Using the Scene mode 36 Using the Close-up Shot mode 36 Using the Night Shot mode...
... screen 23 Setting the sound 23 Using the Home screen 24 Accessing the Home screen 24 Icons on the Home screen 24 Rearranging icons 26 Capturing photos 27 Turning on the front display 28 Zooming 28 Reducing camera shake (OIS 30 Tips for getting a clearer photo 31 Extended functions 33 Using shooting modes 34 Using the Smart Auto mode 34 Using the Simple Shot mode 35 Using the Scene mode 36 Using the Close-up Shot mode 36 Using the Night Shot mode...
User Manual (user Manual) (ver.1.0) (English)
Page 11
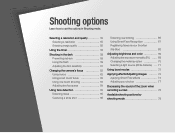
... shot 66 Detecting eye blinking 66 Using Smart Face Recognition 67 Registering faces as your favorites (My Star 68 Adjusting brightness and color 69 Adjusting the exposure manually (EV 69 Changing the metering option 70 Selecting a light source (White balance 71 Using burst modes 73 Applying effects/Adjusting images 74 Applying Smart Filter effects 74 Adjusting your photos 77 Decreasing the sound of the zoom when recording a video 78 Available shooting options by shooting mode 79...
... shot 66 Detecting eye blinking 66 Using Smart Face Recognition 67 Registering faces as your favorites (My Star 68 Adjusting brightness and color 69 Adjusting the exposure manually (EV 69 Changing the metering option 70 Selecting a light source (White balance 71 Using burst modes 73 Applying effects/Adjusting images 74 Applying Smart Filter effects 74 Adjusting your photos 77 Decreasing the sound of the zoom when recording a video 78 Available shooting options by shooting mode 79...

User Manual (user Manual) (ver.1.0) (English)
Page 12
... by connecting the camera as a removable disk 103 Disconnecting the camera (for Windows XP 104 Transferring files to your Mac computer 105 Printing photos with a PictBridge photo printer ....... 106 Settings 108 Settings menu 109 Accessing the settings menu 109 Sound 110 Display 110 Connectivity 111 General 112 Appendixes 115 Error messages 116 Camera maintenance 117 Cleaning your camera 117 Using or storing the camera 118 About memory cards 119 About the battery 121 Before contacting a service center 125 Camera speci...
... by connecting the camera as a removable disk 103 Disconnecting the camera (for Windows XP 104 Transferring files to your Mac computer 105 Printing photos with a PictBridge photo printer ....... 106 Settings 108 Settings menu 109 Accessing the settings menu 109 Sound 110 Display 110 Connectivity 111 General 112 Appendixes 115 Error messages 116 Camera maintenance 117 Cleaning your camera 117 Using or storing the camera 118 About memory cards 119 About the battery 121 Before contacting a service center 125 Camera speci...
User Manual (user Manual) (ver.1.0) (English)
Page 13
... the battery and memory card ... 16 Charging the battery and turning on your camera 17 Charging the battery 17 Turning on the front display 28 Zooming 28 Reducing camera shake (OIS 30 Tips for shooting. Basic functions Learn about your camera 17 Performing the initial setup 18 Learning icons 20 Using the touch screen 21 Setting the touch screen and sound ...... 23 Setting the display type for the touch screen 23 Setting the sound 23 Using the Home screen 24...
... the battery and memory card ... 16 Charging the battery and turning on your camera 17 Charging the battery 17 Turning on the front display 28 Zooming 28 Reducing camera shake (OIS 30 Tips for shooting. Basic functions Learn about your camera 17 Performing the initial setup 18 Learning icons 20 Using the touch screen 21 Setting the touch screen and sound ...... 23 Setting the display type for the touch screen 23 Setting the sound 23 Using the Home screen 24...
User Manual (user Manual) (ver.1.0) (English)
Page 29
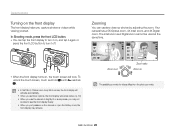
... LCD button to see the front display clearly. • When you capture photos or videos while viewing yourself. Basic functions 28 Your camera has a 5X Optical zoom, 4X Intelli zoom, and 4X Digital zoom. To unlock the touch screen, touch and hold until reaches . • In Self-Shot, Children and Jump Shot modes, the front display will activate automatically. • When you set timer options, the front display will lock. Zoom out Zoom ratio Zoom...
... LCD button to see the front display clearly. • When you capture photos or videos while viewing yourself. Basic functions 28 Your camera has a 5X Optical zoom, 4X Intelli zoom, and 4X Digital zoom. To unlock the touch screen, touch and hold until reaches . • In Self-Shot, Children and Jump Shot modes, the front display will activate automatically. • When you set timer options, the front display will lock. Zoom out Zoom ratio Zoom...
User Manual (user Manual) (ver.1.0) (English)
Page 32
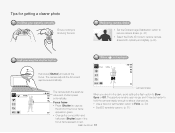
... shutter speed automatically. Reducing camera shake • Set the Optical Image Stabilization option to reduce camera shake. (p. 30) • Select the DUAL IS mode to Slow Sync or Off. Focus frame • Press [Shutter] to capture the photo if the focus frame When you shoot in red. The aperture remains open longer and it may be harder to hold the camera steady enough to take a clear picture. • Use...
... shutter speed automatically. Reducing camera shake • Set the Optical Image Stabilization option to reduce camera shake. (p. 30) • Select the DUAL IS mode to Slow Sync or Off. Focus frame • Press [Shutter] to capture the photo if the focus frame When you shoot in red. The aperture remains open longer and it may be harder to hold the camera steady enough to take a clear picture. • Use...
User Manual (user Manual) (ver.1.0) (English)
Page 36
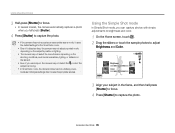
... color. 1 On the Home screen, touch . 2 Drag the sliders or touch the sample photos to adjust Brightness and Color. Using shooting modes 3 Half-press [Shutter] to focus. • In several scenes, the camera automatically captures a photo when you half-press [Shutter]. 4 Press [Shutter] to capture the photo. • If the camera does not recognize an appropriate scene mode, it uses the default settings for the Smart Auto mode. • Even if it changes settings...
... color. 1 On the Home screen, touch . 2 Drag the sliders or touch the sample photos to adjust Brightness and Color. Using shooting modes 3 Half-press [Shutter] to focus. • In several scenes, the camera automatically captures a photo when you half-press [Shutter]. 4 Press [Shutter] to capture the photo. • If the camera does not recognize an appropriate scene mode, it uses the default settings for the Smart Auto mode. • Even if it changes settings...
User Manual (user Manual) (ver.1.0) (English)
Page 38
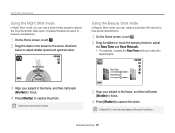
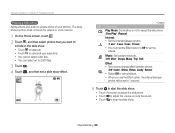
... photos to adjust the Face Tone and Face Retouch. • For example, increase the Face Tone setting to prevent blurry photos. Use a tripod to make skin appear lighter. Using shooting modes Using the Night Shot mode In Night Shot mode, you can use a slow shutter speed to Auto Macro. In Beauty Shot mode, the focus distance will be set to extend the time the shutter stays open. Increase the aperture value to prevent overexposure. 1 On the Home screen...
... photos to adjust the Face Tone and Face Retouch. • For example, increase the Face Tone setting to prevent blurry photos. Use a tripod to make skin appear lighter. Using shooting modes Using the Night Shot mode In Night Shot mode, you can use a slow shutter speed to Auto Macro. In Beauty Shot mode, the focus distance will be set to extend the time the shutter stays open. Increase the aperture value to prevent overexposure. 1 On the Home screen...
User Manual (user Manual) (ver.1.0) (English)
Page 44
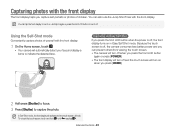
... LCD button again or press [POWER]. • The front display will turn on in Easy Self Shot mode. Capturing photos with the front display. To unlock the touch screen, touch and hold until reaches . Because the touch screen is off . Extended functions 43 Using the Self-Shot mode Conveniently capture photos of children. You can also use the Jump Shot Timer with the front display The front display helps you press [HOME]. 2 Half-press [Shutter] to focus...
... LCD button again or press [POWER]. • The front display will turn on in Easy Self Shot mode. Capturing photos with the front display. To unlock the touch screen, touch and hold until reaches . Because the touch screen is off . Extended functions 43 Using the Self-Shot mode Conveniently capture photos of children. You can also use the Jump Shot Timer with the front display The front display helps you press [HOME]. 2 Half-press [Shutter] to focus...
User Manual (user Manual) (ver.1.0) (English)
Page 48
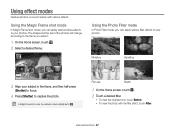
..., and then half-press [Shutter] to focus. 4 Press [Shutter] to your photos. Fish-eye Sketch 1 On the Home screen, touch . 2 Touch a desired filter. • To view the original photo, touch Before. • To view the photo with various effects. Using effect modes Capture photos or record videos with the filter effect, touch After. Extended functions 47 Using the Photo Filter mode In Photo Filter mode, you can apply various...
..., and then half-press [Shutter] to focus. 4 Press [Shutter] to your photos. Fish-eye Sketch 1 On the Home screen, touch . 2 Touch a desired filter. • To view the original photo, touch Before. • To view the photo with various effects. Using effect modes Capture photos or record videos with the filter effect, touch After. Extended functions 47 Using the Photo Filter mode In Photo Filter mode, you can apply various...
User Manual (user Manual) (ver.1.0) (English)
Page 55
... shot 66 Detecting eye blinking 66 Using Smart Face Recognition 67 Registering faces as your favorites (My Star 68 Adjusting brightness and color 69 Adjusting the exposure manually (EV) ...... 69 Changing the metering option 70 Selecting a light source (White balance) ... 71 Using burst modes 73 Applying effects/Adjusting images ......... 74 Applying Smart Filter effects 74 Adjusting your photos 77 Decreasing the sound of the zoom when recording a video 78 Available shooting options by shooting mode 79...
... shot 66 Detecting eye blinking 66 Using Smart Face Recognition 67 Registering faces as your favorites (My Star 68 Adjusting brightness and color 69 Adjusting the exposure manually (EV) ...... 69 Changing the metering option 70 Selecting a light source (White balance) ... 71 Using burst modes 73 Applying effects/Adjusting images ......... 74 Applying Smart Filter effects 74 Adjusting your photos 77 Decreasing the sound of the zoom when recording a video 78 Available shooting options by shooting mode 79...
User Manual (user Manual) (ver.1.0) (English)
Page 91
... stop the slide show. All Play * Default Icon Description Play Mode: Set whether or not to repeat the slide show. (One Play*, Repeat) Interval: • Set the interval between photos will be set a slide show effect. The slide show function does not work for videos or voice memos. 1 On the Home screen, touch . 2 Touch , and then select photos that you use the Effect option, the interval...
... stop the slide show. All Play * Default Icon Description Play Mode: Set whether or not to repeat the slide show. (One Play*, Repeat) Interval: • Set the interval between photos will be set a slide show effect. The slide show function does not work for videos or voice memos. 1 On the Home screen, touch . 2 Touch , and then select photos that you use the Effect option, the interval...
User Manual (user Manual) (ver.1.0) (English)
Page 98
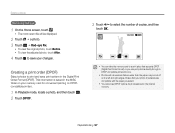
... paper may be displayed. 2 Touch “ a photo. 3 Touch m “ Red-eye Fix. • To view the original photo, touch Before. • To view the adjusted photo, touch After. 4 Touch V to print and save your changes. Playback/Editing 97 Creating a print order (DPOF) Select photos to save print options in the Digital Print Order Format (DPOF). This information is saved in the internal memory. Ensure that your memory card for convenient printing on DPOFcompatible printers. 1 In Playback mode, locate a photo, and then...
... paper may be displayed. 2 Touch “ a photo. 3 Touch m “ Red-eye Fix. • To view the original photo, touch Before. • To view the adjusted photo, touch After. 4 Touch V to print and save your changes. Playback/Editing 97 Creating a print order (DPOF) Select photos to save print options in the Digital Print Order Format (DPOF). This information is saved in the internal memory. Ensure that your memory card for convenient printing on DPOFcompatible printers. 1 In Playback mode, locate a photo, and then...
User Manual (user Manual) (ver.1.0) (English)
Page 113
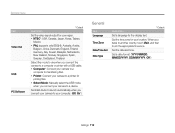
... a printer for your location. Set a date format. (YYYY/MM/DD, MM/DD/YYYY, DD/MM/YYYY, Off*) Settings 112 When you connect your camera to your camera to another country, touch Visit, and then touch the appropriate time zone. Set the time zone for printing files. • Select Mode: Manually select the USB mode when you connect your computer. (Off, On*) General Item Language Time Zone Date/Time Set Date Type * Default Description Set a language...
... a printer for your location. Set a date format. (YYYY/MM/DD, MM/DD/YYYY, DD/MM/YYYY, Off*) Settings 112 When you connect your camera to your camera to another country, touch Visit, and then touch the appropriate time zone. Set the time zone for printing files. • Select Mode: Manually select the USB mode when you connect your computer. (Off, On*) General Item Language Time Zone Date/Time Set Date Type * Default Description Set a language...
User Manual (user Manual) (ver.1.0) (English)
Page 114
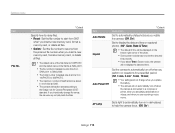
... or printer, when you are playing a slide show or videos, and when you perform no operations for Camera File system (DCF) standard. Item Auto Rotate Imprint * Default Description Set to automatically rotate photos as you replace the battery. • The camera will not display the date and time. If you intentionally change when you rotate the camera. (Off, On*) Set to display the date and time on captured photos. (Off*, Date, Date & Time) • The date and time...
... or printer, when you are playing a slide show or videos, and when you perform no operations for Camera File system (DCF) standard. Item Auto Rotate Imprint * Default Description Set to automatically rotate photos as you replace the battery. • The camera will not display the date and time. If you intentionally change when you rotate the camera. (Off, On*) Set to display the date and time on captured photos. (Off*, Date, Date & Time) • The date and time...

User Manual (user Manual) (ver.1.0) (English)
Page 139
... mode 44 Cleaning camera body 117 lens 117 touch screen 117 Close up shot Close-up Shot mode 36 macro 62 Connecting to a computer Mac 105 Windows 100 Contrast Playback mode 96 Shooting mode 77 D Date/Time set 112 Deleting files 88 DIgital Print Order Format (DPOF) 97 Digital zoom 29 Disconnecting the camera 104 Display brightness 111 Display set 23 DUAL IS mode 39 E Editing photos 94 Editing videos capturing 92 trimming 91 Enlarging 89 Error messages 116 F Face detection 65 Flash Auto...
... mode 44 Cleaning camera body 117 lens 117 touch screen 117 Close up shot Close-up Shot mode 36 macro 62 Connecting to a computer Mac 105 Windows 100 Contrast Playback mode 96 Shooting mode 77 D Date/Time set 112 Deleting files 88 DIgital Print Order Format (DPOF) 97 Digital zoom 29 Disconnecting the camera 104 Display brightness 111 Display set 23 DUAL IS mode 39 E Editing photos 94 Editing videos capturing 92 trimming 91 Enlarging 89 Error messages 116 F Face detection 65 Flash Auto...
User Manual (user Manual) (ver.1.0) (English)
Page 141
... Guide mode 40 Power button 14 Power save mode 111 Printing photos 106 Program mode 38 Protecting files 87 Q Quick view 111 R Red-eye Playback mode 97 Shooting mode 59 Reducing camera shake DUAL IS mode 39 Optical Image Stabilization(OIS) 30 Reset 114 Resolution Playback mode 94 Shooting mode 55 Retouching faces Playback mode 96 Shooting mode 37 Rotating 95 S Saturation Playback mode 96 Shooting mode 77 Scene mode 36 Self-Shot mode 43 Service center 125 Settings 109 Sharpness 77 Shooting portraits Beauty Shot mode 37 Blink detection 66 Face detection 65 Red-eye...
... Guide mode 40 Power button 14 Power save mode 111 Printing photos 106 Program mode 38 Protecting files 87 Q Quick view 111 R Red-eye Playback mode 97 Shooting mode 59 Reducing camera shake DUAL IS mode 39 Optical Image Stabilization(OIS) 30 Reset 114 Resolution Playback mode 94 Shooting mode 55 Retouching faces Playback mode 96 Shooting mode 37 Rotating 95 S Saturation Playback mode 96 Shooting mode 77 Scene mode 36 Self-Shot mode 43 Service center 125 Settings 109 Sharpness 77 Shooting portraits Beauty Shot mode 37 Blink detection 66 Face detection 65 Red-eye...


