
User Manual
Page 4
... storage at any or all losses to the product incurred by an unexpected power stoppage. (Any questions concerning UPS, consult your use of non-standard product or violation of instructions mentioned in California USA. Please turn off the power cord. Likewise, the hard drive may cause damage or malfunction to other equipment, menu setup, etc. special handling may not work...
... storage at any or all losses to the product incurred by an unexpected power stoppage. (Any questions concerning UPS, consult your use of non-standard product or violation of instructions mentioned in California USA. Please turn off the power cord. Likewise, the hard drive may cause damage or malfunction to other equipment, menu setup, etc. special handling may not work...

User Manual
Page 6
... 20 Connecting the Video, Audio, and Monitor 20 Connecting the USB 21 Connecting External SATA HDD 21 Connecting POS Device 21 Connecting the Alarm Input/Output 22 Connecting the RS-485 Device 23 Connecting the Network LIVE 25 25 Getting Started 27 Live Screen Configuration 31 Live Mode 33 Spot Out 34 Zoom 34 Audio ON/OFF 34 Freeze 35 Event Monitoring USING THE DVR 36 36 System Setup 46 Setting the Device 54 Setting the Recording 57 Setting the Event...
... 20 Connecting the Video, Audio, and Monitor 20 Connecting the USB 21 Connecting External SATA HDD 21 Connecting POS Device 21 Connecting the Alarm Input/Output 22 Connecting the RS-485 Device 23 Connecting the Network LIVE 25 25 Getting Started 27 Live Screen Configuration 31 Live Mode 33 Spot Out 34 Zoom 34 Audio ON/OFF 34 Freeze 35 Event Monitoring USING THE DVR 36 36 System Setup 46 Setting the Device 54 Setting the Recording 57 Setting the Event...
User Manual
Page 9
... time you press the button in Live mode, the screen mode will be switched in sequence. (1 live channel + (N-1) live channel) Sets Audio ON/OFF. OVERVIEW Part Names LED Indicator Camera Control REC Direction / Select Button USB Port 1 / 2 MODE AUDIO ALARM MENU/RETURN Channel Jog shuttle OPEN/CLOSE Power Functions ALARM : Lights on and off , and to select channel numbers directly in the Live Mode, or numbers in the PTZ Mode. Fast Rewind () : Used for quick backward search while in the PTZ Mode. Connects...
... time you press the button in Live mode, the screen mode will be switched in sequence. (1 live channel + (N-1) live channel) Sets Audio ON/OFF. OVERVIEW Part Names LED Indicator Camera Control REC Direction / Select Button USB Port 1 / 2 MODE AUDIO ALARM MENU/RETURN Channel Jog shuttle OPEN/CLOSE Power Functions ALARM : Lights on and off , and to select channel numbers directly in the Live Mode, or numbers in the PTZ Mode. Fast Rewind () : Used for quick backward search while in the PTZ Mode. Connects...

User Manual
Page 26
... area of the screen. In Live mode, press buttons in the DVR. 1. live mode, right-click any button to display a dialog where you press a menu button on the remote control or the front panel of the DVR when the corresponding menu requires logging in the right figure. 2011-01-01 01:10:25 2011-01-01 01:10:2S5cene Mode ZOOM Audio Off Freeze Stop Alarm Record Play Search...
... area of the screen. In Live mode, press buttons in the DVR. 1. live mode, right-click any button to display a dialog where you press a menu button on the remote control or the front panel of the DVR when the corresponding menu requires logging in the right figure. 2011-01-01 01:10:25 2011-01-01 01:10:2S5cene Mode ZOOM Audio Off Freeze Stop Alarm Record Play Search...

User Manual
Page 27
... firmware is full and the DVR has an insufficient space to record. Displays AUDIO ON/MUTE. Displays the current record mode from the network. Displayed if no input is entered in the condition that the motion detection is a problem with the icons on the screen of the recording screen. (Page 56) Displayed in PTZ setting, and highlighted yellow if PTZ is set to . Displays the camera name and the changed channel, if any. LIVE SCREEN CONFIGURATION Icons...
... firmware is full and the DVR has an insufficient space to record. Displays AUDIO ON/MUTE. Displays the current record mode from the network. Displayed if no input is entered in the condition that the motion detection is a problem with the icons on the screen of the recording screen. (Page 56) Displayed in PTZ setting, and highlighted yellow if PTZ is set to . Displays the camera name and the changed channel, if any. LIVE SCREEN CONFIGURATION Icons...

User Manual
Page 28
... in live Live Screen Menu In addition to see the "HDD FAIL"( ) message in the top left corner. live Error Information • If the internal HDD is not connected, the "NO HDD"( ) message will be deactivated, depending on the user permission. 2011-01-01 01:10:25 2011-01-01 01:10:2S5cene Mode ZOOM Audio Off Freeze Stop Alarm Record Play...
... in live Live Screen Menu In addition to see the "HDD FAIL"( ) message in the top left corner. live Error Information • If the internal HDD is not connected, the "NO HDD"( ) message will be deactivated, depending on the user permission. 2011-01-01 01:10:25 2011-01-01 01:10:2S5cene Mode ZOOM Audio Off Freeze Stop Alarm Record Play...

User Manual
Page 38
... the DVR's specific function and settings. When the administrator setup is the same to a desired item, and set permissions of candidate words, use < , > buttons to change Administrator's ID and password. The administrator can be responsible for Admin ID and Password input appears. Permission Management Admin Group User ID Password Confirm P/W admin Setup 3. OK Cancel The default password can use and set and change the password after installing...
... the DVR's specific function and settings. When the administrator setup is the same to a desired item, and set permissions of candidate words, use < , > buttons to change Administrator's ID and password. The administrator can be responsible for Admin ID and Password input appears. Permission Management Admin Group User ID Password Confirm P/W admin Setup 3. OK Cancel The default password can use and set and change the password after installing...

User Manual
Page 39
... display the virtual keyboard. For entering a group name, refer to "Using Virtual Keyboard". (Page 38) • Group Authority : Sets permissions to access menu items of the group users to access the menu according to the permissions. Select . A window for those user groups. Permission Management Admin Group User Group Group Authority Live View Setup Search Setup Backup Setup Menu Setup Bi-directional audio Record Lock PTZ Add Remote Alarm Out Setup Delete Rename Shutdown • Add...
... display the virtual keyboard. For entering a group name, refer to "Using Virtual Keyboard". (Page 38) • Group Authority : Sets permissions to access menu items of the group users to access the menu according to the permissions. Select . A window for those user groups. Permission Management Admin Group User Group Group Authority Live View Setup Search Setup Backup Setup Menu Setup Bi-directional audio Record Lock PTZ Add Remote Alarm Out Setup Delete Rename Shutdown • Add...
User Manual
Page 46
... Monitor. Use direction buttons to move to select . If set to a desired item, and set Video, Audio, Channel Name and Dwell Time of the channel ON/OFF on the remote control or front panel. 2. Select . If set to , the channel is not listed in the Auto Sequence mode. 46_ using the DVR SETTING THE DEVICE You can configure the camera settings including Video, Audio, Channel Name, Dwell Time and Progressive. 5. using the DVR Camera Camera PTZ CH Video...
... Monitor. Use direction buttons to move to select . If set to a desired item, and set Video, Audio, Channel Name and Dwell Time of the channel ON/OFF on the remote control or front panel. 2. Select . If set to , the channel is not listed in the Auto Sequence mode. 46_ using the DVR SETTING THE DEVICE You can configure the camera settings including Video, Audio, Channel Name, Dwell Time and Progressive. 5. using the DVR Camera Camera PTZ CH Video...

User Manual
Page 61
... also if the HDD is not activated. Setting the Connection Sets the protocol and environment of Live screen from a remote place, and supports mail forwarding function with events. Press the [MENU] button on the selected connection mode. - Use the up/down during the backup. You can switch to the menu screen during the backup will return to , and press [ENTER] button. Connection Mode Connection Protocol Connection Mode Bandwidth Static IP 2Mbps ...
... also if the HDD is not activated. Setting the Connection Sets the protocol and environment of Live screen from a remote place, and supports mail forwarding function with events. Press the [MENU] button on the selected connection mode. - Use the up/down during the backup. You can switch to the menu screen during the backup will return to , and press [ENTER] button. Connection Mode Connection Protocol Connection Mode Bandwidth Static IP 2Mbps ...

User Manual
Page 62
... can receive the data (only in window to move to TCP, and recommended for the protocol type. • Port (TCP) : Initially, is done, press . 62_ using the DVR • IP, Gateway, Subnet Mask, and DNS - For : IP address, Gateway, and Subnet Mask are activated. When the connection setup is set automatically. • User ID, Password : In case you selected . 6. Connection Mode Connection Protocol Protocol Type Port...
... can receive the data (only in window to move to TCP, and recommended for the protocol type. • Port (TCP) : Initially, is done, press . 62_ using the DVR • IP, Gateway, Subnet Mask, and DNS - For : IP address, Gateway, and Subnet Mask are activated. When the connection setup is set automatically. • User ID, Password : In case you selected . 6. Connection Mode Connection Protocol Protocol Type Port...
User Manual
Page 66
... event type to the user. SMTP Setting Sets the SMTP mail server. Select . The account input box will be activated. • User : Enter a user to use authentication when connecting to , only the text notification will see the SMTP setting window. 3. Select . 3. Use direction buttons to move to . Mailing Service SMTP Event Group Event Interval 10 min Use Event Transfer Sensor Motion Change P/W Power On/Off HDD Info Manual Record • Event Interval : Set the event interval. If a series of events...
... event type to the user. SMTP Setting Sets the SMTP mail server. Select . The account input box will be activated. • User : Enter a user to use authentication when connecting to , only the text notification will see the SMTP setting window. 3. Select . 3. Use direction buttons to move to . Mailing Service SMTP Event Group Event Interval 10 min Use Event Transfer Sensor Motion Change P/W Power On/Off HDD Info Manual Record • Event Interval : Set the event interval. If a series of events...

User Manual
Page 68
... settings of radiation incoming to the iris. 68_ using the DVR CONTROLLING A PTZ DEVICE The DVR enables you access the "PTZ Control" mode to display the "PTZ Control" menu. 2011-01-01 01:10:25 M Be sure to configure PTZ working environments before operation, since the PTZ Working(Active) mark can use one to display the context menu, and select . 2011-01-01 01:10:2S5cene Mode Spot Out PTZ Control ZOOM Audio Freeze Stop Alarm Record...
... settings of radiation incoming to the iris. 68_ using the DVR CONTROLLING A PTZ DEVICE The DVR enables you access the "PTZ Control" mode to display the "PTZ Control" menu. 2011-01-01 01:10:25 M Be sure to configure PTZ working environments before operation, since the PTZ Working(Active) mark can use one to display the context menu, and select . 2011-01-01 01:10:2S5cene Mode Spot Out PTZ Control ZOOM Audio Freeze Stop Alarm Record...

User Manual
Page 69
... to adjust the focus manually. • Auto Pan : The camera automatically runs between the two points that you selected. • Scan : The camera moves to the DVR. Using the mouse may help make setup easier. 1. Select the key. M If you replace the camera of the PTZ device in the PTZ Control menu. Using the mouse may help make setup easier. 1. OK! 3. Select in the menu. (Page 47) For camera specifications that supports PTZ...
... to adjust the focus manually. • Auto Pan : The camera automatically runs between the two points that you selected. • Scan : The camera moves to the DVR. Using the mouse may help make setup easier. 1. Select the key. M If you replace the camera of the PTZ device in the PTZ Control menu. Using the mouse may help make setup easier. 1. OK! 3. Select in the menu. (Page 47) For camera specifications that supports PTZ...

User Manual
Page 72
...; You can set the motion area manually. • Setup : The Setup button will be displayed on the bottom of the selected channel. - Manual Area : You can enter specific text to display the preview image. Motion Search If a motion is connected to perform the search. Use direction buttons to set the motion area to , the button will be activated only if you have set a desired area to the DVR. The screen switches to All...
...; You can set the motion area manually. • Setup : The Setup button will be displayed on the bottom of the selected channel. - Manual Area : You can enter specific text to display the preview image. Motion Search If a motion is connected to perform the search. Use direction buttons to set the motion area to , the button will be activated only if you have set a desired area to the DVR. The screen switches to All...

User Manual
Page 76
...; Password of the Admin and general users can be changed in the Setup menu of the DVR. Normal users should have set to change the password after installing the product. For general users, enter the DVR user ID and password. J The default password can be exposed to a hacking thread so it is set under to "Use" before connecting to the security settings on your web browser and type the IP address or URL of the DVR Admin...
...; Password of the Admin and general users can be changed in the Setup menu of the DVR. Normal users should have set to change the password after installing the product. For general users, enter the DVR user ID and password. J The default password can be exposed to a hacking thread so it is set under to "Use" before connecting to the security settings on your web browser and type the IP address or URL of the DVR Admin...

User Manual
Page 77
... can change the split-screen mode by clicking buttons for connected camera with the Windows Firewall. USING LIVE VIEWER The Live Viewer screen consists of following : This displays the IP address and the model name of Live Viewer. These buttons are used for the screen split and full screen mode. Shows the IP address and model name of the connected DVR. Shows the channel of the connected DVR. English _77 WEB VIEWER 5. These buttons are used for PTZ related functions. These buttons are used for...
... can change the split-screen mode by clicking buttons for connected camera with the Windows Firewall. USING LIVE VIEWER The Live Viewer screen consists of following : This displays the IP address and the model name of Live Viewer. These buttons are used for the screen split and full screen mode. Shows the IP address and model name of the connected DVR. Shows the channel of the connected DVR. English _77 WEB VIEWER 5. These buttons are used for PTZ related functions. These buttons are used for...
User Manual
Page 109
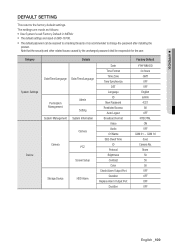
... Camera Camera PTZ Screen Setup Storage Device HDD Alarm Date Time Format Time Zone Time Synchronize DST Language ID New Password Restricted Access Auto Logout Broadcast Format Video Audio CH Name SEQ-Dwell Time ID Protocol Brightness Contrast Color Check Alarm Output Port Duration Replace Alarm Output Port Duration Factory Default YYYY-MM-DD 24 hours GMT OFF OFF English admin 4321 All OFF NTSC/PAL ON OFF CAM 01 ~ CAM 16 5sec Camera No. The settings are made as follows; • Use...
... Camera Camera PTZ Screen Setup Storage Device HDD Alarm Date Time Format Time Zone Time Synchronize DST Language ID New Password Restricted Access Auto Logout Broadcast Format Video Audio CH Name SEQ-Dwell Time ID Protocol Brightness Contrast Color Check Alarm Output Port Duration Replace Alarm Output Port Duration Factory Default YYYY-MM-DD 24 hours GMT OFF OFF English admin 4321 All OFF NTSC/PAL ON OFF CAM 01 ~ CAM 16 5sec Camera No. The settings are made as follows; • Use...

User Manual
Page 112
... mode to exit the screen and select a channel. Alarm (Motion Detection/ Video Loss) - The screen displays the logo image repeatedly. This may find the cause and solve the problem. appendix TROUBLESHOOTING Symptom Countermeasures The system does not turn on and the indicator on the front panel does not work at all. Check if the power supply system is corrupt. In the event monitoring screen, press the [ALARM] button...
... mode to exit the screen and select a channel. Alarm (Motion Detection/ Video Loss) - The screen displays the logo image repeatedly. This may find the cause and solve the problem. appendix TROUBLESHOOTING Symptom Countermeasures The system does not turn on and the indicator on the front panel does not work at all. Check if the power supply system is corrupt. In the event monitoring screen, press the [ALARM] button...

User Manual
Page 133
... guarantee shall be responsible for free of their respective company. Samsung Techwin reserves the right to verify the integrity and correctness of this document without prior notice. The default password can be entirely on the user's own responsibility. Samsung Techwin will resolve the problem for the user. 8 Channel/ 16 Channel DVR User Manual Copyright ©2011 Samsung Techwin Co., Ltd. All...
... guarantee shall be responsible for free of their respective company. Samsung Techwin reserves the right to verify the integrity and correctness of this document without prior notice. The default password can be entirely on the user's own responsibility. Samsung Techwin will resolve the problem for the user. 8 Channel/ 16 Channel DVR User Manual Copyright ©2011 Samsung Techwin Co., Ltd. All...


