User Manual (ENGLISH)
Page 2
... and Cables 10 Remote Control Buttons 11 Operating the Remote Control 12 Installation and Basic Adjustments Installation and Turning On 14 Zooming and Focus Adjustment 16 Leveling with Adjustable Feet 17 Using the Lens Shift Dial 18 Screen Size and Projection Distance 19 Connections and Source Setup Before Connections 22 Connecting to Video Equipment Connecting to VCR/Camcorder/Cable Box ..........23 Connecting to DVD 24 Connecting to the Digital TV Receiver 25 Setting up the External Input Source 26 Naming the External Connections 27 Picture Adjustment Selecting Picture Mode 30...
... and Cables 10 Remote Control Buttons 11 Operating the Remote Control 12 Installation and Basic Adjustments Installation and Turning On 14 Zooming and Focus Adjustment 16 Leveling with Adjustable Feet 17 Using the Lens Shift Dial 18 Screen Size and Projection Distance 19 Connections and Source Setup Before Connections 22 Connecting to Video Equipment Connecting to VCR/Camcorder/Cable Box ..........23 Connecting to DVD 24 Connecting to the Digital TV Receiver 25 Setting up the External Input Source 26 Naming the External Connections 27 Picture Adjustment Selecting Picture Mode 30...
User Manual (ENGLISH)
Page 5
... INFO button on the remote control. I The Projector lamp changes in nature depending on time of use and using environment. Preparation Caution on Lamp Use and Replacement Caution on Lamp Use and Replacement Projector Lamp I Free servicing will be offered within 90 days after turning off the power of the lamp before replacing the lamp. Refer to the installation and other recommended operational sections of the user's manual to the manual for proper handling. Cool off the projector for replacement. (Ultra...
... INFO button on the remote control. I The Projector lamp changes in nature depending on time of use and using environment. Preparation Caution on Lamp Use and Replacement Caution on Lamp Use and Replacement Projector Lamp I Free servicing will be offered within 90 days after turning off the power of the lamp before replacing the lamp. Refer to the installation and other recommended operational sections of the user's manual to the manual for proper handling. Cool off the projector for replacement. (Ultra...
User Manual (ENGLISH)
Page 9
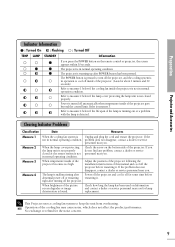
... the control limit. Refer to keep the unit from overheating. When the lamp cover protecting the lamp unit is not in normal operating condition. Adjust the position of the projector following the installation instructions of this manual and cool off the projector. Check how long the lamp has been used on Information and contact a dealer or service personnel near you. Preparation Projector and Accessories Indicator Information : Turned On : Flashing : Turned Off TEMP LAMP STANDBY Information...
... the control limit. Refer to keep the unit from overheating. When the lamp cover protecting the lamp unit is not in normal operating condition. Adjust the position of the projector following the installation instructions of this manual and cool off the projector. Check how long the lamp has been used on Information and contact a dealer or service personnel near you. Preparation Projector and Accessories Indicator Information : Turned On : Flashing : Turned Off TEMP LAMP STANDBY Information...
User Manual (ENGLISH)
Page 11
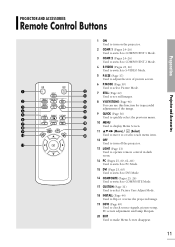
...) Used to operate remote control in dark room. 14 PC (Pages 25, 60, 62~66) Used to switch to PC Mode. 15 DVI (Page 25, 60) Used to switch to DVI Mode. 16 COMPOSITE (Pages 23, 26) Used to switch to COMPOSITE Mode. 17 CUSTOM (Page 31) Used to select Picture User Adjust Mode. 18 INSTALL (Page 44) Used to flip or reverse the projected image. 19 INFO (Page 49) Used to check source signals, picture setup, PC screen adjustment and lamp...
...) Used to operate remote control in dark room. 14 PC (Pages 25, 60, 62~66) Used to switch to PC Mode. 15 DVI (Page 25, 60) Used to switch to DVI Mode. 16 COMPOSITE (Pages 23, 26) Used to switch to COMPOSITE Mode. 17 CUSTOM (Page 31) Used to select Picture User Adjust Mode. 18 INSTALL (Page 44) Used to flip or reverse the projected image. 19 INFO (Page 49) Used to check source signals, picture setup, PC screen adjustment and lamp...

User Manual (ENGLISH)
Page 60
Using PC Video Cable or DVI Cable Rear side of the projector. No driver installation is not supported. NOTE Viewing the PC Screen PC 1 1 Turn on the rear side of the projector to DVI port of Projector Connecting to PC Connecting to PC Rear Connection DVI-D Video Cable PC Video Cable or DVI-D Port Connect PC (RGB In) port on the projector and press the PC button to select PC. I Sound comes out from PC speakers. 60 If...
Using PC Video Cable or DVI Cable Rear side of the projector. No driver installation is not supported. NOTE Viewing the PC Screen PC 1 1 Turn on the rear side of the projector to DVI port of Projector Connecting to PC Connecting to PC Rear Connection DVI-D Video Cable PC Video Cable or DVI-D Port Connect PC (RGB In) port on the projector and press the PC button to select PC. I Sound comes out from PC speakers. 60 If...
User Manual (ENGLISH)
Page 68
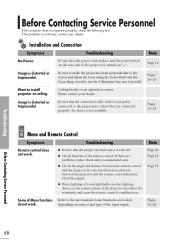
... lighting of 3-way light bulbs or other lighting device on "-". I Check the angle and distance between the projector and the remote control that there is turned on the remote sensor of the remote control. Ceiling bracket is properly connected to the screen and adjust the focus using the Zoom Knob and the Focus Ring. Page 26 Page 12 Page 13 Some of the input signal. Pages 23~25 Menu and Remote Control Symptoms Troubleshooting Note Remote control does not work...
... lighting of 3-way light bulbs or other lighting device on "-". I Check the angle and distance between the projector and the remote control that there is turned on the remote sensor of the remote control. Ceiling bracket is properly connected to the screen and adjust the focus using the Zoom Knob and the Focus Ring. Page 26 Page 12 Page 13 Some of the input signal. Pages 23~25 Menu and Remote Control Symptoms Troubleshooting Note Remote control does not work...

User Manual (ENGLISH)
Page 69
... to instructions on . Check the connection cables again. I Check the Remote Control batteries. Page 31 Page 16 Page 19~20 Repair indicator is selected. Refer to properly connect the external devices. Adjustable items of frequency discrepancy. I Be sure that cable is in place. I Adjust the focus. I Be sure that the proper input source is on lamp and repair. Images are properly set . Especially, connect the component (Y, Pb, Pr) cables matching the color codes. Only blue screen...
... to instructions on . Check the connection cables again. I Check the Remote Control batteries. Page 31 Page 16 Page 19~20 Repair indicator is selected. Refer to properly connect the external devices. Adjustable items of frequency discrepancy. I Be sure that cable is in place. I Adjust the focus. I Be sure that the proper input source is on lamp and repair. Images are properly set . Especially, connect the component (Y, Pb, Pr) cables matching the color codes. Only blue screen...
User Manual (ENGLISH)
Page 77
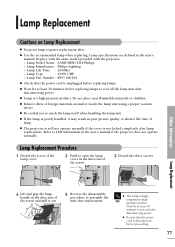
Lamp Manufacture : Philips Lighting - I Be careful not to proceed after lamp replacement. I Wait for at least 30 minutes before replacing lamps to open the lamp cover in poor picture quality or shorter life time of the arrow. 3 Detach the three screws. NOTE temperature highpressure product. I Check that the power cord is unplugged before proceeding. 77 Lamp Life Time : 2000Hrs - Lamp Part Number : BP47-00010A I Be sure that the power cord is disconnected before replacing lamps. Refer to assemble...
Lamp Manufacture : Philips Lighting - I Be careful not to proceed after lamp replacement. I Wait for at least 30 minutes before replacing lamps to open the lamp cover in poor picture quality or shorter life time of the arrow. 3 Detach the three screws. NOTE temperature highpressure product. I Check that the power cord is unplugged before proceeding. 77 Lamp Life Time : 2000Hrs - Lamp Part Number : BP47-00010A I Be sure that the power cord is disconnected before replacing lamps. Refer to assemble...
User Manual (ENGLISH)
Page 80
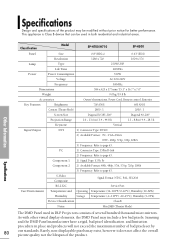
... Accessories 9.0 kg / 19.8 lb Owner's Instructions, Power Cord, Remote control, Batteries Key Features Brightness 700 ANSI 600 ANSI Contrast (Theatre Mode) Screen Size 2800 : 1 Diagonal 30.385~300" 2000 : 1 Diagonal 40~200" Projection Range 1.0 ~ 13.6 m / 3.4 ~ 44.8 ft 1.3 ~ 8.8 m / 4.4 ~ 28.5 ft Keystone Vertical Input/Output DVI 1) Connector Type: DVI-D 2) Available Format: PC - Signal Format: NTSC, PAL, SECAM User Environment RS-232C Service Port Temperature and Operating Temperature (32~104ºF / 0~40...
... Accessories 9.0 kg / 19.8 lb Owner's Instructions, Power Cord, Remote control, Batteries Key Features Brightness 700 ANSI 600 ANSI Contrast (Theatre Mode) Screen Size 2800 : 1 Diagonal 30.385~300" 2000 : 1 Diagonal 40~200" Projection Range 1.0 ~ 13.6 m / 3.4 ~ 44.8 ft 1.3 ~ 8.8 m / 4.4 ~ 28.5 ft Keystone Vertical Input/Output DVI 1) Connector Type: DVI-D 2) Available Format: PC - Signal Format: NTSC, PAL, SECAM User Environment RS-232C Service Port Temperature and Operating Temperature (32~104ºF / 0~40...
User Manual (ENGLISH)
Page 2
... of power source indicated on an unstable cart, stand, tripod, bracket, or table where it can make any inside . A falling set . Do not place it from the wall outlet before operating your set . G Operate your appliance dealer or local power company. 3 Important Safety Information Preparation This symbol alerts you a product that you've followed the manufacturer's instructions for mounting. Your new Samsung Projector...
... of power source indicated on an unstable cart, stand, tripod, bracket, or table where it can make any inside . A falling set . Do not place it from the wall outlet before operating your set . G Operate your appliance dealer or local power company. 3 Important Safety Information Preparation This symbol alerts you a product that you've followed the manufacturer's instructions for mounting. Your new Samsung Projector...

User Manual (ENGLISH)
Page 4
...Side and Cables 14 Remote Control Buttons 15 Operating the Remote Control 16 Installation and Basic Adjustments Installation/Turning On 18 Zooming and Focus Adjustment 20 Leveling with Adjustable Feet 21 Using the Lens Shift Dial 22 Screen Size and Projection Distance 23 Connections and Source Setup Before Connections 26 Connecting to Video Equipment Connecting to VCR/Camcorder/Cable Box ..........27 Connecting to DVD 28 Connecting to the Digital TV Receiver 29 Setting up the External Input Source 30 Naming the External Connections 31 Picture Adjustment Selecting Picture Mode 34...
...Side and Cables 14 Remote Control Buttons 15 Operating the Remote Control 16 Installation and Basic Adjustments Installation/Turning On 18 Zooming and Focus Adjustment 20 Leveling with Adjustable Feet 21 Using the Lens Shift Dial 22 Screen Size and Projection Distance 23 Connections and Source Setup Before Connections 26 Connecting to Video Equipment Connecting to VCR/Camcorder/Cable Box ..........27 Connecting to DVD 28 Connecting to the Digital TV Receiver 29 Setting up the External Input Source 30 Naming the External Connections 31 Picture Adjustment Selecting Picture Mode 34...
User Manual (ENGLISH)
Page 5
....) I Turn off . Do not stare light source directly. Minimized fan noise and light leakage I The Projector lamp changes in an dark environment. 8 Caution on Lamp Use and Replacement Projector Lamp I The airflow and fan installation structure are optimized to minimize fan noise and beam leakage. I The remote control is broken, be careful not to be very hot. User adjustments I Quality picture tuning focused on improving color - Refer to the installation and other recommended operational sections...
....) I Turn off . Do not stare light source directly. Minimized fan noise and light leakage I The Projector lamp changes in an dark environment. 8 Caution on Lamp Use and Replacement Projector Lamp I The airflow and fan installation structure are optimized to minimize fan noise and beam leakage. I The remote control is broken, be careful not to be very hot. User adjustments I Quality picture tuning focused on improving color - Refer to the installation and other recommended operational sections...
User Manual (ENGLISH)
Page 7
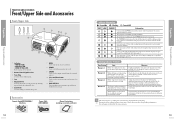
... after POWER button has been pressed. Refer to page 13 for details. 2 Remote Control Signal Receiver 3 Focus Ring Used for Focus Adjustment. 4 Lens 5 Adjustable Feet You can adjust screen images up and down within 30 seconds. When the lamp cover protecting the lamp unit is in normal operation condition. Adjust the position of the projector following the installation instructions of the projector becomes too high. NOTE Operation of the lamp is running out or a problem with the lamp...
... after POWER button has been pressed. Refer to page 13 for details. 2 Remote Control Signal Receiver 3 Focus Ring Used for Focus Adjustment. 4 Lens 5 Adjustable Feet You can adjust screen images up and down within 30 seconds. When the lamp cover protecting the lamp unit is in normal operation condition. Adjust the position of the projector following the installation instructions of the projector becomes too high. NOTE Operation of the lamp is running out or a problem with the lamp...
User Manual (ENGLISH)
Page 8
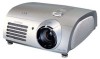
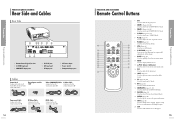
... select Picture Mode. 1 12 7 STILL (Page 44) 13 Used to see still images. 2 14 8 V.KEYSTONE (Page 48) 3 15 You can use this function for 110V Video (COMPOSITE) Cable S-Video Cable Connected to make Menu Screen disappear. 15 Projector and Accessories Preparation Projector and Accessories Preparation PROJECTOR AND ACCESSORIES Rear Side and Cables Rear Side 1 23 4 56 78 9 1 Remote Control Signal Receiver 2 S-VIDEO Input port 3 COMPOSITE Input ports 4 RS-232C port 5 DVI Input port 6 PC Input port 7 AC Power Input 8 Power Switch 9 Component Input port Cables Power Cord...
... select Picture Mode. 1 12 7 STILL (Page 44) 13 Used to see still images. 2 14 8 V.KEYSTONE (Page 48) 3 15 You can use this function for 110V Video (COMPOSITE) Cable S-Video Cable Connected to make Menu Screen disappear. 15 Projector and Accessories Preparation Projector and Accessories Preparation PROJECTOR AND ACCESSORIES Rear Side and Cables Rear Side 1 23 4 56 78 9 1 Remote Control Signal Receiver 2 S-VIDEO Input port 3 COMPOSITE Input ports 4 RS-232C port 5 DVI Input port 6 PC Input port 7 AC Power Input 8 Power Switch 9 Component Input port Cables Power Cord...
User Manual (ENGLISH)
Page 10
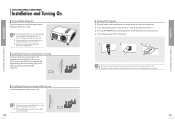
... of the screen. Rotate the image (projected from the projector) horizontally. (Page 46) Installing Projector in a bright place. Screen display comes up in 30 seconds. 1 2 3 I When the cooling fan stops, push the power switch toward "-". 3. Plug the power cord into the power terminal on the backside of the projector. 2. Press the POWER button of the projector or the ON button of the projector toward "O" and unplug the power cord. 19 Installation and Basic Adjustments Preparation...
... of the screen. Rotate the image (projected from the projector) horizontally. (Page 46) Installing Projector in a bright place. Screen display comes up in 30 seconds. 1 2 3 I When the cooling fan stops, push the power switch toward "-". 3. Plug the power cord into the power terminal on the backside of the projector. 2. Press the POWER button of the projector or the ON button of the projector toward "O" and unplug the power cord. 19 Installation and Basic Adjustments Preparation...
User Manual (ENGLISH)
Page 14
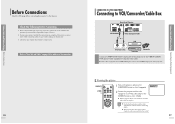
... projector does not support sound. (Separate audio system is not available, check the video cables are in damage to S-VIDEO input port of ports may result in place. The number and position of the projector. I If the video equipment has S-VIDEO OUT port, connect it may differ depending on page 14 for cables used for sound.) 27 I Check that the projector and the video equipment are completed. Connections and Source Setup Connecting to Video Equipment Connections and Source Setup Before Connections Before Connections Check...
... projector does not support sound. (Separate audio system is not available, check the video cables are in damage to S-VIDEO input port of ports may result in place. The number and position of the projector. I If the video equipment has S-VIDEO OUT port, connect it may differ depending on page 14 for cables used for sound.) 27 I Check that the projector and the video equipment are completed. Connections and Source Setup Connecting to Video Equipment Connections and Source Setup Before Connections Before Connections Check...
User Manual (ENGLISH)
Page 24
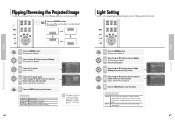
...adjusting the amount of the projector, horizontal/vertical flipping and picture reversal are available. It also lowers power consumption and extends the life of the button. Setup Install Light Setting V-Keystone Test Pattern PC Factory Default Information : Front-Floor √ : Theater √ Move Enter Return Theater Bright Light Setting √ √ Move Enter Return 47 Light Setting Setup The Setup menu is displayed. 3 Press the button. Front-Floor Rear-Ceiling Rear-Floor Front-Ceiling 1 Press the MENU button. Setup Install Light Setting V-Keystone...
...adjusting the amount of the projector, horizontal/vertical flipping and picture reversal are available. It also lowers power consumption and extends the life of the button. Setup Install Light Setting V-Keystone Test Pattern PC Factory Default Information : Front-Floor √ : Theater √ Move Enter Return Theater Bright Light Setting √ √ Move Enter Return 47 Light Setting Setup The Setup menu is displayed. 3 Press the button. Front-Floor Rear-Ceiling Rear-Floor Front-Ceiling 1 Press the MENU button. Setup Install Light Setting V-Keystone...
User Manual (ENGLISH)
Page 26
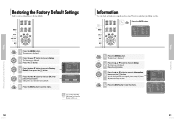
... Input Source : PC Picture Mode : Movie1 Picture Size : Full Brightness : 50 Contrast : 50 Color Temperature : 6500K R-Gain : 50 G-Gain : 50 B-Gain : 50 R-Offset : 0 G-Offset : 0 B-Offset : 0 DNIe Install Light Setting V-Keystone Coarse Fine Resolution H-Frequency V-Frequency Lamp Time : On : Front-Floor : Theater : 0 : 1344 : 101 : 1024X768 : 31KHz : 70Hz : 0 Hour OK 1 Press the MENU button. Press the button. Restoring the Factory Default Settings Setup Restoring the Factory Default Settings Used to restore setting values to Setup. The Setup menu is displayed. The Setup...
... Input Source : PC Picture Mode : Movie1 Picture Size : Full Brightness : 50 Contrast : 50 Color Temperature : 6500K R-Gain : 50 G-Gain : 50 B-Gain : 50 R-Offset : 0 G-Offset : 0 B-Offset : 0 DNIe Install Light Setting V-Keystone Coarse Fine Resolution H-Frequency V-Frequency Lamp Time : On : Front-Floor : Theater : 0 : 1344 : 101 : 1024X768 : 31KHz : 70Hz : 0 Hour OK 1 Press the MENU button. Press the button. Restoring the Factory Default Settings Setup Restoring the Factory Default Settings Used to restore setting values to Setup. The Setup menu is displayed. The Setup...
User Manual (ENGLISH)
Page 37
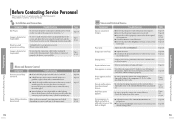
... the advanced display property. Be sure that the Color, Brightness settings are properly set . I Direct lighting of the input signal. I Be sure that the connection cable (video) is continues, contact your dealer. depending on screen. Be sure to the proper port. If the problem is properly connected to properly connect the external devices. Before Contacting Service Personnel Troubleshooting Before Contacting Service Personnel If this projector does not operate properly, check the...
... the advanced display property. Be sure that the Color, Brightness settings are properly set . I Direct lighting of the input signal. I Be sure that the connection cable (video) is continues, contact your dealer. depending on screen. Be sure to the proper port. If the problem is properly connected to properly connect the external devices. Before Contacting Service Personnel Troubleshooting Before Contacting Service Personnel If this projector does not operate properly, check the...

User Manual (ENGLISH)
Page 39
... Clean and maintain the projector in malfunction. Contact your dealer or service personnel to clean the inside of the projector. I Do not use a wet cloth. Video (Composite) Cable S-Video Cable Component Cable PC Video Cable 1.5V AAA Batteries Adapter for purchasing accessories or optional parts. Cleaning the Projector and Lens Use a dry soft cloth. It may result in the following way. I Do not clean the lens using a fingertip or a sharp object. Accessories Remote Control Power Cable Owner's Instructions...
... Clean and maintain the projector in malfunction. Contact your dealer or service personnel to clean the inside of the projector. I Do not use a wet cloth. Video (Composite) Cable S-Video Cable Component Cable PC Video Cable 1.5V AAA Batteries Adapter for purchasing accessories or optional parts. Cleaning the Projector and Lens Use a dry soft cloth. It may result in the following way. I Do not clean the lens using a fingertip or a sharp object. Accessories Remote Control Power Cable Owner's Instructions...


