User Manual (ENGLISH)
Page 5
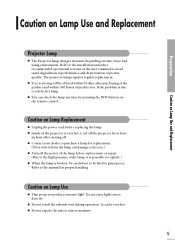
...lamp. Do not stare light source directly. I Contact your eyes.) I Turn off the projector for proper handling. Refer to the installation and other recommended operational sections of the user's manual to purchase a lamp for replacement. (Ultra violets from the lamp can be hurt by ...pressing the INFO button on Lamp Replacement I This projector produces intense light. Preparation Caution on Lamp Use and Replacement ...
...lamp. Do not stare light source directly. I Contact your eyes.) I Turn off the projector for proper handling. Refer to the installation and other recommended operational sections of the user's manual to purchase a lamp for replacement. (Ultra violets from the lamp can be hurt by ...pressing the INFO button on Lamp Replacement I This projector produces intense light. Preparation Caution on Lamp Use and Replacement ...
User Manual (ENGLISH)
Page 9
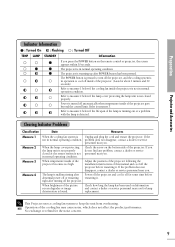
...If the not in normal operation condition. Refer to measure 1 below if the cooling fan inside of the projector. Check the screw on the remote control or projector, the screen appears within 30 seconds. When brightness of the cooling fan may cause noise, which does not... No exchange or refund for about 1 minute and 30 seconds) Refer to measure 2 below if the life span of this manual and cool off for lamp replacement. This Projector uses a cooling fan system to measure 3. Clearing Indicator Problems Classification Measure 1 Measure 2 Measure 3 Measure 4 State Measures When...
...If the not in normal operation condition. Refer to measure 1 below if the cooling fan inside of the projector. Check the screw on the remote control or projector, the screen appears within 30 seconds. When brightness of the cooling fan may cause noise, which does not... No exchange or refund for about 1 minute and 30 seconds) Refer to measure 2 below if the life span of this manual and cool off for lamp replacement. This Projector uses a cooling fan system to measure 3. Clearing Indicator Problems Classification Measure 1 Measure 2 Measure 3 Measure 4 State Measures When...
User Manual (ENGLISH)
Page 19
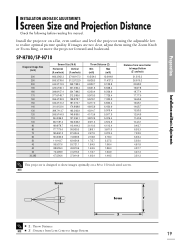
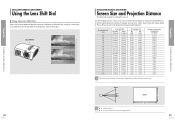
... 10.4/4.1 9.4/3.7 8.3/3.3 7.3/2.9 6.2/2.4 5.2/2.0 4.5/1.8 4.2/1.7 3.4/1.3 3.2/1.3 This projector is designed to show images optimally on a flat, even surface and level the projector using the Zoom Knob or Focus Ring, or move the projector forward and backward. Preparation Installation and Basic Adjustments INSTALLATION AND BASIC ...ADJUSTMENTS Screen Size and Projection Distance Check the following before reading this manual....
... 10.4/4.1 9.4/3.7 8.3/3.3 7.3/2.9 6.2/2.4 5.2/2.0 4.5/1.8 4.2/1.7 3.4/1.3 3.2/1.3 This projector is designed to show images optimally on a flat, even surface and level the projector using the Zoom Knob or Focus Ring, or move the projector forward and backward. Preparation Installation and Basic Adjustments INSTALLATION AND BASIC ...ADJUSTMENTS Screen Size and Projection Distance Check the following before reading this manual....

User Manual (ENGLISH)
Page 22
... the type of ports may result in damage to the projector. 3. Refer to the manual of devices. 2. Connections and Source Setup Before Connections Before Connections Check the followings before connecting the projector to "Rear Side and Cables" on type of the device the projector is connected to . Refer to other devices. Check the following...
... the type of ports may result in damage to the projector. 3. Refer to the manual of devices. 2. Connections and Source Setup Before Connections Before Connections Check the followings before connecting the projector to "Rear Side and Cables" on type of the device the projector is connected to . Refer to other devices. Check the following...
User Manual (ENGLISH)
Page 58
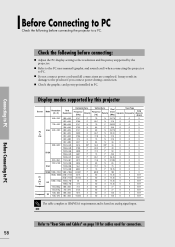
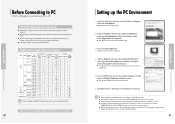
.../VESA requirements and is based on page 10 for cables used for connection. I Refer to the PC user manual (graphic and sound card) when connecting the projector to the resolution and frequency supported by this projector Source Mode Resolution Total (H x V) Resolution 640 x 350 800 x 449 832 x 445 720 x 400 900 x 449 936 x 446...PC. I Do not connect power cord until all connections are completed. NOTE Refer to a PC. Before Connecting to PC Check the following before connecting the projector to "Rear Side and Cables" on analog signal input. Display modes supported by the...
.../VESA requirements and is based on page 10 for cables used for connection. I Refer to the PC user manual (graphic and sound card) when connecting the projector to the resolution and frequency supported by this projector Source Mode Resolution Total (H x V) Resolution 640 x 350 800 x 449 832 x 445 720 x 400 900 x 449 936 x 446...PC. I Do not connect power cord until all connections are completed. NOTE Refer to a PC. Before Connecting to PC Check the following before connecting the projector to "Rear Side and Cables" on analog signal input. Display modes supported by the...
User Manual (ENGLISH)
Page 68
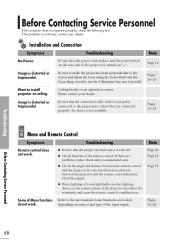
...Remote control does not work . If there is distorted or trapezoidal. Be sure that the proper external source is properly connected to install projector on "-". Be sure to make the projection beam perpendicular to use the V-Keystone function if possible. Pages 16~20 Want to the ...may affect the sensitivity and cause the remote control to the user manual. I Check the angle and distance between the projector and the remote control that the connection cable (video) is selected. I Check batteries of the projector may block the signal. depending on the remote sensor of the remote...
...Remote control does not work . If there is distorted or trapezoidal. Be sure that the proper external source is properly connected to install projector on "-". Be sure to make the projection beam perpendicular to use the V-Keystone function if possible. Pages 16~20 Want to the ...may affect the sensitivity and cause the remote control to the user manual. I Check the angle and distance between the projector and the remote control that the connection cable (video) is selected. I Check batteries of the projector may block the signal. depending on the remote sensor of the remote...
User Manual (ENGLISH)
Page 77
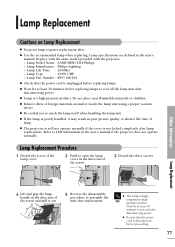
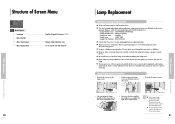
...replacement. Other Information Lamp Replacement 4 Lift and grip the lamp handle in the user's manual. Lamp Model Name : LAMP-MERCURY-Philips - Lamp Type : 250W UHP - I The projector is will not operate normally if the cover is unplugged before replacing lamps to touch the... Check that the power cord is poorly handled, it out. 5 Reverse the disassembly procedure to open the lamp cover in the user's manual if the projector does not operate normally. Lamp Life Time : 2000Hrs - Lamp Replacement Procedure 1 Detach the screw of the arrow. 3 Detach the three...
...replacement. Other Information Lamp Replacement 4 Lift and grip the lamp handle in the user's manual. Lamp Model Name : LAMP-MERCURY-Philips - Lamp Type : 250W UHP - I The projector is will not operate normally if the cover is unplugged before replacing lamps to touch the... Check that the power cord is poorly handled, it out. 5 Reverse the disassembly procedure to open the lamp cover in the user's manual if the projector does not operate normally. Lamp Life Time : 2000Hrs - Lamp Replacement Procedure 1 Detach the screw of the arrow. 3 Detach the three...
User Manual (ENGLISH)
Page 3
For your safety, this set is equal to normal. Pay particular attention to the instruction manual. Overloading can radiate radio frequency energy and, if not installed and used near a radio or television receiver in the unit, where they can be suitable.... This booklet was prepared by the manufacturer or those controls that they exit from the unit. The party responsible for product compliance: SAMSUNG ELECTRONICS CO., LTD America QA Lab of Samsung 3351 Michelson Drive, Suite #290, Irvine, CA92612 USA VCCI This is a Class B product based on the standard of the computer ...
For your safety, this set is equal to normal. Pay particular attention to the instruction manual. Overloading can radiate radio frequency energy and, if not installed and used near a radio or television receiver in the unit, where they can be suitable.... This booklet was prepared by the manufacturer or those controls that they exit from the unit. The party responsible for product compliance: SAMSUNG ELECTRONICS CO., LTD America QA Lab of Samsung 3351 Michelson Drive, Suite #290, Irvine, CA92612 USA VCCI This is a Class B product based on the standard of the computer ...
User Manual (ENGLISH)
Page 5
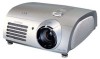
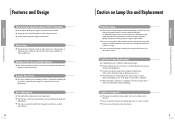
...glass pieces. Various Input Ports I Five types of picture quality. Refer to the installation and other recommended operational sections of the user's manual to avoid rapid degradation of performance and deterioration of input ports including a DVI-D (compatible with HDCP) port, two Component ports improve...Lamp Use Preparation Features and Design Optical engine adopting advanced DLP technology I DLPTM HD2+ DMD panel capable of each input port. Minimized fan noise and light leakage I You can damage your eyes.) I Turn off the projector for to improve usability in an dark environment. 8...
...glass pieces. Various Input Ports I Five types of picture quality. Refer to the installation and other recommended operational sections of the user's manual to avoid rapid degradation of performance and deterioration of input ports including a DVI-D (compatible with HDCP) port, two Component ports improve...Lamp Use Preparation Features and Design Optical engine adopting advanced DLP technology I DLPTM HD2+ DMD panel capable of each input port. Minimized fan noise and light leakage I You can damage your eyes.) I Turn off the projector for to improve usability in an dark environment. 8...
User Manual (ENGLISH)
Page 7
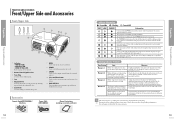
... the lamp has been used on the bottom side of the picture screen degrades or image deterioration is not in normal operation condition. Projector and Accessories Preparation PROJECTOR AND ACCESSORIES Front/Upper Side and Accessories Front/Upper Side 11 10 98 7 1 2 3 1 Indicators - STAND BY (Blue ...screen position by moving up after turning off inside of this manual and cool off for about 1 minute and 30 seconds) Refer to measure 3. The projector is Unplug and plug the cord and restart the projector. Power is malfunctioning after abnormal power off or restarting right ...
... the lamp has been used on the bottom side of the picture screen degrades or image deterioration is not in normal operation condition. Projector and Accessories Preparation PROJECTOR AND ACCESSORIES Front/Upper Side and Accessories Front/Upper Side 11 10 98 7 1 2 3 1 Indicators - STAND BY (Blue ...screen position by moving up after turning off inside of this manual and cool off for about 1 minute and 30 seconds) Refer to measure 3. The projector is Unplug and plug the cord and restart the projector. Power is malfunctioning after abnormal power off or restarting right ...
User Manual (ENGLISH)
Page 12
....2 20.8/8.2 19.8/7.8 18.7/7.4 17.7/7.0 16.6/6.5 15.6/6.1 14.6/5.7 13.5/5.3 12.5/4.9 11.4/4.5 10.4/4.1 9.4/3.7 8.3/3.3 7.3/2.9 6.2/2.4 5.2/2.0 4.5/1.8 4.2/1.7 3.4/1.3 3.2/1.3 This projector is designed to show images optimally on a 80 to Image Bottom 23 Installation and Basic Adjustments Preparation Lens Shift Dial UP DOWN 22 INSTALLATION AND... BASIC ADJUSTMENTS Screen Size and Projection Distance Check the following before reading this manual. Installation and Basic Adjustments Preparation INSTALLATION AND BASIC ADJUSTMENTS Using the Lens Shift Dial Using the...
....2 20.8/8.2 19.8/7.8 18.7/7.4 17.7/7.0 16.6/6.5 15.6/6.1 14.6/5.7 13.5/5.3 12.5/4.9 11.4/4.5 10.4/4.1 9.4/3.7 8.3/3.3 7.3/2.9 6.2/2.4 5.2/2.0 4.5/1.8 4.2/1.7 3.4/1.3 3.2/1.3 This projector is designed to show images optimally on a 80 to Image Bottom 23 Installation and Basic Adjustments Preparation Lens Shift Dial UP DOWN 22 INSTALLATION AND... BASIC ADJUSTMENTS Screen Size and Projection Distance Check the following before reading this manual. Installation and Basic Adjustments Preparation INSTALLATION AND BASIC ADJUSTMENTS Using the Lens Shift Dial Using the...
User Manual (ENGLISH)
Page 14
...power until all the connections are turned off before connecting the projector to other devices. Composite 2 Connect the projector and the video equipment via S-Video cable and press the S-VIDEO button to . Refer to the manual of the device the projector is connected to the VIDEO (yellow) OUT port of ...the projector to . Refer to "Rear Side and Cables" on page 14 for cables used for sound.) 27 ...
...power until all the connections are turned off before connecting the projector to other devices. Composite 2 Connect the projector and the video equipment via S-Video cable and press the S-VIDEO button to . Refer to the manual of the device the projector is connected to the VIDEO (yellow) OUT port of ...the projector to . Refer to "Rear Side and Cables" on page 14 for cables used for sound.) 27 ...
User Manual (ENGLISH)
Page 31
...Color quality setup. 3 Press the Advanced button. It may be signal problems. 61 Setting up to display settings supported by the projector. I Do not connect power cord until all connections are completed. I Projected images may differ from the monitor depending on the type...button in Display Properties window to Resolution described in the display mode table supported by this projector. 3 I Refer to the PC user manual (graphic and sound card) when connecting the projector to Vertical Frequency described in damage to IBM/VESA requirements and is based on Properties. ...
...Color quality setup. 3 Press the Advanced button. It may be signal problems. 61 Setting up to display settings supported by the projector. I Do not connect power cord until all connections are completed. I Projected images may differ from the monitor depending on the type...button in Display Properties window to Resolution described in the display mode table supported by this projector. 3 I Refer to the PC user manual (graphic and sound card) when connecting the projector to Vertical Frequency described in damage to IBM/VESA requirements and is based on Properties. ...
User Manual (ENGLISH)
Page 37
... advanced display property. Adjust the vertical frequency of the projector. Be sure that the Color, Brightness settings are connected properly, the device is no obstacle between the remote control and the projector. Avoid to the user manual. I Check that the power cord in place. ...I Check the Remote Control batteries. I Be sure that the proper operation of the projector is selected. Repair indicator is either too far...
... advanced display property. Adjust the vertical frequency of the projector. Be sure that the Color, Brightness settings are connected properly, the device is no obstacle between the remote control and the projector. Avoid to the user manual. I Check that the power cord in place. ...I Check the Remote Control batteries. I Be sure that the proper operation of the projector is selected. Repair indicator is either too far...
User Manual (ENGLISH)
Page 41
...near flammable materials or children. Structure of Screen Menu Other Information Structure of lamp. Replace with the same model provided with the projector. - I Lamp is poorly handled, it out. 5 Reverse the disassembly procedure to touch the lamp itself when handling the lamp...1 Detach the screw of the lamp cover. 2 Push to LED information in the user's manual. I Projector lamp requires replacement after replacement. Lamp specifications are defined in the user's manual if the projector does not operate normally. Lamp Life Time : 2000Hrs - I Use the recommended lamp when...
...near flammable materials or children. Structure of Screen Menu Other Information Structure of lamp. Replace with the same model provided with the projector. - I Lamp is poorly handled, it out. 5 Reverse the disassembly procedure to touch the lamp itself when handling the lamp...1 Detach the screw of the lamp cover. 2 Push to LED information in the user's manual. I Projector lamp requires replacement after replacement. Lamp specifications are defined in the user's manual if the projector does not operate normally. Lamp Life Time : 2000Hrs - I Use the recommended lamp when...

