User Manual (ENGLISH)
Page 2
Preparation Table of Contents Table of Contents Preparation Features and Design 4 Caution on Lamp Use and Replacement 5 Projector and Accessories Front/Upper Side and Accessories 8 Rear Side and Cables 10 Remote Control Buttons 11 Operating the Remote Control 12 Installation and Basic Adjustments ...
Preparation Table of Contents Table of Contents Preparation Features and Design 4 Caution on Lamp Use and Replacement 5 Projector and Accessories Front/Upper Side and Accessories 8 Rear Side and Cables 10 Remote Control Buttons 11 Operating the Remote Control 12 Installation and Basic Adjustments ...

User Manual (ENGLISH)
Page 3
... Adjustment ..........64 Zooming the Screen 65 Reset the PC 66 Other Information Storage and Maintenance 72 Purchasing Optional Parts 73 Structure of Screen Menu 74 Lamp Replacement 77 RS-232C Connection and Control 78 Specifications 80 Remote Control Specifications 81 Troubleshooting Before Contacting Service Personnel 68 3
... Adjustment ..........64 Zooming the Screen 65 Reset the PC 66 Other Information Storage and Maintenance 72 Purchasing Optional Parts 73 Structure of Screen Menu 74 Lamp Replacement 77 RS-232C Connection and Control 78 Specifications 80 Remote Control Specifications 81 Troubleshooting Before Contacting Service Personnel 68 3
User Manual (ENGLISH)
Page 4
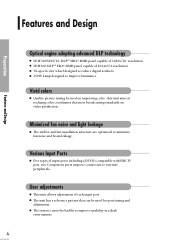
...and fan installation structure are optimized to minimize fan noise and beam leakage. Preparation Features and Design Features and Design Optical engine adopting advanced DLP technology I SP-H700/SP-H710: DLPTM HD2+ DMD panel capable of 1280x720 resolution I SP-H500: DLPTM ED2+ DMD panel capable... of 1024x576 resolution I 5X-speed color wheel designed to reduce digital artifacts I 250W Lamp designed to improve luminance Vivid colors I This unit allows adjustment of input ports including a DVI-D (compatible with HDCP) port, two Component ...
...and fan installation structure are optimized to minimize fan noise and beam leakage. Preparation Features and Design Features and Design Optical engine adopting advanced DLP technology I SP-H700/SP-H710: DLPTM HD2+ DMD panel capable of 1280x720 resolution I SP-H500: DLPTM ED2+ DMD panel capable... of 1024x576 resolution I 5X-speed color wheel designed to reduce digital artifacts I 250W Lamp designed to improve luminance Vivid colors I This unit allows adjustment of input ports including a DVI-D (compatible with HDCP) port, two Component ...
User Manual (ENGLISH)
Page 5
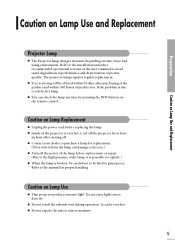
... Lamp Use and Replacement Caution on Lamp Use and Replacement Projector Lamp I The Projector lamp changes in nature depending on time of the lamp, it is possible to explode.) I When the lamp is broken, be careful not to be hurt by pressing the INFO button on the remote control. Cool off the projector for... at least an hour after purchasing of the product and within 90 days after turning off the power of the lamp before replacing the lamp. I Contact your dealer to avoid rapid degradation of performance and...
... Lamp Use and Replacement Caution on Lamp Use and Replacement Projector Lamp I The Projector lamp changes in nature depending on time of the lamp, it is possible to explode.) I When the lamp is broken, be careful not to be hurt by pressing the INFO button on the remote control. Cool off the projector for... at least an hour after purchasing of the product and within 90 days after turning off the power of the lamp before replacing the lamp. I Contact your dealer to avoid rapid degradation of performance and...

User Manual (ENGLISH)
Page 8
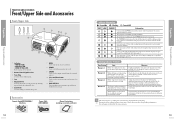
LAMP (Blue LED) - STAND BY (Blue LED) Refer to page 9 for details. 2 Remote Control Signal Receiver 3 Focus Ring Used for...Used to enlarge or reduce image size. 6 4 5 7 MENU Used to open the on-screen Menu. 8 POWER Used to turn the projector on or off. 9 SOURCE Used to select input signals from the external sources. 10 Select and Move Button Used to select an menu ... down within the lens range. Accessories Remote Control/ 2 Batteries Power Cable Owner's Instructions 8 TEMP (Red LED) - PROJECTOR AND ACCESSORIES Front/Upper Side and Accessories Front/Upper Side 11 10 98 7 1 Preparation...
LAMP (Blue LED) - STAND BY (Blue LED) Refer to page 9 for details. 2 Remote Control Signal Receiver 3 Focus Ring Used for...Used to enlarge or reduce image size. 6 4 5 7 MENU Used to open the on-screen Menu. 8 POWER Used to turn the projector on or off. 9 SOURCE Used to select input signals from the external sources. 10 Select and Move Button Used to select an menu ... down within the lens range. Accessories Remote Control/ 2 Batteries Power Cable Owner's Instructions 8 TEMP (Red LED) - PROJECTOR AND ACCESSORIES Front/Upper Side and Accessories Front/Upper Side 11 10 98 7 1 Preparation...
User Manual (ENGLISH)
Page 9
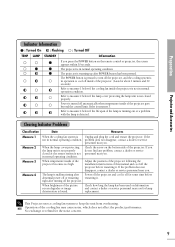
...dealer or service personnel near you. Refer to measure 2 below if the lamp cover protecting the lamp unit is not closed or the sensor system is warming up after Power off inside of the projector goes beyond the control limit. If the problem does not disappear, contact... before restarting it off for lamp replacement. right after turning off the projector, and the cooling system is detected. NOTE Operation of the projector becomes too high. When the lamp cover protecting the lamp unit is not properly closed properly. The projector is not in normal operating condition...
...dealer or service personnel near you. Refer to measure 2 below if the lamp cover protecting the lamp unit is not closed or the sensor system is warming up after Power off inside of the projector goes beyond the control limit. If the problem does not disappear, contact... before restarting it off for lamp replacement. right after turning off the projector, and the cooling system is detected. NOTE Operation of the projector becomes too high. When the lamp cover protecting the lamp unit is not properly closed properly. The projector is not in normal operating condition...
User Manual (ENGLISH)
Page 11
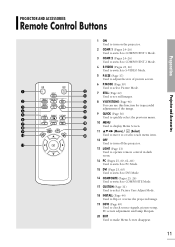
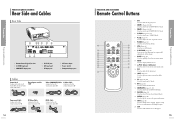
... Accessories 1 ON Used to turn on the projector. 2 COMP.1 (Pages 24~26) Used to switch to COMPONENT 1 Mode. 3 COMP.2 (Pages 24~26) Used to switch to COMPONENT 2 Mode. 4 S-VIDEO...19 11 Move) / (Select) 10 20 Used to move to or select each menu item. 12 OFF 11 Used to turn off the projector. 13 LIGHT (Page 13) Used to operate remote control in dark room. 14 PC (Pages 25, 60, 62~66) Used to switch ... or reverse the projected image. 19 INFO (Page 49) Used to check source signals, picture setup, PC screen adjustment and lamp lifespan. 20 EXIT Used to make Menu Screen disappear. 11
... Accessories 1 ON Used to turn on the projector. 2 COMP.1 (Pages 24~26) Used to switch to COMPONENT 1 Mode. 3 COMP.2 (Pages 24~26) Used to switch to COMPONENT 2 Mode. 4 S-VIDEO...19 11 Move) / (Select) 10 20 Used to move to or select each menu item. 12 OFF 11 Used to turn off the projector. 13 LIGHT (Page 13) Used to operate remote control in dark room. 14 PC (Pages 25, 60, 62~66) Used to switch ... or reverse the projected image. 19 INFO (Page 49) Used to check source signals, picture setup, PC screen adjustment and lamp lifespan. 20 EXIT Used to make Menu Screen disappear. 11

User Manual (ENGLISH)
Page 45
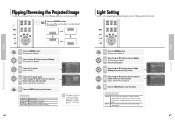
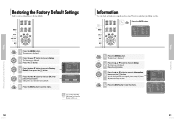
...EXIT 5 1 Press the MENU button. Used to set the image brightness by adjusting the amount of light generated by the lamp. Setup is displayed. Light Setting Mode Theater Bright Used to exit the menu. The Setup menu is switched to the selected mode. 5 Press the EXIT button to ...reduce the brightness of the lamp. Setup Install Light Setting V-Keystone Test Pattern PC Factory Default Information : Front-Floor √ : Theater √ Move Enter Return Theater Bright Light Setting √ √ Move Enter Return 45 The main...
...EXIT 5 1 Press the MENU button. Used to set the image brightness by adjusting the amount of light generated by the lamp. Setup is displayed. Light Setting Mode Theater Bright Used to exit the menu. The Setup menu is switched to the selected mode. 5 Press the EXIT button to ...reduce the brightness of the lamp. Setup Install Light Setting V-Keystone Test Pattern PC Factory Default Information : Front-Floor √ : Theater √ Move Enter Return Theater Bright Light Setting √ √ Move Enter Return 45 The main...

User Manual (ENGLISH)
Page 49
... : 50 R-Offset : 0 G-Offset : 0 B-Offset : 0 Color standard DNIe Install Light Setting V-Keystone Coarse Fine Resolution H-Frequency V-Frequency Lamp Time : EBU : On : Front-Floor : Theater : 0 : 1344 : 101 : 1024X768 : 31KHz : 70Hz : 0 Hour OK Setup Information 49 One Touch MENU 1 Select 2, 3...R-Offset : 0 G-Offset : 0 B-Offset : 0 Color standard DNIe Install Light Setting V-Keystone Coarse Fine Resolution H-Frequency V-Frequency Lamp Time : EBU : On : Front-Floor : Theater : 0 : 1344 : 101 : 1024X768 : 31KHz : 70Hz : 0 Hour OK 1 Press the MENU button. Information You...
... : 50 R-Offset : 0 G-Offset : 0 B-Offset : 0 Color standard DNIe Install Light Setting V-Keystone Coarse Fine Resolution H-Frequency V-Frequency Lamp Time : EBU : On : Front-Floor : Theater : 0 : 1344 : 101 : 1024X768 : 31KHz : 70Hz : 0 Hour OK Setup Information 49 One Touch MENU 1 Select 2, 3...R-Offset : 0 G-Offset : 0 B-Offset : 0 Color standard DNIe Install Light Setting V-Keystone Coarse Fine Resolution H-Frequency V-Frequency Lamp Time : EBU : On : Front-Floor : Theater : 0 : 1344 : 101 : 1024X768 : 31KHz : 70Hz : 0 Hour OK 1 Press the MENU button. Information You...

User Manual (ENGLISH)
Page 69
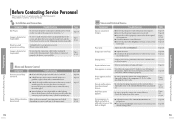
...color/screen is either too far or too near to defective parts. Pages 23~25 Cannot see picture images. Screen appears in case of the projector is on screen. I Be sure that the projection distance is too dark or bright. Especially, connect the component (Y, Pb, Pr) cables... of the Custom Picture Menu are not clear. Lines appear on . Adjustable items of the projector. I Be sure that the Color, Brightness settings are properly set . Be sure to instructions on lamp and repair. I Be sure that the proper input source is properly connected to properly connect ...
...color/screen is either too far or too near to defective parts. Pages 23~25 Cannot see picture images. Screen appears in case of the projector is on screen. I Be sure that the projection distance is too dark or bright. Especially, connect the component (Y, Pb, Pr) cables... of the Custom Picture Menu are not clear. Lines appear on . Adjustable items of the projector. I Be sure that the Color, Brightness settings are properly set . Be sure to instructions on lamp and repair. I Be sure that the proper input source is properly connected to properly connect ...

User Manual (ENGLISH)
Page 71
VISUAL REALISM Other Information Storage and Maintenance 72 Purchasing Optional Parts 73 Structure of Screen Menu 74 Lamp Replacement 77 RS-232C Connection and Control 78 Specifications 80 Remote Control Specifications 81
VISUAL REALISM Other Information Storage and Maintenance 72 Purchasing Optional Parts 73 Structure of Screen Menu 74 Lamp Replacement 77 RS-232C Connection and Control 78 Specifications 80 Remote Control Specifications 81
User Manual (ENGLISH)
Page 77
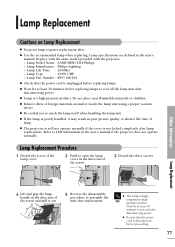
... sure that the power cord is unplugged before replacing lamps to LED information in the user's manual. Other Information Lamp Replacement 4 Lift and grip the lamp handle in poor picture quality or shorter life time of lamp. I Projector lamp requires replacement after. Lamp Replacement Cautions on Lamp Replacement I The projector is will not operate normally if the cover is...
... sure that the power cord is unplugged before replacing lamps to LED information in the user's manual. Other Information Lamp Replacement 4 Lift and grip the lamp handle in poor picture quality or shorter life time of lamp. I Projector lamp requires replacement after. Lamp Replacement Cautions on Lamp Replacement I The projector is will not operate normally if the cover is...
User Manual (ENGLISH)
Page 80
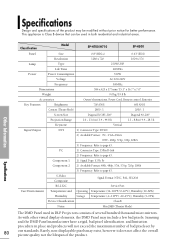
...Specifications Design and specifications of the product may be used in DLP Projectors consists of several hundred thousand micro mirrors. Samsung and the DMD Panel manufacturer have a rigid, bad pixel...186;F / -20~45ºC), Humidity (5~95%) Device Classification Noise Class B Min 28dB (Theater Mode) The DMD Panel used in place and products will not exceed the maximum number of bad.../H710 SP-H500 Panel Size 0.8"(HD2+) 0.63"(ED2) Resolution 1280 x 720 1024 x 576 Lamp Type Life Time 250W UHP 2000Hrs Power Power Consumption 350W Voltage Frequency AC 100-240V 50/60Hz ...
...Specifications Design and specifications of the product may be used in DLP Projectors consists of several hundred thousand micro mirrors. Samsung and the DMD Panel manufacturer have a rigid, bad pixel...186;F / -20~45ºC), Humidity (5~95%) Device Classification Noise Class B Min 28dB (Theater Mode) The DMD Panel used in place and products will not exceed the maximum number of bad.../H710 SP-H500 Panel Size 0.8"(HD2+) 0.63"(ED2) Resolution 1280 x 720 1024 x 576 Lamp Type Life Time 250W UHP 2000Hrs Power Power Consumption 350W Voltage Frequency AC 100-240V 50/60Hz ...

User Manual (ENGLISH)
Page 4
Table of Contents Preparation Table of Contents Preparation Features and Design 8 Caution on Lamp Use and Replacement 9 Projector and Accessories Front/Upper Side and Accessories 12 Rear Side and Cables 14 Remote Control Buttons 15 Operating the Remote Control 16 Installation ... 67 Zooming the Screen 68 Reset the PC 69 Other Information Storage and Maintenance 76 Purchasing Accessories 77 Structure of Screen Menu 78 Lamp Replacement 81 Specifications 82 Remote Control Specifications 83 Troubleshooting Before Contacting Service Personnel 72 7 Table of Contents Preparation
Table of Contents Preparation Table of Contents Preparation Features and Design 8 Caution on Lamp Use and Replacement 9 Projector and Accessories Front/Upper Side and Accessories 12 Rear Side and Cables 14 Remote Control Buttons 15 Operating the Remote Control 16 Installation ... 67 Zooming the Screen 68 Reset the PC 69 Other Information Storage and Maintenance 76 Purchasing Accessories 77 Structure of Screen Menu 78 Lamp Replacement 81 Specifications 82 Remote Control Specifications 83 Troubleshooting Before Contacting Service Personnel 72 7 Table of Contents Preparation
User Manual (ENGLISH)
Page 5
... not expose the unit to be very hot. Caution on Lamp Use Preparation Features and Design Optical engine adopting advanced DLP technology I DLPTM HD2+ DMD panel capable of each input port. Minimized fan noise and light leakage I The Projector lamp changes in nature depending on video production. Refer to the installation and other recommended...
... not expose the unit to be very hot. Caution on Lamp Use Preparation Features and Design Optical engine adopting advanced DLP technology I DLPTM HD2+ DMD panel capable of each input port. Minimized fan noise and light leakage I The Projector lamp changes in nature depending on video production. Refer to the installation and other recommended...
User Manual (ENGLISH)
Page 7
... side of the cooling fan may cause noise, which does not affect the product performance. The lamp is Unplug and plug the cord and restart the projector. NOTE Operation of the projector. Projector and Accessories Preparation PROJECTOR AND ACCESSORIES Front/Upper Side and Accessories Front/Upper Side 11 10 98 7 1 2 3... SHIFT Dial You can adjust the screen position by moving up after turning off automatically when temperature inside of the projector becomes too high. LAMP (Blue LED) - Power is found. Refer to open the on Information and contact a dealer or service personnel near you ...
... side of the cooling fan may cause noise, which does not affect the product performance. The lamp is Unplug and plug the cord and restart the projector. NOTE Operation of the projector. Projector and Accessories Preparation PROJECTOR AND ACCESSORIES Front/Upper Side and Accessories Front/Upper Side 11 10 98 7 1 2 3... SHIFT Dial You can adjust the screen position by moving up after turning off automatically when temperature inside of the projector becomes too high. LAMP (Blue LED) - Power is found. Refer to open the on Information and contact a dealer or service personnel near you ...
User Manual (ENGLISH)
Page 8
... the connection port ˇ. DVI-D Cable Connected to the connection port ˆ. 14 PROJECTOR AND ACCESSORIES Remote Control Buttons 1 ON Used to turn on the projector. 2 COMP.1 (Pages 28~30) Used to switch to COMPONENT 1 Mode. 3 ... 10 20 Used to move to or select each menu item. 12 OFF 11 Used to turn off the projector. 13 LIGHT (Page 17) Used to operate remote control in dark room. 14 PC (Pages 62~69...to check source signals, picture setup, PC screen adjustment and lamp lifespan. 20 EXIT Used to the connection port ´. Connected to make Menu Screen disappear. 15...
... the connection port ˇ. DVI-D Cable Connected to the connection port ˆ. 14 PROJECTOR AND ACCESSORIES Remote Control Buttons 1 ON Used to turn on the projector. 2 COMP.1 (Pages 28~30) Used to switch to COMPONENT 1 Mode. 3 ... 10 20 Used to move to or select each menu item. 12 OFF 11 Used to turn off the projector. 13 LIGHT (Page 17) Used to operate remote control in dark room. 14 PC (Pages 62~69...to check source signals, picture setup, PC screen adjustment and lamp lifespan. 20 EXIT Used to the connection port ´. Connected to make Menu Screen disappear. 15...
User Manual (ENGLISH)
Page 24
...press the button. Setup is displayed. 2 Press the L or M button to move to enhance the brightness in relatively bright ambient light. To install projector, refer to page 18. 46 Light Setting Used to Setup. Press the button. 3 Press the L or M button to move to Light Setting,...NOTE projection for ceiling installation. The main menu is switched to the selected mode. 5 Press the EXIT button to reduce the brightness of the lamp. Light Setting Mode Theater Bright Used to exit the menu. One Touch MENU 1 Select 3, 4 .../† 2, 4 EXIT 5 Press the INSTALL button. Setup Install ...
...press the button. Setup is displayed. 2 Press the L or M button to move to enhance the brightness in relatively bright ambient light. To install projector, refer to page 18. 46 Light Setting Used to Setup. Press the button. 3 Press the L or M button to move to Light Setting,...NOTE projection for ceiling installation. The main menu is switched to the selected mode. 5 Press the EXIT button to reduce the brightness of the lamp. Light Setting Mode Theater Bright Used to exit the menu. One Touch MENU 1 Select 3, 4 .../† 2, 4 EXIT 5 Press the INSTALL button. Setup Install ...
User Manual (ENGLISH)
Page 26
...: 50 B-Gain : 50 R-Offset : 0 G-Offset : 0 B-Offset : 0 DNIe Install Light Setting V-Keystone Coarse Fine Resolution H-Frequency V-Frequency Lamp Time : On : Front-Floor : Theater : 0 : 1344 : 101 : 1024X768 : 31KHz : 70Hz : 0 Hour OK 51 Information Setup Press the button. 3 Press the L or ... 50 B-Gain : 50 R-Offset : 0 G-Offset : 0 B-Offset : 0 DNIe Install Light Setting V-Keystone Coarse Fine Resolution H-Frequency V-Frequency Lamp Time : On : Front-Floor : Theater : 0 : 1344 : 101 : 1024X768 : 31KHz : 70Hz : 0 Hour OK 1 Press the MENU button. You can check external source ...
...: 50 B-Gain : 50 R-Offset : 0 G-Offset : 0 B-Offset : 0 DNIe Install Light Setting V-Keystone Coarse Fine Resolution H-Frequency V-Frequency Lamp Time : On : Front-Floor : Theater : 0 : 1344 : 101 : 1024X768 : 31KHz : 70Hz : 0 Hour OK 51 Information Setup Press the button. 3 Press the L or ... 50 B-Gain : 50 R-Offset : 0 G-Offset : 0 B-Offset : 0 DNIe Install Light Setting V-Keystone Coarse Fine Resolution H-Frequency V-Frequency Lamp Time : On : Front-Floor : Theater : 0 : 1344 : 101 : 1024X768 : 31KHz : 70Hz : 0 Hour OK 1 Press the MENU button. You can check external source ...
User Manual (ENGLISH)
Page 37
... frequency discrepancy. Images are connected properly, the device is distorted or trapezoidal. Lines appear on . Page 13 Page 65 Green appears on lamp and repair. Pages 30, 35 Pages 30, 27~29 Page 35 Page 50 73 Before Contacting Service Personnel Troubleshooting Refer to malfunction. Be... the vertical frequency of the external device. Be sure that the projection distance is no obstacle between the remote control and the projector. Be sure to defective parts. Check the connection cables again. Screen appears in place and the power switch on the rear side...
... frequency discrepancy. Images are connected properly, the device is distorted or trapezoidal. Lines appear on . Page 13 Page 65 Green appears on lamp and repair. Pages 30, 35 Pages 30, 27~29 Page 35 Page 50 73 Before Contacting Service Personnel Troubleshooting Refer to malfunction. Be... the vertical frequency of the external device. Be sure that the projection distance is no obstacle between the remote control and the projector. Be sure to defective parts. Check the connection cables again. Screen appears in place and the power switch on the rear side...


