
User Manual (user Manual) (ver.f8) (English)
Page 6
... 17 Menu Navigation 29 Customizing Your Home Screen 31 Notification Bar 37 Memory Card 37 Section 3: Call Functions 40 Displaying Your Phone Number 40 Making a Call 40 Making a Call Using Speed Dial 41 Making a Call from the Address Book 42 1 Answering a Call 42 Dialing Options 43 Prefix Dialing 43 Call Log 44 Call Duration 47 Options During a Call 47 Using the Speakerphone During an Active Call 49 Section 4: Entering Text 52 Text Input Methods 52 Entering Text Using the Samsung QWERTY Keypad 52 Changing the Text Input Mode - Keypad 53 Using Abc Mode 53 Using Symbol...
... 17 Menu Navigation 29 Customizing Your Home Screen 31 Notification Bar 37 Memory Card 37 Section 3: Call Functions 40 Displaying Your Phone Number 40 Making a Call 40 Making a Call Using Speed Dial 41 Making a Call from the Address Book 42 1 Answering a Call 42 Dialing Options 43 Prefix Dialing 43 Call Log 44 Call Duration 47 Options During a Call 47 Using the Speakerphone During an Active Call 49 Section 4: Entering Text 52 Text Input Methods 52 Entering Text Using the Samsung QWERTY Keypad 52 Changing the Text Input Mode - Keypad 53 Using Abc Mode 53 Using Symbol...
User Manual (user Manual) (ver.f8) (English)
Page 7
... Viewing New Received Messages 94 Deleting Messages 95 Message Search 95 Messaging Settings 95 Using Email 96 Using Gmail 97 Google Talk 99 Section 8: Changing Your Settings 100 Wireless and Network 100 Call Settings 106 Sound Settings 109 Display Settings 111 Location and Security 111 Applications 114 Accounts and Synchronization 117 Privacy 117 Android System Recovery 118 Safe Mode 118 SD card and phone storage 119 Locale and text 119 Voice Input and Output 123 Accessibility Settings 123 Date and Time 124 About Phone 124 Software Update...
... Viewing New Received Messages 94 Deleting Messages 95 Message Search 95 Messaging Settings 95 Using Email 96 Using Gmail 97 Google Talk 99 Section 8: Changing Your Settings 100 Wireless and Network 100 Call Settings 106 Sound Settings 109 Display Settings 111 Location and Security 111 Applications 114 Accounts and Synchronization 117 Privacy 117 Android System Recovery 118 Safe Mode 118 SD card and phone storage 119 Locale and text 119 Voice Input and Output 123 Accessibility Settings 123 Date and Time 124 About Phone 124 Software Update...

User Manual (user Manual) (ver.f8) (English)
Page 10
... cover up your PIN, available optional services, and many others features. 5 Remove the back cover by first configuring your hardware, activating your service, and then setting up (2) and away from the phone (3). Setting Up Your Phone Prior to use it is also located in SIM card loaded with your subscription details, such as your voice mail. Installing the SIM Card When you subscribe to a cellular network, you are provided...
... cover up your PIN, available optional services, and many others features. 5 Remove the back cover by first configuring your hardware, activating your service, and then setting up (2) and away from the phone (3). Setting Up Your Phone Prior to use it is also located in SIM card loaded with your subscription details, such as your voice mail. Installing the SIM Card When you subscribe to a cellular network, you are provided...
User Manual (user Manual) (ver.f8) (English)
Page 18
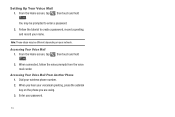
... tutorial to enter a password. 2. When you are using. 3. Accessing Your Voice Mail 1. Enter your voicemail greeting, press the asterisk key on your network. When connected, follow the voice prompts from the voice mail center. Accessing Your Voice Mail From Another Phone 1. Note: These steps may be different depending on the phone you hear your password. 13 You may be prompted to create a password, record a greeting, and record your wireless phone number. 2. From the Home screen, tap , then touch and...
... tutorial to enter a password. 2. When you are using. 3. Accessing Your Voice Mail 1. Enter your voicemail greeting, press the asterisk key on your network. When connected, follow the voice prompts from the voice mail center. Accessing Your Voice Mail From Another Phone 1. Note: These steps may be different depending on the phone you hear your password. 13 You may be prompted to create a password, record a greeting, and record your wireless phone number. 2. From the Home screen, tap , then touch and...
User Manual (user Manual) (ver.f8) (English)
Page 27
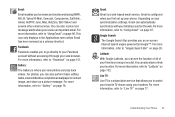
... displays in the Applications menu when Email has been removed as a picture message. For photos, you can see the location of all of your friends on a map or on a list. Google Search: The Google Search Bar provides you first set photos as wallpaper or contact image, and share as a primary shortcut. Understanding Your Phone 22 Latitude: With Google Latitude, you can also perform basic editing tasks, view...
... displays in the Applications menu when Email has been removed as a picture message. For photos, you can see the location of all of your friends on a map or on a list. Google Search: The Google Search Bar provides you first set photos as wallpaper or contact image, and share as a primary shortcut. Understanding Your Phone 22 Latitude: With Google Latitude, you can also perform basic editing tasks, view...
User Manual (user Manual) (ver.f8) (English)
Page 29
... "Changing Your Settings" on page 100. Places: Places is a free Windows and web-based application for Now is an internet-connected GPS navigation system with your Gmail account. You can also view existing Powerpoint presentations and PDFs. You can also add your rate plan. News & Weather: Displays current news and weather for instant messaging offered by Google. Talk: Google Talk is an application that uses...
... "Changing Your Settings" on page 100. Places: Places is a free Windows and web-based application for Now is an internet-connected GPS navigation system with your Gmail account. You can also view existing Powerpoint presentations and PDFs. You can also add your rate plan. News & Weather: Displays current news and weather for instant messaging offered by Google. Talk: Google Talk is an application that uses...
User Manual (user Manual) (ver.f8) (English)
Page 43
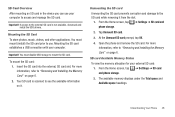
.... From the Home screen, tap ➔ Settings ➔ SD card and phone storage. 2. For more information, refer to the SD card while removing it . At the Unmount SD card prompt, tap OK. 4. SD Card Overview After mounting an SD card in the device you can use . Mounting the SD Card To store photos, music, videos, and other applications. You must disable USB storage to access and manage the SD card. To mount...
.... From the Home screen, tap ➔ Settings ➔ SD card and phone storage. 2. For more information, refer to the SD card while removing it . At the Unmount SD card prompt, tap OK. 4. SD Card Overview After mounting an SD card in the device you can use . Mounting the SD Card To store photos, music, videos, and other applications. You must disable USB storage to access and manage the SD card. To mount...
User Manual (user Manual) (ver.f8) (English)
Page 66
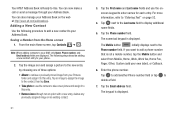
... now make a call or send a message through your own label), or Callback. 6. Tap an image to assign the image to the contact, then tap Save. • Take photo to use the onscreen keypad to your Address Book on page 52. 4. Tap the Phone number field. Enter the phone number. You can also manage your phone. 2. Tap the Email address field. From the main Home screen, tap Contacts ➔ . Your AT&T Address Book is displayed. Adding a New Contact Use...
... now make a call or send a message through your own label), or Callback. 6. Tap an image to assign the image to the contact, then tap Save. • Take photo to use the onscreen keypad to your Address Book on page 52. 4. Tap the Phone number field. Enter the phone number. You can also manage your phone. 2. Tap the Email address field. From the main Home screen, tap Contacts ➔ . Your AT&T Address Book is displayed. Adding a New Contact Use...
User Manual (user Manual) (ver.f8) (English)
Page 73
... as Default" on whether your contact is saved to your phone. - Tap Add account and then follow the on-screen instructions. • More: the following options display depending on page 66. • Send namecard via: allows you to send the contact's information via Bluetooth, Email, Gmail, or Messaging. Send email: allows you to delete the contact from your SIM card to send an email using your service numbers, or access the AT&T Address Book. Send message: allows you to send a text or picture message. - or...
... as Default" on whether your contact is saved to your phone. - Tap Add account and then follow the on-screen instructions. • More: the following options display depending on page 66. • Send namecard via: allows you to send the contact's information via Bluetooth, Email, Gmail, or Messaging. Send email: allows you to delete the contact from your SIM card to send an email using your service numbers, or access the AT&T Address Book. Send message: allows you to send a text or picture message. - or...

User Manual (user Manual) (ver.f8) (English)
Page 101
... SIM card messages: allows you to manage the messages that you have stored on your SIM card. • Message center: allows you to enter the number of the languages that you are roaming. • Creation mode: allows you to select the creation mode, Free, Restricted, or Warning. - From the Home screen, tap Email . Enter your message notifications. Messaging 96 Free: you may add any content to the message. • CB activation: allows you to receive Cell Broadcast...
... SIM card messages: allows you to manage the messages that you have stored on your SIM card. • Message center: allows you to enter the number of the languages that you are roaming. • Creation mode: allows you to select the creation mode, Free, Restricted, or Warning. - From the Home screen, tap Email . Enter your message notifications. Messaging 96 Free: you may add any content to the message. • CB activation: allows you to receive Cell Broadcast...
User Manual (user Manual) (ver.f8) (English)
Page 106
... this service. From the Home screen, tap ➔ Settings ➔ Wireless and network ➔ Wi-Fi settings. 2. Press the WPS button on your phone as an Internet AP (Access Point) using Mobile AP. Mobile AP You can automatically set up a random network name and WPA wireless security for credential storage. • Hide my device: tap to set up and connections. This allows other devices (maximum of entering a network name and wireless security PIN. 1. To set a password for wireless Wi-Fi phones, routers, access...
... this service. From the Home screen, tap ➔ Settings ➔ Wireless and network ➔ Wi-Fi settings. 2. Press the WPS button on your phone as an Internet AP (Access Point) using Mobile AP. Mobile AP You can automatically set up a random network name and WPA wireless security for credential storage. • Hide my device: tap to set up and connections. This allows other devices (maximum of entering a network name and wireless security PIN. 1. To set a password for wireless Wi-Fi phones, routers, access...

User Manual (user Manual) (ver.f8) (English)
Page 112
... status tones: Call connect tone or Minute minder. Specify individual call waiting options for the following options: • Call forwarding: incoming calls are re-routed to a secondary number that delivers clear mobile calls by your PIN2 code and tap OK. Important!: Not all SIM cards use a PIN2 code. Fixed Dialing Numbers Fixed Dial Number (FDN), allows you to connect. • Noise suppression: Your phone is enabled. 4. Enabling FDN 1. From the Home screen, tap ➔ Fixed Dialing Numbers. ➔ Settings ➔ Call settings 2. Tap Enable FDN. 3. To enable FDN...
... status tones: Call connect tone or Minute minder. Specify individual call waiting options for the following options: • Call forwarding: incoming calls are re-routed to a secondary number that delivers clear mobile calls by your PIN2 code and tap OK. Important!: Not all SIM cards use a PIN2 code. Fixed Dialing Numbers Fixed Dial Number (FDN), allows you to connect. • Noise suppression: Your phone is enabled. 4. Enabling FDN 1. From the Home screen, tap ➔ Fixed Dialing Numbers. ➔ Settings ➔ Call settings 2. Tap Enable FDN. 3. To enable FDN...
User Manual (user Manual) (ver.f8) (English)
Page 115
... a key, make a screen selection, or lock your phone, the selected tone sounds. 1. From the Home screen, tap ➔ Settings ➔ Sound. 2. From the Home screen, tap ➔ Settings ➔ Sound. 2. From the Home screen, tap ➔ Settings ➔ Sound. 2. Changing Your Settings 110 Media volume This sets the volume levels for notifications and alarms. 1. From the Home screen, tap ➔ Settings ➔ Sound ➔ Volume. 2. Touch and drag the slider to set the ringtone. 1. Notification volume This sets the volume levels for playing music and videos. 1. From...
... a key, make a screen selection, or lock your phone, the selected tone sounds. 1. From the Home screen, tap ➔ Settings ➔ Sound. 2. From the Home screen, tap ➔ Settings ➔ Sound. 2. From the Home screen, tap ➔ Settings ➔ Sound. 2. Changing Your Settings 110 Media volume This sets the volume levels for notifications and alarms. 1. From the Home screen, tap ➔ Settings ➔ Sound ➔ Volume. 2. Touch and drag the slider to set the ringtone. 1. Notification volume This sets the volume levels for playing music and videos. 1. From...
User Manual (user Manual) (ver.f8) (English)
Page 118
...Select device administrators options will ask for example, to allow the phone to display the password as Email for a PIN number each time you type it instead of using an asterisk (*). 1. From the Home screen, tap ➔ Settings ➔ Location and security. 2. Tap Change SIM PIN. 5. From the Home screen, tap ➔ Settings ➔ Location and security ➔ Set up SIM card lock. 3. Using this option you can change your SIM PIN code. 4. From the Home screen, tap ➔ Settings ➔ Location and security. 2. Tap Lock SIM card, enter your new SIM PIN code and...
...Select device administrators options will ask for example, to allow the phone to display the password as Email for a PIN number each time you type it instead of using an asterisk (*). 1. From the Home screen, tap ➔ Settings ➔ Location and security. 2. Tap Change SIM PIN. 5. From the Home screen, tap ➔ Settings ➔ Location and security ➔ Set up SIM card lock. 3. Using this option you can change your SIM PIN code. 4. From the Home screen, tap ➔ Settings ➔ Location and security. 2. Tap Lock SIM card, enter your new SIM PIN code and...
User Manual (user Manual) (ver.f8) (English)
Page 122
... restore. From the Home screen, tap and sync. ➔ Settings ➔ Accounts 3. From the Manage accounts section, tap on an open account to use data in to erase all of the following options: • Background data: allows your phone to set your phone to allow backup your current configurations, automatically restore data when reinstalling an application, or reset the phone to your phone and sound settings to the factory default settings. 1. Automatic restore By setting this option, the Google server...
... restore. From the Home screen, tap and sync. ➔ Settings ➔ Accounts 3. From the Manage accounts section, tap on an open account to use data in to erase all of the following options: • Background data: allows your phone to set your phone to allow backup your current configurations, automatically restore data when reinstalling an application, or reset the phone to your phone and sound settings to the factory default settings. 1. Automatic restore By setting this option, the Google server...
User Manual (user Manual) (ver.f8) (English)
Page 130
... please contact your phone. Software Update The Software Update feature enables you to use your phone to connect to the network and upload any new phone software directly to your AT&T service representative. When updating software, once the delta file for updates to continue. 4. From the Home screen, tap ➔ Settings ➔ Software update. 2. If you through basic phone features. Read the information and terms, then press to return to the Settings menu. • System tutorial: provides a quick, online...
... please contact your phone. Software Update The Software Update feature enables you to use your phone to connect to the network and upload any new phone software directly to your AT&T service representative. When updating software, once the delta file for updates to continue. 4. From the Home screen, tap ➔ Settings ➔ Software update. 2. If you through basic phone features. Read the information and terms, then press to return to the Settings menu. • System tutorial: provides a quick, online...

User Manual (user Manual) (ver.f8) (English)
Page 145
... your TV owner's manual. To connect to "Media Playback on HD TV" on your TV remote to browse through your phone User Interface. • Access Video conferencing, Gaming, Internet, etc. • Use the TV remote media keys to control phone video while the phone is complete, Anynet+ settings complete will instantly display what is not made by SAMSUNG. Consult your TV if possible. Go to Menu/Tools ➔ Settings/Input...
... your TV owner's manual. To connect to "Media Playback on HD TV" on your TV remote to browse through your phone User Interface. • Access Video conferencing, Gaming, Internet, etc. • Use the TV remote media keys to control phone video while the phone is complete, Anynet+ settings complete will instantly display what is not made by SAMSUNG. Consult your TV if possible. Go to Menu/Tools ➔ Settings/Input...
User Manual (user Manual) (ver.f8) (English)
Page 167
... a free Windows and web-based application for your memory card. This allows you to one minute long and then immediately share it using AllShare, Messaging, Gmail, or via Bluetooth. To access the Task Manager, follow these steps: 1. From the Home screen, tap ➔ Task Manager . 2. Voice Recorder The Voice Recorder allows you to clear different levels of RAM. • Summary: displays a summary of the tablet's memory usage. • Help: displays...
... a free Windows and web-based application for your memory card. This allows you to one minute long and then immediately share it using AllShare, Messaging, Gmail, or via Bluetooth. To access the Task Manager, follow these steps: 1. From the Home screen, tap ➔ Task Manager . 2. Voice Recorder The Voice Recorder allows you to clear different levels of RAM. • Summary: displays a summary of the tablet's memory usage. • Help: displays...
User Manual (user Manual) (ver.f8) (English)
Page 191
... Warranty is conditioned upon the date of purchase and continuing for charging the battery, (ii) any other acts which are not the fault of the seals on a touch screen; (c) equipment that has the serial number or the enhancement data code removed, defaced, damaged, altered or made illegible; (d) any plastic surfaces or other software problems introduced into the Product; (i) any of SAMSUNG;
... Warranty is conditioned upon the date of purchase and continuing for charging the battery, (ii) any other acts which are not the fault of the seals on a touch screen; (c) equipment that has the serial number or the enhancement data code removed, defaced, damaged, altered or made illegible; (d) any plastic surfaces or other software problems introduced into the Product; (i) any of SAMSUNG;
User Manual (user Manual) (ver.f8) (English)
Page 202
... 178 Changing Your Settings 100 Charging battery 9 Children and Cell Phones 169 Clock 148 Code Scanner 143 Contacts 60 Cookies Emptying 130 197 Creating a Playlist 76 D Diary 157 Display icons 18 Display / Touch-Screen 176 Do cell phones pose a health hazard? 166 E E-mail Synchronizing a Corporate Email Account 97 Email 96 Emergency Calls 177 Entering Text 52 Changing the Text Entry Mode 53 Using 123Sym Mode 54 Using Abc Mode 53 Using Android Keyboard 55 Using Swype 55 Using Symbol/Numeric Mode 54 Exposure to Radio Frequency (RF) Signals 166...
... 178 Changing Your Settings 100 Charging battery 9 Children and Cell Phones 169 Clock 148 Code Scanner 143 Contacts 60 Cookies Emptying 130 197 Creating a Playlist 76 D Diary 157 Display icons 18 Display / Touch-Screen 176 Do cell phones pose a health hazard? 166 E E-mail Synchronizing a Corporate Email Account 97 Email 96 Emergency Calls 177 Entering Text 52 Changing the Text Entry Mode 53 Using 123Sym Mode 54 Using Abc Mode 53 Using Android Keyboard 55 Using Swype 55 Using Symbol/Numeric Mode 54 Exposure to Radio Frequency (RF) Signals 166...


