Samsung SGH-A997 Sim Card
Related Manual Pages


Similar Questions

How Do I Change Where Incoming Sms Are Saved To On Rugby 3 Sgh-a997?
Once I didn't have auto deletion of inbox enabled, and I had trouble receiving new messages. I had t...
Once I didn't have auto deletion of inbox enabled, and I had trouble receiving new messages. I had t...
(Posted by BloodyPrince 6 years ago)

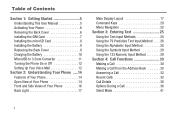
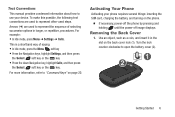
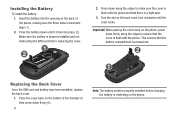
Where Is The Sim Card? Can You Change The Sim Card When Traveling?
Where is the SIM card? Can you change the SIM card when traveling? Is the phone unlocked so I can ch...
Where is the SIM card? Can you change the SIM card when traveling? Is the phone unlocked so I can ch...
(Posted by juparkorean 10 years ago)

Sim Card In Samsung Sch-u370
where is the sim card in Samsung sch-u370?
where is the sim card in Samsung sch-u370?
(Posted by rachidaomari 10 years ago)

How Can I Replace My Sim Card In A Sph-m330 Model Phone.
Where is the SIM card ?
Where is the SIM card ?
(Posted by Howdy9 11 years ago)