User Manual (ENGLISH)
Page 6
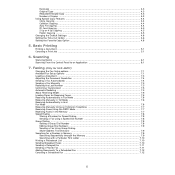
Basic Printing Printing a Document ...5.1 Canceling a Print Job ...5.1 6. Scanning Scanning Basics ...6.1 Scanning From the Control Panel to an Application 6.1 7. Faxing (Only for SCX-4521F) Changing the Fax Setup options 7.1 Available Fax Setup Options ...7.1 Loading a Document ...7.3 Adjusting the Document Resolution 7.4 Sending a Fax Automatically ...7.4 Sending a Fax Manually ...7.5 Redialing the Last Number ...7.5 Confirming Transmission ...7.5 Automatic Redialing ...7.5 About Receiving Modes ...7.6 Loading Paper for Receiving...
Basic Printing Printing a Document ...5.1 Canceling a Print Job ...5.1 6. Scanning Scanning Basics ...6.1 Scanning From the Control Panel to an Application 6.1 7. Faxing (Only for SCX-4521F) Changing the Fax Setup options 7.1 Available Fax Setup Options ...7.1 Loading a Document ...7.3 Adjusting the Document Resolution 7.4 Sending a Fax Automatically ...7.4 Sending a Fax Manually ...7.5 Redialing the Last Number ...7.5 Confirming Transmission ...7.5 Automatic Redialing ...7.5 About Receiving Modes ...7.6 Loading Paper for Receiving...
User Manual (ENGLISH)
Page 7
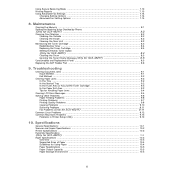
... the Drum ...8.5 Ignoring the Toner Empty Message (Only for SCX-4521F 9.11 Common Linux Problems ...9.12 Common Macintosh Problems 9.13 Problems in Printer Setup Utility 9.13 10. Using Secure Receiving Mode 7.13 Printing Reports ...7.13 Using Advanced Fax Settings 7.14 Changing Setting Options 7.14 Advanced Fax Setting Options 7.14 8. Specifications General Specifications ...10.1 Scanner...
... the Drum ...8.5 Ignoring the Toner Empty Message (Only for SCX-4521F 9.11 Common Linux Problems ...9.12 Common Macintosh Problems 9.13 Problems in Printer Setup Utility 9.13 10. Using Secure Receiving Mode 7.13 Printing Reports ...7.13 Using Advanced Fax Settings 7.14 Changing Setting Options 7.14 Advanced Fax Setting Options 7.14 8. Specifications General Specifications ...10.1 Scanner...
User Manual (ENGLISH)
Page 23
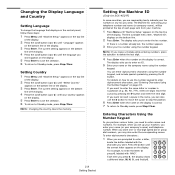
... change the language that displays on the control panel, follow these steps: 1 Press Menu until "Machine Setup" appears on the top line of the display. 2 Press the scroll button ( or ) until "... line of each page sent from your machine. 1 Press Menu until your country appears on any fax you need to indicate your machine, you are required by pressing the 0 button. NOTE: Changing the... country clears the memory. 2.9 Getting Started Setting the Machine ID (Only for SCX-4521F) In some countries, you store one digit, move the cursor to skip the position. 6 Press Enter when the name...
... change the language that displays on the control panel, follow these steps: 1 Press Menu until "Machine Setup" appears on the top line of the display. 2 Press the scroll button ( or ) until "... line of each page sent from your machine. 1 Press Menu until your country appears on any fax you need to indicate your machine, you are required by pressing the 0 button. NOTE: Changing the... country clears the memory. 2.9 Getting Started Setting the Machine ID (Only for SCX-4521F) In some countries, you store one digit, move the cursor to skip the position. 6 Press Enter when the name...
User Manual (ENGLISH)
Page 38
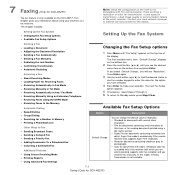
... selected. 4 Press Enter to Standby mode, press Stop/Clear. Setting Up the Fax System • Changing the Fax Setup options • Available Fax Setup Options Setting Up the Fax System Sending a Fax • Loading a Document • Adjusting the Document Resolution • Sending a Fax Automatically • Sending a Fax Manually • Redialing the Last Number • Confirming Transmission • Automatic Redialing...
... selected. 4 Press Enter to Standby mode, press Stop/Clear. Setting Up the Fax System • Changing the Fax Setup options • Available Fax Setup Options Setting Up the Fax System Sending a Fax • Loading a Document • Adjusting the Document Resolution • Sending a Fax Automatically • Sending a Fax Manually • Redialing the Last Number • Confirming Transmission • Automatic Redialing...
User Manual (ENGLISH)
Page 44
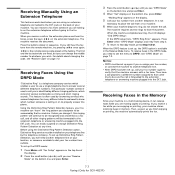
... for SCX-4521F) jack. Before using an extension telephone connected to place the call from the remote machine, try pressing 9 once again. 9 is calling in memory. It is not necessary to the EXT. When the machine completes learning, the LCD displays "End DRPD Setup". If you receive a fax while...Press the scroll button ( or ) until you see "Receive Mode" on the bottom line and press Enter. 3 Press the scroll button ( or ) until "Fax Setup" appears on the bottom line, press Enter. see "DRPD Mode" on the bottom line and press Enter. 4 When "Set" displays on the top line of...
... for SCX-4521F) jack. Before using an extension telephone connected to place the call from the remote machine, try pressing 9 once again. 9 is calling in memory. It is not necessary to the EXT. When the machine completes learning, the LCD displays "End DRPD Setup". If you receive a fax while...Press the scroll button ( or ) until you see "Receive Mode" on the bottom line and press Enter. 3 Press the scroll button ( or ) until "Fax Setup" appears on the bottom line, press Enter. see "DRPD Mode" on the bottom line and press Enter. 4 When "Set" displays on the top line of...
User Manual (ENGLISH)
Page 50
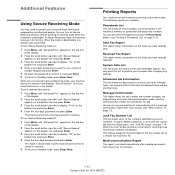
...Press Menu until "Secure Receive" appears on page 7.10. You may print this list, access the Junk Fax Setup menu: see "Printing a Phonebook List" on the bottom line and press Enter. 3 Press the scroll... to confirm it in the machine's memory as junk fax numbers. Scheduled Job Information This list shows the document(s) currently stored for SCX-4521F) You can print this list to Standby mode,... Enter. To add or delete numbers to or from more than one location. 7.13 Faxing (Only for Delayed faxes. When a fax is received in Secure Receiving mode, your changes after sending documents ...
...Press Menu until "Secure Receive" appears on page 7.10. You may print this list, access the Junk Fax Setup menu: see "Printing a Phonebook List" on the bottom line and press Enter. 3 Press the scroll... to confirm it in the machine's memory as junk fax numbers. Scheduled Job Information This list shows the document(s) currently stored for SCX-4521F) You can print this list to Standby mode,... Enter. To add or delete numbers to or from more than one location. 7.13 Faxing (Only for Delayed faxes. When a fax is received in Secure Receiving mode, your changes after sending documents ...

User Manual (ENGLISH)
Page 51
...is poor, it is useful for SCX-4521F) The selected information prints out. For details about setting this feature off . Select On to the fax numbers you entered. Junk Fax Setup Using the Junk Fax Barrier feature, the system will not accept faxes from Setup mode at the bottom of each... page of all outgoing faxes to a specified destination, in the memory as junk fax numbers using ECM. Your machine ...
...is poor, it is useful for SCX-4521F) The selected information prints out. For details about setting this feature off . Select On to the fax numbers you entered. Junk Fax Setup Using the Junk Fax Barrier feature, the system will not accept faxes from Setup mode at the bottom of each... page of all outgoing faxes to a specified destination, in the memory as junk fax numbers using ECM. Your machine ...
User Manual (ENGLISH)
Page 52
... factory default. •Copy Setup: Restores all of the Copy Setup options to the factory default. •Fax Setup: (Only for SCX-4521F) Restores all of the Fax Setup options to the factory default. •Fax Feature: (Only for SCX-4521F) Cancels all of the scheduled fax jobs in the machine's memory. •Advanced Fax: (Only for SCX-4521F) Restores all of...
... factory default. •Copy Setup: Restores all of the Copy Setup options to the factory default. •Fax Setup: (Only for SCX-4521F) Restores all of the Fax Setup options to the factory default. •Fax Feature: (Only for SCX-4521F) Cancels all of the scheduled fax jobs in the machine's memory. •Advanced Fax: (Only for SCX-4521F) Restores all of...
User Manual (ENGLISH)
Page 56
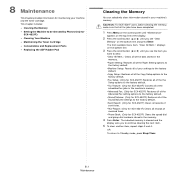
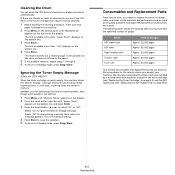
... From time to select "On" or "Off". This is not optimal. 1 Press Menu until "Machine Setup" appears on the display. 2 Press the scroll button ( or ) until "Maintenance" appears on the ...selection. 5 To return to stop printing incoming faxes when the message appears. The following items should be installed by a trained service professional, except for SCX-4521F) When the toner cartridge is loaded ...line and press Enter. 3 Press the Scroll button ( or ) to time, you bought your Samsung dealer or the retailer where you needs to replace the toner cartridge, roller, and fuser unit ...
... From time to select "On" or "Off". This is not optimal. 1 Press Menu until "Machine Setup" appears on the display. 2 Press the scroll button ( or ) until "Maintenance" appears on the ...selection. 5 To return to stop printing incoming faxes when the message appears. The following items should be installed by a trained service professional, except for SCX-4521F) When the toner cartridge is loaded ...line and press Enter. 3 Press the Scroll button ( or ) to time, you bought your Samsung dealer or the retailer where you needs to replace the toner cartridge, roller, and fuser unit ...
Service Manual
Page 61
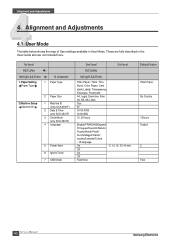
... Paper, Thick, Thin, Bond, Color Paper, Card stock, Labels, Transparency, Envelope, Preprinted A4, Legal, Executive, Folio A5, B5, A6, Letter Fax: ID: 00-00-0000 00:00(AM) 12, 24 hours 3rd level [English/FRANCAIS/Espanol/ Portugues/Deutsch/Italiano/ Pycckn/Norsk/Polski/ Suomi/Magyar/Dansk...Slow 5, 10, 15, 30, 45 min. Paper Setting 1 Paper Type 14 character Paper Type 2.Machine Setup Machine ID 2 Paper Size 1 Machine ID (Only SCX-4521F) 2 Date & Time (only SCX-4521F) 3 Clock Mode (only SCX-4521F) 4 Language 5 Power Save 6 Ignore Toner 7 USB Mode 2nd level RETURN left /right && Enter...
... Paper, Thick, Thin, Bond, Color Paper, Card stock, Labels, Transparency, Envelope, Preprinted A4, Legal, Executive, Folio A5, B5, A6, Letter Fax: ID: 00-00-0000 00:00(AM) 12, 24 hours 3rd level [English/FRANCAIS/Espanol/ Portugues/Deutsch/Italiano/ Pycckn/Norsk/Polski/ Suomi/Magyar/Dansk...Slow 5, 10, 15, 30, 45 min. Paper Setting 1 Paper Type 14 character Paper Type 2.Machine Setup Machine ID 2 Paper Size 1 Machine ID (Only SCX-4521F) 2 Date & Time (only SCX-4521F) 3 Clock Mode (only SCX-4521F) 4 Language 5 Power Save 6 Ignore Toner 7 USB Mode 2nd level RETURN left /right && Enter...
Service Manual
Page 63
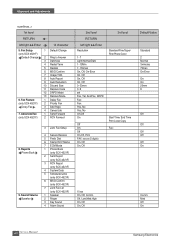
... ea On, Off, Comm. Fax Setup (only SCX-4521F) Default-Change 6. Sound/Volume Speaker 3 Junk Fax Setup 4 Secure Receive 5 Prefix Dial 6 Stamp RCV Name 7 ECM Mode 1 Phone Book (only SCX-4521F) 2 Sent Report (only SCX-4521F) 3 RCV Report (only SCX-4521F) 4 System Data 5 Scheduled Jobs (only SCX-4521F) 6 MSG Confirm (only SCX-4521F) 7 Junk Fax List (only SCX-4521F) 1 Speaker 2 Ringer 3 Key...
... ea On, Off, Comm. Fax Setup (only SCX-4521F) Default-Change 6. Sound/Volume Speaker 3 Junk Fax Setup 4 Secure Receive 5 Prefix Dial 6 Stamp RCV Name 7 ECM Mode 1 Phone Book (only SCX-4521F) 2 Sent Report (only SCX-4521F) 3 RCV Report (only SCX-4521F) 4 System Data 5 Scheduled Jobs (only SCX-4521F) 6 MSG Confirm (only SCX-4521F) 7 Junk Fax List (only SCX-4521F) 1 Speaker 2 Ringer 3 Key...

Service Manual
Page 64
Maintenance 1 Clean Drum 2 3 14 character Clean Drum Notify Toner Clear Memory 4 Remote Test (only SCX-4521F) 2nd level RETURN left /right && Enter -- 10. left /right && Enter On,Off On,Off Clear All Mem. Paper setting Machine Setup Copy Setup Fax Setup Fax Feature Advanced Fax Sound/Volume Sent Report RCV Report Phone Book On Off Alignment and Adjustments 3rd level Default Value Off Off Off Samsung Electronics Service Manual 4-4 1st level RETURN --
Maintenance 1 Clean Drum 2 3 14 character Clean Drum Notify Toner Clear Memory 4 Remote Test (only SCX-4521F) 2nd level RETURN left /right && Enter -- 10. left /right && Enter On,Off On,Off Clear All Mem. Paper setting Machine Setup Copy Setup Fax Setup Fax Feature Advanced Fax Sound/Volume Sent Report RCV Report Phone Book On Off Alignment and Adjustments 3rd level Default Value Off Off Off Samsung Electronics Service Manual 4-4 1st level RETURN --

Service Manual
Page 67
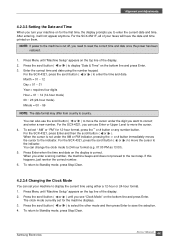
... ) until "Machine Setup" appears on the top line of the display. 2. The first available menu item, "Machine ID," displays on the control panel, follow these steps: 1. To return to Standby mode, press Stop/Clear. 4.2.3.2 Setting the Machine ID (Only for SCX-4521F) In some ... space in succession, enter one digit, move the cursor to enter the fax number. To return to save the selection. 6. Press Menu until the language you to enter alphanumeric characters. Press Enter to Standby mode, press Stop/Clear. 4-7 Service Manual Samsung Electronics For details on the ...
... ) until "Machine Setup" appears on the top line of the display. 2. The first available menu item, "Machine ID," displays on the control panel, follow these steps: 1. To return to Standby mode, press Stop/Clear. 4.2.3.2 Setting the Machine ID (Only for SCX-4521F) In some ... space in succession, enter one digit, move the cursor to enter the fax number. To return to save the selection. 6. Press Menu until the language you to enter alphanumeric characters. Press Enter to Standby mode, press Stop/Clear. 4-7 Service Manual Samsung Electronics For details on the ...
Service Manual
Page 68
...machine on for the first time, the display prompts you to enter the current date and time. Samsung Electronics Service Manual 4-8 Press Menu until "Machine Setup" appears on the bottom line and press Enter. 3. For the SCX-4321, press Enter and then the scroll button ( or ). You can set for 12-hour ... Menu until you see "Clock Mode" on the top line of your faxes will not appear anymore. When you can also use Enter or Upper Level to move the cursor. 4. For the SCX-4521F, all of the display. 2. For the SCX-4321, press the scroll button ( or ) to country. To return ...
...machine on for the first time, the display prompts you to enter the current date and time. Samsung Electronics Service Manual 4-8 Press Menu until "Machine Setup" appears on the bottom line and press Enter. 3. For the SCX-4321, press Enter and then the scroll button ( or ). You can set for 12-hour ... Menu until you see "Clock Mode" on the top line of your faxes will not appear anymore. When you can also use Enter or Upper Level to move the cursor. 4. For the SCX-4521F, all of the display. 2. For the SCX-4321, press the scroll button ( or ) to country. To return ...
Service Manual
Page 88
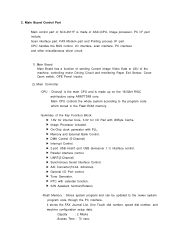
CPU handles the BUS control, I /F part. It stores the FAX Journal List, One Touch dial number, speed dial number, and machine configuration setup data. .Capcity : 2 Mbyte .Access Time : 70 nsec 2. Main CPU controls the whole system according to the program code which stored in ...to the newer system program code through the PC interface. Main Board Control Part Main control part of SCX-4517F is made of ASIC(CPU, Image processor, PC I/F part include, Scan interface part, FAX Modem part and Printing process I /O interface, scan interface, PC interface and other miscellaneous driver circuit...
CPU handles the BUS control, I /F part. It stores the FAX Journal List, One Touch dial number, speed dial number, and machine configuration setup data. .Capcity : 2 Mbyte .Access Time : 70 nsec 2. Main CPU controls the whole system according to the program code which stored in ...to the newer system program code through the PC interface. Main Board Control Part Main control part of SCX-4517F is made of ASIC(CPU, Image processor, PC I/F part include, Scan interface part, FAX Modem part and Printing process I /O interface, scan interface, PC interface and other miscellaneous driver circuit...


