
Universal Print Driver Guide (ENGLISH)
Page 9
... 2 3 Printer list Status window 4 • Recent - Create a Favorite Folder: Creates a folder for favorite printers. • Settings: Displays options for a printer by USB or network. - Shows printer list. Changing Samsung Universal Print Driver settings Setting the pop-up : 1. Search Now: Searches printers that are using to see this window. • Update Now: Updates...
... 2 3 Printer list Status window 4 • Recent - Create a Favorite Folder: Creates a folder for favorite printers. • Settings: Displays options for a printer by USB or network. - Shows printer list. Changing Samsung Universal Print Driver settings Setting the pop-up : 1. Search Now: Searches printers that are using to see this window. • Update Now: Updates...
User Manual (ENGLISH)
Page 7
Printing Multiple Pages on One Sheet of the Paper 5.14 Printing a Reduced or Enlarged Document 5.15 Fitting Your Document to a Selected Paper Size ...... 5.16 Printing ... NT 4.0/2000/XP 5.29 Chapter 6: SCANNING Scanning Basics 6.2 Scanning Using Samsung SmarThru 6.2 Scanning Process with TWAIN-enabled Software ...... 6.5 Scanning Using the WIA Driver 6.6 Scanning Using Network Scan 6.7 About Network Scan 6.7 Installing the Network Scan Program 6.7 Scanning Using Network Scan 6.9 Setting Network Scan Timeout 6.10 Chapter 7: MAINTENANCE Cleaning Your Machine 7.2 Cleaning the Outside...
Printing Multiple Pages on One Sheet of the Paper 5.14 Printing a Reduced or Enlarged Document 5.15 Fitting Your Document to a Selected Paper Size ...... 5.16 Printing ... NT 4.0/2000/XP 5.29 Chapter 6: SCANNING Scanning Basics 6.2 Scanning Using Samsung SmarThru 6.2 Scanning Process with TWAIN-enabled Software ...... 6.5 Scanning Using the WIA Driver 6.6 Scanning Using Network Scan 6.7 About Network Scan 6.7 Installing the Network Scan Program 6.7 Scanning Using Network Scan 6.9 Setting Network Scan Timeout 6.10 Chapter 7: MAINTENANCE Cleaning Your Machine 7.2 Cleaning the Outside...

User Manual (ENGLISH)
Page 9
... Drivers B.4 Using PostScript Printer Driver Features B.5 Accessing Printer Properties B.5 Printer Settings B.6 Appendix C: PRINTING FROM A MACINTOSH (Option) Installing Software for Macintosh C.2 Setting Up the Machine C.4 For a Network-connected Macintosh C.4 For a USB-connected Macintosh C.5 Printing a Document C.6 Canceling a Print Job C.7 Using Advanced Printing Features C.7 Printing Multiple Pages on...
... Drivers B.4 Using PostScript Printer Driver Features B.5 Accessing Printer Properties B.5 Printer Settings B.6 Appendix C: PRINTING FROM A MACINTOSH (Option) Installing Software for Macintosh C.2 Setting Up the Machine C.4 For a Network-connected Macintosh C.4 For a USB-connected Macintosh C.5 Printing a Document C.6 Canceling a Print Job C.7 Using Advanced Printing Features C.7 Printing Multiple Pages on...
User Manual (ENGLISH)
Page 10
... D.2 Installing the Alphabet keypad (Only for SCX-6320F E.5 ix D.12 Selecting the Samsung Network Printer Port ..... D.13 Installing PostScript DIMM D.14 Installing an Optional Tray D.17 Setting Tray 2 in the Printer Properties D.18 Appendix E: SPECIFICATIONS General Specifications E.2 Scanner and Copy Specifications E.4 Printer Specifications E.4 Facsimile Specifications (only for SCX-6220 D.6 Configuring Network Parameters D.8 Supported Operating Systems D.8 Resetting...
... D.2 Installing the Alphabet keypad (Only for SCX-6320F E.5 ix D.12 Selecting the Samsung Network Printer Port ..... D.13 Installing PostScript DIMM D.14 Installing an Optional Tray D.17 Setting Tray 2 in the Printer Properties D.18 Appendix E: SPECIFICATIONS General Specifications E.2 Scanner and Copy Specifications E.4 Printer Specifications E.4 Facsimile Specifications (only for SCX-6220 D.6 Configuring Network Parameters D.8 Supported Operating Systems D.8 Resetting...
User Manual (ENGLISH)
Page 16
... to be found on the label located on your telephone line should also know that service may cause harm to the telephone network. Installing several types of the electrical load placed on the telephone line, and is recommended that no other equipment, except for... determining whether you further instructions on the same telephone line may temporarily cease service, providing that terminal equipment causes harm to the telephone network, the telephone company should immediately remove it from the telephone company. The dispatcher will give you have "overloaded" the line. However,...
... to be found on the label located on your telephone line should also know that service may cause harm to the telephone network. Installing several types of the electrical load placed on the telephone line, and is recommended that no other equipment, except for... determining whether you further instructions on the same telephone line may temporarily cease service, providing that terminal equipment causes harm to the telephone network, the telephone company should immediately remove it from the telephone company. The dispatcher will give you have "overloaded" the line. However,...

User Manual (ENGLISH)
Page 17
...the mutual recognition of the Member States related to 1999/5/EC Radio Equipment & Telecommunications Terminal Equipment Directive (FAX) This Samsung product has been self-certified by means of TBR21 terminals. EC Certification Certification to electromagnetic compatibility. To assist in accordance ... to hearing aids. • You may safely connect this equipment to the telephone network by Samsung for pan-European single terminal connection to the analogue public switched telephone network (PSTN) in the use and application of terminal equipment which contains notes and additional...
...the mutual recognition of the Member States related to 1999/5/EC Radio Equipment & Telecommunications Terminal Equipment Directive (FAX) This Samsung product has been self-certified by means of TBR21 terminals. EC Certification Certification to electromagnetic compatibility. To assist in accordance ... to hearing aids. • You may safely connect this equipment to the telephone network by Samsung for pan-European single terminal connection to the analogue public switched telephone network (PSTN) in the use and application of terminal equipment which contains notes and additional...
User Manual (ENGLISH)
Page 24
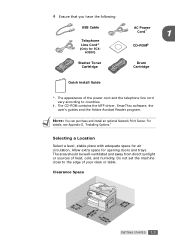
... power cord and the telephone line cord vary according to the edge of heat, cold, and humidity. NOTE: You can purchase and install an optional Network Print Server. Clearance Space GETTING STARTED 1.3 Do not set the machine close to countries. †. 4 Ensure that you have the following: USB Cable Telephone Line...
... power cord and the telephone line cord vary according to the edge of heat, cold, and humidity. NOTE: You can purchase and install an optional Network Print Server. Clearance Space GETTING STARTED 1.3 Do not set the machine close to countries. †. 4 Ensure that you have the following: USB Cable Telephone Line...
User Manual (ENGLISH)
Page 27
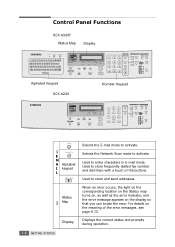
Control Panel Functions SCX-6320F Status Map Display Alphabet Keypad SCX-6220 Number Keypad 1 E M A Alphabet I keypad L Status 2 Map Display 1.6 GETTING STARTED Selects the E-mail mode to store and send addresses. Displays the current status and prompts ... on the Status map turns on, as well as the error indicator, and the error message appears on the meaning of the buttons. Selects the Network Scan mode to enter characters in E-mail mode. Used to store frequently dialled fax number and dial them with a touch of the error messages, see...
Control Panel Functions SCX-6320F Status Map Display Alphabet Keypad SCX-6220 Number Keypad 1 E M A Alphabet I keypad L Status 2 Map Display 1.6 GETTING STARTED Selects the E-mail mode to store and send addresses. Displays the current status and prompts ... on the Status map turns on, as well as the error indicator, and the error message appears on the meaning of the buttons. Selects the Network Scan mode to enter characters in E-mail mode. Used to store frequently dialled fax number and dial them with a touch of the error messages, see...
User Manual (ENGLISH)
Page 28
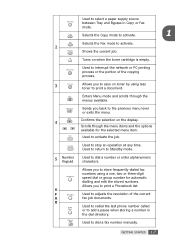
Turns on toner by using less toner to store frequently-dialed fax numbers using a one, two or three-digit speed dial or group number for the selected menu item. Enters Menu mode and scrolls through the menus available. Used to ... for automatic dialling and edit the stored numbers. Used to stop an operation at any time. Used to activate the job. Used to interrupt the network or PC printing process or the portion of the current A fax job documents. Allows you to save on when the toner cartridge is empty. Allows...
Turns on toner by using less toner to store frequently-dialed fax numbers using a one, two or three-digit speed dial or group number for the selected menu item. Enters Menu mode and scrolls through the menus available. Used to ... for automatic dialling and edit the stored numbers. Used to stop an operation at any time. Used to activate the job. Used to interrupt the network or PC printing process or the portion of the current A fax job documents. Allows you to save on when the toner cartridge is empty. Allows...

User Manual (ENGLISH)
Page 111
... Windows. 2 From the Start menu, select Control Panel and double- Setting Up the Client Computer 1 Right-click Start and select Explorer. 2 Open your network folder in the left column. 3 Right-click the shared name and select Capture Printer Port. 4 Select the port you want, check the Reconnect at log... Name field and then click OK. Setting Up the Locally Shared Printer You can be shared by other users on the network through a Windows 9x, Me, 2000, XP or NT 4.0 network printer connection. Double-click your printer icon. 7 From the Printer menu, select Properties. 8 From the Details tab, ...
... Windows. 2 From the Start menu, select Control Panel and double- Setting Up the Client Computer 1 Right-click Start and select Explorer. 2 Open your network folder in the left column. 3 Right-click the shared name and select Capture Printer Port. 4 Select the port you want, check the Reconnect at log... Name field and then click OK. Setting Up the Locally Shared Printer You can be shared by other users on the network through a Windows 9x, Me, 2000, XP or NT 4.0 network printer connection. Double-click your printer icon. 7 From the Printer menu, select Properties. 8 From the Details tab, ...

User Manual (ENGLISH)
Page 112
... click New Port. For Windows 2000, check the Shared As box. For Windows XP, from the Start menu, select Printers and Faxes. 5 Double-click your network folder in the left column. 3 Click the shared name. 4 For Windows NT 4.0/2000, from the Start menu, select Settings and Printers. PRINTING 5.29 For Windows...
... click New Port. For Windows 2000, check the Shared As box. For Windows XP, from the Start menu, select Printers and Faxes. 5 Double-click your network folder in the left column. 3 Click the shared name. 4 For Windows NT 4.0/2000, from the Start menu, select Settings and Printers. PRINTING 5.29 For Windows...
User Manual (ENGLISH)
Page 114
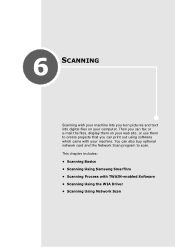
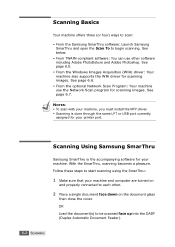
This chapter includes: • Scanning Basics • Scanning Using Samsung SmarThru • Scanning Process with your computer. Then you can fax or e-mail the files, display them to scan. 6 SCANNING Scanning with your machine lets you turn pictures and text into digital files on your web site, or use them on your machine. You can also buy optional network card and the Network Scan program to create projects that you can print out using software which came with TWAIN-enabled Software • Scanning Using the WIA Driver • Scanning Using Network Scan
This chapter includes: • Scanning Basics • Scanning Using Samsung SmarThru • Scanning Process with your computer. Then you can fax or e-mail the files, display them to scan. 6 SCANNING Scanning with your machine lets you turn pictures and text into digital files on your web site, or use them on your machine. You can also buy optional network card and the Network Scan program to create projects that you can print out using software which came with TWAIN-enabled Software • Scanning Using the WIA Driver • Scanning Using Network Scan
User Manual (ENGLISH)
Page 115
See below. • From TWAIN-compliant software: You can use the Network Scan program for your printer port. Scanning Using Samsung SmarThru Samsung SmarThru is done through the same LPT or USB port currently assigned for scanning images. Follow these steps to each other ... computer are turned on the document glass then close the cover. With the SmarThru, scanning becomes a pleasure. See page 6.6. • From the optional Network Scan Program: Your machine use other . 2 Place a single document face down on and properly connected to start scanning using the SmarThru: 1 Make sure...
See below. • From TWAIN-compliant software: You can use the Network Scan program for your printer port. Scanning Using Samsung SmarThru Samsung SmarThru is done through the same LPT or USB port currently assigned for scanning images. Follow these steps to each other ... computer are turned on the document glass then close the cover. With the SmarThru, scanning becomes a pleasure. See page 6.6. • From the optional Network Scan Program: Your machine use other . 2 Place a single document face down on and properly connected to start scanning using the SmarThru: 1 Make sure...
User Manual (ENGLISH)
Page 120
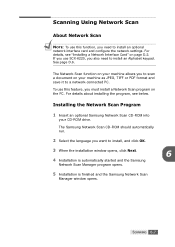
... PC. SCANNING 6.7 Installing the Network Scan Program 1 Insert an optional Samsung Network Scan CD-ROM into your machine as JPEG, TIFF or PDF format and save it to a network-connected PC. If you use SCX-6220, you also need to install an optional network interface card and configure the network settings. The Network Scan function on your machine...
... PC. SCANNING 6.7 Installing the Network Scan Program 1 Insert an optional Samsung Network Scan CD-ROM into your machine as JPEG, TIFF or PDF format and save it to a network-connected PC. If you use SCX-6220, you also need to install an optional network interface card and configure the network settings. The Network Scan function on your machine...
User Manual (ENGLISH)
Page 121
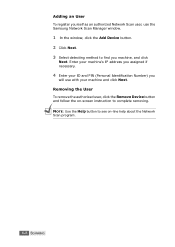
... the Remove Device button and follow the on-screen instruction to see on-line help about the Network Scan program. 6.8 SCANNING Adding an User To register yourself as an authorized Network Scan user, use the Samsung Network Scan Manager window. 1 In the window, click the Add Device button. 2 Click Next. 3 Select detecting method to...
... the Remove Device button and follow the on-screen instruction to see on-line help about the Network Scan program. 6.8 SCANNING Adding an User To register yourself as an authorized Network Scan user, use the Samsung Network Scan Manager window. 1 In the window, click the Add Device button. 2 Click Next. 3 Select detecting method to...
User Manual (ENGLISH)
Page 122
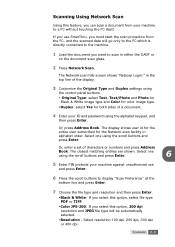
...& White image type and Color for color image type. •Duplex: select Yes for the Network scan facility in either the DADF or on the document scan glass. 2 Press Network Scan. Select one using the scroll buttons and press Enter. 6 5 Enter PIN protects your machine against unauthorized use ...from your ID and password using the scroll buttons and press Enter. SCANNING 6.9 Select one using the alphabet keypad, and then press Enter. The closest matching entries are shown. Scanning Using Network Scan Using this option, 200 dpi resolution and JPEG file type will go only ...
...& White image type and Color for color image type. •Duplex: select Yes for the Network scan facility in either the DADF or on the document scan glass. 2 Press Network Scan. Select one using the scroll buttons and press Enter. 6 5 Enter PIN protects your machine against unauthorized use ...from your ID and password using the scroll buttons and press Enter. SCANNING 6.9 Select one using the alphabet keypad, and then press Enter. The closest matching entries are shown. Scanning Using Network Scan Using this option, 200 dpi resolution and JPEG file type will go only ...
User Manual (ENGLISH)
Page 123
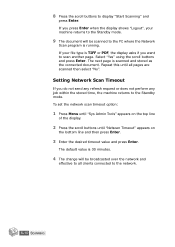
...refresh request or does not perform any job within the stored time, the machine returns to display "Start Scanning" and press Enter. To set the network scan timeout option: 1 Press Menu until "Sys Admin Tools" appears on the bottom line and then press Enter. 3 Enter the desired timeout ...until "Netscan Timeout" appears on the top line of the display. 2 Press the scroll buttons until all clients connected to the PC where the Network Scan program is scanned and stored as the connected document. 8 Press the scroll buttons to the Standby mode. Select "Yes" using the scroll buttons...
...refresh request or does not perform any job within the stored time, the machine returns to display "Start Scanning" and press Enter. To set the network scan timeout option: 1 Press Menu until "Sys Admin Tools" appears on the bottom line and then press Enter. 3 Enter the desired timeout ...until "Netscan Timeout" appears on the top line of the display. 2 Press the scroll buttons until all clients connected to the PC where the Network Scan program is scanned and stored as the connected document. 8 Press the scroll buttons to the Standby mode. Select "Yes" using the scroll buttons...

User Manual (ENGLISH)
Page 135
... this option is deleted from the machine's data base. The System Admin Tools menu may be configured which are categorized as a public billing machine. •Network Setup - enables or disables the department code. •Auxiliary Access - creates or deletes mailboxes. Admin Tools". 7.12 MAINTENANCE See the Facsimile User's Guide....Netscan Timeout - Admin Tools" displays on the top line. The following options and features are placed in a separate chapter: •Password Protect - sets the network configuration for the System Admin Tools menu: 1 Press Menu until "Sys.
... this option is deleted from the machine's data base. The System Admin Tools menu may be configured which are categorized as a public billing machine. •Network Setup - enables or disables the department code. •Auxiliary Access - creates or deletes mailboxes. Admin Tools". 7.12 MAINTENANCE See the Facsimile User's Guide....Netscan Timeout - Admin Tools" displays on the top line. The following options and features are placed in a separate chapter: •Password Protect - sets the network configuration for the System Admin Tools menu: 1 Press Menu until "Sys.

User Manual (ENGLISH)
Page 139
... name, you need to enter some information in the TCP/IP of the Information, Machine Setup, Network Settings, Maintenance and support tabs. Port is consist of Network Settings tab. • SMTP Server and Port: enter your machine's network information. • IP Address or Host Name: select IP Address or Host Name. The Default...
... name, you need to enter some information in the TCP/IP of the Information, Machine Setup, Network Settings, Maintenance and support tabs. Port is consist of Network Settings tab. • SMTP Server and Port: enter your machine's network information. • IP Address or Host Name: select IP Address or Host Name. The Default...

User Manual (ENGLISH)
Page 141
NOTE: Remaining level will prevent e-mail transmission. 7.18 MAINTENANCE NOTE: It is possible that Firewall in the network will follow in system and there is approximately 20% to know when error occurs. mail Notification mail. • Location: enter a position information recorded in the E- ...
NOTE: Remaining level will prevent e-mail transmission. 7.18 MAINTENANCE NOTE: It is possible that Firewall in the network will follow in system and there is approximately 20% to know when error occurs. mail Notification mail. • Location: enter a position information recorded in the E- ...


