

User Manual (ENGLISH)
Page 6
... paper feed area and rear the machine ...9.1 Rear and inside ...8.1 Cleaning the scan unit ...8.3 Maintaining the cartridge ...8.3 Toner cartridge storage ...8.3 Handling instructions ...8.3 Use of non-Samsung and refilled toner cartridge 8.3 Estimated cartridge life ...8.3 Redistributing toner ...8.4 Replacing the toner cartridge ...8.5 Maintenance Parts ...8.7 9. Ordering supplies and accessories Supplies ...10.1 How to purchase ...10.1 11. Specifications General specifications...
... paper feed area and rear the machine ...9.1 Rear and inside ...8.1 Cleaning the scan unit ...8.3 Maintaining the cartridge ...8.3 Toner cartridge storage ...8.3 Handling instructions ...8.3 Use of non-Samsung and refilled toner cartridge 8.3 Estimated cartridge life ...8.3 Redistributing toner ...8.4 Replacing the toner cartridge ...8.5 Maintenance Parts ...8.7 9. Ordering supplies and accessories Supplies ...10.1 How to purchase ...10.1 11. Specifications General specifications...
User Manual (ENGLISH)
Page 7
...synonymous with original. • Paper is mainly based on printer driver properties and instructions for setting up your machine from the Samsung website, www.samsungprinter.com. Properties Note The date format may differ from country to protect the machine from possible mechanical damage or... a printer driver help , support, printer drivers, manuals, and order information from the following table offers the conventions of the toner cartridge. The following resources, either as detailed explanation on setting up the properties for using your machine and this requires that you...
...synonymous with original. • Paper is mainly based on printer driver properties and instructions for setting up your machine from the Samsung website, www.samsungprinter.com. Properties Note The date format may differ from country to protect the machine from possible mechanical damage or... a printer driver help , support, printer drivers, manuals, and order information from the following table offers the conventions of the toner cartridge. The following resources, either as detailed explanation on setting up the properties for using your machine and this requires that you...

User Manual (ENGLISH)
Page 13
Please make sure that you print a large number of your machine. • The surface of the output tray may become hot if you do not touch the surface, and do not allow children near it. 1.2 Front view Machine overview 1 control panel 2 scanner lid 3 top cover 4 output tray 5 output support 6 tray 7 tray open button 8 scanner glass 9 top cover lever 10 toner cartridge 11 inner cover Note • All illustrations on this user's guide may differ from your machine. These are the main components of pages at once.
Please make sure that you print a large number of your machine. • The surface of the output tray may become hot if you do not touch the surface, and do not allow children near it. 1.2 Front view Machine overview 1 control panel 2 scanner lid 3 top cover 4 output tray 5 output support 6 tray 7 tray open button 8 scanner glass 9 top cover lever 10 toner cartridge 11 inner cover Note • All illustrations on this user's guide may differ from your machine. These are the main components of pages at once.
User Manual (ENGLISH)
Page 15
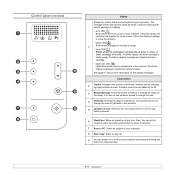
... an image on or off the control panel by using up /down arrows: Moves to the next value when the one of toner is close, or toner cartridge is empty. 1 • toner LED Blinks when the estimated cartridge life of copy buttons pressed. 6 Stop/Clear: Stops an operation at any time.... up /down arrows. See page 9.7 about 4 seconds. 7 Scan to PC: Scans an original to your machine. Check the display message and replace the toner cartridge. • paper jam LED Lights blink when there is totally empty. The message shows with short message on a display. • error LED Blinks...
... an image on or off the control panel by using up /down arrows: Moves to the next value when the one of toner is close, or toner cartridge is empty. 1 • toner LED Blinks when the estimated cartridge life of copy buttons pressed. 6 Stop/Clear: Stops an operation at any time.... up /down arrows. See page 9.7 about 4 seconds. 7 Scan to PC: Scans an original to your machine. Check the display message and replace the toner cartridge. • paper jam LED Lights blink when there is totally empty. The message shows with short message on a display. • error LED Blinks...
User Manual (ENGLISH)
Page 19
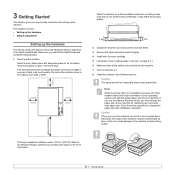
... machine may affect the printing quality. 2 Unpack the machine and check all the enclosed items. 3 Remove the tape holding the machine tightly. 4 Install both the toner cartridge. 5 Load paper. (See "Loading paper in the tray" on a flat and stable surface for not letting it upside down. Caution When you move the... air circulation. This chapter includes: • Setting up the hardware • Altitude adjustment Setting up the machine. 3 Getting Started This chapter gives you step-by toner, which is explained in the Quick Install Guide.
... machine may affect the printing quality. 2 Unpack the machine and check all the enclosed items. 3 Remove the tape holding the machine tightly. 4 Install both the toner cartridge. 5 Load paper. (See "Loading paper in the tray" on a flat and stable surface for not letting it upside down. Caution When you move the... air circulation. This chapter includes: • Setting up the hardware • Altitude adjustment Setting up the machine. 3 Getting Started This chapter gives you step-by toner, which is explained in the Quick Install Guide.
User Manual (ENGLISH)
Page 20
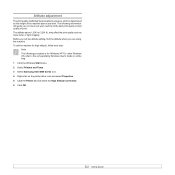
... OK. 3.2 For other Windows OS, refer to the corresponding Windows User's Guide or online help. 1 Click the Windows Start menu. 2 Select Printers and Faxes. 3 Select Samsung SCX-4500 Series icon. 4 Right-click on how to set the machine for high altitude, follow next step: Note The following information will guide you are using... your machine to the best print quality or best quality of the machine above 1,000 m (3,281 ft), may affect the print quality such as loose toner or light imaging. Altitude adjustment The print quality is affected by the height of print.
... OK. 3.2 For other Windows OS, refer to the corresponding Windows User's Guide or online help. 1 Click the Windows Start menu. 2 Select Printers and Faxes. 3 Select Samsung SCX-4500 Series icon. 4 Right-click on how to set the machine for high altitude, follow next step: Note The following information will guide you are using... your machine to the best print quality or best quality of the machine above 1,000 m (3,281 ft), may affect the print quality such as loose toner or light imaging. Altitude adjustment The print quality is affected by the height of print.

User Manual (ENGLISH)
Page 21
... want to load originals and print media into your machine. Always keep it with the scanner lid open while copying may affect copy quality and toner consumption. • Dust on the scanner glass may cause black spots on the scanner glass and align it clean. (Page 8.3) • If you how to...
... want to load originals and print media into your machine. Always keep it with the scanner lid open while copying may affect copy quality and toner consumption. • Dust on the scanner glass may cause black spots on the scanner glass and align it clean. (Page 8.3) • If you how to...
User Manual (ENGLISH)
Page 27
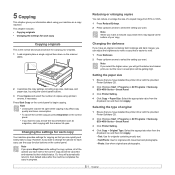
... be canceled and returned to their default status. Note When you make a reduced copy, black lines may affect copy quality and toner consumption. • To cancel the current copy job, press Stop/Clear on the scanner glass. 2 Customize the copy settings including...• Copying originals • Changing the settings for originals with the provided Printer Software CD. 2 Click Windows Start > Programs or All Programs > Samsung SCX-4500 Series > Smart Panel. 3 Click Printer Setting. 4 Click Copy > Original Type. Select the appropriate value from the dropdown list, and then click Apply...
... be canceled and returned to their default status. Note When you make a reduced copy, black lines may affect copy quality and toner consumption. • To cancel the current copy job, press Stop/Clear on the scanner glass. 2 Customize the copy settings including...• Copying originals • Changing the settings for originals with the provided Printer Software CD. 2 Click Windows Start > Programs or All Programs > Samsung SCX-4500 Series > Smart Panel. 3 Click Printer Setting. 4 Click Copy > Original Type. Select the appropriate value from the dropdown list, and then click Apply...

User Manual (ENGLISH)
Page 30
... the cabinet. • If your hands or any reason. 8.1 This will cause damage to the OPC drum. Cleaning your machine and the toner cartridge. Cleaning the outside Make sure to brush off the dirt on the cloth provided before cleaning the cabinet, wiping in on each time the... replaced or if print and scan quality problems occur. Caution • Do not touch the green surface, the OPC drum or the front of the toner cartridge, with water to clean it. 8 Maintenance This chapter provides information for about 4 seconds to print a machine report. Cleaning the inside of alcohol,...
... the cabinet. • If your hands or any reason. 8.1 This will cause damage to the OPC drum. Cleaning your machine and the toner cartridge. Cleaning the outside Make sure to brush off the dirt on the cloth provided before cleaning the cabinet, wiping in on each time the... replaced or if print and scan quality problems occur. Caution • Do not touch the green surface, the OPC drum or the front of the toner cartridge, with water to clean it. 8 Maintenance This chapter provides information for about 4 seconds to print a machine report. Cleaning the inside of alcohol,...
User Manual (ENGLISH)
Page 31
... your fingers, since the top cover is very heavy. 8.2 3 With a dry lint-free cloth, wipe away any dust and spilled toner from the toner cartridges area and their cavities. 5 Slide the toner cartridge back into fabric. 4 Locate the long strip of glass (LSU) inside the front door, and gently swab the glass to...
... your fingers, since the top cover is very heavy. 8.2 3 With a dry lint-free cloth, wipe away any dust and spilled toner from the toner cartridges area and their cavities. 5 Slide the toner cartridge back into fabric. 4 Locate the long strip of glass (LSU) inside the front door, and gently swab the glass to...
User Manual (ENGLISH)
Page 32
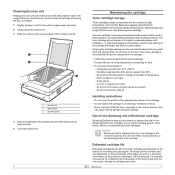
... cartridge with salty air. 1 scanner lid 2 white sheet 3 scanner glass 4 Wipe the underside of a refilled, remanufactured, or non-Samsung brand toner cartridge. Opening the cartridge package prior to change the cartridge more often. 8.3 Do not store on , operating environment, printing interval, media... - Cleaning the scan unit Keeping the scan unit clean helps ensure the best possible copies. Use of non-Samsung and refilled toner cartridge Samsung Electronics does not recommend or approve the use dramatically shortens its original, unopened package until it will be in humidity...
... cartridge with salty air. 1 scanner lid 2 white sheet 3 scanner glass 4 Wipe the underside of a refilled, remanufactured, or non-Samsung brand toner cartridge. Opening the cartridge package prior to change the cartridge more often. 8.3 Do not store on , operating environment, printing interval, media... - Cleaning the scan unit Keeping the scan unit clean helps ensure the best possible copies. Use of non-Samsung and refilled toner cartridge Samsung Electronics does not recommend or approve the use dramatically shortens its original, unopened package until it will be in humidity...

User Manual (ENGLISH)
Page 33
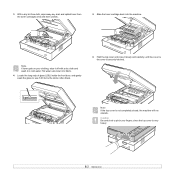
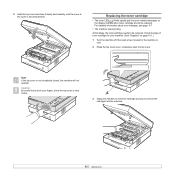
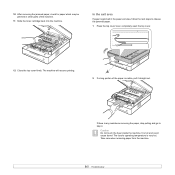
... 9.7. This will still occur even after you leave the top cover open the top cover. 2 Grasp the handles on a paper. Redistributing toner When a toner is low the toner LED( ) blinks slowly. You can be exposed to light. Use the handle on your clothing, wipe it off with your hands or any... water. Note In some cases, white streaks or light printing will cause damage to avoid touching this area. • If you have redistributed the toner. 1 Press the top cover lever, completely open for any other material. Caution • Do not touch the green surface, the OPC drum or...
... 9.7. This will still occur even after you leave the top cover open the top cover. 2 Grasp the handles on a paper. Redistributing toner When a toner is low the toner LED( ) blinks slowly. You can be exposed to light. Use the handle on your clothing, wipe it off with your hands or any... water. Note In some cases, white streaks or light printing will cause damage to avoid touching this area. • If you have redistributed the toner. 1 Press the top cover lever, completely open for any other material. Caution • Do not touch the green surface, the OPC drum or...
User Manual (ENGLISH)
Page 34
...on page 10.1.) 1 Turn the machine off, then wait a few minutes for your fingers, since the top cover is securely latched. At this stage, the toner cartridge needs to be replaced. 5 Hold the top cover and close it slowly and carefully, until the cover is the cover is very heavy. 3 Grasp... the handles on the toner cartridge and pull to remove the cartridge from the machine. 8.5 Check the type of toner cartridge for the machine to cool. 2 Press the top cover lever, completely open the top cover. For ...
...on page 10.1.) 1 Turn the machine off, then wait a few minutes for your fingers, since the top cover is securely latched. At this stage, the toner cartridge needs to be replaced. 5 Hold the top cover and close it slowly and carefully, until the cover is the cover is very heavy. 3 Grasp... the handles on the toner cartridge and pull to remove the cartridge from the machine. 8.5 Check the type of toner cartridge for the machine to cool. 2 Press the top cover lever, completely open the top cover. For ...

User Manual (ENGLISH)
Page 35
... for any other material. Caution • Do not touch the green surface, the OPC drum or the front of the toner cartridge. • To prevent damage, do not expose the toner cartridge to be halted for more than a few minutes, the OPC drum can be exposed to avoid touching this area. &#...8226; If you leave the top cover open the toner cartridge package. Use the handle on your hands or any reason. Note If toner gets on each toner cartridge, with your clothing, wipe it slowly and carefully, until the cover is the cover is ...
... for any other material. Caution • Do not touch the green surface, the OPC drum or the front of the toner cartridge. • To prevent damage, do not expose the toner cartridge to be halted for more than a few minutes, the OPC drum can be exposed to avoid touching this area. &#...8226; If you leave the top cover open the toner cartridge package. Use the handle on your hands or any reason. Note If toner gets on each toner cartridge, with your clothing, wipe it slowly and carefully, until the cover is the cover is ...

User Manual (ENGLISH)
Page 40
...4 Press the top cover lever, completely open the top cover. 7 Press the top cover lever, completely open for any other material. Note If toner gets on the toner cartridge and pull to be halted for more than a few minutes, the OPC drum can be exposed to next step. Close the top cover... cover is not completely closed, the machine will cause damage to pinch your hands or any reason. Hot water sets toner into fabric. 9 Carefully take the jammed paper out of the toner cartridge, with a dry cloth and wash it slowly and carefully, until the cover is securely latched. Caution • ...
...4 Press the top cover lever, completely open the top cover. 7 Press the top cover lever, completely open for any other material. Note If toner gets on the toner cartridge and pull to be halted for more than a few minutes, the OPC drum can be exposed to next step. Close the top cover... cover is not completely closed, the machine will cause damage to pinch your hands or any reason. Hot water sets toner into fabric. 9 Carefully take the jammed paper out of the toner cartridge, with a dry cloth and wash it slowly and carefully, until the cover is securely latched. Caution • ...
User Manual (ENGLISH)
Page 41
It is visible, pull it straight out. The machine will resume printing. 2 If a long portion of the machine. 11 Slide the toner cartridge back into the machine. The fuser's operating temperature is any resistance removing the paper, stop pulling and go to release the jammed paper. 1 Press ...
It is visible, pull it straight out. The machine will resume printing. 2 If a long portion of the machine. 11 Slide the toner cartridge back into the machine. The fuser's operating temperature is any resistance removing the paper, stop pulling and go to release the jammed paper. 1 Press ...
User Manual (ENGLISH)
Page 43
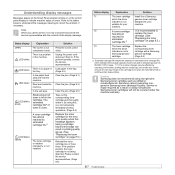
...the service representatives. Please contact the service representatives. (Page 8.5) Status display Explanation Solution T1 The toner cartridge Install the a Samsung- Service or repair required as refilled or remanufactured. Refer to the tables below to understand the ... the jam. (Page 9.5) Take out the corresponding toner cartridge and thoroughly shake it clicks. If the problem persists, the toner cartridge is not completely closed. cartridge. (Page 8.5) a. Samsung cannot guarantee nongenuine Samsung toner cartridge's quality. Status display OPEN LED blinks LED ...
...the service representatives. Please contact the service representatives. (Page 8.5) Status display Explanation Solution T1 The toner cartridge Install the a Samsung- Service or repair required as refilled or remanufactured. Refer to the tables below to understand the ... the jam. (Page 9.5) Take out the corresponding toner cartridge and thoroughly shake it clicks. If the problem persists, the toner cartridge is not completely closed. cartridge. (Page 8.5) a. Samsung cannot guarantee nongenuine Samsung toner cartridge's quality. Status display OPEN LED blinks LED ...

User Manual (ENGLISH)
Page 44
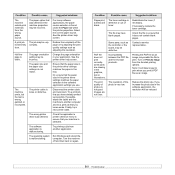
...8226; Make sure that meets the specifications required by the machine. (See "Specifications on print media" on the control panel to 100 sheets of only one type, size, and weight. • If multiple sheets have caused a paper jam, clear the paper jam. (See "Clearing paper jams" on... is incorrect. Paper sticks together. Open the top cover and remove the debris. Check the power switch and the power source. Install the toner cartridge. Disconnect the printer cable and reconnect it correctly. • There is being used. The machine may be configured incorrectly. Contact a ...
...8226; Make sure that meets the specifications required by the machine. (See "Specifications on print media" on the control panel to 100 sheets of only one type, size, and weight. • If multiple sheets have caused a paper jam, clear the paper jam. (See "Clearing paper jams" on... is incorrect. Paper sticks together. Open the top cover and remove the debris. Check the power switch and the power source. Install the toner cartridge. Disconnect the printer cable and reconnect it correctly. • There is being used. The machine may be configured incorrectly. Contact a ...
User Manual (ENGLISH)
Page 45
...within the printer properties. The paper size and the paper size settings do not match. The operating system is loose or defective. Redistribute the toner, if necessary. The file may enable the file to print when you have blank pages. Check the file to ensure that you use.... that was selected. The paper option that it does not contain blank pages. Exit Windows and reboot the computer. If necessary, replace the toner cartridge. Select the correct paper source. Finally, try adjusting the print quality settings such as an image. Turn the machine off and then ...
...within the printer properties. The paper size and the paper size settings do not match. The operating system is loose or defective. Redistribute the toner, if necessary. The file may enable the file to print when you have blank pages. Check the file to ensure that you use.... that was selected. The paper option that it does not contain blank pages. Exit Windows and reboot the computer. If necessary, replace the toner cartridge. Select the correct paper source. Finally, try adjusting the print quality settings such as an image. Turn the machine off and then ...
User Manual (ENGLISH)
Page 46
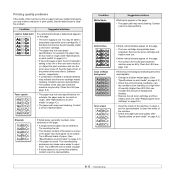
...The paper path may be defective. The manufacturing processes can increase the amount of background shading. • Remove the old toner cartridge, and then install a new one . If white vertical streaks appear on page 4.3.) • The paper lot is bad. Try reprinting the job. ... type and quality. (See "Specifications on print media" on the page: • The toner cartridge has probably been scratched. Remove the toner cartridge and install a new one . (See "Replacing the toner cartridge" on its surface. You may be dirty. for example, the paper may notice a...
...The paper path may be defective. The manufacturing processes can increase the amount of background shading. • Remove the old toner cartridge, and then install a new one . If white vertical streaks appear on page 4.3.) • The paper lot is bad. Try reprinting the job. ... type and quality. (See "Specifications on print media" on the page: • The toner cartridge has probably been scratched. Remove the toner cartridge and install a new one . (See "Replacing the toner cartridge" on its surface. You may be dirty. for example, the paper may notice a...


