
User Manual
Page 2
... or wholly, without prior notice. Samsung Techwin will resolve the problem for free of Samsung Techwin Co., Ltd. 12X SPEED DOME CAMERA User Manual Copyright ©2010 Samsung Techwin Co., Ltd. Other trademarks mentioned in this manual are excluded: y If the system behaves abnormally because you run a program irrelevant to change the contents of this document. Use of Samsung Techwin Co., Ltd. The warranty period...
... or wholly, without prior notice. Samsung Techwin will resolve the problem for free of Samsung Techwin Co., Ltd. 12X SPEED DOME CAMERA User Manual Copyright ©2010 Samsung Techwin Co., Ltd. Other trademarks mentioned in this manual are excluded: y If the system behaves abnormally because you run a program irrelevant to change the contents of this document. Use of Samsung Techwin Co., Ltd. The warranty period...

User Manual
Page 3
.... Securely plug the power cord into the power receptacle. screwdrivers, coins, metal parts, etc.) or containers filled with the installation instructions. • Use only the 24V, 60Hz AC adaptor for power supply. WARNING • To reduce the risk of electric shock is specified in accordance with water on top of camera may cause personal injury. 6. Using any other adapter could...
.... Securely plug the power cord into the power receptacle. screwdrivers, coins, metal parts, etc.) or containers filled with the installation instructions. • Use only the 24V, 60Hz AC adaptor for power supply. WARNING • To reduce the risk of electric shock is specified in accordance with water on top of camera may cause personal injury. 6. Using any other adapter could...

User Manual
Page 4
... damage the CCD image sensor. 8. Avoid aiming the camera directly towards extremely bright objects such as sun, as a disconnect device and shall stay readily operable at any way. (SAMSUNG is a lighting storm. Apparatus shall not be sure to turn off the power and then move or reinstall it in any time. 10.When using the product. The Mains plug is used as...
... damage the CCD image sensor. 8. Avoid aiming the camera directly towards extremely bright objects such as sun, as a disconnect device and shall stay readily operable at any way. (SAMSUNG is a lighting storm. Apparatus shall not be sure to turn off the power and then move or reinstall it in any time. 10.When using the product. The Mains plug is used as...
User Manual
Page 7
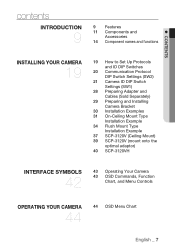
... Switches 20 Communication Protocol DIP Switch Settings (SW2) 21 Camera ID DIP Switch Settings (SW1) 28 Preparing Adapter and Cables (Sold Separately) 29 Preparing and Installing Camera Bracket 30 Installation Examples 31 On-Ceiling Mount Type Installation Example 34 Flush Mount Type Installation Example 37 SCP-3120V (Ceiling Mount) 39 SCP-3120V (mount onto the optimal adaptor) 40 SCP-3120VH INTERFACE SYMBOLS 42 43 Operating Your Camera 43 OSD Commands, Function Chart, and Menu Controls OPERATING YOUR CAMERA...
... Switches 20 Communication Protocol DIP Switch Settings (SW2) 21 Camera ID DIP Switch Settings (SW1) 28 Preparing Adapter and Cables (Sold Separately) 29 Preparing and Installing Camera Bracket 30 Installation Examples 31 On-Ceiling Mount Type Installation Example 34 Flush Mount Type Installation Example 37 SCP-3120V (Ceiling Mount) 39 SCP-3120V (mount onto the optimal adaptor) 40 SCP-3120VH INTERFACE SYMBOLS 42 43 Operating Your Camera 43 OSD Commands, Function Chart, and Menu Controls OPERATING YOUR CAMERA...
User Manual
Page 9
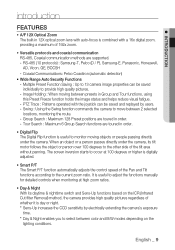
... the Pan and Tilt functions according to the current zoom ratio. INTRODUCTION introduction FEATURES • A/F 12X Optical Zoom The built-in 12X optical zoom lens with auto-focus is combined with the joystick can be saved and replayed by electrically extending the camera's exposure time. * Day & Night enables you to select between color and B/W modes depending on the lighting conditions. PTZ Trace : Patterns operated with a 16x digital zoom, providing...
... the Pan and Tilt functions according to the current zoom ratio. INTRODUCTION introduction FEATURES • A/F 12X Optical Zoom The built-in 12X optical zoom lens with auto-focus is combined with the joystick can be saved and replayed by electrically extending the camera's exposure time. * Day & Night enables you to select between color and B/W modes depending on the lighting conditions. PTZ Trace : Patterns operated with a 16x digital zoom, providing...
User Manual
Page 11
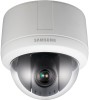
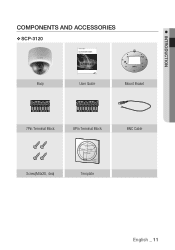
INTRODUCTION COMPONENTS AND ACCESSORIES ❖ SCP-3120 12X SPEED DOME CAMERA User Manual SCP-3120/3120V/3120VH Body User Guide Mount Braket 7Pin Terminal Block 8Pin Terminal Block BNC Cable Screw(M4x20, 4ea) Template English English _ 11
INTRODUCTION COMPONENTS AND ACCESSORIES ❖ SCP-3120 12X SPEED DOME CAMERA User Manual SCP-3120/3120V/3120VH Body User Guide Mount Braket 7Pin Terminal Block 8Pin Terminal Block BNC Cable Screw(M4x20, 4ea) Template English English _ 11
User Manual
Page 12
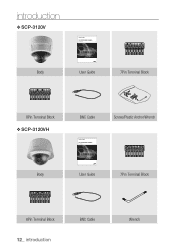
introduction ❖ SCP-3120V 12X SPEED DOME CAMERA User Manual SCP-3120/3120V/3120VH Body User Guide 7Pin Terminal Block 8Pin Terminal Block ❖ SCP-3120VH BNC Cable Screws/Plastic Anchor/Wrench 12X SPEED DOME CAMERA User Manual SCP-3120/3120V/3120VH Body User Guide 7Pin Terminal Block 8Pin Terminal Block 12_ introduction BNC Cable Wrench
introduction ❖ SCP-3120V 12X SPEED DOME CAMERA User Manual SCP-3120/3120V/3120VH Body User Guide 7Pin Terminal Block 8Pin Terminal Block ❖ SCP-3120VH BNC Cable Screws/Plastic Anchor/Wrench 12X SPEED DOME CAMERA User Manual SCP-3120/3120V/3120VH Body User Guide 7Pin Terminal Block 8Pin Terminal Block 12_ introduction BNC Cable Wrench
User Manual
Page 13
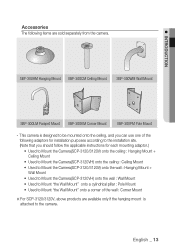
... installation site. (Note that you should follow the applicable instructions for each mounting adaptor.) • Used to Mount the Camera(SCP-3120/3120V) onto the ceiling : Hanging Mount + Ceiling Mount • Used to Mount the Camera(SCP-3120VH) onto the ceiling : Ceiling Mount • Used to Mount the Camera(SCP-3120/3120V) onto the wall : Hanging Mount + Wall Mount • Used to Mount the Camera(SCP-3120VH) onto the wall : Wall Mount • Used to Mount "the Wall Mount" onto a cylindrical pillar : Pole Mount • Used to Mount...
... installation site. (Note that you should follow the applicable instructions for each mounting adaptor.) • Used to Mount the Camera(SCP-3120/3120V) onto the ceiling : Hanging Mount + Ceiling Mount • Used to Mount the Camera(SCP-3120VH) onto the ceiling : Ceiling Mount • Used to Mount the Camera(SCP-3120/3120V) onto the wall : Hanging Mount + Wall Mount • Used to Mount the Camera(SCP-3120VH) onto the wall : Wall Mount • Used to Mount "the Wall Mount" onto a cylindrical pillar : Pole Mount • Used to Mount...
User Manual
Page 14
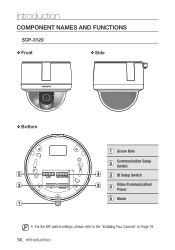
introduction COMPONENT NAMES AND FUNCTIONS SCP-3120 ❖ Front ❖ Side ❖ Bottom Screw Hole Communication Setup Switch ID Setup Switch Video/Communication/ Power Alarm M For the DIP switch settings, please refer to the "Installing Your Camera" on Page 19. 14_ introduction
introduction COMPONENT NAMES AND FUNCTIONS SCP-3120 ❖ Front ❖ Side ❖ Bottom Screw Hole Communication Setup Switch ID Setup Switch Video/Communication/ Power Alarm M For the DIP switch settings, please refer to the "Installing Your Camera" on Page 19. 14_ introduction
User Manual
Page 21
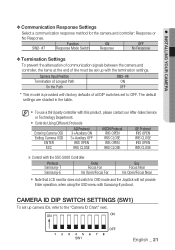
...; Control with the SSC-5000 Controller Protocol Samsung-T Samsung-E Enter Focus Far Iris Open/Focus Far Esc Focus Near Iris Open/Focus Near Note that LCD monitor does not switch to OSD mode and the Joystick will not provide Enter operation, when using the OSD menu with factory defaults of all DIP switches set to the "Camera ID Chart" next. CAMERA ID DIP SWITCH SETTINGS (SW1) To set up camera IDs, refer to OFF. INSTALLING YOUR CAMERA...
...; Control with the SSC-5000 Controller Protocol Samsung-T Samsung-E Enter Focus Far Iris Open/Focus Far Esc Focus Near Iris Open/Focus Near Note that LCD monitor does not switch to OSD mode and the Joystick will not provide Enter operation, when using the OSD menu with factory defaults of all DIP switches set to the "Camera ID Chart" next. CAMERA ID DIP SWITCH SETTINGS (SW1) To set up camera IDs, refer to OFF. INSTALLING YOUR CAMERA...

User Manual
Page 33
For more instructions, please refer to Page 20. For more detailed instructions, please refer to the proper terminals on the bottom of the camera. Connect Cables Connect each camera cable to Page 17:"Camera Wiring Interface Board". 6. Camera DIP Switch Setup DIP switches for communication and ID setup are located on the bottom of the camera. English English _ 33 INSTALLING YOUR CAMERA 5.
For more instructions, please refer to Page 20. For more detailed instructions, please refer to the proper terminals on the bottom of the camera. Connect Cables Connect each camera cable to Page 17:"Camera Wiring Interface Board". 6. Camera DIP Switch Setup DIP switches for communication and ID setup are located on the bottom of the camera. English English _ 33 INSTALLING YOUR CAMERA 5.

User Manual
Page 44
operating your camera OSD MENU CHART P1 P2 Zoom/Focus White Balance Exposure Camera Setting Back Light AGC DNR XDR Day/Night Others P3 P4 P5 Focus Mode AUTO/MANUAL/ONESHOT Digital Zoom OFF/2X/3X/4X/5X/.../16X ATW(IN)/ATW(OUT) AWC Manual Red Blue 0~255 0~255 Brightness 0~64 Iris AUTO MANUAL Iris Value(0~64) OFF Shutter A.FLK MANUAL Shutter Speed OFF Sens-Up Auto Sens-up Limit 2X/4X...512X...
operating your camera OSD MENU CHART P1 P2 Zoom/Focus White Balance Exposure Camera Setting Back Light AGC DNR XDR Day/Night Others P3 P4 P5 Focus Mode AUTO/MANUAL/ONESHOT Digital Zoom OFF/2X/3X/4X/5X/.../16X ATW(IN)/ATW(OUT) AWC Manual Red Blue 0~255 0~255 Brightness 0~64 Iris AUTO MANUAL Iris Value(0~64) OFF Shutter A.FLK MANUAL Shutter Speed OFF Sens-Up Auto Sens-up Limit 2X/4X...512X...

User Manual
Page 46
... Alarm Output Timer 1~2 ON 1~60(Sec), 1~60(Min) Out Off 1~2 MD Dwell Time OFF ON 1~60(Sec), 1~60(Min) Power On Reset Cancel/Execute Factory Default Set Cancel/Execute Camera Default Set Cancel/Execute Auto Refresh OFF ON 1~7Day(s) On/Off ON/OFF Edit Password Old Pwd/New Pwd 46_ operating your camera P1 OSD Setting Alarm Setting Initialize Password Setting Status P2 P3 P4 P5 Image Hold ON/OFF Jog Speed Manual...
... Alarm Output Timer 1~2 ON 1~60(Sec), 1~60(Min) Out Off 1~2 MD Dwell Time OFF ON 1~60(Sec), 1~60(Min) Power On Reset Cancel/Execute Factory Default Set Cancel/Execute Camera Default Set Cancel/Execute Auto Refresh OFF ON 1~7Day(s) On/Off ON/OFF Edit Password Old Pwd/New Pwd 46_ operating your camera P1 OSD Setting Alarm Setting Initialize Password Setting Status P2 P3 P4 P5 Image Hold ON/OFF Jog Speed Manual...
User Manual
Page 47
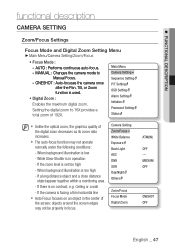
... Menu ► Main Menu/Camera Setting/Zoom/Focus • Focus Mode : - If the camera is facing a thin horizontal line Auto Focus focuses on an object in focus. When background illumination is used. • Digital Zoom : Enables the maximum digital zoom. AUTO : Performs continuous auto-focus. - Camera Setting Zoom/Focus White Balance Exposure Back Light AGC DNR XDR Day/Night Others Zoom/Focus Focus Mode Digital Zoom ATW(IN) OFF --MEDIUM OFF ONESHOT OFF English English _ 47 Main Menu Camera Setting Sequence Setting P/T Setting OSD Setting Alarm Setting Initialize Password...
... Menu ► Main Menu/Camera Setting/Zoom/Focus • Focus Mode : - If the camera is facing a thin horizontal line Auto Focus focuses on an object in focus. When background illumination is used. • Digital Zoom : Enables the maximum digital zoom. AUTO : Performs continuous auto-focus. - Camera Setting Zoom/Focus White Balance Exposure Back Light AGC DNR XDR Day/Night Others Zoom/Focus Focus Mode Digital Zoom ATW(IN) OFF --MEDIUM OFF ONESHOT OFF English English _ 47 Main Menu Camera Setting Sequence Setting P/T Setting OSD Setting Alarm Setting Initialize Password...

User Manual
Page 66
... Setting/PTZ Trace Maximum 4 patterns of the PTZ Trace action. When the memory card is displayed. Main Menu Camera Setting • Replay : Replays a route saved by the Trace function. Alarm Setting Initialize Password Setting Status The memory duration varies depending on the screen. * Use the OSD On button to pause while saving a trace. (When using the SCC-3100A/SCC-1000 controller) Group SEQ Tour SEQ PTZ Trace Auto Run * When Using Different Protocols Power...
... Setting/PTZ Trace Maximum 4 patterns of the PTZ Trace action. When the memory card is displayed. Main Menu Camera Setting • Replay : Replays a route saved by the Trace function. Alarm Setting Initialize Password Setting Status The memory duration varies depending on the screen. * Use the OSD On button to pause while saving a trace. (When using the SCC-3100A/SCC-1000 controller) Group SEQ Tour SEQ PTZ Trace Auto Run * When Using Different Protocols Power...

User Manual
Page 67
..., or 1~5 minutes.) Main Menu Camera Setting Sequence Setting P/T Setting OSD Setting Alarm Setting Initialize Password Setting Status Sequence Setting Preset Swing SEQ Group SEQ Tour SEQ PTZ Trace Auto Run Power On Resume ON Auto Run Mode Time OFF 20 SEC English English _ 67 PRESET : Auto run a selected trace mode. - TRACE : Auto run a selected preset number. - Refer to the next page. • Time : Enables setting up the camera's tilt angle and auto pan speed manually. - HOME : Auto run Home Position (Refet to set up an Auto Run duration. (The...
..., or 1~5 minutes.) Main Menu Camera Setting Sequence Setting P/T Setting OSD Setting Alarm Setting Initialize Password Setting Status Sequence Setting Preset Swing SEQ Group SEQ Tour SEQ PTZ Trace Auto Run Power On Resume ON Auto Run Mode Time OFF 20 SEC English English _ 67 PRESET : Auto run a selected trace mode. - TRACE : Auto run a selected preset number. - Refer to the next page. • Time : Enables setting up the camera's tilt angle and auto pan speed manually. - HOME : Auto run Home Position (Refet to set up an Auto Run duration. (The...
User Manual
Page 85
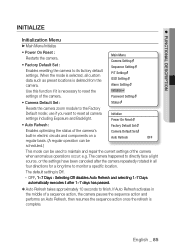
... to reset the settings of the camera when anomalous operations occur: e.g. Use this function if it after the camera repeatedly rotated in electric circuits and components on a regular basis. (A regular operation can be Camera Default Set Auto Refresh OFF scheduled.) This mode can be used to monitor a specific location. English English _ 85 Main Menu Camera Setting Sequence Setting P/T Setting OSD Setting Alarm Setting Initialize Password Setting • Camera Default Set : Status Resets the camera zoom module to its factory default settings. OFF...
... to reset the settings of the camera when anomalous operations occur: e.g. Use this function if it after the camera repeatedly rotated in electric circuits and components on a regular basis. (A regular operation can be Camera Default Set Auto Refresh OFF scheduled.) This mode can be used to monitor a specific location. English English _ 85 Main Menu Camera Setting Sequence Setting P/T Setting OSD Setting Alarm Setting Initialize Password Setting • Camera Default Set : Status Resets the camera zoom module to its factory default settings. OFF...
User Manual
Page 88
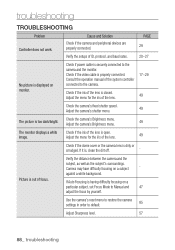
... power cable is closed. Check if the iris of ID, protocol, and baud rates. Picture is out of the lens is securely connected to default. 85 Adjust Sharpness level. 57 88_ troubleshooting Adjust the camera's Brightness menu. 49 The monitor displays a white image. If it is displayed on a particular subject, set Focus Mode to the camera. 17~29 Check if the iris of focus. against a white background. Consult the operation manual of the system controller connected to Manual...
... power cable is closed. Check if the iris of ID, protocol, and baud rates. Picture is out of the lens is securely connected to default. 85 Adjust Sharpness level. 57 88_ troubleshooting Adjust the camera's Brightness menu. 49 The monitor displays a white image. If it is displayed on a particular subject, set Focus Mode to the camera. 17~29 Check if the iris of focus. against a white background. Consult the operation manual of the system controller connected to Manual...

User Manual
Page 89
... overheated. Adjust Sharpness level. 57 Picture's colors are set. Check if the dome cover or the camera lens is pointing directly at a fluorescent light or sunlight. Check if power cable is securely connected to remove the flickering. Consult the operation manual of the system controller connected to the camera. 17~29 Check if Pan Limit and/or Tilt Limit are not good. Adjust Dwell Time in Day & Night menu. 56...
... overheated. Adjust Sharpness level. 57 Picture's colors are set. Check if the dome cover or the camera lens is pointing directly at a fluorescent light or sunlight. Check if power cable is securely connected to remove the flickering. Consult the operation manual of the system controller connected to the camera. 17~29 Check if Pan Limit and/or Tilt Limit are not good. Adjust Dwell Time in Day & Night menu. 56...
Brochure
Page 2
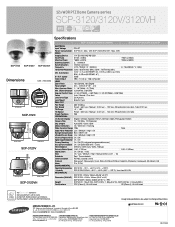
...°(Tele) Focus Auto / Manual / One shot Lens Drive Type DC Auto Iris Lens Mount Board-in type Pan / Tilt Pan Range 360° Endless Pan Speed Preset : 650°/sec / Manual : 0.05°/sec ~ 120°/sec (Proportional zoom ratio), Turbo 200°/sec Tilt Range -5° ~ 185° Tilt Speed Preset : 650°/sec / Manual : 0.05°/sec ~ 120°/sec (Proportional zoom ratio) Preset Positions 255 Operational On Screen Display English, Chinese, Spanish...
...°(Tele) Focus Auto / Manual / One shot Lens Drive Type DC Auto Iris Lens Mount Board-in type Pan / Tilt Pan Range 360° Endless Pan Speed Preset : 650°/sec / Manual : 0.05°/sec ~ 120°/sec (Proportional zoom ratio), Turbo 200°/sec Tilt Range -5° ~ 185° Tilt Speed Preset : 650°/sec / Manual : 0.05°/sec ~ 120°/sec (Proportional zoom ratio) Preset Positions 255 Operational On Screen Display English, Chinese, Spanish...


