User Manual (ENGLISH)
Page 14
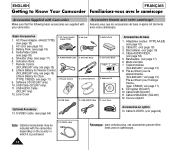
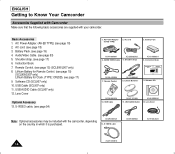
...page 54) Note: Optional accessories may be included with your camcorder. Lithium Battery for Remote Control. (SCL906/L907 only, see page 15) Lithium Battery for Clock. (TYPE: CR2025, see page 53) 5. USB Cable 11. AC Power Adapter 1. Remote Control 9. Instruction Book. 7. USB Cable (SCL907 ...only) SSTTOAPRT/ TIMSEERLF DISPLAY STILL RETZUERRNO CROESUENTTER WIDE 11. Software CD 10. Télécommande. (SCL906/L907, voir page 15) 8. Câble USB AUDIO (SCL907) 12. AC Power Adapter. (AA-E8 TYPE) (AA-E8 TYPE) (see page 19) 4. Battery Pack. (see page 18)...
...page 54) Note: Optional accessories may be included with your camcorder. Lithium Battery for Remote Control. (SCL906/L907 only, see page 15) Lithium Battery for Clock. (TYPE: CR2025, see page 53) 5. USB Cable 11. AC Power Adapter 1. Remote Control 9. Instruction Book. 7. USB Cable (SCL907 ...only) SSTTOAPRT/ TIMSEERLF DISPLAY STILL RETZUERRNO CROESUENTTER WIDE 11. Software CD 10. Télécommande. (SCL906/L907, voir page 15) 8. Câble USB AUDIO (SCL907) 12. AC Power Adapter. (AA-E8 TYPE) (AA-E8 TYPE) (see page 19) 4. Battery Pack. (see page 18)...
User Manual (ENGLISH)
Page 18
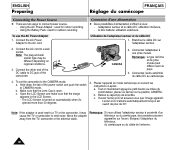
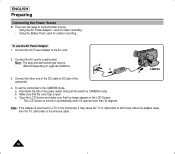
...secteur. 2. Connectez l'adaptateur à une prise murale. To set the camcorder to DC jack of the camcorder. 2. Make sure that the image appears in the LCD Screen. - a. Move the adapter away from the TV, camcorder or the antenna cable. Connexion d'une alimentation ✤ Deux possibilités...and push the switch to connect power source. - c. The LCD Screen is turned on 2 regional conditions. 1 3. b. To use the AC Power Adapter 1. Eloignez l'adaptateur du téléviseur, du caméscope ou du câble de l'antenne. 18 le bloc batterie: utilisation...
...secteur. 2. Connectez l'adaptateur à une prise murale. To set the camcorder to DC jack of the camcorder. 2. Make sure that the image appears in the LCD Screen. - a. Move the adapter away from the TV, camcorder or the antenna cable. Connexion d'une alimentation ✤ Deux possibilités...and push the switch to connect power source. - c. The LCD Screen is turned on 2 regional conditions. 1 3. b. To use the AC Power Adapter 1. Eloignez l'adaptateur du téléviseur, du caméscope ou du câble de l'antenne. 18 le bloc batterie: utilisation...
User Manual (ENGLISH)
Page 19
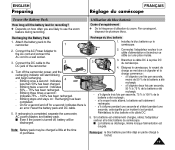
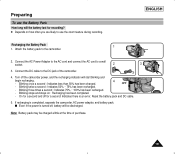
...and DC cable. 5. If recharging is an error. Installez le bloc batterie sur le caméscope. 2. Connect the AC Power Adapter to the AC cord and connect the AC cord to use the Battery Pack How long will start blinking and begin recharging. - Recharging the Battery Pack 1. Ré...et s'éteint pendant une seconde, cela signifie qu'un incident s'est produit. I Even if the power is turned off the camcorder power, and the recharging indicator will the battery last for a second: Indicates there is completed, separate the camcorder, AC power adapter, and battery pack.
...and DC cable. 5. If recharging is an error. Installez le bloc batterie sur le caméscope. 2. Connect the AC Power Adapter to the AC cord and connect the AC cord to use the Battery Pack How long will start blinking and begin recharging. - Recharging the Battery Pack 1. Ré...et s'éteint pendant une seconde, cela signifie qu'un incident s'est produit. I Even if the power is turned off the camcorder power, and the recharging indicator will the battery last for a second: Indicates there is completed, separate the camcorder, AC power adapter, and battery pack.
User Manual (ENGLISH)
Page 69
... FONDU EN FERMETURE..46 FONDU EN OUVERTURE..46 - LLCD 26 LENTILLE 9 LOCK 18 LOGEMENT CASSETTE ....11 LONGUEUR FOCALE.........68 LUMINOSITE 26 69 ABROAD 63 AC POWER ADAPTER........18 ADJUSTING 26 AF 36 AUDIO 53 AUTO FOCUSING 36 AUTO MODE 38 AUTO POWER OFF 24 - CAMERA 18 CASSETTE 22 CASSETTE HOLDER ..........11 CLEANING... 31 DIMENSIONS 68 DIS 35 DISPLAY 12 DSE 40 - E EASY 33 EJECT 22 EJECTION D'UNE CASSETTE 22 ENREGISTREMENT AUTOMATIQUE 15 ENTER 26 - HAND STRAP 16 Hi8 54 - N - H -
... FONDU EN FERMETURE..46 FONDU EN OUVERTURE..46 - LLCD 26 LENTILLE 9 LOCK 18 LOGEMENT CASSETTE ....11 LONGUEUR FOCALE.........68 LUMINOSITE 26 69 ABROAD 63 AC POWER ADAPTER........18 ADJUSTING 26 AF 36 AUDIO 53 AUTO FOCUSING 36 AUTO MODE 38 AUTO POWER OFF 24 - CAMERA 18 CASSETTE 22 CASSETTE HOLDER ..........11 CLEANING... 31 DIMENSIONS 68 DIS 35 DISPLAY 12 DSE 40 - E EASY 33 EJECT 22 EJECTION D'UNE CASSETTE 22 ENREGISTREMENT AUTOMATIQUE 15 ENTER 26 - HAND STRAP 16 Hi8 54 - N - H -
User Manual (ENGLISH)
Page 5
Notices and Safety Instructions 22. NOTE TO CATV SYSTEM INSTALLER: This reminder is used at 240V ac, a suitable plug adapter should be connected to the grounding system of the building as practical. NOTE: "Hg LAMP(S) INSIDE THIS PRODUCT CONTAIN MERCURY AND MUST BE RECYCLED OR ...
Notices and Safety Instructions 22. NOTE TO CATV SYSTEM INSTALLER: This reminder is used at 240V ac, a suitable plug adapter should be connected to the grounding system of the building as practical. NOTE: "Hg LAMP(S) INSIDE THIS PRODUCT CONTAIN MERCURY AND MUST BE RECYCLED OR ...
User Manual (ENGLISH)
Page 6
... Screen Display) ...12 Accessories Supplied with the Camcorder...14 Remote Control (SCL906/L907 only) ...15 s Self Timer Recording...15 Preparing Adjusting the Hand Strap and Shoulder Strap ...16 Attaching the Lens Cover ...17 Lithium Battery Installation ...17 Connecting the Power Source...18 s To use the AC Power Adapter ...18 s To use the Battery Pack... Zooming In and Out...30 Digital Zoom ...31 EASY mode (for Beginners) ...33 CUSTOM-Creating your own customized recording settings...34 DIS (Digital Image Stabilizer, SCL906/L907 only)...35 MF/AF (Manual Focus/Auto Focus) ...36 BLC...37 2
... Screen Display) ...12 Accessories Supplied with the Camcorder...14 Remote Control (SCL906/L907 only) ...15 s Self Timer Recording...15 Preparing Adjusting the Hand Strap and Shoulder Strap ...16 Attaching the Lens Cover ...17 Lithium Battery Installation ...17 Connecting the Power Source...18 s To use the AC Power Adapter ...18 s To use the Battery Pack... Zooming In and Out...30 Digital Zoom ...31 EASY mode (for Beginners) ...33 CUSTOM-Creating your own customized recording settings...34 DIS (Digital Image Stabilizer, SCL906/L907 only)...35 MF/AF (Manual Focus/Auto Focus) ...36 BLC...37 2
User Manual (ENGLISH)
Page 10
... OF PROPERLY. * When the lithium battery becomes weak or dead please contact your local dealer. even if the battery pack or AC power adapter is removed. ✤ The lithium battery for the camcorder lasts about 8~10 months under normal operation from time of installation. ✤ When the lithium battery becomes weak or dead...
... OF PROPERLY. * When the lithium battery becomes weak or dead please contact your local dealer. even if the battery pack or AC power adapter is removed. ✤ The lithium battery for the camcorder lasts about 8~10 months under normal operation from time of installation. ✤ When the lithium battery becomes weak or dead...
User Manual (ENGLISH)
Page 18
... 53) 5. Audio/Video Cable. (see page 19) 4. Software CD (SCL907 only) 10. Battery Pack AD44-00090A 4. Instruction Book Video Camcorder 8mm COLOR Caméscope 8mm ÉCRAN LCD COULEUR AD39-40200A 7. Software CD AD59-00062A 10. USB AUDIO Cable AD46-00060A 12. ... strap. (see page 18) 3. Remote Control. (see page 18) 2. USB Cable AD43-10130H 11. AC Power Adapter. (AA-E8 TYPE) (see page 15) (SCL906/L907 only) 8. Lithium Battery for Remote Control. (see page 15) (SCL906/L907 only) Lithium Battery for Clock. (TYPE: CR2025, see page 54) 1. S-VIDEO cable. (see ...
... 53) 5. Audio/Video Cable. (see page 19) 4. Software CD (SCL907 only) 10. Battery Pack AD44-00090A 4. Instruction Book Video Camcorder 8mm COLOR Caméscope 8mm ÉCRAN LCD COULEUR AD39-40200A 7. Software CD AD59-00062A 10. USB AUDIO Cable AD46-00060A 12. ... strap. (see page 18) 3. Remote Control. (see page 18) 2. USB Cable AD43-10130H 11. AC Power Adapter. (AA-E8 TYPE) (see page 15) (SCL906/L907 only) 8. Lithium Battery for Remote Control. (see page 15) (SCL906/L907 only) Lithium Battery for Clock. (TYPE: CR2025, see page 54) 1. S-VIDEO cable. (see ...
User Manual (ENGLISH)
Page 21
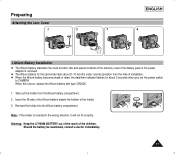
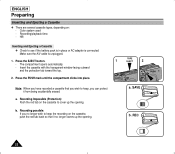
...doctor immediately. 17 Reinsert the holder into the lithium battery compartment. even if the battery pack or AC power adapter is inserted in the wrong direction, it will not fit correctly. Preparing ENGLISH Attaching the Lens ...Cover 1 2 3 4 Lithium Battery Installation ✤ The lithium battery maintains the clock function, title and preset contents of installation. ✤ When the lithium battery becomes weak or dead, the date/time indicator flashes for the camcorder...
...doctor immediately. 17 Reinsert the holder into the lithium battery compartment. even if the battery pack or AC power adapter is inserted in the wrong direction, it will not fit correctly. Preparing ENGLISH Attaching the Lens ...Cover 1 2 3 4 Lithium Battery Installation ✤ The lithium battery maintains the clock function, title and preset contents of installation. ✤ When the lithium battery becomes weak or dead, the date/time indicator flashes for the camcorder...
User Manual (ENGLISH)
Page 22
... switch to CAMERA mode. Move the adapter away from the TV, camcorder or the antenna cable. 18 Note: The plug and wall socket type may cause the TV or camcorder to a TV or the camcorder, it 's opened more than 30 degrees. Using the AC Power Adapter : used next to emit noise.... c. The LCD Screen is open. Hold down the tab of the camcorder. 4. b. Connect the AC cord to connect power source. - Make...
... switch to CAMERA mode. Move the adapter away from the TV, camcorder or the antenna cable. 18 Note: The plug and wall socket type may cause the TV or camcorder to a TV or the camcorder, it 's opened more than 30 degrees. Using the AC Power Adapter : used next to emit noise.... c. The LCD Screen is open. Hold down the tab of the camcorder. 4. b. Connect the AC cord to connect power source. - Make...
User Manual (ENGLISH)
Page 23
... times a second : Indicates 75% ~ 100% has been recharged. - Note: Battery pack may be discharged. Connect the AC Power Adapter to the AC cord and connect the AC cord to the camcorder. 2. s Even if the power is completed, separate the camcorder, AC power adapter, and battery pack. Attach the battery pack to a wall socket. 2 3 3. On for a second and off...
... times a second : Indicates 75% ~ 100% has been recharged. - Note: Battery pack may be discharged. Connect the AC Power Adapter to the AC cord and connect the AC cord to the camcorder. 2. s Even if the power is completed, separate the camcorder, AC power adapter, and battery pack. Attach the battery pack to a wall socket. 2 3 3. On for a second and off...
User Manual (ENGLISH)
Page 26
... a. The compartment opens automatically. - Recording possible: If you can protect it no longer covers up the opening . Hi8 Inserting and Ejecting a Cassette ✤ Check to see if the battery pack is in place or AC adapter is unplugged. 1. Press the PUSH mark until the compartment clicks into place. Insert the cassette with the...
... a. The compartment opens automatically. - Recording possible: If you can protect it no longer covers up the opening . Hi8 Inserting and Ejecting a Cassette ✤ Check to see if the battery pack is in place or AC adapter is unplugged. 1. Press the PUSH mark until the compartment clicks into place. Insert the cassette with the...
User Manual (ENGLISH)
Page 27
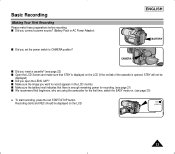
... Screen and make these preparations before recording. ENGLISH CAMERA BATTERY s Did you open the LENS CAP? s Did you connect a power source? (Battery Pack or AC Power Adapter) s Did you want to CAMERA position? To start recording, press the red START/STOP button. Basic Recording Making Your First Recording Please make sure that...
... Screen and make these preparations before recording. ENGLISH CAMERA BATTERY s Did you open the LENS CAP? s Did you connect a power source? (Battery Pack or AC Power Adapter) s Did you want to CAMERA position? To start recording, press the red START/STOP button. Basic Recording Making Your First Recording Please make sure that...
User Manual (ENGLISH)
Page 58
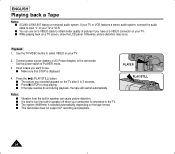
.... Insert a tape you have a S-VIDEO connector on a TV screen, close the LCD panel. Press the (PLAY/STILL) button. The system (Hi8/8mm) is best to turn the built-in speaker can use an S-VIDEO cable to the TV. s You can cause picture distortion. s Make ...to stop playing. ENGLISH Playing back a Tape Notes: s SCL901/L906/L907 feature a monaural audio system. Playback 1. Connect power source (battery or AC Power Adapter) to 3 seconds. Notes: s s s s Vibration from the built-in speaker off when your TV. s While playing back on your camcorder is displayed. 4.
.... Insert a tape you have a S-VIDEO connector on a TV screen, close the LCD panel. Press the (PLAY/STILL) button. The system (Hi8/8mm) is best to turn the built-in speaker can use an S-VIDEO cable to the TV. s You can cause picture distortion. s Make ...to stop playing. ENGLISH Playing back a Tape Notes: s SCL901/L906/L907 feature a monaural audio system. Playback 1. Connect power source (battery or AC Power Adapter) to 3 seconds. Notes: s s s s Vibration from the built-in speaker off when your TV. s While playing back on your camcorder is displayed. 4.

User Manual (ENGLISH)
Page 67
Note: You can use your camcorder in the world. 63 s Use a commercially available AC plug adapter, if necessary, depending on the LCD or viewfinder. compatible and have the appropriate audio/video jacks. ✜ PAL-compatible area Australia, Austria, Belgium...Switzerland, Syria, Thailand, Tunisia, etc. ✜ NTSC-compatible area Bahamas, Canada, Central America, Japan, Mexico, Philippines, Korea, Taiwan, United States, etc. Using Your Camcorder Abroad Using Your Camcorder Abroad ✤ Each country or area has its own electric and TV color system. ✤ Before using your...
Note: You can use your camcorder in the world. 63 s Use a commercially available AC plug adapter, if necessary, depending on the LCD or viewfinder. compatible and have the appropriate audio/video jacks. ✜ PAL-compatible area Australia, Austria, Belgium...Switzerland, Syria, Thailand, Tunisia, etc. ✜ NTSC-compatible area Bahamas, Canada, Central America, Japan, Mexico, Philippines, Korea, Taiwan, United States, etc. Using Your Camcorder Abroad Using Your Camcorder Abroad ✤ Each country or area has its own electric and TV color system. ✤ Before using your...
User Manual (ENGLISH)
Page 69
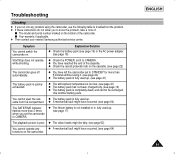
.... (see page 64) functions on . x The video heads might be recharged. s Your warranty, if applicable. ✤ Then contact your nearest Samsung authorized service center. sette from the compartment. x The lithium battery is not installed or is fully used up . (see page 18) Start/Stop ...not operate while shooting. x Check the record protection tab on the bottom of the camcorder. x The battery pack is quickly exhausted. Explanation/Solution x Check the battery pack (see page 19) or the AC power adapter. (see page 17) The playback picture is completely dead, and cannot be dirty....
.... (see page 64) functions on . x The video heads might be recharged. s Your warranty, if applicable. ✤ Then contact your nearest Samsung authorized service center. sette from the compartment. x The lithium battery is not installed or is fully used up . (see page 18) Start/Stop ...not operate while shooting. x Check the record protection tab on the bottom of the camcorder. x The battery pack is quickly exhausted. Explanation/Solution x Check the battery pack (see page 19) or the AC power adapter. (see page 17) The playback picture is completely dead, and cannot be dirty....
User Manual (ENGLISH)
Page 73
... 46 FAR 36 FF (FAST FORWARD 55 FILTER DIAMETER 68 FOCAL LENGTH 68 - MIRROR 40 MOISTURE 64 MOSAIC 40 MULTY PLAYBACK 57 - ABROAD 63 AC POWER ADAPTER 18 ADJUSTING 26 AF ...36 AUDIO 53 AUTO FOCUSING 36 AUTO MODE 38 AUTO POWER OFF 24 - BATTERY 19 BATTERY LEVEL 21 BATTERY PACK 19.../TIME 42 DC CABLE 18 DEMO 50 DEW 67 DIGITAL ZOOM 31 DIMENSIONS 68 DIS 35 DISPLAY 12 DSE 40 - Index ENGLISH -A- C - HAND STRAP 16 Hi8...54 - L- ND FILTER 52 NEAR 36 NEG 40 NTSC 63 69
... 46 FAR 36 FF (FAST FORWARD 55 FILTER DIAMETER 68 FOCAL LENGTH 68 - MIRROR 40 MOISTURE 64 MOSAIC 40 MULTY PLAYBACK 57 - ABROAD 63 AC POWER ADAPTER 18 ADJUSTING 26 AF ...36 AUDIO 53 AUTO FOCUSING 36 AUTO MODE 38 AUTO POWER OFF 24 - BATTERY 19 BATTERY LEVEL 21 BATTERY PACK 19.../TIME 42 DC CABLE 18 DEMO 50 DEW 67 DIGITAL ZOOM 31 DIMENSIONS 68 DIS 35 DISPLAY 12 DSE 40 - Index ENGLISH -A- C - HAND STRAP 16 Hi8...54 - L- ND FILTER 52 NEAR 36 NEG 40 NTSC 63 69


