

Instruction Booklet
Page 1
U S ENGLISH Video Camcorder 8mm COLOR LCD S C L 5 2 0 / L 5 3 0 / L 5 4 0 / L 5 5 0 ( N T S C ) S C L 5 2 0 / L 5 3 0 / L 5 4 0 Hi SCL550 Owner's Instruction Book Before operating the unit, please read this instruction book thoroughly, and retain it for future reference.
U S ENGLISH Video Camcorder 8mm COLOR LCD S C L 5 2 0 / L 5 3 0 / L 5 4 0 / L 5 5 0 ( N T S C ) S C L 5 2 0 / L 5 3 0 / L 5 4 0 Hi SCL550 Owner's Instruction Book Before operating the unit, please read this instruction book thoroughly, and retain it for future reference.
Instruction Booklet
Page 2
......12 Descriptions s Front View/Side View/Rear View...13, 14, 15 s OSD (On Screen Display) ...16 Accessories Supplied with the Camcorder...18 Remote Control...19 s Self Timer Recording...19 Preparing Adjusting the Hand Strap and Shoulder Strap...20 Lithium Battery Installation...21 Connecting the Power Source......
......12 Descriptions s Front View/Side View/Rear View...13, 14, 15 s OSD (On Screen Display) ...16 Accessories Supplied with the Camcorder...18 Remote Control...19 s Self Timer Recording...19 Preparing Adjusting the Hand Strap and Shoulder Strap...20 Lithium Battery Installation...21 Connecting the Power Source......
Instruction Booklet
Page 3
... Remote Control...59 DSE in PLAYER mode...59 Maintenance Cleaning and Taking care of the Camcorder...59 s Cleaning the Viewfinder ...59 s Cleaning the LCD Panel...59 s Cleaning the Video Heads ...60 s Storing the Camcorder...60 Using Your Camcorder Abroad 61 Troubleshooting Self Diagnosis Display ...62 Checking...63 Moisture Condensation...65 Specifications ...66 Index...
... Remote Control...59 DSE in PLAYER mode...59 Maintenance Cleaning and Taking care of the Camcorder...59 s Cleaning the Viewfinder ...59 s Cleaning the LCD Panel...59 s Cleaning the Video Heads ...60 s Storing the Camcorder...60 Using Your Camcorder Abroad 61 Troubleshooting Self Diagnosis Display ...62 Checking...63 Moisture Condensation...65 Specifications ...66 Index...
Instruction Booklet
Page 4
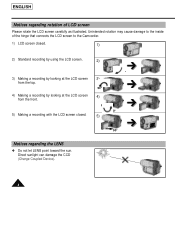
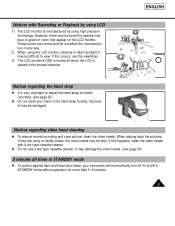
... of LCD screen Please rotate the LCD screen carefully as illustrated. ENGLISH Notices regarding rotation of the hinge that connects the LCD screen to the Camcorder. 1) LCD screen closed. 1) 2) Standard recording by using the LCD screen. 2) 90° 3) Making a recording by looking at the LCD screen 3) from the top. 90°...
... of LCD screen Please rotate the LCD screen carefully as illustrated. ENGLISH Notices regarding rotation of the hinge that connects the LCD screen to the Camcorder. 1) LCD screen closed. 1) 2) Standard recording by using the LCD screen. 2) 90° 3) Making a recording by looking at the LCD screen 3) from the top. 90°...

Instruction Booklet
Page 5
...sunlight can damage the inside to hot temperature outside to warm temperature inside the camcorder. Be careful when placing the camcorder under sunlight or by a window. 2) Do not pick up the camcorder by the viewfinder. 3) Unintended rotation may cause condensation to form inside during...the summer. 2) If the "DEW" protection feature is activated, leave the camcorder in atmospheric temperature may cause damage to the viewfinder. for example: s When you take the camcorder from cold temperature outside during the winter. Notices regarding moisture condensation 1) A sudden...
...sunlight can damage the inside to hot temperature outside to warm temperature inside the camcorder. Be careful when placing the camcorder under sunlight or by a window. 2) Do not pick up the camcorder by the viewfinder. 3) Unintended rotation may cause condensation to form inside during...the summer. 2) If the "DEW" protection feature is activated, leave the camcorder in atmospheric temperature may cause damage to the viewfinder. for example: s When you take the camcorder from cold temperature outside during the winter. Notices regarding moisture condensation 1) A sudden...
Instruction Booklet
Page 6
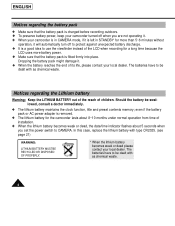
... weak or dead please contact your local dealer. even if the battery pack or AC power adapter is removed. 1 The lithium battery for the camcorder lasts about 8~10 months under normal operation from time of installation. 1 When the lithium battery becomes weak or dead, the date/time indicator flashes...battery power. 1 Make sure that the battery pack is charged before recording outdoors. 1 To preserve battery power, keep your camcorder turned off when you are not operating it. 1 When your camcorder is in CAMERA mode, if it is left in STANDBY for a long time because the LCD uses more than 5~6 ...
... weak or dead please contact your local dealer. even if the battery pack or AC power adapter is removed. 1 The lithium battery for the camcorder lasts about 8~10 months under normal operation from time of installation. 1 When the lithium battery becomes weak or dead, the date/time indicator flashes...battery power. 1 Make sure that the battery pack is charged before recording outdoors. 1 To preserve battery power, keep your camcorder turned off when you are not operating it. 1 When your camcorder is in CAMERA mode, if it is left in STANDBY for a long time because the LCD uses more than 5~6 ...
Instruction Booklet
Page 7
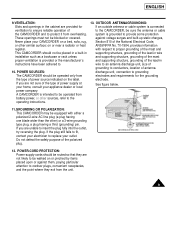
... the video heads with Recording or Playback by using the LCD monitor outdoors in STANDBY mode 1 To protect against tape and head-drum wear, your camcorder will automatically turn off when the LCD is manufactured by using high precision technology. Notices with a dry type cassette cleaner. 1 Do not use the viewfinder...
... the video heads with Recording or Playback by using the LCD monitor outdoors in STANDBY mode 1 To protect against tape and head-drum wear, your camcorder will automatically turn off when the LCD is manufactured by using high precision technology. Notices with a dry type cassette cleaner. 1 Do not use the viewfinder...

Instruction Booklet
Page 8
... serious damage to constitute a risk of important operating and maintenance instructions in the literature accompanying this CAMCORDER from the wall outlet before the CAMCORDER is operated. 2.RETAIN INSTRUCTIONS: The safety and operating instructions should be of uninsulated dangerous voltage within... that may be retained for dusting cabinets. 6. for example, near a swimming pool or lake. 8 ACCESSORIES: Do not place this CAMCORDER on the CAMCORDER and in a wet basement, near a bathtub, wash bowl, kitchen sink, laundry tub, in the operating instructions should be followed. ...
... serious damage to constitute a risk of important operating and maintenance instructions in the literature accompanying this CAMCORDER from the wall outlet before the CAMCORDER is operated. 2.RETAIN INSTRUCTIONS: The safety and operating instructions should be of uninsulated dangerous voltage within... that may be retained for dusting cabinets. 6. for example, near a swimming pool or lake. 8 ACCESSORIES: Do not place this CAMCORDER on the CAMCORDER and in a wet basement, near a bathtub, wash bowl, kitchen sink, laundry tub, in the operating instructions should be followed. ...
Instruction Booklet
Page 9
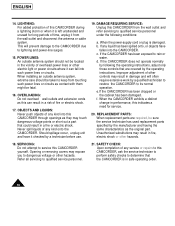
...fit, contact your electrician to replace your appliance dealer or local power company. See figure below. 11.GROUNDING OR POLARIZATION: This CAMCORDER may be equipped with respect to proper grounding of the mast and supporting structure, grounding of the lead-in wire and supporting ...size of grounding to conductors, location of antennadischarge unit, connection to grounding electrodes and requirements for ventilation to ensure reliable operation of the CAMCORDER and to protect it from the unit. 9 Do not defeat the safety purpose of the polarized plug. 12. POWER-CORD PROTECTION:...
...fit, contact your electrician to replace your appliance dealer or local power company. See figure below. 11.GROUNDING OR POLARIZATION: This CAMCORDER may be equipped with respect to proper grounding of the mast and supporting structure, grounding of the lead-in wire and supporting ...size of grounding to conductors, location of antennadischarge unit, connection to grounding electrodes and requirements for ventilation to ensure reliable operation of the CAMCORDER and to protect it from the unit. 9 Do not defeat the safety purpose of the polarized plug. 12. POWER-CORD PROTECTION:...
Instruction Booklet
Page 10
...with them might be taken to keep from the wall outlet and refer servicing to its normal operation. When the CAMCORDER exhibits a distinct change in performance, this CAMCORDER yourself. Opening or removing covers may result in fire, electric shock or other controls may touch dangerous voltage points ...need for long periods of any service or repairs to determine that are required, be located in damage and will prevent damage to the CAMCORDER due to lightning and power-line surges. 15. Refer all servicing to rain or water. LIGHTNING: For added protection of fire or electric...
...with them might be taken to keep from the wall outlet and refer servicing to its normal operation. When the CAMCORDER exhibits a distinct change in performance, this CAMCORDER yourself. Opening or removing covers may result in fire, electric shock or other controls may touch dangerous voltage points ...need for long periods of any service or repairs to determine that are required, be located in damage and will prevent damage to the CAMCORDER due to lightning and power-line surges. 15. Refer all servicing to rain or water. LIGHTNING: For added protection of fire or electric...
Instruction Booklet
Page 12
Snap Shot (SCL530/L540/L550 only) The Snap Shot function lets you record an object at close range. ENGLISH Features Your camcorder has many features for a limited time in Camera mode. (see page 50) PIP (SCL530/L540/L550 only) The PIP function shows where the center of ...
Snap Shot (SCL530/L540/L550 only) The Snap Shot function lets you record an object at close range. ENGLISH Features Your camcorder has many features for a limited time in Camera mode. (see page 50) PIP (SCL530/L540/L550 only) The PIP function shows where the center of ...

Instruction Booklet
Page 13
... mode (see page 28) FF works in PLAYER mode (see page 48) 10. FADE FADE works in CAMERAmode. 15. PLAYER : Select to turn off the camcorder. - MF (see page 57) 3. MIC MIC works in PLAYER mode (see page 39) 11. Edit (REW) 1. MF 12. TAPE EJECT 7. Edit (REW) Edit ... Sensor (see page 56) 4. MIC 14. LCD 1. TAPE EJECT Use when ejecting the tape (see page 49) 9. PIP(Z.RETURN) PIP works in CAMERAmode (BLC for SCL540) 8. CAMERA : Select to record. - Lens 16. LCD (see page 22) - ENGLISH Front View 4. Edit (FF) 3. POWER switch (see page 30) 12. DATE/TIME(STOP) ...
... mode (see page 28) FF works in PLAYER mode (see page 48) 10. FADE FADE works in CAMERAmode. 15. PLAYER : Select to turn off the camcorder. - MF (see page 57) 3. MIC MIC works in PLAYER mode (see page 39) 11. Edit (REW) 1. MF 12. TAPE EJECT 7. Edit (REW) Edit ... Sensor (see page 56) 4. MIC 14. LCD 1. TAPE EJECT Use when ejecting the tape (see page 49) 9. PIP(Z.RETURN) PIP works in CAMERAmode (BLC for SCL540) 8. CAMERA : Select to record. - Lens 16. LCD (see page 22) - ENGLISH Front View 4. Edit (FF) 3. POWER switch (see page 30) 12. DATE/TIME(STOP) ...

Instruction Booklet
Page 17
.... The White Balance modes are MAKE-UP, EMBOSS, WIDE(16:9), CINEMA, NEG., MIRROR, MOSAIC, B&W, SEPIA, GHOST, STROBE and LSS. Tape counter Indicates amount of the Camcorder. Hi8 (SCL550 only) (see page 42) Indicates the DSE mode is superimposed on the scene. s. w. k. l. o. DEW condensation (see page 50) Indicates the time left during...
.... The White Balance modes are MAKE-UP, EMBOSS, WIDE(16:9), CINEMA, NEG., MIRROR, MOSAIC, B&W, SEPIA, GHOST, STROBE and LSS. Tape counter Indicates amount of the Camcorder. Hi8 (SCL550 only) (see page 42) Indicates the DSE mode is superimposed on the scene. s. w. k. l. o. DEW condensation (see page 50) Indicates the time left during...
Instruction Booklet
Page 18
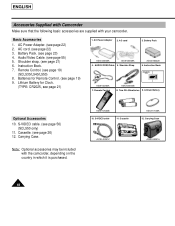
...(see page 19) (SCL530/L540/L550) 8. Batteries for Clock. (TYPE: CR2025, see page 22) 3. AC Power Adapter 2. Instruction Book Video Camcorder 8mm COLOR AD39-40200A 7. Two R6 AAbatteries 9. Cassette. (see page 19) 9. S-VIDEO cable 11. Lithium Battery Optional Accessories 10. S-VIDEO cable.... (see page 55) 5. Note: Optional accessories may be included with your camcorder. Audio/Video Cable. (see page 56) (SCL550 only) 11. Instruction Book. 7. AC cord 3. Remote Control AD63-00044B 8. Carrying Case...
...(see page 19) (SCL530/L540/L550) 8. Batteries for Clock. (TYPE: CR2025, see page 22) 3. AC Power Adapter 2. Instruction Book Video Camcorder 8mm COLOR AD39-40200A 7. Two R6 AAbatteries 9. Cassette. (see page 19) 9. S-VIDEO cable 11. Lithium Battery Optional Accessories 10. S-VIDEO cable.... (see page 55) 5. Note: Optional accessories may be included with your camcorder. Audio/Video Cable. (see page 56) (SCL550 only) 11. Instruction Book. 7. AC cord 3. Remote Control AD63-00044B 8. Carrying Case...

Instruction Booklet
Page 19
Start/Stop (see page 34) 5. WIDE (see page 27) 2. You purchase the camcorder. - WAIT-10S/SELF-END: wait 10 seconds, followed by 30 seconds of the batteries. Self Timer 3. TELE (see page 57) 4. The remote control doesn't work. 1 ...
Start/Stop (see page 34) 5. WIDE (see page 27) 2. You purchase the camcorder. - WAIT-10S/SELF-END: wait 10 seconds, followed by 30 seconds of the batteries. Self Timer 3. TELE (see page 57) 4. The remote control doesn't work. 1 ...

Instruction Booklet
Page 20
... 3. Pull open the Hand Strap cover and release the Hand Strap, adjust its length and stick it back onto the Hand Strap cover. 2. Hold the camcorder in a stable, comfortable position. - tor is very important to adjust the hand strap for 10 seconds, recording starts. 3 : If you have selected SELF-30S, recording...
... 3. Pull open the Hand Strap cover and release the Hand Strap, adjust its length and stick it back onto the Hand Strap cover. 2. Hold the camcorder in a stable, comfortable position. - tor is very important to adjust the hand strap for 10 seconds, recording starts. 3 : If you have selected SELF-30S, recording...

Instruction Booklet
Page 21
... the battery be swallowed, consult a doctor immediately. 21 ENGLISH Shoulder Strap 1 The Shoulder Strap allows you set the power switch to carry your camcorder with type CR2025. 1. Lithium Battery Installation 1 The lithium battery maintains the clock function, title and preset contents of the holder. 3. Insert the...the buckle, adjust the length of installation. 1 When the lithium battery becomes weak or dead, the date/time indicator flashes for the camcorder lasts about 5 seconds when you to CAMERA. even if the battery pack or AC power adapter is inserted in the wrong direction, it...
... the battery be swallowed, consult a doctor immediately. 21 ENGLISH Shoulder Strap 1 The Shoulder Strap allows you set the power switch to carry your camcorder with type CR2025. 1. Lithium Battery Installation 1 The lithium battery maintains the clock function, title and preset contents of the holder. 3. Insert the...the buckle, adjust the length of installation. 1 When the lithium battery becomes weak or dead, the date/time indicator flashes for the camcorder lasts about 5 seconds when you to CAMERA. even if the battery pack or AC power adapter is inserted in the wrong direction, it...
Instruction Booklet
Page 22
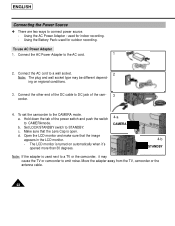
... to CAMERAmode. Connect the other end of the DC cable to DC jack of the power switch and push the switch to a TV or the camcorder, it 's opened more than 30 degrees. 4-a CAMERA 4-b STANDBY Note: If the adapter is turned on regional conditions. 3. a. Open the LCD monitor and make ...- The LCD monitor is used for outdoor recording. Make sure that the image appears in the LCD monitor. - d. Move the adapter away from the TV, camcorder or the antenna cable. 22 ENGLISH Connecting the Power Source 1 There are two ways to the AC cord. 1 2. ing on automatically when it may be...
... to CAMERAmode. Connect the other end of the DC cable to DC jack of the power switch and push the switch to a TV or the camcorder, it 's opened more than 30 degrees. 4-a CAMERA 4-b STANDBY Note: If the adapter is turned on regional conditions. 3. a. Open the LCD monitor and make ...- The LCD monitor is used for outdoor recording. Make sure that the image appears in the LCD monitor. - d. Move the adapter away from the TV, camcorder or the antenna cable. 22 ENGLISH Connecting the Power Source 1 There are two ways to the AC cord. 1 2. ing on automatically when it may be...
Instruction Booklet
Page 23
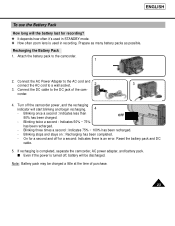
... has been recharged. - Connect the DC cable to a wall socket. 2 3 3. Reset the battery pack and DC cable. 5. Attach the battery pack to the camcorder. 1 2. Blinking twice a second : Indicates 50% ~ 75% has been recharged. - Note: Battery pack may be discharged. If recharging is an error. s ... if the power is used in recording. On for a second and off the camcorder power, and the recharging indicator will the battery last for a second: Indicates there is completed, separate the camcorder, AC power adapter, and battery pack. Prepare as many battery packs as possible...
... has been recharged. - Connect the DC cable to a wall socket. 2 3 3. Reset the battery pack and DC cable. 5. Attach the battery pack to the camcorder. 1 2. Blinking twice a second : Indicates 50% ~ 75% has been recharged. - Note: Battery pack may be discharged. If recharging is an error. s ... if the power is used in recording. On for a second and off the camcorder power, and the recharging indicator will the battery last for a second: Indicates there is completed, separate the camcorder, AC power adapter, and battery pack. Prepare as many battery packs as possible...
Instruction Booklet
Page 25
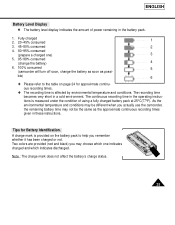
...charge status. 25 Tips for approximate continuous recording times. 1 The recording time is provided on the battery pack to help you actually use the camcorder, the remaining battery time may choose which indicates discharged. Fully charged 1 2. 20~45% consumed 3. 45~80% consumed 2 4. 80~95...% consumed (prepare a charged one indicates charged and which one ) 3 5. 95~98% consumed (change the battery) 4 6. 100% consumed 5 (camcorder will turn off soon, change the battery as soon as the approximate continuous recording times given in a cold environment.
...charge status. 25 Tips for approximate continuous recording times. 1 The recording time is provided on the battery pack to help you actually use the camcorder, the remaining battery time may choose which indicates discharged. Fully charged 1 2. 20~45% consumed 3. 45~80% consumed 2 4. 80~95...% consumed (prepare a charged one indicates charged and which one ) 3 5. 95~98% consumed (change the battery) 4 6. 100% consumed 5 (camcorder will turn off soon, change the battery as soon as the approximate continuous recording times given in a cold environment.


