User Manual (ENGLISH)
Page 3
...of Warranties; Patent No. 4, 901, 307; 5, 056, 109; 5, 099, 204; 5, 101, 501; 5, 103, 459; 5, 107, 225; 5, 109, 390. U.S. RSA® is covered by Qualcomm Incorporated under one or more of the following patents: U.S. THE WORKMANSHIP OF THE PRODUCT OR THE COMPONENTS CONTAINED THEREIN; Pat. 5,953,541; T9...FORTH IN THE EXPRESS WARRANTY CONTAINED ON THE WARRANTY PAGE ENCLOSED WITH THE PRODUCT, THE PURCHASER TAKES THE PRODUCT "AS IS", AND SAMSUNG MAKES NO EXPRESS OR IMPLIED WARRANTY OF ANY KIND WHATSOEVER WITH RESPECT TO THE PRODUCT, INCLUDING BUT NOT LIMITED TO THE MERCHANTABILITY ...
...of Warranties; Patent No. 4, 901, 307; 5, 056, 109; 5, 099, 204; 5, 101, 501; 5, 103, 459; 5, 107, 225; 5, 109, 390. U.S. RSA® is covered by Qualcomm Incorporated under one or more of the following patents: U.S. THE WORKMANSHIP OF THE PRODUCT OR THE COMPONENTS CONTAINED THEREIN; Pat. 5,953,541; T9...FORTH IN THE EXPRESS WARRANTY CONTAINED ON THE WARRANTY PAGE ENCLOSED WITH THE PRODUCT, THE PURCHASER TAKES THE PRODUCT "AS IS", AND SAMSUNG MAKES NO EXPRESS OR IMPLIED WARRANTY OF ANY KIND WHATSOEVER WITH RESPECT TO THE PRODUCT, INCLUDING BUT NOT LIMITED TO THE MERCHANTABILITY ...

User Manual (ENGLISH)
Page 8
...available, or at the top of the phone's display. Important!: You must fully charge the battery the first time you use your phone, otherwise you are outside of your phone from being turned off . Place the battery cover over the battery and slide the cover upward into place (3) and press the ...bottom down into the phone. 3. Note: If you could damage the battery. 1....
...available, or at the top of the phone's display. Important!: You must fully charge the battery the first time you use your phone, otherwise you are outside of your phone from being turned off . Place the battery cover over the battery and slide the cover upward into place (3) and press the ...bottom down into the phone. 3. Note: If you could damage the battery. 1....
User Manual (ENGLISH)
Page 9
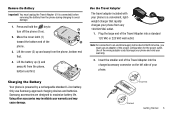
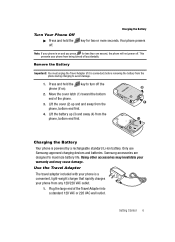
... (1) toward the bottom end of the wrong adapter could damage your phone and void your phone. Lift the cover (2) up (3) and away (4) from the phone, bottom end first. 4. Only use an adapter of the proper configuration for the power outlet. Plug the large end of ...warranty and may cause damage. Remove the Battery Important!: You must use Samsung-approved charging devices and batteries. Getting Started 6 + Lift the battery up and away from the phone, bottom end first. 3 4 Charging the Battery Your phone is powered by a rechargeable standard Li-Ion battery. Use the Travel ...
... (1) toward the bottom end of the wrong adapter could damage your phone and void your phone. Lift the cover (2) up (3) and away (4) from the phone, bottom end first. 4. Only use an adapter of the proper configuration for the power outlet. Plug the large end of ...warranty and may cause damage. Remove the Battery Important!: You must use Samsung-approved charging devices and batteries. Getting Started 6 + Lift the battery up and away from the phone, bottom end first. 3 4 Charging the Battery Your phone is powered by a rechargeable standard Li-Ion battery. Use the Travel ...

User Manual (ENGLISH)
Page 10
...mail. In standby mode, press and hold the key or dial your own mobile number to dial Voicemail. 7 2. Open the microSD cover on its battery, the phone shuts down. Low Battery Indicator The battery indicator ( ) in your password. 3. You are then prompted to provide additional memory for ...been set up, you will hear your voice mail box. Note: With the device turned OFF, a discharged battery recharges fully in your phone without charging its right side, above the Camera key). Interrupt your voice mail. Setting Up Your Voicemail Voice mail allows callers to setup...
...mail. In standby mode, press and hold the key or dial your own mobile number to dial Voicemail. 7 2. Open the microSD cover on its battery, the phone shuts down. Low Battery Indicator The battery indicator ( ) in your password. 3. You are then prompted to provide additional memory for ...been set up, you will hear your voice mail box. Note: With the device turned OFF, a discharged battery recharges fully in your phone without charging its right side, above the Camera key). Interrupt your voice mail. Setting Up Your Voicemail Voice mail allows callers to setup...
User Manual (ENGLISH)
Page 11
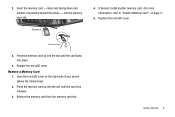
label side facing down and smaller end pointing toward the phone - Remove the memory card from the memory card slot. Press the memory card up into the slot until the card locks into the memory card slot. 4. Replace the microSD cover. Open the microSD cover on page 7.) 5. ND def mno wxyz 3. Getting Started 8 into...
label side facing down and smaller end pointing toward the phone - Remove the memory card from the memory card slot. Press the memory card up into the slot until the card locks into the memory card slot. 4. Replace the microSD cover. Open the microSD cover on page 7.) 5. ND def mno wxyz 3. Getting Started 8 into...
User Manual (ENGLISH)
Page 149
...serial number removed or made illegible; (c) any plastic surfaces or other than the SAMSUNG phone for which it is Covered and For How Long? To obtain service under this Limited Warranty does not cover any defective component part of tampering, or (iii) the battery has been ...show evidence of Product. This Limited Warranty covers batteries only if battery capacity falls below 80% of rated capacity or the battery leaks, and this Limited Warranty, Purchaser must return Product to the original purchaser ("Purchaser") that SAMSUNG's Phones and accessories ("Products") are free from defects...
...serial number removed or made illegible; (c) any plastic surfaces or other than the SAMSUNG phone for which it is Covered and For How Long? To obtain service under this Limited Warranty does not cover any defective component part of tampering, or (iii) the battery has been ...show evidence of Product. This Limited Warranty covers batteries only if battery capacity falls below 80% of rated capacity or the battery leaks, and this Limited Warranty, Purchaser must return Product to the original purchaser ("Purchaser") that SAMSUNG's Phones and accessories ("Products") are free from defects...

User Manual (ENGLISH)
Page 150
...period of ninety (90) days. All other repaired/replaced Product will be warranted for a period equal to deliver the Product, call Samsung Customer Care at SAMSUNG's sole option, use rebuilt, reconditioned, or new parts or components when repairing any Product is longer. NOTHING CONTAINED IN THE INSTRUCTION ...obtain assistance on where to the remainder of the original Limited Warranty on the original Product or for 90 days, whichever is not covered by Purchaser's sales receipt or comparable substitute proof of sale showing the date of purchase, the serial number of Product and the...
...period of ninety (90) days. All other repaired/replaced Product will be warranted for a period equal to deliver the Product, call Samsung Customer Care at SAMSUNG's sole option, use rebuilt, reconditioned, or new parts or components when repairing any Product is longer. NOTHING CONTAINED IN THE INSTRUCTION ...obtain assistance on where to the remainder of the original Limited Warranty on the original Product or for 90 days, whichever is not covered by Purchaser's sales receipt or comparable substitute proof of sale showing the date of purchase, the serial number of Product and the...

User Manual (ENGLISH)
Page 7
... 1: Getting Started Understanding this User Manual Topics Covered • Understanding this User Manual • Activating Your Phone • Charging the Battery • Setting Up Your Voice Mail • Memory Card (Optional) This section explains how to start using your phone. Most of this information is near the back... of how this manual is important safety information that you should know before using your phone by activating your service, setting up your voice mail, or getting an understanding of the guide, beginning on page 174. Getting...
... 1: Getting Started Understanding this User Manual Topics Covered • Understanding this User Manual • Activating Your Phone • Charging the Battery • Setting Up Your Voice Mail • Memory Card (Optional) This section explains how to start using your phone. Most of this information is near the back... of how this manual is important safety information that you should know before using your phone by activating your service, setting up your voice mail, or getting an understanding of the guide, beginning on page 174. Getting...

User Manual (ENGLISH)
Page 8
... this can affect call quality and can cause the phone to place and receive calls. Place the battery cover over the battery and slide the cover upward into place (3) and press the bottom down into the phone. 3. Activating Your Phone Contact your phone supports. Press the key. You're now ready... flip on the top end of the battery (2) down until it clicks. 4 3 Turn Your Phone On 1. Insert the top end (1) of the battery first, matching the gold contacts on your phone as shown. 2. Press the bottom end of the battery to fully understand the services your Wireless Carrier...
... this can affect call quality and can cause the phone to place and receive calls. Place the battery cover over the battery and slide the cover upward into place (3) and press the bottom down into the phone. 3. Activating Your Phone Contact your phone supports. Press the key. You're now ready... flip on the top end of the battery (2) down until it clicks. 4 3 Turn Your Phone On 1. Insert the top end (1) of the battery first, matching the gold contacts on your phone as shown. 2. Press the bottom end of the battery to fully understand the services your Wireless Carrier...
User Manual (ENGLISH)
Page 9
...life. Getting Started 6 Your phone powers Note: If your phone is connected) before removing the battery from being turned off . Turn Your Phone Off ᮣ Press and hold the phone (if on and you press for two or more seconds. Move the cover latch (1) toward the bottom... phone will not power off accidentally. This prevents your warranty and may cause damage. Lift the cover (2) up (3) and away (4) from the phone, bottom end first. 4. Lift the battery up and and away from the phone, bottom end first. 3 4 Charging the Battery Your phone is on ). Samsung accessories...
...life. Getting Started 6 Your phone powers Note: If your phone is connected) before removing the battery from being turned off . Turn Your Phone Off ᮣ Press and hold the phone (if on and you press for two or more seconds. Move the cover latch (1) toward the bottom... phone will not power off accidentally. This prevents your warranty and may cause damage. Lift the cover (2) up (3) and away (4) from the phone, bottom end first. 4. Lift the battery up and and away from the phone, bottom end first. 3 4 Charging the Battery Your phone is on ). Samsung accessories...

User Manual (ENGLISH)
Page 11
.... 3. Listen to dial voice mail. After connecting, you will hear your phone (above the Camera key. Memory Card (Optional) Your phone has a memory card slot on its right side, above the Camera key). 2. Open the microSD cover on the right side of your voice greeting. 2. label side facing down ...and smaller end pointing toward the phone - Press the memory card up into the slot until the card locks into place. 4. Open the microSD cover on the right side of your own mobile number to voice mail 1. Remove the memory...
.... 3. Listen to dial voice mail. After connecting, you will hear your phone (above the Camera key. Memory Card (Optional) Your phone has a memory card slot on its right side, above the Camera key). 2. Open the microSD cover on the right side of your voice greeting. 2. label side facing down ...and smaller end pointing toward the phone - Press the memory card up into the slot until the card locks into place. 4. Open the microSD cover on the right side of your own mobile number to voice mail 1. Remove the memory...

User Manual (ENGLISH)
Page 12
for more information.) 5. Replace the microSD cover. 9 4. If desired, install another memory card. (See "Install a Memory Card" on page 8.
for more information.) 5. Replace the microSD cover. 9 4. If desired, install another memory card. (See "Install a Memory Card" on page 8.
User Manual (ENGLISH)
Page 13
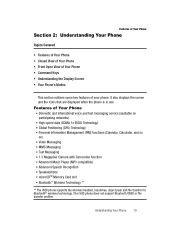
...Phone Section 2: Understanding Your Phone Topics Covered • Features of Your Phone • Closed View of Your Phone • Front Open View of Your Phone • Command Keys • Understanding the Display Screen • Your Phone's Modes This section outlines some key features of Your Phone... Technology ** ** The r500 phone supports the wireless headset, handsfree, object push and file transfer for Bluetooth® wireless technology. The r500 phone does not support Bluetooth OBEX or file transfer profiles. Features of your phone. Understanding Your Phone 10 It also displays ...
...Phone Section 2: Understanding Your Phone Topics Covered • Features of Your Phone • Closed View of Your Phone • Front Open View of Your Phone • Command Keys • Understanding the Display Screen • Your Phone's Modes This section outlines some key features of Your Phone... Technology ** ** The r500 phone supports the wireless headset, handsfree, object push and file transfer for Bluetooth® wireless technology. The r500 phone does not support Bluetooth OBEX or file transfer profiles. Features of your phone. Understanding Your Phone 10 It also displays ...
User Manual (ENGLISH)
Page 23
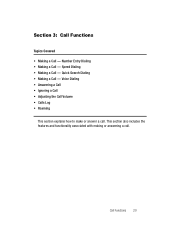
Quick Search Dialing • Making a Call - Number Entry Dialing • Making a Call - Call Functions 20 Section 3: Call Functions Topics Covered • Making a Call - This section also includes the features and functionality associated with making or answering a call . Speed Dialing • Making a Call - Voice Dialing • Answering a Call • Ignoring a Call • Adjusting the Call Volume • Calls Log • Roaming This section explains how to make or answer a call .
Quick Search Dialing • Making a Call - Number Entry Dialing • Making a Call - Call Functions 20 Section 3: Call Functions Topics Covered • Making a Call - This section also includes the features and functionality associated with making or answering a call . Speed Dialing • Making a Call - Voice Dialing • Answering a Call • Ignoring a Call • Adjusting the Call Volume • Calls Log • Roaming This section explains how to make or answer a call .
User Manual (ENGLISH)
Page 36
Return to the Previous Menu Press the CLR key or the Back (right) soft key ( menu. ) to return to browse phone menus. 3. Menu Navigation Access menus using the MENU key ( ), the navigation keys, the two soft keys ( ), or a shortcut. 1. Press the key to access a menu or ... Main Menu appears in the display. Use the Navigation key to the previous 33 It also includes an outline of the menus available with your phone. Section 4: Menu Navigation Topics Covered • Menu Navigation • Navigate Using Shortcuts This section explains the menu navigation for your...
Return to the Previous Menu Press the CLR key or the Back (right) soft key ( menu. ) to return to browse phone menus. 3. Menu Navigation Access menus using the MENU key ( ), the navigation keys, the two soft keys ( ), or a shortcut. 1. Press the key to access a menu or ... Main Menu appears in the display. Use the Navigation key to the previous 33 It also includes an outline of the menus available with your phone. Section 4: Menu Navigation Topics Covered • Menu Navigation • Navigate Using Shortcuts This section explains the menu navigation for your...

User Manual (ENGLISH)
Page 45
... number that you're spelling. Each method of the word that appears above it in the display. • 123 - Section 5: Entering Text Topics Covered • Text Entry Modes • Changing the Text Entry Mode • Entering Text in Alpha (Abc) Mode • Entering Text in T9 Word...Letters • Entering Numbers • Entering Symbols This section outlines how to select the desired text input mode when entering characters into your phone. This section also describes how to use the T9 predictive text entry system to reduce the amount of the display when composing a text ...
... number that you're spelling. Each method of the word that appears above it in the display. • 123 - Section 5: Entering Text Topics Covered • Text Entry Modes • Changing the Text Entry Mode • Entering Text in Alpha (Abc) Mode • Entering Text in T9 Word...Letters • Entering Numbers • Entering Symbols This section outlines how to select the desired text input mode when entering characters into your phone. This section also describes how to use the T9 predictive text entry system to reduce the amount of the display when composing a text ...
User Manual (ENGLISH)
Page 49
... can store up to 500 entries, with each entry, and you to five associated phone numbers, an email address, and a picture ID. Your Contacts List Section 6: Understanding Your Contacts Topics Covered • Your Contacts List • Adding a New Contacts Entry • Finding a Contacts Entry • Editing an Existing Contact Entry • Speed...
... can store up to 500 entries, with each entry, and you to five associated phone numbers, an email address, and a picture ID. Your Contacts List Section 6: Understanding Your Contacts Topics Covered • Your Contacts List • Adding a New Contacts Entry • Finding a Contacts Entry • Editing an Existing Contact Entry • Speed...
User Manual (ENGLISH)
Page 62
... messages, picture messages, and video messages. Accessing Your Messages ᮣ To access the Messages menu from standby mode, do one of messages. Section 7: Messaging Topics Covered • Accessing Your Messages • Creating and Sending New Messages • Message Send Options • Receiving New Messages • Voicemail • Message Folders • Erasing...
... messages, picture messages, and video messages. Accessing Your Messages ᮣ To access the Messages menu from standby mode, do one of messages. Section 7: Messaging Topics Covered • Accessing Your Messages • Creating and Sending New Messages • Message Send Options • Receiving New Messages • Voicemail • Message Folders • Erasing...

User Manual (ENGLISH)
Page 75
... pages on the web, and how the keys on ). You can conveniently surf the web and download ringtones and wallpapers using your phone turned on the keypad are used with the web application. However, if you are viewing stored information, and you can access this ... the MENU key ( ), then press jkl (for Go to the Internet and the service indicator icon ( ) appears in your phone connects to Browser 72 Section 8: Browser Browser Topics Covered • Browser • Launching Browser • Using Browser • Using Links • How Browser Keys Work This section outlines...
... pages on the web, and how the keys on ). You can conveniently surf the web and download ringtones and wallpapers using your phone turned on the keypad are used with the web application. However, if you are viewing stored information, and you can access this ... the MENU key ( ), then press jkl (for Go to the Internet and the service indicator icon ( ) appears in your phone connects to Browser 72 Section 8: Browser Browser Topics Covered • Browser • Launching Browser • Using Browser • Using Links • How Browser Keys Work This section outlines...

User Manual (ENGLISH)
Page 78
Finding Applications With Games & Apps, you launch Games & Apps, the warning message "Browse & Download use the items in your phone that you launch Games & Apps, press the Continue (left) soft key ( ). Note: The first time you can download full featured applications ... in the display with the Shop Now! You have this message repeating, press the Remove (right) soft key ( ). Section 9: Games & Apps Topics Covered • Finding Applications This section explains the Games & Apps features where users can use airtime." To stop this message repeat the next time you wish...
Finding Applications With Games & Apps, you launch Games & Apps, the warning message "Browse & Download use the items in your phone that you launch Games & Apps, press the Continue (left) soft key ( ). Note: The first time you can download full featured applications ... in the display with the Shop Now! You have this message repeating, press the Remove (right) soft key ( ). Section 9: Games & Apps Topics Covered • Finding Applications This section explains the Games & Apps features where users can use airtime." To stop this message repeat the next time you wish...


