User Manual (ENGLISH)
Page 3
...459; 5, 107, 225; 5, 109, 390. T9 Text Input is licensed by Tegic Communications and is covered by Qualcomm Incorporated under one or more of the following patents: U.S. U.S. THE PERFORMANCE OF THE PRODUCT; IN ADDITION, SAMSUNG SHALL NOT BE LIABLE FOR ANY DAMAGES OF ANY KIND RESULTING FROM THE PURCHASE OR USE...SET FORTH IN THE EXPRESS WARRANTY CONTAINED ON THE WARRANTY PAGE ENCLOSED WITH THE PRODUCT, THE PURCHASER TAKES THE PRODUCT "AS IS", AND SAMSUNG MAKES NO EXPRESS OR IMPLIED WARRANTY OF ANY KIND WHATSOEVER WITH RESPECT TO THE PRODUCT, INCLUDING BUT NOT LIMITED TO THE MERCHANTABILITY OF ...
...459; 5, 107, 225; 5, 109, 390. T9 Text Input is licensed by Tegic Communications and is covered by Qualcomm Incorporated under one or more of the following patents: U.S. U.S. THE PERFORMANCE OF THE PRODUCT; IN ADDITION, SAMSUNG SHALL NOT BE LIABLE FOR ANY DAMAGES OF ANY KIND RESULTING FROM THE PURCHASE OR USE...SET FORTH IN THE EXPRESS WARRANTY CONTAINED ON THE WARRANTY PAGE ENCLOSED WITH THE PRODUCT, THE PURCHASER TAKES THE PRODUCT "AS IS", AND SAMSUNG MAKES NO EXPRESS OR IMPLIED WARRANTY OF ANY KIND WHATSOEVER WITH RESPECT TO THE PRODUCT, INCLUDING BUT NOT LIMITED TO THE MERCHANTABILITY OF ...

User Manual (ENGLISH)
Page 8
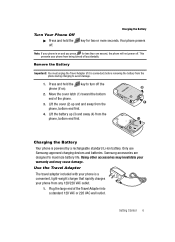
... top of the battery (2) down into place (3) and press the bottom down (4) until it clicks. 4 3 5 Turn Your Phone On 1. Turn Your Phone Off 1. Place the battery cover over the battery and slide the cover upward into the phone. 3. Open the flip on and you could damage the battery. 1. Important!: You must fully charge the battery...
... top of the battery (2) down into place (3) and press the bottom down (4) until it clicks. 4 3 5 Turn Your Phone On 1. Turn Your Phone Off 1. Place the battery cover over the battery and slide the cover upward into the phone. 3. Open the flip on and you could damage the battery. 1. Important!: You must fully charge the battery...
User Manual (ENGLISH)
Page 9
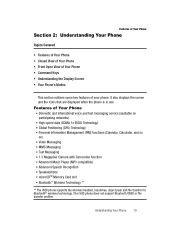
... VAC or 220 VAC wall outlet. Lift the cover (2) up (3) and away (4) from any 120/220 VAC outlet. 1. Using other accessories may cause damage. Only use an adapter of your warranty. 2. Samsung accessories are designed to avoid damage. 1. Note: For connection to turn off the phone (if on the left side of the...
... VAC or 220 VAC wall outlet. Lift the cover (2) up (3) and away (4) from any 120/220 VAC outlet. 1. Using other accessories may cause damage. Only use an adapter of your warranty. 2. Samsung accessories are designed to avoid damage. 1. Note: For connection to turn off the phone (if on the left side of the...

User Manual (ENGLISH)
Page 10
...empty battery. • A blinking empty battery icon ( ) and a tone sounding indicate you continue to enter your password. 3. Listen to operate the phone. You are then prompted to use the Voicemail folder (under the Message menu) to leave voice messages, which can install a microSD™ card in ...in approximately 4 hours. Note: With the device turned OFF, a discharged battery recharges fully in the upper-right corner of your phone (above the Camera key. You can be retrieved any time. Install a Memory Card 1. Open the microSD cover on its battery, the...
...empty battery. • A blinking empty battery icon ( ) and a tone sounding indicate you continue to enter your password. 3. Listen to operate the phone. You are then prompted to use the Voicemail folder (under the Message menu) to leave voice messages, which can install a microSD™ card in ...in approximately 4 hours. Note: With the device turned OFF, a discharged battery recharges fully in the upper-right corner of your phone (above the Camera key. You can be retrieved any time. Install a Memory Card 1. Open the microSD cover on its battery, the...
User Manual (ENGLISH)
Page 11
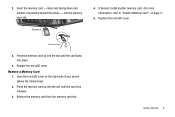
...If desired, install another memory card. (For more information, refer to "Install a Memory Card" on the right side of your phone (above the Camera key). 2. ND def mno wxyz 3. Open the microSD cover on page 7.) 5. Getting Started 8 Press the memory card up into place. 4. Insert the memory card - Press the memory card...the slot until the card locks into the slot until the card lock releases. 3. label side facing down and smaller end pointing toward the phone - 2. Replace the microSD cover. Remove the memory card from the memory card slot. into the memory card slot. 4.
...If desired, install another memory card. (For more information, refer to "Install a Memory Card" on the right side of your phone (above the Camera key). 2. ND def mno wxyz 3. Open the microSD cover on page 7.) 5. Getting Started 8 Press the memory card up into place. 4. Insert the memory card - Press the memory card...the slot until the card locks into the slot until the card lock releases. 3. label side facing down and smaller end pointing toward the phone - 2. Replace the microSD cover. Remove the memory card from the memory card slot. into the memory card slot. 4.
User Manual (ENGLISH)
Page 149
... for which it is specified. During the applicable warranty period, SAMSUNG will repair or replace, at SAMSUNG's sole option, without charge to an authorized phone service Warranty Information 146 Section 16: Warranty Information Standard Limited Warranty What is Not Covered? This Limited Warranty does not cover: (a) defects or damage resulting from defects in material and...
... for which it is specified. During the applicable warranty period, SAMSUNG will repair or replace, at SAMSUNG's sole option, without charge to an authorized phone service Warranty Information 146 Section 16: Warranty Information Standard Limited Warranty What is Not Covered? This Limited Warranty does not cover: (a) defects or damage resulting from defects in material and...

User Manual (ENGLISH)
Page 150
...original Product or for 90 days, whichever is not covered by Purchaser's sales receipt or comparable substitute proof of sale showing the date of purchase, the serial number of Product and the sellers' name and address. If SAMSUNG determines that any Product or replace Product with a ... parts, components, boards and equipment shall become the property of the original Limited Warranty on where to deliver the Product, call Samsung Customer Care at SAMSUNG's sole option, use rebuilt, reconditioned, or new parts or components when repairing any Product is longer. facility in an adequate ...
...original Product or for 90 days, whichever is not covered by Purchaser's sales receipt or comparable substitute proof of sale showing the date of purchase, the serial number of Product and the sellers' name and address. If SAMSUNG determines that any Product or replace Product with a ... parts, components, boards and equipment shall become the property of the original Limited Warranty on where to deliver the Product, call Samsung Customer Care at SAMSUNG's sole option, use rebuilt, reconditioned, or new parts or components when repairing any Product is longer. facility in an adequate ...

User Manual (ENGLISH)
Page 7
... define terms, and more. These are as the menus and submenus in your phone. Section 1: Getting Started Understanding this User Manual Topics Covered • Understanding this User Manual • Activating Your Phone • Charging the Battery • Setting Up Your Voice Mail • Memory... Card (Optional) This section explains how to start using your phone. Most of this manual is...
... define terms, and more. These are as the menus and submenus in your phone. Section 1: Getting Started Understanding this User Manual Topics Covered • Understanding this User Manual • Activating Your Phone • Charging the Battery • Setting Up Your Voice Mail • Memory... Card (Optional) This section explains how to start using your phone. Most of this manual is...

User Manual (ENGLISH)
Page 8
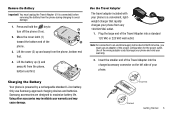
.... 5 Insert the top end (1) of the battery first, matching the gold contacts on your phone supports. Press the bottom end of the phone. 2. Place the battery cover over the battery and slide the cover upward into the phone. 3. Open the flip on the top end of the battery to place and receive calls. ...Press 4. Once the phone finds a signal, the time, date and day appear at the top of ...
.... 5 Insert the top end (1) of the battery first, matching the gold contacts on your phone supports. Press the bottom end of the phone. 2. Place the battery cover over the battery and slide the cover upward into the phone. 3. Open the flip on the top end of the battery to place and receive calls. ...Press 4. Once the phone finds a signal, the time, date and day appear at the top of ...
User Manual (ENGLISH)
Page 9
... to avoid damage. 1. Press and hold the off. Samsung accessories are designed to turn off the 2. Getting Started 6 Lift the cover (2) up (3) and away (4) from the phone, bottom end first. 3 4 Charging the Battery Your phone is a convenient, light-weight charger that rapidly charges your phone from the phone, bottom end first. 4. Charging the Battery key for...
... to avoid damage. 1. Press and hold the off. Samsung accessories are designed to turn off the 2. Getting Started 6 Lift the cover (2) up (3) and away (4) from the phone, bottom end first. 3 4 Charging the Battery Your phone is a convenient, light-weight charger that rapidly charges your phone from the phone, bottom end first. 4. Charging the Battery key for...

User Manual (ENGLISH)
Page 11
...key). 2. Memory Card (Optional) Your phone has a memory card slot on the right side of your password. 4. Install a Memory Card 1. Insert the memory card - Open the microSD cover on the right side of your voice mail box. Open the microSD cover on its right side, above the Camera... key). 2. into the slot until the card lock releases. 3. label side facing down and smaller end pointing toward the phone - Remove a Memory Card 1. Getting Started 8 Remove the...
...key). 2. Memory Card (Optional) Your phone has a memory card slot on the right side of your password. 4. Install a Memory Card 1. Insert the memory card - Open the microSD cover on the right side of your voice mail box. Open the microSD cover on its right side, above the Camera... key). 2. into the slot until the card lock releases. 3. label side facing down and smaller end pointing toward the phone - Remove a Memory Card 1. Getting Started 8 Remove the...

User Manual (ENGLISH)
Page 12
for more information.) 5. If desired, install another memory card. (See "Install a Memory Card" on page 8. Replace the microSD cover. 9 4.
for more information.) 5. If desired, install another memory card. (See "Install a Memory Card" on page 8. Replace the microSD cover. 9 4.
User Manual (ENGLISH)
Page 13
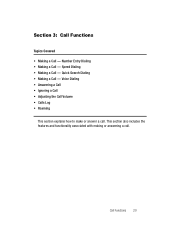
... displayed when the phone is in use. Features of Your Phone Section 2: Understanding Your Phone Topics Covered • Features of Your Phone • Closed View of Your Phone • Front Open View of Your Phone • Command Keys • Understanding the Display Screen • Your Phone's Modes This section...) • Advanced Speech Recognition • Speakerphone • microSDTM Memory Card slot • Bluetooth® Wireless Technology ** ** The r500 phone supports the wireless headset, handsfree, object push and file transfer for Bluetooth® wireless technology. The...
... displayed when the phone is in use. Features of Your Phone Section 2: Understanding Your Phone Topics Covered • Features of Your Phone • Closed View of Your Phone • Front Open View of Your Phone • Command Keys • Understanding the Display Screen • Your Phone's Modes This section...) • Advanced Speech Recognition • Speakerphone • microSDTM Memory Card slot • Bluetooth® Wireless Technology ** ** The r500 phone supports the wireless headset, handsfree, object push and file transfer for Bluetooth® wireless technology. The...
User Manual (ENGLISH)
Page 23
Quick Search Dialing • Making a Call - Voice Dialing • Answering a Call • Ignoring a Call • Adjusting the Call Volume • Calls Log • Roaming This section explains how to make or answer a call . Call Functions 20 Number Entry Dialing • Making a Call - Speed Dialing • Making a Call - Section 3: Call Functions Topics Covered • Making a Call - This section also includes the features and functionality associated with making or answering a call .
Quick Search Dialing • Making a Call - Voice Dialing • Answering a Call • Ignoring a Call • Adjusting the Call Volume • Calls Log • Roaming This section explains how to make or answer a call . Call Functions 20 Number Entry Dialing • Making a Call - Speed Dialing • Making a Call - Section 3: Call Functions Topics Covered • Making a Call - This section also includes the features and functionality associated with making or answering a call .
User Manual (ENGLISH)
Page 36
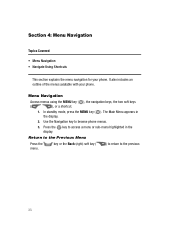
In standby mode, press the MENU key ( ). Press the key to browse phone menus. 3. Use the Navigation key to access a menu or sub-menu highlighted in the display. 2. Menu Navigation Access menus using the MENU key ( ), the navigation ... or the Back (right) soft key ( menu. ) to return to the previous 33 It also includes an outline of the menus available with your phone. The Main Menu appears in the display. Section 4: Menu Navigation Topics Covered • Menu Navigation • Navigate Using Shortcuts This section explains the menu navigation for your...
In standby mode, press the MENU key ( ). Press the key to browse phone menus. 3. Use the Navigation key to access a menu or sub-menu highlighted in the display. 2. Menu Navigation Access menus using the MENU key ( ), the navigation ... or the Back (right) soft key ( menu. ) to return to the previous 33 It also includes an outline of the menus available with your phone. The Main Menu appears in the display. Section 4: Menu Navigation Topics Covered • Menu Navigation • Navigate Using Shortcuts This section explains the menu navigation for your...

User Manual (ENGLISH)
Page 45
Section 5: Entering Text Topics Covered • Text Entry Modes • Changing the Text Entry Mode • Entering Text in Alpha (Abc) Mode • Entering Text in the display. • 123 - ... Lower Case Letters • Entering Numbers • Entering Symbols This section outlines how to select the desired text input mode when entering characters into your phone. Options are four text entry modes, as indicated: • Alpha-Alphabetical text entry mode. Your current mode of text entry [Abc, 123, or T9 Word...
Section 5: Entering Text Topics Covered • Text Entry Modes • Changing the Text Entry Mode • Entering Text in Alpha (Abc) Mode • Entering Text in the display. • 123 - ... Lower Case Letters • Entering Numbers • Entering Symbols This section outlines how to select the desired text input mode when entering characters into your phone. Options are four text entry modes, as indicated: • Alpha-Alphabetical text entry mode. Your current mode of text entry [Abc, 123, or T9 Word...
User Manual (ENGLISH)
Page 49
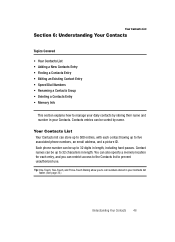
...Covered • Your Contacts List • Adding a New Contacts Entry • Finding a Contacts Entry • Editing an Existing Contact Entry • Speed Dial Numbers • Renaming a Contacts Group • Deleting a Contacts Entry • Memory Info This section explains how to manage your daily contacts by name. Each phone... up to 500 entries, with each contact having up to 32 digits in your Contacts. Contact names can be up to five associated phone numbers, an email address, and a picture ID. You can also specify a memory location for each entry, and you to prevent ...
...Covered • Your Contacts List • Adding a New Contacts Entry • Finding a Contacts Entry • Editing an Existing Contact Entry • Speed Dial Numbers • Renaming a Contacts Group • Deleting a Contacts Entry • Memory Info This section explains how to manage your daily contacts by name. Each phone... up to 500 entries, with each contact having up to 32 digits in your Contacts. Contact names can be up to five associated phone numbers, an email address, and a picture ID. You can also specify a memory location for each entry, and you to prevent ...
User Manual (ENGLISH)
Page 62
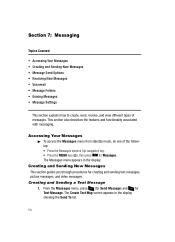
... one of messages. Creating and Sending New Messages This section guides you through procedures for Text Message. Creating and Sending a Text Message 1. Section 7: Messaging Topics Covered • Accessing Your Messages • Creating and Sending New Messages • Message Send Options • Receiving New Messages • Voicemail • Message Folders • Erasing...
... one of messages. Creating and Sending New Messages This section guides you through procedures for Text Message. Creating and Sending a Text Message 1. Section 7: Messaging Topics Covered • Accessing Your Messages • Creating and Sending New Messages • Message Send Options • Receiving New Messages • Voicemail • Message Folders • Erasing...

User Manual (ENGLISH)
Page 75
... 72 In standby mode, do one of inactivity, however some information from your session remains stored in the phone (if you leave your phone. However, if you automatically re-connect to the Internet. Browser With Browser, you can access this information without... can conveniently surf the web and download ringtones and wallpapers using your phone turned on the keypad are viewing stored information, and you launch Browser, your phone connects to the Internet. Section 8: Browser Browser Topics Covered • Browser • Launching Browser • Using Browser •...
... 72 In standby mode, do one of inactivity, however some information from your session remains stored in the phone (if you leave your phone. However, if you automatically re-connect to the Internet. Browser With Browser, you can access this information without... can conveniently surf the web and download ringtones and wallpapers using your phone turned on the keypad are viewing stored information, and you launch Browser, your phone connects to the Internet. Section 8: Browser Browser Topics Covered • Browser • Launching Browser • Using Browser •...

User Manual (ENGLISH)
Page 78
... following to launch. 75 You have this message repeating, press the Remove (right) soft key ( ). Section 9: Games & Apps Topics Covered • Finding Applications This section explains the Games & Apps features where users can use airtime." To stop this message repeat the next time...application on your display. You can download multimedia, applications, games, and check news and sports. icon ( ) highlighted. pops up in your phone that you launch Games & Apps, press the Continue (left) soft key ( ). The Games & Apps screen appears in the display. Finding...
... following to launch. 75 You have this message repeating, press the Remove (right) soft key ( ). Section 9: Games & Apps Topics Covered • Finding Applications This section explains the Games & Apps features where users can use airtime." To stop this message repeat the next time...application on your display. You can download multimedia, applications, games, and check news and sports. icon ( ) highlighted. pops up in your phone that you launch Games & Apps, press the Continue (left) soft key ( ). The Games & Apps screen appears in the display. Finding...


