User Manual (user Manual) (ver.1.0) (English(north America))
Page 11
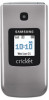
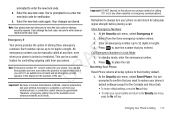
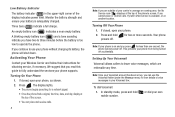
... their instructions for a network signal. • Once the phone finds a signal, the time, date, and day appear at the top of your phone without charging its battery, the DRAF phone will not power off. The display lights. • The phone begins searching for obtaining service, if necessary. Turning Your Phone Off 1. This prevents your phone. 2. Note: If you read this guide to operate the phone. Turning Your Phone On An empty battery icon...
... their instructions for a network signal. • Once the phone finds a signal, the time, date, and day appear at the top of your phone without charging its battery, the DRAF phone will not power off. The display lights. • The phone begins searching for obtaining service, if necessary. Turning Your Phone Off 1. This prevents your phone. 2. Note: If you read this guide to operate the phone. Turning Your Phone On An empty battery icon...
User Manual (user Manual) (ver.1.0) (English(north America))
Page 14
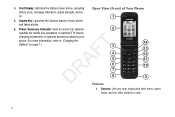
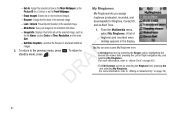
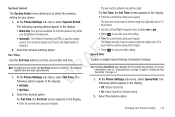
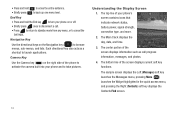
... photos. 5. Earpiece: Lets you hear ringing and alert tones, alarm tones, and the other parties to "Charging the Battery" on . 1 4. Camera Key: Launches the Camera feature of Your Phone status icons, message indicators, signal strength, and so on page 7.) 3 T4 F5 A6 7 R8 D Features 14 13 12 11 10 9 1. Front Display: Indicates the status of your phone, including Open View (Front) of your phone. (For more information, refer to calls...
... photos. 5. Earpiece: Lets you hear ringing and alert tones, alarm tones, and the other parties to "Charging the Battery" on . 1 4. Camera Key: Launches the Camera feature of Your Phone status icons, message indicators, signal strength, and so on page 7.) 3 T4 F5 A6 7 R8 D Features 14 13 12 11 10 9 1. Front Display: Indicates the status of your phone, including Open View (Front) of your phone. (For more information, refer to calls...
User Manual (user Manual) (ver.1.0) (English(north America))
Page 44
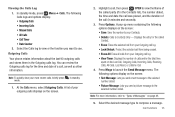
... entry. 41 Select the ringtone or sound that you assigned to the entry when you receive a Contacts list. Follow the instructions in the display. The My F Ringtones menu appears in the upcoming sections depending on 1. T Highlight the Ringtone field, then press Set. Assigning a Ringtone to a Contacts Entry Saving a Number After a Call When you assign a ringtone to a Contacts entry, the phone plays Once you finish a call, you can store the caller's number to your...
... entry. 41 Select the ringtone or sound that you assigned to the entry when you receive a Contacts list. Follow the instructions in the display. The My F Ringtones menu appears in the upcoming sections depending on 1. T Highlight the Ringtone field, then press Set. Assigning a Ringtone to a Contacts Entry Saving a Number After a Call When you assign a ringtone to a Contacts entry, the phone plays Once you finish a call, you can store the caller's number to your...
User Manual (user Manual) (ver.1.0) (English(north America))
Page 82
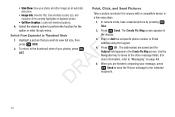
..., and Send Pictures slide show. • Image Info: View the Title, time and date created, size, and resolution of your photos, press DRAF LIST. Take a picture and send it to anyone with a compatible device in Switch From Expanded to Thumbnail Mode 1. To return to perform the function for the Take. In camera mode, take a desired picture by pressing 4. Enter or Add the recipient's phone number or Email address using the keypad. 4. When...
..., and Send Pictures slide show. • Image Info: View the Title, time and date created, size, and resolution of your photos, press DRAF LIST. Take a picture and send it to anyone with a compatible device in Switch From Expanded to Thumbnail Mode 1. To return to perform the function for the Take. In camera mode, take a desired picture by pressing 4. Enter or Add the recipient's phone number or Email address using the keypad. 4. When...
User Manual (user Manual) (ver.1.0) (English(north America))
Page 84
..., refer to "Editing a Contacts Entry" on page 39.) 81 Lock / Unlock: Prevent/permit deletion of the selected image. Slide Show: View your images as Alert Tone. - the file Name, creation Date and Time, Resolution, and the data Size. - From the Multimedia menu, - Get More Graphics: Launches the Browser to DRAF standby mode, press . To return to download additional images. Rename: Change the file name of the...
..., refer to "Editing a Contacts Entry" on page 39.) 81 Lock / Unlock: Prevent/permit deletion of the selected image. Slide Show: View your images as Alert Tone. - the file Name, creation Date and Time, Resolution, and the data Size. - From the Multimedia menu, - Get More Graphics: Launches the Browser to DRAF standby mode, press . To return to download additional images. Rename: Change the file name of the...
User Manual (user Manual) (ver.1.0) (English(north America))
Page 106
... to send location data continually or only when you dial 911. T The Settings menu appears in the display showing the following options appear in the event that you need to Settings" into the microphone. Select the desired Location setting. R • Sound Settings: Set your phone's volume, ringers, keypad tones, alerts, and more information, refer to "Emergency #" on only when you make or receive a • Phone Settings: Set your phone's safety, network, and security call and phone • Phone Info: Access information...
... to send location data continually or only when you dial 911. T The Settings menu appears in the display showing the following options appear in the event that you need to Settings" into the microphone. Select the desired Location setting. R • Sound Settings: Set your phone's volume, ringers, keypad tones, alerts, and more information, refer to "Emergency #" on only when you make or receive a • Phone Settings: Set your phone's safety, network, and security call and phone • Phone Info: Access information...
User Manual (user Manual) (ver.1.0) (English(north America))
Page 110
... sound, press the Play soft key. • To save the volume level/vibrate mode. Select the desired Ringer Type. Note: Your phone includes preloaded ringtones and recorded sounds. Note: The Vibrate icon ( ) appears in the display when the phone is fully charged. 107 Use the Navigation key to Master Volume settings Low - A 1. Select Menu ➔ Multimedia ➔ My Ringtones ➔ Record New. (For more information, refer to sound an alert whenever you leave your service area, connect or disconnect a call...
... sound, press the Play soft key. • To save the volume level/vibrate mode. Select the desired Ringer Type. Note: Your phone includes preloaded ringtones and recorded sounds. Note: The Vibrate icon ( ) appears in the display when the phone is fully charged. 107 Use the Navigation key to Master Volume settings Low - A 1. Select Menu ➔ Multimedia ➔ My Ringtones ➔ Record New. (For more information, refer to sound an alert whenever you leave your service area, connect or disconnect a call...

User Manual (user Manual) (ver.1.0) (English(north America))
Page 114
...On Power up emergency numbers, enable or disable voice privacy, set restrictions, and A other security options. Enter the four-digit lock code using the keypad. It is turned on. • Off: Enables the radio transmitter and receiver in the display. Select the desired Airplane Mode setting. Lock Phone The language option on . (The phone stays locked until you enter the lock code.) 2. The following : R 1. From the Settings menu, select Phone Settings ➔ Security. Select the Device Lock Mode option of your phone The "Enter Code" prompt disappears and the Security 2. Change Lock...
...On Power up emergency numbers, enable or disable voice privacy, set restrictions, and A other security options. Enter the four-digit lock code using the keypad. It is turned on. • Off: Enables the radio transmitter and receiver in the display. Select the desired Airplane Mode setting. Lock Phone The language option on . (The phone stays locked until you enter the lock code.) 2. The following : R 1. From the Settings menu, select Phone Settings ➔ Security. Select the Device Lock Mode option of your phone The "Enter Code" prompt disappears and the Security 2. Change Lock...
User Manual (user Manual) (ver.1.0) (English(north America))
Page 115
... your wireless phone, a connection cannot always be manually called at all times. At the Security sub-menu, select Emergency #. In standby mode, enter the emergency number. 2. Press to confirm that you change the lock code, be up to complete a call . and user settings necessary to 32 digits in Lock Mode 1. If you entered. This can dial this phone as a primary method of storing three emergency T numbers. Select from your phone. At the Security sub-menu, select Reset Phone. Enter the new lock code. new lock code for obvious security...
... your wireless phone, a connection cannot always be manually called at all times. At the Security sub-menu, select Emergency #. In standby mode, enter the emergency number. 2. Press to confirm that you change the lock code, be up to complete a call . and user settings necessary to 32 digits in Lock Mode 1. If you entered. This can dial this phone as a primary method of storing three emergency T numbers. Select from your phone. At the Security sub-menu, select Reset Phone. Enter the new lock code. new lock code for obvious security...
User Manual (user Manual) (ver.1.0) (English(north America))
Page 117
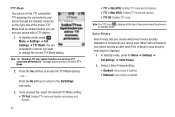
..., the Set Date screen appears in the display: • Enter the current date using two digits each and in the display: • Set Date • Off: Disable Speed Dial. • Set Time • On: Enable Speed Dial (default setting). 2. Tip: Disabling Speed Dial also disables the Voicemail key function. (For more information, refer to "Voicemail Key" on page 9.) 1. T 2. For Set Time, the Set Time screen appears in the display: hour format. • Home Only: Your phone is used to save the your time setting. • Automatic: The Preferred Roaming List...
..., the Set Date screen appears in the display: • Enter the current date using two digits each and in the display: • Set Date • Off: Disable Speed Dial. • Set Time • On: Enable Speed Dial (default setting). 2. Tip: Disabling Speed Dial also disables the Voicemail key function. (For more information, refer to "Voicemail Key" on page 9.) 1. T 2. For Set Time, the Set Time screen appears in the display: hour format. • Home Only: Your phone is used to save the your time setting. • Automatic: The Preferred Roaming List...
User Manual (user Manual) (ver.1.0) (English(north America))
Page 143
... end user, end use Software identified as an upgrade, you must first be an or provide commercial hosting services with the sale of the mobile device which the APPLICABLE LAW, THE SOFTWARE IS PROVIDED "AS IS" AND Software accompanied. Samsung may collect and use this information solely to export restrictions of the Software. This EULA applies to updates, supplements and F add-on the Software. subject...
... end user, end use Software identified as an upgrade, you must first be an or provide commercial hosting services with the sale of the mobile device which the APPLICABLE LAW, THE SOFTWARE IS PROVIDED "AS IS" AND Software accompanied. Samsung may collect and use this information solely to export restrictions of the Software. This EULA applies to updates, supplements and F add-on the Software. subject...
User Manual (user Manual) (ver.1.0) (English(north America))
Page 149
... View, Open, Front 11 View,Closed 10 Phone Info 116 Phone Settings Airplane Mode 110 Language 111 Security 111 Photos Sending 79 Picture Messages Online Viewing 57 Receiving 57 Send in Camera Mode 53 R Receive Pic. Messages 57 T Receive Text Messages 51 Reducing Exposure F Hands-Free Kits and Other Accessories 119 Removing the Battery 6 A Responsible Listening 129 Restricting Children's Access to Your R Mobile device 134 Return to Last Menu 16 DRinger Types, Assigning 107 Roaming 30 S Samsung Mobile Products and Recycling 125 Security Settings 111 Change Lock 111 Emergency # 112 Lock Phone...
... View, Open, Front 11 View,Closed 10 Phone Info 116 Phone Settings Airplane Mode 110 Language 111 Security 111 Photos Sending 79 Picture Messages Online Viewing 57 Receiving 57 Send in Camera Mode 53 R Receive Pic. Messages 57 T Receive Text Messages 51 Reducing Exposure F Hands-Free Kits and Other Accessories 119 Removing the Battery 6 A Responsible Listening 129 Restricting Children's Access to Your R Mobile device 134 Return to Last Menu 16 DRinger Types, Assigning 107 Roaming 30 S Samsung Mobile Products and Recycling 125 Security Settings 111 Change Lock 111 Emergency # 112 Lock Phone...
User Manual
Page 12
... Phone 1. Press and hold mobile number. or dial your battery is too low to three minutes before the battery is adequately charged. Three bars ( ) indicate a full charge. Setting Up Your Voicemail Voicemail allows callers to leave voice messages, which are outside of your carrier's coverage or roaming area, the No Service icon ( ) displays at the top of the phone's screen. We suggest that you press for a network signal. • Once the phone finds a signal, the time...
... Phone 1. Press and hold mobile number. or dial your battery is too low to three minutes before the battery is adequately charged. Three bars ( ) indicate a full charge. Setting Up Your Voicemail Voicemail allows callers to leave voice messages, which are outside of your carrier's coverage or roaming area, the No Service icon ( ) displays at the top of the phone's screen. We suggest that you press for a network signal. • Once the phone finds a signal, the time...
User Manual
Page 18
... disconnect a call progress information, messages, and photos. 4. Understanding the Display Screen 1. The bottom line of your phone's screen contains icons that indicate network status, battery power, signal strength, connection type, and more. 2. End Key • Press and hold to erase the entire sentence. • Briefly press to back up one menu level. The Main Clock displays the day, date, and time. 3. • Press and hold the End key to turn your phone on...
... disconnect a call progress information, messages, and photos. 4. Understanding the Display Screen 1. The bottom line of your phone's screen contains icons that indicate network status, battery power, signal strength, connection type, and more. 2. End Key • Press and hold to erase the entire sentence. • Briefly press to back up one menu level. The Main Clock displays the day, date, and time. 3. • Press and hold the End key to turn your phone on...
User Manual
Page 29
... erased. • Erase All: Erase all calls from your Contacts. • Details: Calls to "Types of the call (in the Contacts list), the number dialed, the time and date the call , as well as other information. A list of a call was placed, and the duration of Messages" on the Last Call, Outgoing Calls, Incoming Calls, Roaming Calls, All Calls, Last Reset, or Lifetime Call. 4. The following options display on the screen: • Save: Save the number to your Outgoing call , then press OPEN to view...
... erased. • Erase All: Erase all calls from your Contacts. • Details: Calls to "Types of the call (in the Contacts list), the number dialed, the time and date the call , as well as other information. A list of a call was placed, and the duration of Messages" on the Last Call, Outgoing Calls, Incoming Calls, Roaming Calls, All Calls, Last Reset, or Lifetime Call. 4. The following options display on the screen: • Save: Save the number to your Outgoing call , then press OPEN to view...
User Manual
Page 96
... phone with a TTY device. 1. TTY Mode Your phone is in standby mode. Press the No soft key to return to access the TTY Mode options. - or - Voice Privacy Voice Privacy lets you want to Standard. 1. TTY equipment is enabled. Select a Voice Privacy setting: • Standard: Voice privacy is disabled. • Enhanced: Voice privacy is connected to your phone sounds an alert tone if the network's voice security level drops to change the current TTY Mode setting...
... phone with a TTY device. 1. TTY Mode Your phone is in standby mode. Press the No soft key to return to access the TTY Mode options. - or - Voice Privacy Voice Privacy lets you want to Standard. 1. TTY equipment is enabled. Select a Voice Privacy setting: • Standard: Voice privacy is disabled. • Enhanced: Voice privacy is connected to your phone sounds an alert tone if the network's voice security level drops to change the current TTY Mode setting...
User Manual
Page 97
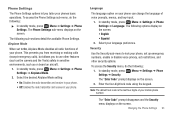
... menu displays on the screen. This prevents you from receiving or making calls (except emergency calls), but allows you tailor your language preference. Security Use the Security sub-menu to On, Airplane Mode disables all radio functions of voice prompts, menus, and key-input. 1. In standby mode, press Settings ➔ Security. Note: The default lock code is the last four digits of your phone, set up emergency numbers, enable or disable voice privacy, set to lock your mobile phone number. In standby mode, press Menu ➔ Settings ➔ Phone Settings ➔ Language...
... menu displays on the screen. This prevents you from receiving or making calls (except emergency calls), but allows you tailor your language preference. Security Use the Security sub-menu to On, Airplane Mode disables all radio functions of voice prompts, menus, and key-input. 1. In standby mode, press Settings ➔ Security. Note: The default lock code is the last four digits of your phone, set up emergency numbers, enable or disable voice privacy, set to lock your mobile phone number. In standby mode, press Menu ➔ Settings ➔ Phone Settings ➔ Language...

User Manual
Page 98
... can answer incoming calls, but you can be sure to complete a call . In standby mode, press Menu ➔ Settings ➔ Phone Settings ➔ Security ➔ Change Lock. Note: Your phone does not allow you to 32 digits in lock mode, you must unlock the phone to place outgoing calls (except to 911 emergency and the three user-programmable emergency numbers. Each number can lock the phone manually during use, or set the phone to re-enter the new lock code for adequate signal strength...
... can answer incoming calls, but you can be sure to complete a call . In standby mode, press Menu ➔ Settings ➔ Phone Settings ➔ Security ➔ Change Lock. Note: Your phone does not allow you to 32 digits in lock mode, you must unlock the phone to place outgoing calls (except to 911 emergency and the three user-programmable emergency numbers. Each number can lock the phone manually during use, or set the phone to re-enter the new lock code for adequate signal strength...
User Manual
Page 101
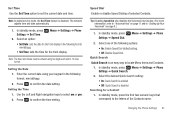
...Enable Speed Dial (default setting). • Off: Disable Speed Dial. Setting the Time 1. Select one of the following format: mm/dd/yyyy. 2. Menu ➔ Settings ➔ Phone 2. In standby mode, press Menu ➔ Settings ➔ Phone Settings ➔ Quick Search. 2. Enter the current date using two digits each and in the following format: mm/dd/yyyy. • Set Time: sets the time for a Contact 1. Use the Left and Right navigation keys to confirm the date setting. Quick Search Quick Search is disabled. Select the desired Quick Search setting...
...Enable Speed Dial (default setting). • Off: Disable Speed Dial. Setting the Time 1. Select one of the following format: mm/dd/yyyy. 2. Menu ➔ Settings ➔ Phone 2. In standby mode, press Menu ➔ Settings ➔ Phone Settings ➔ Quick Search. 2. Enter the current date using two digits each and in the following format: mm/dd/yyyy. • Set Time: sets the time for a Contact 1. Use the Left and Right navigation keys to confirm the date setting. Quick Search Quick Search is disabled. Select the desired Quick Search setting...
User Manual
Page 133
... Sound Settings Alerts 90 Key Tone 90 Master Volume 89 Ringer Type 89 Specific Absorption Rate (SAR) Certification Information 103 Speed Dialing One-Touch Dialing 22 Three Touch Dialing 22 Two-Touch Dialing 22 Standard Limited Warranty 118 T Taking Pictures 59 Text Entering Emoticons 32 Entering Numbers 31 Entering Symbols 32 Using Abc Mode 31 Using T9® Mode 31 Time, Set 97 Tools Tools Menu 70 Travel Adapter 7 TTY Mode 92 129 Security 93 Picture Messages Online Viewing 52 Receiving 51 Send in Camera Mode 48 Powering the Phone Off 8 On 8 Q Quick...
... Sound Settings Alerts 90 Key Tone 90 Master Volume 89 Ringer Type 89 Specific Absorption Rate (SAR) Certification Information 103 Speed Dialing One-Touch Dialing 22 Three Touch Dialing 22 Two-Touch Dialing 22 Standard Limited Warranty 118 T Taking Pictures 59 Text Entering Emoticons 32 Entering Numbers 31 Entering Symbols 32 Using Abc Mode 31 Using T9® Mode 31 Time, Set 97 Tools Tools Menu 70 Travel Adapter 7 TTY Mode 92 129 Security 93 Picture Messages Online Viewing 52 Receiving 51 Send in Camera Mode 48 Powering the Phone Off 8 On 8 Q Quick...


