

Quick Guide (easy Manual) (Korean)
Page 2
...REW) buttons, find the first position you wish to record a picture. Still Image : Press the PHOTO button to play back. Set the Power Switch to (CAMERA). 4. Set the Power Switch to (CAMOFF ERA). 4. Turn the Power switch to start recording. MPEG4 : Press the (PLAY/STILL) button to OFF OFF.... OFF OFF OFF OFF OFF Set the Power Switch to stop the play back. Turn the Power switch to a TV with the AUDIO/VIDEO cable. TAPE PLAYBACK 1 VIDEO AUDIO(L) AUDIO(R) S-VIDEO Multi-AV DSC Recording 1 REC PLAY OFF OFF 4 OFF OFF DSC PLAYBACK 1 REC PLAY OFF OFF 4 OFF OFF 2 2 4 2 5 ...
...REW) buttons, find the first position you wish to record a picture. Still Image : Press the PHOTO button to play back. Set the Power Switch to (CAMERA). 4. Set the Power Switch to (CAMOFF ERA). 4. Turn the Power switch to start recording. MPEG4 : Press the (PLAY/STILL) button to OFF OFF.... OFF OFF OFF OFF OFF Set the Power Switch to stop the play back. Turn the Power switch to a TV with the AUDIO/VIDEO cable. TAPE PLAYBACK 1 VIDEO AUDIO(L) AUDIO(R) S-VIDEO Multi-AV DSC Recording 1 REC PLAY OFF OFF 4 OFF OFF DSC PLAYBACK 1 REC PLAY OFF OFF 4 OFF OFF 2 2 4 2 5 ...

Quick Guide (easy Manual) (ver.1.0) (English)
Page 3
...drop the battery pack. Notes Regarding the Battery Pack ✳ When the battery reaches the end of its life, please contact your Samsung product are trademarks or registered trademarks of their respective holders. Batteries must be damaged if immersed in water or subjected to high levels... cassette compartment opened and the battery removed. Unauthorised recording of copyrighted materials may damage the video heads. For example, in a parked closed car in a dry, warm room with the camera lens pointing directly at least two hours in summer or exposed to high temperature (above ...
...drop the battery pack. Notes Regarding the Battery Pack ✳ When the battery reaches the end of its life, please contact your Samsung product are trademarks or registered trademarks of their respective holders. Batteries must be damaged if immersed in water or subjected to high levels... cassette compartment opened and the battery removed. Unauthorised recording of copyrighted materials may damage the video heads. For example, in a parked closed car in a dry, warm room with the camera lens pointing directly at least two hours in summer or exposed to high temperature (above ...
Quick Guide (easy Manual) (ver.1.0) (English)
Page 4
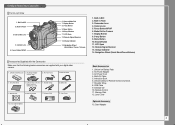
...Focus Button MF/AF 6. Camcorder Lens 4. Camera Lens 5. Display Button 8. 5-way Button 9. Navigation Wheel (Quick Menu/Focus/Volume) Accessories Supplied with the Camcorder Make sure that the following basic accessories are supplied with your digital video camera. 1. AC Power Cord 4. Built-in ...Flash 3. Built-in MIC 2. Mode Dial for Camera 7. Charge Indicator 14. Remote Control 11. Software CD 10. Camera Mode Dial 7. Lithium Ion Battery pack 2. Menu...
...Focus Button MF/AF 6. Camcorder Lens 4. Camera Lens 5. Display Button 8. 5-way Button 9. Navigation Wheel (Quick Menu/Focus/Volume) Accessories Supplied with the Camcorder Make sure that the following basic accessories are supplied with your digital video camera. 1. AC Power Cord 4. Built-in ...Flash 3. Built-in MIC 2. Mode Dial for Camera 7. Charge Indicator 14. Remote Control 11. Software CD 10. Camera Mode Dial 7. Lithium Ion Battery pack 2. Menu...

Quick Guide (easy Manual) (ver.1.0) (English)
Page 9
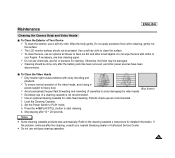
...memory card from your device, move or copy your data from heaters and other heat sources. Format the memory card periodically. Cleaning the Camera Body and Video Heads I To prevent any damage to a PC. Load the Cleaning Cassette. 2. Set the Power Switch to start cleaning. 4. ...battery pack has been removed, and other heat sources. Maintenance Cleaning and Maintaining the Camcorder ✤ For prolonged use of your nearest Samsung dealer or Authorised Service Centre. ✤ Do not use wet-type cleaning cassettes. 9 Avoid storing cassettes under direct sunlight, and avoid...
...memory card from your device, move or copy your data from heaters and other heat sources. Format the memory card periodically. Cleaning the Camera Body and Video Heads I To prevent any damage to a PC. Load the Cleaning Cassette. 2. Set the Power Switch to start cleaning. 4. ...battery pack has been removed, and other heat sources. Maintenance Cleaning and Maintaining the Camcorder ✤ For prolonged use of your nearest Samsung dealer or Authorised Service Centre. ✤ Do not use wet-type cleaning cassettes. 9 Avoid storing cassettes under direct sunlight, and avoid...

Quick Guide (easy Manual) (ver.1.0) (English)
Page 10
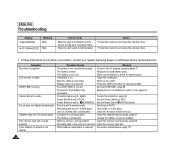
...obstructing object 10 Blinking Informs that... Restart the camcorder If problem continues, contact your nearest Samsung dealer or authorised service center/personnel. Rear of LCD Low temperatures might produce a dark LCD... to a charged one or connect to other Format the memory card using the camera menu device or has error in wrong position The battery is exhausted Insert the cassette...Symptom No power is supplied LCD monitor is blank DATE/TIME is wrong Cannot Record a video Possible Causes Measure The power is not connected properly Connect the AC adapter properly, page...
...obstructing object 10 Blinking Informs that... Restart the camcorder If problem continues, contact your nearest Samsung dealer or authorised service center/personnel. Rear of LCD Low temperatures might produce a dark LCD... to a charged one or connect to other Format the memory card using the camera menu device or has error in wrong position The battery is exhausted Insert the cassette...Symptom No power is supplied LCD monitor is blank DATE/TIME is wrong Cannot Record a video Possible Causes Measure The power is not connected properly Connect the AC adapter properly, page...

User Manual (user Manual) (English, French)
Page 148
... the START/STOP button. To start the recording, press the START/STOP button again. 8. AV IN/OUT 8. Connect AUDIO ✤ La borne S-VIDEO ne retransmet que la vidéo. Une fois l'enregistrement terminé, sélectionnez «SORTIE» dans ENTREE/SORTIE AV . Connect the Multi-AV...pour enregistrer. Switch to exit the menu screen. 6. Allumez votre télévision et sélectionnez le canal que 2. PLAY MODE INITIAL CAMERA A/V VIEWER REC MODE PHOTO SEARCH AUDIO MODE 12bit AUDIO SELECT WIND CUT PB DSE AV IN/OUT OUT sélectionnez A/V , puis ENTREE/...
... the START/STOP button. To start the recording, press the START/STOP button again. 8. AV IN/OUT 8. Connect AUDIO ✤ La borne S-VIDEO ne retransmet que la vidéo. Une fois l'enregistrement terminé, sélectionnez «SORTIE» dans ENTREE/SORTIE AV . Connect the Multi-AV...pour enregistrer. Switch to exit the menu screen. 6. Allumez votre télévision et sélectionnez le canal que 2. PLAY MODE INITIAL CAMERA A/V VIEWER REC MODE PHOTO SEARCH AUDIO MODE 12bit AUDIO SELECT WIND CUT PB DSE AV IN/OUT OUT sélectionnez A/V , puis ENTREE/...

User Manual (user Manual) (English, French)
Page 149
...riaux protégés peut constituer une atteinte aux droits des propriétaires du the rights of the Copyright owners and against copyright laws. CAMERA A/V IN/OUT à l'aide du bouton OK . press the OK button. AUDIO SELECT 4. Press the START/STOP button. 6. I Le... message PAUSE s'affiche sur l'écran LCD. 7. Play the video tape and press the START/STOP button to A/V SET 7. To stop the recording, press the Notes (STOP) button. Connect AUDIO cables for better quality....
...riaux protégés peut constituer une atteinte aux droits des propriétaires du the rights of the Copyright owners and against copyright laws. CAMERA A/V IN/OUT à l'aide du bouton OK . press the OK button. AUDIO SELECT 4. Press the START/STOP button. 6. I Le... message PAUSE s'affiche sur l'écran LCD. 7. Play the video tape and press the START/STOP button to A/V SET 7. To stop the recording, press the Notes (STOP) button. Connect AUDIO cables for better quality....

User Manual (user Manual) (ver.1.0) (English)
Page 11
... the DPOF...142 Connecting to Other Devices - MySET Menu...131 Memorizing Your Current Settings...131 Loading Your Customized Settings ...132 Customizing Your Camera - PC...149 Connecting to a PC using a DV (i.Link, IEEE 1394) cable...149 Connecting to a PC using a USB ...cable ...151 Maintenance 154 Cleaning and Maintaining the Camcorder ...154 After Using Your Camcorder...154 Cleaning the Camera Body and Video Heads...155 Using Your Camcorder Abroad ...156 Troubleshooting 157 Troubleshooting ...157 Self Diagnosis Display ...157 Specifications 160 INDEX 162 Warranty...
... the DPOF...142 Connecting to Other Devices - MySET Menu...131 Memorizing Your Current Settings...131 Loading Your Customized Settings ...132 Customizing Your Camera - PC...149 Connecting to a PC using a DV (i.Link, IEEE 1394) cable...149 Connecting to a PC using a USB ...cable ...151 Maintenance 154 Cleaning and Maintaining the Camcorder ...154 After Using Your Camcorder...154 Cleaning the Camera Body and Video Heads...155 Using Your Camcorder Abroad ...156 Troubleshooting 157 Troubleshooting ...157 Self Diagnosis Display ...157 Specifications 160 INDEX 162 Warranty...

User Manual (user Manual) (ver.1.0) (English)
Page 13
... Power Switch (refer to the camcorder, open the LCD monitor and then open the Jack Cover. 9 Press the START/STOP button to record a video, or press the PHOTO button to page 83). 3. PPPHHHOOOTTTOOO 6. Insert the Memory Card into the memory card slot (refer to record a still ...cable to page 31). 34 5. Start ENGLISH Quick Start ✤ This device is a Camcorder and a Digital Still Camera in the following order: 1. Install the battery pack. Set your device to REC or (CAMERA) mode by connecting the power cable to page 47). 1 2 2. Please read this manual in its entirety. ...
... Power Switch (refer to the camcorder, open the LCD monitor and then open the Jack Cover. 9 Press the START/STOP button to record a video, or press the PHOTO button to page 83). 3. PPPHHHOOOTTTOOO 6. Insert the Memory Card into the memory card slot (refer to record a still ...cable to page 31). 34 5. Start ENGLISH Quick Start ✤ This device is a Camcorder and a Digital Still Camera in the following order: 1. Install the battery pack. Set your device to REC or (CAMERA) mode by connecting the power cable to page 47). 1 2 2. Please read this manual in its entirety. ...

User Manual (user Manual) (ver.1.0) (English)
Page 17
...' or 'Playback' Using the LCD 1. However, there may be tiny dots (red, blue or green in any way. 2. If this happens, clean the video heads with the camera lens pointing directly at the sun. Do not position the camcorder such that appear on the LCD monitor. The LCD monitor has been manufactured...
...' or 'Playback' Using the LCD 1. However, there may be tiny dots (red, blue or green in any way. 2. If this happens, clean the video heads with the camera lens pointing directly at the sun. Do not position the camcorder such that appear on the LCD monitor. The LCD monitor has been manufactured...

User Manual (user Manual) (ver.1.0) (English)
Page 58
The top menu including CAMERA is a tool used at the same time. ✤ WHT.BALANCE mode is standard indoor lighting. Press the DOWN button to exit the menu screen. OUTDOOR 5. ... the light source is not available in a given scene/environment. Press the MENU button to select CAMERA , then press the OK button. Notes ✤ WHT.BALANCE and NITE PIX modes cannot be used to adapt video equipment to select WHT.BALANCE , then press the OK button. INDOOR - The selected option is displayed...
The top menu including CAMERA is a tool used at the same time. ✤ WHT.BALANCE mode is standard indoor lighting. Press the DOWN button to exit the menu screen. OUTDOOR 5. ... the light source is not available in a given scene/environment. Press the MENU button to select CAMERA , then press the OK button. Notes ✤ WHT.BALANCE and NITE PIX modes cannot be used to adapt video equipment to select WHT.BALANCE , then press the OK button. INDOOR - The selected option is displayed...
User Manual (user Manual) (ver.1.0) (English)
Page 153
...Mac OS (9.1 or later) ✓ Main Memory: More than 64MB of DV ports (4pin and 6pin). Be careful since there are transmitted in the Camera (PLAY) mode. ✤ Using the IEEE1394 cable (DV cable), you can take input from your camcorder to a PC which supports the IEEE 1394 ...connection. ✤ Windows Movie Maker and other Video Capturing Software can transfer data by connecting to Other Devices - It may not operate properly. ✤ Operation is commercially available. ✤ Most DV...
...Mac OS (9.1 or later) ✓ Main Memory: More than 64MB of DV ports (4pin and 6pin). Be careful since there are transmitted in the Camera (PLAY) mode. ✤ Using the IEEE1394 cable (DV cable), you can take input from your camcorder to a PC which supports the IEEE 1394 ...connection. ✤ Windows Movie Maker and other Video Capturing Software can transfer data by connecting to Other Devices - It may not operate properly. ✤ Operation is commercially available. ✤ Most DV...

User Manual (user Manual) (ver.1.0) (English)
Page 157
... disk. ✤ USB Streaming transfers video in realtime using the DVC Media 5.1. 1. To Disconnect USB Connection ✓ After completing the data transfer, you must disconnect the cable in (CAMERA) mode. ✓ The PC will not recognize your PC camera application such as Microsoft Netmeeting. 4. ...No Memory Card or an unformatted Memory Card is inserted, PC will recognize your camera as a PC camera for video chatting, video conference and other devices at the same time, it requires DVC Media 5.1, DirectX 9.0a, Windows Media Player 9.0. &#...
... disk. ✤ USB Streaming transfers video in realtime using the DVC Media 5.1. 1. To Disconnect USB Connection ✓ After completing the data transfer, you must disconnect the cable in (CAMERA) mode. ✓ The PC will not recognize your PC camera application such as Microsoft Netmeeting. 4. ...No Memory Card or an unformatted Memory Card is inserted, PC will recognize your camera as a PC camera for video chatting, video conference and other devices at the same time, it requires DVC Media 5.1, DirectX 9.0a, Windows Media Player 9.0. &#...
User Manual (user Manual) (ver.1.0) (English)
Page 159
Maintenance ENGLISH Cleaning the Camera Body and Video Heads To Clean the Exterior of a cleaning cassette is not recommended. ✓ Use an optional cleaning cassette for video head cleaning. Wipe the body gently. Use a soft dry cloth to avoid damaging the video heads. ✓ Excessive use of Your ...If necessary, use lens cleaning paper. ✓ Do not use a soft dry cloth. To Clean the Video Heads ✓ Dirty heads might cause problems with cloths or your nearest Samsung dealer or Authorized Service Center. ✤ Do not use an optional air blower to start cleaning. 4....
Maintenance ENGLISH Cleaning the Camera Body and Video Heads To Clean the Exterior of a cleaning cassette is not recommended. ✓ Use an optional cleaning cassette for video head cleaning. Wipe the body gently. Use a soft dry cloth to avoid damaging the video heads. ✓ Excessive use of Your ...If necessary, use lens cleaning paper. ✓ Do not use a soft dry cloth. To Clean the Video Heads ✓ Dirty heads might cause problems with cloths or your nearest Samsung dealer or Authorized Service Center. ✤ Do not use an optional air blower to start cleaning. 4....
User Manual (user Manual) (ver.1.0) (English)
Page 162
...is supplied LCD monitor is blank DATE/TIME is wrong Cannot Record a video Focus does not adjust automatically Cassette tape will not load properly The memory.... Protection tab is set to SAVE Power Switch is set to PLAY Power Switch is set to (CAMERA) Focus is required Measure Connect the AC adapter properly, page 27 Replace the dead battery pack Warm...formatted Action Format the memory card using the camera menu Format the memory card using the camera menu ✤ If these instructions do not solve your problem, contact your nearest Samsung dealer or authorized service center/personnel. Multi...
...is supplied LCD monitor is blank DATE/TIME is wrong Cannot Record a video Focus does not adjust automatically Cassette tape will not load properly The memory.... Protection tab is set to SAVE Power Switch is set to PLAY Power Switch is set to (CAMERA) Focus is required Measure Connect the AC adapter properly, page 27 Replace the dead battery pack Warm...formatted Action Format the memory card using the camera menu Format the memory card using the camera menu ✤ If these instructions do not solve your problem, contact your nearest Samsung dealer or authorized service center/personnel. Multi...

User Manual (user Manual) (ver.1.0) (English)
Page 164
...LCD Monitor Size Pixel Bright / Color Adjust Rotation Angle Mirror Viewfinder Display Device Size Pixel Diopter Adjust SCD6040 NTSC 2 Rotary heads, Helical Scanning System Rotary heads, PCM system Digital Video tape: 0.25 inch (6.35mm) MiniDV cassette SP: approx. 0.74 inch/s(18.81mm/s), LP: ...approx. 0.5 inch/s(12.56mm/s) SP: 60 minutes, LP: 90 minutes (when using DVM60) Approx. 180 sec (when using DVM60) CAMCORDER CAMERA MiniDV JPEG (DCF) 66 X 96...
...LCD Monitor Size Pixel Bright / Color Adjust Rotation Angle Mirror Viewfinder Display Device Size Pixel Diopter Adjust SCD6040 NTSC 2 Rotary heads, Helical Scanning System Rotary heads, PCM system Digital Video tape: 0.25 inch (6.35mm) MiniDV cassette SP: approx. 0.74 inch/s(18.81mm/s), LP: ...approx. 0.5 inch/s(12.56mm/s) SP: 60 minutes, LP: 90 minutes (when using DVM60) Approx. 180 sec (when using DVM60) CAMCORDER CAMERA MiniDV JPEG (DCF) 66 X 96...

User Manual (user Manual) (ver.1.0) (English)
Page 165
... Auto Focus / Manual Focus Shutter Speed (Auto) Manual Shutter Speed Auto White Balance Metering Connectors Video output S-VIDEO output Audio output DV input / output USB output External MIC Others Operating Temperature Storage Temperature ENGLISH ...CAMCORDER 10x 900x 2.7 ~ 27mm 1.4 / 1.8 Variable 4 step 30 Nite Pix / Power Nite Pix Wide Macro CAMCORDER 1/6 Charge Coupled Device 680K / 340K NO / NO DIS YES / YES 1/60 ~ 1/10,000 1/60 ~ 1/10,000 8 step YES CAMERA...
... Auto Focus / Manual Focus Shutter Speed (Auto) Manual Shutter Speed Auto White Balance Metering Connectors Video output S-VIDEO output Audio output DV input / output USB output External MIC Others Operating Temperature Storage Temperature ENGLISH ...CAMCORDER 10x 900x 2.7 ~ 27mm 1.4 / 1.8 Variable 4 step 30 Nite Pix / Power Nite Pix Wide Macro CAMCORDER 1/6 Charge Coupled Device 680K / 340K NO / NO DIS YES / YES 1/60 ~ 1/10,000 1/60 ~ 1/10,000 8 step YES CAMERA...


