

User Manual (ENGLISH)
Page 30
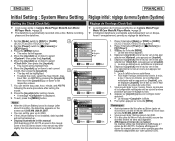
...;n [Joystick]. 5. Coloque el interruptor [Mode] en [DISC] o [CARD]. 1. Camera Mode ►System Clock Set Beep Sound ►On Language ►English Demonstration ►On Move OK Select MENU Exit Camera Mode ►System Clock Set Beep Sound Language Demonstration JAN 01 2007 12 : 00 AM Adjust OK Select MENU Exit (sólo SC-DC173(U)/DC175/DC575) 2. Para salir, presione el botón [MENU]. 9. Algunas partes de la OSD manual. Mueva el [Joystick] hacia...
...;n [Joystick]. 5. Coloque el interruptor [Mode] en [DISC] o [CARD]. 1. Camera Mode ►System Clock Set Beep Sound ►On Language ►English Demonstration ►On Move OK Select MENU Exit Camera Mode ►System Clock Set Beep Sound Language Demonstration JAN 01 2007 12 : 00 AM Adjust OK Select MENU Exit (sólo SC-DC173(U)/DC175/DC575) 2. Para salir, presione el botón [MENU]. 9. Algunas partes de la OSD manual. Mueva el [Joystick] hacia...
User Manual (ENGLISH)
Page 30
... [DISC] or [CARD]. 4 (SC-DC173(U)/DC175/DC575 only) 2. Placez l'interrupteur [Power] sur [ (Camera)] ou [ (Player)]. 3. Appuyez sur la touche [MENU] . La liste des menus apparaît. 4. Pour quitter, appuyez sur la touche [MENU]. Before recording, please set the day, year, hour, minute, and AM/PM following the same procedure after setting minute. A message is not installed, data inputted will be highlighted. To adjust...
... [DISC] or [CARD]. 4 (SC-DC173(U)/DC175/DC575 only) 2. Placez l'interrupteur [Power] sur [ (Camera)] ou [ (Player)]. 3. Appuyez sur la touche [MENU] . La liste des menus apparaît. 4. Pour quitter, appuyez sur la touche [MENU]. Before recording, please set the day, year, hour, minute, and AM/PM following the same procedure after setting minute. A message is not installed, data inputted will be highlighted. To adjust...
User Manual (ENGLISH)
Page 84
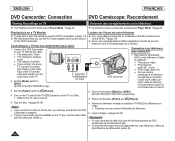
... la prise blanche du câble audio (audio G). 84 Set the [Mode] switch to the audio input of the TV and the white jack (Audio L) to [DISC]. (SC-DC173(U)/DC175/DC575 only) Signal flow AV Cable 3. ENGLISH FRANÇAIS DVD Camcorder: Connection DVD Caméscope: Raccordement Viewing Recordings on TV Visionner des enregistrements sur le téléviseur The Playback function works only in Player Mode. page 26 La...
... la prise blanche du câble audio (audio G). 84 Set the [Mode] switch to the audio input of the TV and the white jack (Audio L) to [DISC]. (SC-DC173(U)/DC175/DC575 only) Signal flow AV Cable 3. ENGLISH FRANÇAIS DVD Camcorder: Connection DVD Caméscope: Raccordement Viewing Recordings on TV Visionner des enregistrements sur le téléviseur The Playback function works only in Player Mode. page 26 La...
User Manual (ENGLISH)
Page 91
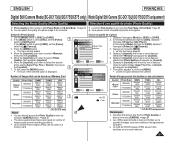
... Approx. 10000 * : SC-DC575 only Notes You can directly access the Photo Quality function by using the [Q.MENU] button. page 27 The above approximate figures are based on number of images under normal recording conditions. Up to 20,000 Photo images (JPEG) can select the quality of a photo image to [DISC] or [CARD]. 2. Choisir la qualité de la photo M.Cam Mode ►Memory Photo Quality File No. ►...
... Approx. 10000 * : SC-DC575 only Notes You can directly access the Photo Quality function by using the [Q.MENU] button. page 27 The above approximate figures are based on number of images under normal recording conditions. Up to 20,000 Photo images (JPEG) can select the quality of a photo image to [DISC] or [CARD]. 2. Choisir la qualité de la photo M.Cam Mode ►Memory Photo Quality File No. ►...

User Manual (ENGLISH)
Page 92
... recorded at 1152X864 on your DVD Camcorder may not playback properly 7 on other digital devices that can select the size of a photo image to select , then press the [Joystick]. 6. Notes You can directly access the Photo Size function by using the [Q.MENU] button. page 27 The number of images that do not support this photo size. High resolution images use more memory than lower resolution images. Placez l'interrupteur [Mode] sur [CARD]. 2. Placez l'interrupteur [Power] sur [ (Camera...
... recorded at 1152X864 on your DVD Camcorder may not playback properly 7 on other digital devices that can select the size of a photo image to select , then press the [Joystick]. 6. Notes You can directly access the Photo Size function by using the [Q.MENU] button. page 27 The number of images that do not support this photo size. High resolution images use more memory than lower resolution images. Placez l'interrupteur [Mode] sur [CARD]. 2. Placez l'interrupteur [Power] sur [ (Camera...
User Manual (ENGLISH)
Page 106
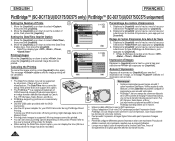
... display the time (24-hour format) when the image has been recorded. Réglage de l'option d'impression de la date et de l'heure 3. ENGLISH FRANÇAIS PictBridge™ (SC-DC173(U)/DC175/DC575 only) PictBridge™ (SC-DC173(U)/DC175/DC575 uniquement) Setting the Number of prints, then press the [Joystick]. Setting the Date/Time Imprint Option 3. Check with the DVD Camcorder. Use the AC power adapter for details. When setting the Date/Time...
... display the time (24-hour format) when the image has been recorded. Réglage de l'option d'impression de la date et de l'heure 3. ENGLISH FRANÇAIS PictBridge™ (SC-DC173(U)/DC175/DC575 only) PictBridge™ (SC-DC173(U)/DC175/DC575 uniquement) Setting the Number of prints, then press the [Joystick]. Setting the Date/Time Imprint Option 3. Check with the DVD Camcorder. Use the AC power adapter for details. When setting the Date/Time...
User Manual (ENGLISH)
Page 2
... (Remote) (SC-DC175/DC575 only 31 Setting the Beep Sound (Beep Sound 32 Setting the Shutter Sound (Shutter Sound) (SC-DC173(U)/DC175/DC575 only 33 Selecting the OSD Language (Language 34 Viewing the Demonstration (Demonstration 35 Initial Setting : Display Menu Setting 36 Adjusting the LCD Screen (LCD Bright/LCD Color 36 Displaying the Date/Time (Date/Time 37 Setting the TV Display (TV Display 38 DVD Camcorder: Before Recording 39 Using the Viewfinder 39 Using the LCD ENHANCER 39 Various Recording Techniques 40 Inserting and Removing a Disc 41 Selecting the Record Mode (Rec...
... (Remote) (SC-DC175/DC575 only 31 Setting the Beep Sound (Beep Sound 32 Setting the Shutter Sound (Shutter Sound) (SC-DC173(U)/DC175/DC575 only 33 Selecting the OSD Language (Language 34 Viewing the Demonstration (Demonstration 35 Initial Setting : Display Menu Setting 36 Adjusting the LCD Screen (LCD Bright/LCD Color 36 Displaying the Date/Time (Date/Time 37 Setting the TV Display (TV Display 38 DVD Camcorder: Before Recording 39 Using the Viewfinder 39 Using the LCD ENHANCER 39 Various Recording Techniques 40 Inserting and Removing a Disc 41 Selecting the Record Mode (Rec...
User Manual (ENGLISH)
Page 6
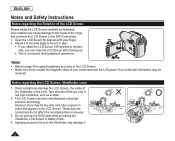
... recorded picture in color) that connects the LCD Screen to the lens side, you can damage the LCD Screen, the inside of the LCD Screen Please rotate the LCD Screen carefully as at dusk. 2. Rotate it to the best angle to record or play. If you rotate the LCD Screen 180 degrees to the DVD Camcorder. 1. Open the LCD Screen 90 degrees with it . 6 PHOTO PHOTO Direct sunlight can close the LCD Screen with your credit card...
... recorded picture in color) that connects the LCD Screen to the lens side, you can damage the LCD Screen, the inside of the LCD Screen Please rotate the LCD Screen carefully as at dusk. 2. Rotate it to the best angle to record or play. If you rotate the LCD Screen 180 degrees to the DVD Camcorder. 1. Open the LCD Screen 90 degrees with it . 6 PHOTO PHOTO Direct sunlight can close the LCD Screen with your credit card...
User Manual (ENGLISH)
Page 22
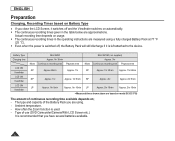
... model SC-DC173U The amount of continuous recording time available depends on usage. The continuous recording times in the operating instructions are using a fully charged Battery Pack at 77 °F (25 °C). Even when the power is switched off, the Battery Pack will still discharge if it is left attached to the device. Type of use (DVD Camcorder/Camera/With LCD Screen etc.). Battery Type Charging time LCD ON Viewfinder LCD ON Viewfinder LCD ON View...
... model SC-DC173U The amount of continuous recording time available depends on usage. The continuous recording times in the operating instructions are using a fully charged Battery Pack at 77 °F (25 °C). Even when the power is switched off, the Battery Pack will still discharge if it is left attached to the device. Type of use (DVD Camcorder/Camera/With LCD Screen etc.). Battery Type Charging time LCD ON Viewfinder LCD ON Viewfinder LCD ON View...
User Manual (ENGLISH)
Page 24
... continuous recording times in the operating instructions are measured using the Battery Pack, you are not operating it. If your DVD Camcorder is in Camera Mode, and it is left in STBY mode without being operated for approximate continuous recording time. The recording time is affected by temperature and environmental conditions. The recording time shortens dramatically in the instructions. When replacing the battery pack, only use the same type as...
... continuous recording times in the operating instructions are measured using the Battery Pack, you are not operating it. If your DVD Camcorder is in Camera Mode, and it is left in STBY mode without being operated for approximate continuous recording time. The recording time is affected by temperature and environmental conditions. The recording time shortens dramatically in the instructions. When replacing the battery pack, only use the same type as...

User Manual (ENGLISH)
Page 30
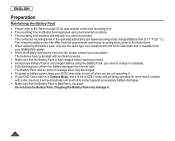
... to 2040. If the Lithium Battery is not installed, data inputted will appear. 4. Press the [Joystick] after setting minute. A message is automatically recorded onto a disc. ENGLISH Initial Setting : System Menu Setting Setting the Clock (Clock Set) Clock setup works in Camera Mode/Player Mode/M.Cam Mode/M.Player Mode. page 26 The date/time is displayed. 9. Set the [Power] switch to select , then press the [Joystick]. 5. You can set current month, then press the [Joystick...
... to 2040. If the Lithium Battery is not installed, data inputted will appear. 4. Press the [Joystick] after setting minute. A message is automatically recorded onto a disc. ENGLISH Initial Setting : System Menu Setting Setting the Clock (Clock Set) Clock setup works in Camera Mode/Player Mode/M.Cam Mode/M.Player Mode. page 26 The date/time is displayed. 9. Set the [Power] switch to select , then press the [Joystick]. 5. You can set current month, then press the [Joystick...

User Manual (ENGLISH)
Page 42
... format later, use the menu. page 79 Removing a Disc 1. Move the [Joystick] left or right to select or , then press [Joystick]. Please refer to page 123 for Finalized disc compatibility. To format later, use the menu. page 79 For a DVD+RW disc: You are prompted with the message. Note The Finalize/Format functions are prompted with the message. Formatting a new disc is between Video and VR mode Video (Video Mode...
... format later, use the menu. page 79 Removing a Disc 1. Move the [Joystick] left or right to select or , then press [Joystick]. Please refer to page 123 for Finalized disc compatibility. To format later, use the menu. page 79 For a DVD+RW disc: You are prompted with the message. Note The Finalize/Format functions are prompted with the message. Formatting a new disc is between Video and VR mode Video (Video Mode...

User Manual (ENGLISH)
Page 44
... battery power consumption. If the power cable/batteries are displayed on the LCD Screen or Viewfinder. Make sure the Battery Level indicates that is displayed. Make sure the image you want to record appears on the LCD Screen. 5. Tip This DVD Camcorder has two [Record Start/Stop] buttons. After data recovery, the system will be switched to record again, a new title scene will be created. Open the LCD Screen Set the [Mode] switch to [DISC]. (SC...
... battery power consumption. If the power cable/batteries are displayed on the LCD Screen or Viewfinder. Make sure the Battery Level indicates that is displayed. Make sure the image you want to record appears on the LCD Screen. 5. Tip This DVD Camcorder has two [Record Start/Stop] buttons. After data recovery, the system will be switched to record again, a new title scene will be created. Open the LCD Screen Set the [Mode] switch to [DISC]. (SC...
User Manual (ENGLISH)
Page 52
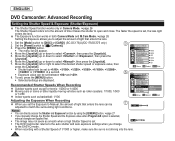
... the lens. 1. ENGLISH DVD Camcorder: Advanced Recording Setting the Shutter Speed & Exposure (Shutter/Exposure) The Shutter Speed function works only in both Camera Mode and M.Cam Mode. page 26 Setting the Exposure allows you to adjust the amount of light that enters the lens can be adjusted to match the surrounding light conditions. 7 S.1/60 Notes You can directly access the Shutter and Exposure function by using the [Q.MENU] button. page 27 If you manually change the Shutter Speed and...
... the lens. 1. ENGLISH DVD Camcorder: Advanced Recording Setting the Shutter Speed & Exposure (Shutter/Exposure) The Shutter Speed function works only in both Camera Mode and M.Cam Mode. page 26 Setting the Exposure allows you to adjust the amount of light that enters the lens can be adjusted to match the surrounding light conditions. 7 S.1/60 Notes You can directly access the Shutter and Exposure function by using the [Q.MENU] button. page 27 If you manually change the Shutter Speed and...
User Manual (ENGLISH)
Page 57
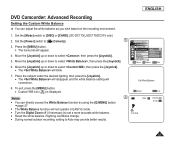
... operate in EASY.Q mode. Turn the Digital Zoom off (if necessary) to set a more accurate white balance. Reset the white balance if lighting conditions change. During normal outdoor recording, setting to select , then press the [Joystick]. 5. Set the [Mode] switch to [ (Camera)]. 6 3. Camera Mode ►Camera Program AE White Balance Auto A Digital Effect Indoor Shutter Outdoor Exposure Custom WB 16:9 Wide ▼ Move OK Select MENU Exit 7. OK Select MENU Exit Notes You can adjust the white balance...
... operate in EASY.Q mode. Turn the Digital Zoom off (if necessary) to set a more accurate white balance. Reset the white balance if lighting conditions change. During normal outdoor recording, setting to select , then press the [Joystick]. 5. Set the [Mode] switch to [ (Camera)]. 6 3. Camera Mode ►Camera Program AE White Balance Auto A Digital Effect Indoor Shutter Outdoor Exposure Custom WB 16:9 Wide ▼ Move OK Select MENU Exit 7. OK Select MENU Exit Notes You can adjust the white balance...
User Manual (ENGLISH)
Page 100
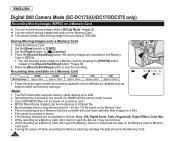
... record a photo image on a Memory Card by variables such as subject matter and memory card type. Insert the Memory Card. 4 2. Press the [Record Start/Stop] button, the moving images are approximate as it may record noise. While recording on a Memory Card, don't eject the Memory Card or it may break the data on the Memory Card or Memory Card itself. Turning the power off while accessing the Memory Card may damage the data stored on the Memory Card. 100 ENGLISH Digital Still Camera Mode (SC-DC173(U)/DC175/DC575...
... record a photo image on a Memory Card by variables such as subject matter and memory card type. Insert the Memory Card. 4 2. Press the [Record Start/Stop] button, the moving images are approximate as it may record noise. While recording on a Memory Card, don't eject the Memory Card or it may break the data on the Memory Card or Memory Card itself. Turning the power off while accessing the Memory Card may damage the data stored on the Memory Card. 100 ENGLISH Digital Still Camera Mode (SC-DC173(U)/DC175/DC575...

User Manual (ENGLISH)
Page 110
... be installed: - Video Codec Click on on the bottom left corner and select "Run" to display a dialog. If the setup screen does not appear, click on "Start" on the Setup screen. DirectX9.0 - PC Camera/USB Streaming driver(Capture Driver) 2. DirectX9.0 - ENGLISH USB Interface (SC-DC173(U)/DC175/DC575 only) Installing DV Media PRO Program When you install the DV Media PRO software on your Windows computer, you can enjoy the following operations by this DVD Camcorder...
... be installed: - Video Codec Click on on the bottom left corner and select "Run" to display a dialog. If the setup screen does not appear, click on "Start" on the Setup screen. DirectX9.0 - PC Camera/USB Streaming driver(Capture Driver) 2. DirectX9.0 - ENGLISH USB Interface (SC-DC173(U)/DC175/DC575 only) Installing DV Media PRO Program When you install the DV Media PRO software on your Windows computer, you can enjoy the following operations by this DVD Camcorder...
User Manual (ENGLISH)
Page 113
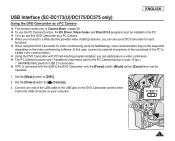
... use the PC Camera function, the DV Driver, Video Codec and DirectX 9.0 programs must be installed in a video conference. The PC Camera's screen size (Transferred video frame rate for the PC Camera function is max 15 fps.) - 640X480(VGA) pixels for USB 2.0 connection. If PC is connected with the USB to the DVD Camcorder, only the [Power] switch, [Mode] switch, [Zoom] lever can use your computer. 2 113 Set the [Power] switch to [DISC]. 1 2. ENGLISH USB Interface (SC-DC173(U)/DC175/DC575 only) Using the DVD Camcorder...
... use the PC Camera function, the DV Driver, Video Codec and DirectX 9.0 programs must be installed in a video conference. The PC Camera's screen size (Transferred video frame rate for the PC Camera function is max 15 fps.) - 640X480(VGA) pixels for USB 2.0 connection. If PC is connected with the USB to the DVD Camcorder, only the [Power] switch, [Mode] switch, [Zoom] lever can use your computer. 2 113 Set the [Power] switch to [DISC]. 1 2. ENGLISH USB Interface (SC-DC173(U)/DC175/DC575 only) Using the DVD Camcorder...
User Manual (ENGLISH)
Page 114
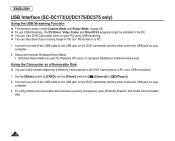
... the removable disk. 114 Set the [Mode] switch to [CARD], set the [Power] switch to a PC via a USB connection. 1. ENGLISH USB Interface (SC-DC173(U)/DC175/DC575 only) Using the USB Streaming Function This function works in both Camera Mode and Player Mode. page 26 To use USB streaming, the DV Driver, Video Codec and DirectX 9.0 programs must be installed in the PC. You can easily transfer data from a Memory Card inserted in the DVD Camcorder to [ (Camera)] or [ (Player)]. 2. Setup and execute Windows Movie...
... the removable disk. 114 Set the [Mode] switch to [CARD], set the [Power] switch to a PC via a USB connection. 1. ENGLISH USB Interface (SC-DC173(U)/DC175/DC575 only) Using the USB Streaming Function This function works in both Camera Mode and Player Mode. page 26 To use USB streaming, the DV Driver, Video Codec and DirectX 9.0 programs must be installed in the PC. You can easily transfer data from a Memory Card inserted in the DVD Camcorder to [ (Camera)] or [ (Player)]. 2. Setup and execute Windows Movie...
User Manual (ENGLISH)
Page 122
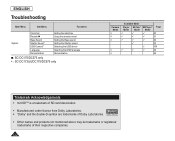
ENGLISH Troubleshooting Main Menu Sub Menu Functions System Clock Set Remote Beep Sound Shutter Sound* USB Connect* Language Demonstration Setting the date/time Using the remote control Setting the Beep sound Setting the Shutter sound Selecting the USB device Selecting the OSD language Demonstration : SC-DC175/DC575 only * : SC-DC173(U)/DC175/DC575 only Camera Mode Available Mode Player M.Cam* Mode Mode M.Player* Page Mode ...
ENGLISH Troubleshooting Main Menu Sub Menu Functions System Clock Set Remote Beep Sound Shutter Sound* USB Connect* Language Demonstration Setting the date/time Using the remote control Setting the Beep sound Setting the Shutter sound Selecting the USB device Selecting the OSD language Demonstration : SC-DC175/DC575 only * : SC-DC173(U)/DC175/DC575 only Camera Mode Available Mode Player M.Cam* Mode Mode M.Player* Page Mode ...


