
User Manual (user Manual) (ver.1.0) (English)
Page 3
...-up static charges, Section 810 of the National Electrical Code, ANSI/NFPA No. 70-1984, provides information with either a polarized 2-wire AC line plug (a plug having a third (grounding) pin. POWER-CORD PROTECTION: Power-supply cords should be sure the antenna or cable system is connected to be routed so that they exit from battery power, or other ) or a 3-wire grounding type plug, a plug having one...
...-up static charges, Section 810 of the National Electrical Code, ANSI/NFPA No. 70-1984, provides information with either a polarized 2-wire AC line plug (a plug having a third (grounding) pin. POWER-CORD PROTECTION: Power-supply cords should be sure the antenna or cable system is connected to be routed so that they exit from battery power, or other ) or a 3-wire grounding type plug, a plug having one...
User Manual (user Manual) (ver.1.0) (English)
Page 6
... the Lens Cover ...18 Lithium Battery Installation (SC-D457 only)...19 Battery Installation for the Remote Control...19 Connecting a Power Source ...20 To use the AC Power Adapter and DC Cable...20 To select the Camcorder Mode ...20 Using the Lithium Ion Battery Pack...21 Charging the Lithium Ion Battery Pack ...21 Table of continuous Recording Time based on Model and Battery Type...22 Battery Level Display...23 OSD (On Screen Display in Camera/Player Modes) ...24 OSD (On Screen Display in M.Cam/M.Player Modes) ...25 Turning...
... the Lens Cover ...18 Lithium Battery Installation (SC-D457 only)...19 Battery Installation for the Remote Control...19 Connecting a Power Source ...20 To use the AC Power Adapter and DC Cable...20 To select the Camcorder Mode ...20 Using the Lithium Ion Battery Pack...21 Charging the Lithium Ion Battery Pack ...21 Table of continuous Recording Time based on Model and Battery Type...22 Battery Level Display...23 OSD (On Screen Display in Camera/Player Modes) ...24 OSD (On Screen Display in M.Cam/M.Player Modes) ...25 Turning...
User Manual (user Manual) (ver.1.0) (English)
Page 7
... ...35 Adjusting the Focus ...35 Inserting and Ejecting a Cassette ...36 Hints for Stable Image Recording...37 Recording with the LCD Screen...37 Recording with the Viewfinder...37 Various Recording Techniques...38 Making your First Recording ...39 Using EASY.Q Mode (for Beginners)...40 Record Search (REC SEARCH) ...41 Setting the Zero Memory (SC-D457 only) ...42 Self Record using the Remote Control (SC-D457 only)...43 Zooming In and Out ...44 Using the Tele Macro...45 Using Quick Menu: Tele...
... ...35 Adjusting the Focus ...35 Inserting and Ejecting a Cassette ...36 Hints for Stable Image Recording...37 Recording with the LCD Screen...37 Recording with the Viewfinder...37 Various Recording Techniques...38 Making your First Recording ...39 Using EASY.Q Mode (for Beginners)...40 Record Search (REC SEARCH) ...41 Setting the Zero Memory (SC-D457 only) ...42 Self Record using the Remote Control (SC-D457 only)...43 Zooming In and Out ...44 Using the Tele Macro...45 Using Quick Menu: Tele...
User Manual (user Manual) (ver.1.0) (English)
Page 8
... Playback (PB ZOOM) ...74 AV In/Out (SC-D457 only) ...75 Audio Dubbing (SC-D457 only)...76 Dubbing Sound ...76 Dubbed Audio Playback ...77 IEEE 1394 Data Transfer...78 USB Interface...80 Digital Still Camera Mode ...86 Memory Stick (Optional Accessory)...86 Memory Stick Functions ...86 Inserting and Ejecting the Memory Card ...87 Structure of Folders and Files on the Memory Card ...88 Image Format ...88 Selecting the Camcorder Mode ...88 Selecting the Built-in Memory (SC-D455/D457 only) ...89 Using Quick Menu: Memory Type...
... Playback (PB ZOOM) ...74 AV In/Out (SC-D457 only) ...75 Audio Dubbing (SC-D457 only)...76 Dubbing Sound ...76 Dubbed Audio Playback ...77 IEEE 1394 Data Transfer...78 USB Interface...80 Digital Still Camera Mode ...86 Memory Stick (Optional Accessory)...86 Memory Stick Functions ...86 Inserting and Ejecting the Memory Card ...87 Structure of Folders and Files on the Memory Card ...88 Image Format ...88 Selecting the Camcorder Mode ...88 Selecting the Built-in Memory (SC-D455/D457 only) ...89 Using Quick Menu: Memory Type...

User Manual (user Manual) (ver.1.0) (English)
Page 12
... distorts playback, or only a blue screen is displayed, the video heads may damage the video heads. 8 The batteries are not operating it is not charged. ENGLISH Notes and Safety Instructions Notes regarding the Video Head Cleaning I Do not use a recommended battery pack as chemical waste. Do not drop the Battery pack. I Make sure that the Battery pack is fully charged before starting to charge it . I Fully discharging a Lithium-Ion battery damages the internal...
... distorts playback, or only a blue screen is displayed, the video heads may damage the video heads. 8 The batteries are not operating it is not charged. ENGLISH Notes and Safety Instructions Notes regarding the Video Head Cleaning I Do not use a recommended battery pack as chemical waste. Do not drop the Battery pack. I Make sure that the Battery pack is fully charged before starting to charge it . I Fully discharging a Lithium-Ion battery damages the internal...

User Manual (user Manual) (ver.1.0) (English)
Page 15
... record and play back standard still images. - I Digital Data Transfer Function with Memory Stick, Memory Stick PRO, MMC and SD. Using Memory Card, you to alter the shutter speed and aperture to suit the type of scene/action to be transferred to a PC, making it possible to Know Your Camcorder ENGLISH Features I 900x Digital Zoom The 900x Digital Zoom allows you to your PC using the USB interface without a separate external Memory Card, using the built-in memory installed in camera mode. Getting to record video onto a Memory Card...
... record and play back standard still images. - I Digital Data Transfer Function with Memory Stick, Memory Stick PRO, MMC and SD. Using Memory Card, you to alter the shutter speed and aperture to suit the type of scene/action to be transferred to a PC, making it possible to Know Your Camcorder ENGLISH Features I 900x Digital Zoom The 900x Digital Zoom allows you to your PC using the USB interface without a separate external Memory Card, using the built-in memory installed in camera mode. Getting to record video onto a Memory Card...
User Manual (user Manual) (ver.1.0) (English)
Page 16
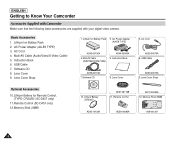
... digital video camera. Lens Cover Strap 1. AC Power Adapter (AA-E8 TYPE) AD43-00136A 4. USB Cable 7. Lens Cover 9. Lithium Ion Battery Pack 2. Instruction Book 6. AC Cord AD39-00076A 6. Memory Stick (8MB) AD43-10130H AD59-00085A 1109-001221 12 Instruction Book AD39-00119A 7.Software CD 8. USB Cable AD39-00073A 9. Basic Accessories 1. Multi-AV Cable (Audio/Video/S-Video Cable) 5. Lens Cover Strap Optional Accessories 10.Lithium Battery for Remote Control. (TYPE: CR2025) (SC-D457 only) 11.Remote Control (SC-D457 only) 12.Memory Stick (8MB) 10. AC Power Adapter...
... digital video camera. Lens Cover Strap 1. AC Power Adapter (AA-E8 TYPE) AD43-00136A 4. USB Cable 7. Lens Cover 9. Lithium Ion Battery Pack 2. Instruction Book 6. AC Cord AD39-00076A 6. Memory Stick (8MB) AD43-10130H AD59-00085A 1109-001221 12 Instruction Book AD39-00119A 7.Software CD 8. USB Cable AD39-00073A 9. Basic Accessories 1. Multi-AV Cable (Audio/Video/S-Video Cable) 5. Lens Cover Strap Optional Accessories 10.Lithium Battery for Remote Control. (TYPE: CR2025) (SC-D457 only) 11.Remote Control (SC-D457 only) 12.Memory Stick (8MB) 10. AC Power Adapter...
User Manual (user Manual) (ver.1.0) (English)
Page 24
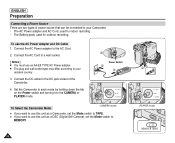
... TYPE AC Power adapter. The AC Power adapter and AC Cord: used for indoor recording. - To use this unit as a DSC (Digital Still Camera), set the Mode switch to your resident country. 3. Connect the AC Cord to a wall socket. [ Notes ] I The plug and wall socket type may differ according to your Camcorder. - Connect the DC cable to the DC jack socket of power source that can be connected to MEMORY. 20 Power Switch To Select the Camcorder Mode...
... TYPE AC Power adapter. The AC Power adapter and AC Cord: used for indoor recording. - To use this unit as a DSC (Digital Still Camera), set the Mode switch to your resident country. 3. Connect the AC Cord to a wall socket. [ Notes ] I The plug and wall socket type may differ according to your Camcorder. - Connect the DC cable to the DC jack socket of power source that can be connected to MEMORY. 20 Power Switch To Select the Camcorder Mode...

User Manual (user Manual) (ver.1.0) (English)
Page 25
...% On for a second and off for a second Error - Turn the Power switch to have several batteries available. Reset the Battery pack and the DC cable 5. How often the zoom is used . Type of continuous recording time available depends on : - It is recommended that the battery is fully charged. Preparation ENGLISH Using the Lithium Ion Battery Pack ✤ The amount of use (Camcorder/Camera/With LCD screen etc.). - It is recommended to OFF, and...
...% On for a second and off for a second Error - Turn the Power switch to have several batteries available. Reset the Battery pack and the DC cable 5. How often the zoom is used . Type of continuous recording time available depends on : - It is recommended that the battery is fully charged. Preparation ENGLISH Using the Lithium Ion Battery Pack ✤ The amount of use (Camcorder/Camera/With LCD screen etc.). - It is recommended to OFF, and...

User Manual (user Manual) (ver.1.0) (English)
Page 36
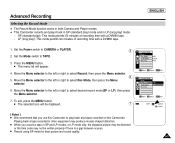
... color Liquid Crystal Display(LCD) screen, which enables you to view what you are recording or playing back directly. ✤ Depending on the conditions under which you are using the Camcorder (indoors or outdoors for example), you want to CAMERA or PLAYER. 1 2. Set the Mode switch to be recorded. Move the Menu selector to the left or right to select Display, then press the Menu selector. 4 5. Camera Mode √Display LCD Bright LCD Color Date/Time...
... color Liquid Crystal Display(LCD) screen, which enables you to view what you are recording or playing back directly. ✤ Depending on the conditions under which you are using the Camcorder (indoors or outdoors for example), you want to CAMERA or PLAYER. 1 2. Set the Mode switch to be recorded. Move the Menu selector to the left or right to select Display, then press the Menu selector. 4 5. Camera Mode √Display LCD Bright LCD Color Date/Time...

User Manual (user Manual) (ver.1.0) (English)
Page 44
... available in Camera mode. ✤ The EASY.Q mode allows a beginner to easily make good recordings. 1. I Battery level, recording mode, counter, date/time, and DIS ( ) will be seen if it has been previously set to TAPE. 3. I The EASY.Q mode settings are recording. By pressing the EASY.Q button, all functions on the LCD screen at the same time. I Digital Zoom, COLOR NITE or Digital Effect is replaced. Press the Start/Stop button to CAMERA. 2. Set the Power switch to start recording. ENGLISH Basic Recording Using EASY.Q Mode (for...
... available in Camera mode. ✤ The EASY.Q mode allows a beginner to easily make good recordings. 1. I Battery level, recording mode, counter, date/time, and DIS ( ) will be seen if it has been previously set to TAPE. 3. I The EASY.Q mode settings are recording. By pressing the EASY.Q button, all functions on the LCD screen at the same time. I Digital Zoom, COLOR NITE or Digital Effect is replaced. Press the Start/Stop button to CAMERA. 2. Set the Power switch to start recording. ENGLISH Basic Recording Using EASY.Q Mode (for...
User Manual (user Manual) (ver.1.0) (English)
Page 57
... Camcorder. To exit, press the MENU button. I The menu list will be written properly if there is a gap between scenes. I We recommend that you record a tape in other equipment may produce mosaic shaped distortion. Playing back a tape recorded in SP and LP modes, or LP mode only, the playback picture may be distorted or the time code may not be displayed. 7 [ Notes ] I Record using SP mode for best picture and sound...
... Camcorder. To exit, press the MENU button. I The menu list will be written properly if there is a gap between scenes. I We recommend that you record a tape in other equipment may produce mosaic shaped distortion. Playing back a tape recorded in SP and LP modes, or LP mode only, the playback picture may be distorted or the time code may not be displayed. 7 [ Notes ] I Record using SP mode for best picture and sound...
User Manual (user Manual) (ver.1.0) (English)
Page 60
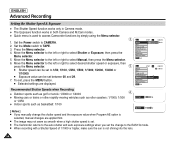
... auto shutter and auto exposure settings when you manually change the shutter speed and the exposure value when Program AE option is selected, manual changes are displayed. Move the Menu selector to the left or right to TAPE. 3. I The image may not seem as roller coasters: 1/1000, 1/500 S. 1/60 † ... I When recording with a Shutter Speed of 1/1000 or higher, make sure the sun is set to access Camcorder functions by simply using...
... auto shutter and auto exposure settings when you manually change the shutter speed and the exposure value when Program AE option is selected, manual changes are displayed. Move the Menu selector to the left or right to TAPE. 3. I The image may not seem as roller coasters: 1/1000, 1/500 S. 1/60 † ... I When recording with a Shutter Speed of 1/1000 or higher, make sure the sun is set to access Camcorder functions by simply using...
User Manual (user Manual) (ver.1.0) (English)
Page 61
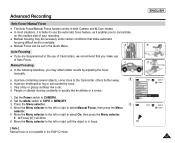
Advanced Recording ENGLISH Auto Focus/Manual Focus ✤ The Auto Focus/Manual Focus function works in both Camera and M.Cam modes. ✤ In most situations, it enables you may be necessary under certain conditions that make automatic focusing difficult and/or unreliable. ✤ Manual Focus can be set in fog or surrounded by adjusting the focus manually. c d Manual Focusing ✤ In the following situations, you to CAMERA. 2. A picture containing several objects, some close to TAPE or MEMORY. 3. Very shiny...
Advanced Recording ENGLISH Auto Focus/Manual Focus ✤ The Auto Focus/Manual Focus function works in both Camera and M.Cam modes. ✤ In most situations, it enables you may be necessary under certain conditions that make automatic focusing difficult and/or unreliable. ✤ Manual Focus can be set in fog or surrounded by adjusting the focus manually. c d Manual Focusing ✤ In the following situations, you to CAMERA. 2. A picture containing several objects, some close to TAPE or MEMORY. 3. Very shiny...

User Manual (user Manual) (ver.1.0) (English)
Page 72
... LCD Bright/Color during playback. ✤ The adjustment method is the same procedure as used in Camera mode. (see page 32) [ Notes ] I You can also view the picture on a TV screen, after rewinding is complete. 6. I The Camcorder stops automatically after connecting the Camcorder to TAPE. 3. I To stop rewinding, press the (STOP) button. Press the (PLAY/STILL) button to view. (see page 36) 4. Press the (REW) button to rewind the tape to PLAYER. 1 2. Set the Power switch...
... LCD Bright/Color during playback. ✤ The adjustment method is the same procedure as used in Camera mode. (see page 32) [ Notes ] I You can also view the picture on a TV screen, after rewinding is complete. 6. I The Camcorder stops automatically after connecting the Camcorder to TAPE. 3. I To stop rewinding, press the (STOP) button. Press the (PLAY/STILL) button to view. (see page 36) 4. Press the (REW) button to rewind the tape to PLAYER. 1 2. Set the Power switch...

User Manual (user Manual) (ver.1.0) (English)
Page 84
..., movie playback may not be sure that the Memory card is a trademark of the Microsoft® Corporation. I Do not connect the Camcorder to a PC using both USB 1.1 and 2.0 standards. (Depends on the PC specification) ✤ You can easily transfer recorded files from the PC or the Camcorder during the data transfer, the data transfer will not recognize your camera as a removable disk. ENGLISH USB Interface Transferring a Digital Image through a USB Connection ✤ The camcorder supports both DV and USB cables. I All...
..., movie playback may not be sure that the Memory card is a trademark of the Microsoft® Corporation. I Do not connect the Camcorder to a PC using both USB 1.1 and 2.0 standards. (Depends on the PC specification) ✤ You can easily transfer recorded files from the PC or the Camcorder during the data transfer, the data transfer will not recognize your camera as a removable disk. ENGLISH USB Interface Transferring a Digital Image through a USB Connection ✤ The camcorder supports both DV and USB cables. I All...
User Manual (user Manual) (ver.1.0) (English)
Page 87
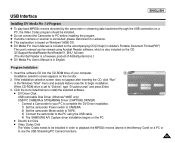
... Media Pro User's Manual is included on the accompanying CD(D:\help\) in Adobe's Portable Document Format(PDF) The user's manual can be installed in order to playback the MPEG4 movies (stored in the Memory Card) on the CD. (D:\Support\AcrobatReader\AcroReader51_ENU_full.exe). (The Acrobat Reader is a freeware product of your PC to complete the DV Driver installation. 1) Set the camcorder Power switch to CAMERA. 2) Set the camcorder Mode switch to TAPE. 3) Connect the camcorder to the PC using Acrobat Reader software...
... Media Pro User's Manual is included on the accompanying CD(D:\help\) in Adobe's Portable Document Format(PDF) The user's manual can be installed in order to playback the MPEG4 movies (stored in the Memory Card) on the CD. (D:\Support\AcrobatReader\AcroReader51_ENU_full.exe). (The Acrobat Reader is a freeware product of your PC to complete the DV Driver installation. 1) Set the camcorder Power switch to CAMERA. 2) Set the camcorder Mode switch to TAPE. 3) Connect the camcorder to the PC using Acrobat Reader software...
User Manual (user Manual) (ver.1.0) (English)
Page 89
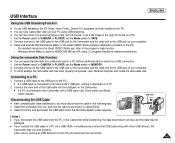
... Ulead VIDEO Studio Software application provided on a PC. 1. Set the Power switch to CAMERA or PLAYER, set the Mode switch to select [Eject]. 2. Connecting to MEMORY. 2. Connect the other end of the USB cable to the USB jack on the Camcorder and the other end to the USB jack on your computer. 3. Select [Confirm] and disconnect the USB cable when the Windows Splash screen appears. If this occurs, remove all USB devices from a Memory card to the Camcorder's USB...
... Ulead VIDEO Studio Software application provided on a PC. 1. Set the Power switch to CAMERA or PLAYER, set the Mode switch to select [Eject]. 2. Connecting to MEMORY. 2. Connect the other end of the USB cable to the USB jack on the Camcorder and the other end to the USB jack on your computer. 3. Select [Confirm] and disconnect the USB cable when the Windows Splash screen appears. If this occurs, remove all USB devices from a Memory card to the Camcorder's USB...
User Manual (user Manual) (ver.1.0) (English)
Page 120
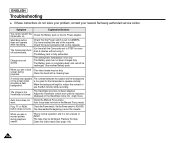
... playback. The image in the Manual Focus mode. Clean the video heads (see a blue The video heads may be dirty. The Battery pack is normal operation and it . The Viewfinder lens has not been adjusted. You have reached the end of the cassette. You have left the Camcorder set to operate normally. Set the Power switch to reduce the contrast or use the BLC function while recording. This is fully exhausted. Auto focus does not Check the Manual Focus menu...
... playback. The image in the Manual Focus mode. Clean the video heads (see a blue The video heads may be dirty. The Battery pack is normal operation and it . The Viewfinder lens has not been adjusted. You have reached the end of the cassette. You have left the Camcorder set to operate normally. Set the Power switch to reduce the contrast or use the BLC function while recording. This is fully exhausted. Auto focus does not Check the Manual Focus menu...
User Manual (user Manual) (ver.1.0) (English)
Page 121
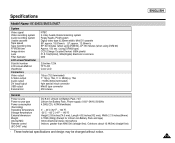
These technical specifications and design may be changed without notice. ENGLISH 117 Specifications Model Name: SC-D453/D455/D457 System Video signal Video recording system Audio recording system Usable cassette Tape speed Tape recording time FF/REW time Image device Lens Filter diameter LCD screen/Viewfinder Size/dot number LCD screen Method Viewfinder Connectors Video output S-Video output Audio output DV input/output USB output External mic NTSC 2 rotary heads, Helical scanning system Rotary heads, PCM system Digital video tape (6.35mm width): Mini DV cassette SP: approx. 18.81mm/s...
These technical specifications and design may be changed without notice. ENGLISH 117 Specifications Model Name: SC-D453/D455/D457 System Video signal Video recording system Audio recording system Usable cassette Tape speed Tape recording time FF/REW time Image device Lens Filter diameter LCD screen/Viewfinder Size/dot number LCD screen Method Viewfinder Connectors Video output S-Video output Audio output DV input/output USB output External mic NTSC 2 rotary heads, Helical scanning system Rotary heads, PCM system Digital video tape (6.35mm width): Mini DV cassette SP: approx. 18.81mm/s...


