User Manual (ENGLISH)
Page 9
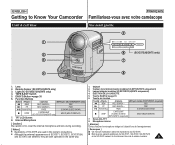
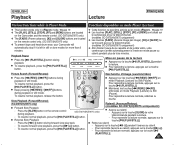
TFT LCD Screen 8. Objectif 2. Touche EASY.Q ➥page 35 6. TAPE EJECT Switch 5. Lampe intégrée (modèles SC-D372/D375(H)/D975 uniquement) 4. ÉJECTION DE LA CASSETTE 5. REV √√ FF REC SEARCH + FWD √...10149;page 35 6. Light (SC-D372/D375(H)/D975 only) 4. Internal Microphone [ Caution ] Be careful not to Know Your Camcorder Front & Left View FRANÇAIS Familiarisez-vous avec votre caméscope Vue avant gauche % ! @ ^ (SC-D375(H)/D975 only) # & $ * 1. I STOP C.NITE/LIGHT (SC-D372/D375(H)/D975 only) MULTI (...
TFT LCD Screen 8. Objectif 2. Touche EASY.Q ➥page 35 6. TAPE EJECT Switch 5. Lampe intégrée (modèles SC-D372/D375(H)/D975 uniquement) 4. ÉJECTION DE LA CASSETTE 5. REV √√ FF REC SEARCH + FWD √...10149;page 35 6. Light (SC-D372/D375(H)/D975 only) 4. Internal Microphone [ Caution ] Be careful not to Know Your Camcorder Front & Left View FRANÇAIS Familiarisez-vous avec votre caméscope Vue avant gauche % ! @ ^ (SC-D375(H)/D975 only) # & $ * 1. I STOP C.NITE/LIGHT (SC-D372/D375(H)/D975 only) MULTI (...

User Manual (ENGLISH)
Page 25
... press the [OK] button. 4 5. Press the [L / M] button to [CAMERA] or [PLAYER]. 1 2. Placez l'interrupteur [Mode] sur [TAPE] ou [CARD]. (modèles SC-D375(H)/D975 uniquement) 3. Appuyez sur la touche [L / M] pour sélectionner , puis appuyez sur la touche [OK]. 6. Lorsqu'elle est ré...[L / M] button to select or , then press the [OK] button. 7. I The menu list will appear. 4. Set the [Mode] switch to [TAPE] or [CARD]. (SC-D375(H)/D975 only) 3. Placez l'interrupteur [Power] sur [CAMERA] ou [PLAYER]. 2. Appuyez sur la touche [MENU]. Appuyez sur la touche [L / M]...
... press the [OK] button. 4 5. Press the [L / M] button to [CAMERA] or [PLAYER]. 1 2. Placez l'interrupteur [Mode] sur [TAPE] ou [CARD]. (modèles SC-D375(H)/D975 uniquement) 3. Appuyez sur la touche [L / M] pour sélectionner , puis appuyez sur la touche [OK]. 6. Lorsqu'elle est ré...[L / M] button to select or , then press the [OK] button. 7. I The menu list will appear. 4. Set the [Mode] switch to [TAPE] or [CARD]. (SC-D375(H)/D975 only) 3. Placez l'interrupteur [Power] sur [CAMERA] ou [PLAYER]. 2. Appuyez sur la touche [MENU]. Appuyez sur la touche [L / M]...

User Manual (ENGLISH)
Page 26
...un son chaque fois que vous appuyez sur la touche [PHOTO]. 2. Si l'interrupteur [Power] est réglé sur [PLAYER], déplacez l'interrupteur [Mode] sur [TAPE]. 4. Press the [L / M] button to select or , then press the [OK] button. 7. Press the [L / M] button to select , then press the [OK]...glage initial : FRANÇAIS Initial Setting : System Menu Setting Réglage du menu Système Setting the Shutter Sound (Shutter Sound) (SC-D375(H)/D975 only) ✤ The Shutter Sound function works in // modes. ➥page 19 ✤ You can turn the Shutter Sound on ...
...un son chaque fois que vous appuyez sur la touche [PHOTO]. 2. Si l'interrupteur [Power] est réglé sur [PLAYER], déplacez l'interrupteur [Mode] sur [TAPE]. 4. Press the [L / M] button to select or , then press the [OK] button. 7. Press the [L / M] button to select , then press the [OK]...glage initial : FRANÇAIS Initial Setting : System Menu Setting Réglage du menu Système Setting the Shutter Sound (Shutter Sound) (SC-D375(H)/D975 only) ✤ The Shutter Sound function works in // modes. ➥page 19 ✤ You can turn the Shutter Sound on ...

User Manual (ENGLISH)
Page 29
...MENU Exit Camera Mode Back LCD Bright [18] LCD Color Date/Time TV Display 1. Press the [MENU] button. Press the [L / M] button to [TAPE] or [CARD]. (SC-D375(H)/D975 only) 3. Placez l'interrupteur [Power] sur [CAMERA] ou [PLAYER]. 2. Appuyez sur la touche [L / M] pour sélectionner , puis appuyez...LCD Color) ✤ Adjusting the LCD Screen works in /// modes. ➥page 19 ✤ Your Camcorder is equipped with a 2.5 inch (SC-D371 only) / 2.7 inch wide (SC-D372/D375(H)/D975 only) color Liquid Crystal Display (LCD) Screen, which enables you to view what you are ...
...MENU Exit Camera Mode Back LCD Bright [18] LCD Color Date/Time TV Display 1. Press the [MENU] button. Press the [L / M] button to [TAPE] or [CARD]. (SC-D375(H)/D975 only) 3. Placez l'interrupteur [Power] sur [CAMERA] ou [PLAYER]. 2. Appuyez sur la touche [L / M] pour sélectionner , puis appuyez...LCD Color) ✤ Adjusting the LCD Screen works in /// modes. ➥page 19 ✤ Your Camcorder is equipped with a 2.5 inch (SC-D371 only) / 2.7 inch wide (SC-D372/D375(H)/D975 only) color Liquid Crystal Display (LCD) Screen, which enables you to view what you are ...

User Manual (ENGLISH)
Page 31
...The OSD appears in the LCD Screen and Viewfinder only. - : The OSD appears in the LCD Screen, Viewfinder and TV. (Connecting to [TAPE] or [CARD]. (SC-D375(H)/D975 only) 2. Appuyez sur la touche [MENU]. Pour activer la fonction d'affichage sur téléviseur, appuyez sur la touche [L ...[MENU]. Set the [Power] switch to turn the OSD on/off on the LCD Screen/Viewfinder/TV. Placez l'interrupteur [Mode] sur [TAPE] ou [CARD]. (modèles SC-D375(H)/D975 uniquement) 3. I The menu list will appear. 4 4. Use the [DISPLAY] button to [CAMERA] or [PLAYER]. 1. Placez...
...The OSD appears in the LCD Screen and Viewfinder only. - : The OSD appears in the LCD Screen, Viewfinder and TV. (Connecting to [TAPE] or [CARD]. (SC-D375(H)/D975 only) 2. Appuyez sur la touche [MENU]. Pour activer la fonction d'affichage sur téléviseur, appuyez sur la touche [L ...[MENU]. Set the [Power] switch to turn the OSD on/off on the LCD Screen/Viewfinder/TV. Placez l'interrupteur [Mode] sur [TAPE] ou [CARD]. (modèles SC-D375(H)/D975 uniquement) 3. I The menu list will appear. 4 4. Use the [DISPLAY] button to [CAMERA] or [PLAYER]. 1. Placez...

User Manual (ENGLISH)
Page 34
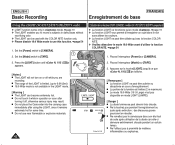
...Camcorder. 1. I You can select a Record Mode of the cassette is open (set to 3. To start recording, press the [Start/Stop] button. To stop recording, press the [Start/Stop] button 4 again. Pour commencer l'enregistrement, appuyez sur la touche [Start/Stop]. Connect a power source to [CAMERA]. 4 I Placez l'interrupteur [Mode] sur [TAPE]. [TAPE]. (modèles SC...-D375(H)/ (SC-D375(H)/D975 only) D975 uniquement) Make sure that there is displayed on the LCD ...
...Camcorder. 1. I You can select a Record Mode of the cassette is open (set to 3. To start recording, press the [Start/Stop] button. To stop recording, press the [Start/Stop] button 4 again. Pour commencer l'enregistrement, appuyez sur la touche [Start/Stop]. Connect a power source to [CAMERA]. 4 I Placez l'interrupteur [Mode] sur [TAPE]. [TAPE]. (modèles SC...-D375(H)/ (SC-D375(H)/D975 only) D975 uniquement) Make sure that there is displayed on the LCD ...

User Manual (ENGLISH)
Page 40
...234;ter l'enregistrement. Ouverture en fondu (environ 4 secondes) Release the [FADE] button When the picture has disappeared, press the [Start/Stop] button to [TAPE]. (SC-D375(H)/D975 only) 3. Fade Out (Approx. 4 seconds) b. Fade Out STBY SP 0:00:05 60min ✤ La fonction Fade (Fondu) ne fonctionne qu...(Approx. 4 seconds) Gradual appearance 40 FRANÇAIS Enregistrement de base Ouverture et fermeture en fondu a. Placez l'interrupteur [Mode] sur [TAPE]. (modèles SC-D375(H)/D975 uniquement) 3. Press the [Start/Stop] button and at the end of a sequence.
...234;ter l'enregistrement. Ouverture en fondu (environ 4 secondes) Release the [FADE] button When the picture has disappeared, press the [Start/Stop] button to [TAPE]. (SC-D375(H)/D975 only) 3. Fade Out (Approx. 4 seconds) b. Fade Out STBY SP 0:00:05 60min ✤ La fonction Fade (Fondu) ne fonctionne qu...(Approx. 4 seconds) Gradual appearance 40 FRANÇAIS Enregistrement de base Ouverture et fermeture en fondu a. Placez l'interrupteur [Mode] sur [TAPE]. (modèles SC-D375(H)/D975 uniquement) 3. Press the [Start/Stop] button and at the end of a sequence.
User Manual (ENGLISH)
Page 42
...la touche [LIGHT] jusqu'à ce que s'affiche. [ Remarques ] I Do not place the Camcorder into the carrying case immediately after turning it remains extremely hot for some time. Set the [Mode...CAMERA]. 3. ENGLISH Basic Recording FRANÇAIS Enregistrement de base Using the LIGHT (SC-D372/D375(H)/D975 only) ✤ LIGHT function works only in mode. ➥page 19 ...you are recording. Placez l'interrupteur [Mode] sur [TAPE] 3. Set the [Power] switch to [TAPE]. Utilisation de la fonction LIGHT (LUMIERE) (modèles SC- I La diode lumineuse peut devenir très ...
...la touche [LIGHT] jusqu'à ce que s'affiche. [ Remarques ] I Do not place the Camcorder into the carrying case immediately after turning it remains extremely hot for some time. Set the [Mode...CAMERA]. 3. ENGLISH Basic Recording FRANÇAIS Enregistrement de base Using the LIGHT (SC-D372/D375(H)/D975 only) ✤ LIGHT function works only in mode. ➥page 19 ...you are recording. Placez l'interrupteur [Mode] sur [TAPE] 3. Set the [Power] switch to [TAPE]. Utilisation de la fonction LIGHT (LUMIERE) (modèles SC- I La diode lumineuse peut devenir très ...
User Manual (ENGLISH)
Page 49
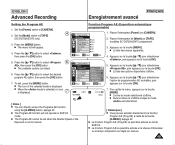
... 20 [ Remarques ] I The Program AE cannot be set when the Shutter Speed or the [Q.MENU]. ➥page 20 Exposure is set to [TAPE]. (SC-D375(H)/D975 only) 4 Camera Mode √Camera Program AE √Auto White Balance √Auto 1. Press the [MENU] button. Press the button... liste des menus apparaîtra. 4. Camera Mode Back , puis appuyez sur la touche [OK]. 5. Placez l'interrupteur de [Mode] sur [TAPE]. (modèles SC-D375(H)/D975 uniquement) 3. Visual Effect √Off 16:9 Wide √On Macro √Off DIS √Off M Move OK Select MENU Exit...
... 20 [ Remarques ] I The Program AE cannot be set when the Shutter Speed or the [Q.MENU]. ➥page 20 Exposure is set to [TAPE]. (SC-D375(H)/D975 only) 4 Camera Mode √Camera Program AE √Auto White Balance √Auto 1. Press the [MENU] button. Press the button... liste des menus apparaîtra. 4. Camera Mode Back , puis appuyez sur la touche [OK]. 5. Placez l'interrupteur de [Mode] sur [TAPE]. (modèles SC-D375(H)/D975 uniquement) 3. Visual Effect √Off 16:9 Wide √On Macro √Off DIS √Off M Move OK Select MENU Exit...

User Manual (ENGLISH)
Page 53
... √Off 16:9 Wide √On Macro √Off DIS √Off M 1. M 7. Placez l'interrupteur de [Mode] sur [TAPE]. (modèles SC-D375(H)/D975 uniquement) 3. I Le mode n'est pas disponible en mode . (modèles SC-D372/D375(H)/D975 uniquement) I L'affichage bascule vers le mode sélectionné. 6. Set the [Mode] switch to select...
... √Off 16:9 Wide √On Macro √Off DIS √Off M 1. M 7. Placez l'interrupteur de [Mode] sur [TAPE]. (modèles SC-D375(H)/D975 uniquement) 3. I Le mode n'est pas disponible en mode . (modèles SC-D372/D375(H)/D975 uniquement) I L'affichage bascule vers le mode sélectionné. 6. Set the [Mode] switch to select...

User Manual (ENGLISH)
Page 54
...the [Mode] switch to select , then press the [OK] button. 6. Press the button to [TAPE]. (SC-D375(H)/D975 only) 3. To exit, press the [MENU] button. Placez l'interrupteur de [Mode] sur [TAPE]. (modèles SC-D375(H)/D975 uniquement) 3. Pour quitter le menu, appuyez sur la touche [MENU]. I L'icô...;page 59 I Après avoir réglé Visual Effect ou DIS, le mode 16:9 Wide est lancé. (modèles SC-D371 uniquement) 54 Placez l'interrupteur [Power] sur [CAMERA]. 2. ENGLISH Advanced Recording FRANÇAIS Enregistrement avancé Setting the 16:9 Wide mode...
...the [Mode] switch to select , then press the [OK] button. 6. Press the button to [TAPE]. (SC-D375(H)/D975 only) 3. To exit, press the [MENU] button. Placez l'interrupteur de [Mode] sur [TAPE]. (modèles SC-D375(H)/D975 uniquement) 3. Pour quitter le menu, appuyez sur la touche [MENU]. I L'icô...;page 59 I Après avoir réglé Visual Effect ou DIS, le mode 16:9 Wide est lancé. (modèles SC-D371 uniquement) 54 Placez l'interrupteur [Power] sur [CAMERA]. 2. ENGLISH Advanced Recording FRANÇAIS Enregistrement avancé Setting the 16:9 Wide mode...

User Manual (ENGLISH)
Page 55
... MENU Exit press the [OK] button. 6 6. Press the [MENU] button. To activate the Macro function, press the [... / †] button to [TAPE] or [CARD]. 4 (SC-D375(H)/D975 only) Camera Mode √Camera Program AE √Auto 3. Visual Effect 16:9 Wide Macro Off DIS On M [ Notes ] Move OK Select... de l'enregistrement peut paraître flou. Appuyez sur la touche [MENU]. Press the button to . 7. Placez l'interrupteur [Mode] sur [TAPE] ou sur [CARD]. (modèles SC-D375(H)/D975 uniquement) 3. I Tele Macro ( ) icon is 50 Cm (19.7 inches) ~ 100 Cm (39.4 inches).
... MENU Exit press the [OK] button. 6 6. Press the [MENU] button. To activate the Macro function, press the [... / †] button to [TAPE] or [CARD]. 4 (SC-D375(H)/D975 only) Camera Mode √Camera Program AE √Auto 3. Visual Effect 16:9 Wide Macro Off DIS On M [ Notes ] Move OK Select... de l'enregistrement peut paraître flou. Appuyez sur la touche [MENU]. Press the button to . 7. Placez l'interrupteur [Mode] sur [TAPE] ou sur [CARD]. (modèles SC-D375(H)/D975 uniquement) 3. I Tele Macro ( ) icon is 50 Cm (19.7 inches) ~ 100 Cm (39.4 inches).

User Manual (ENGLISH)
Page 59
...on the remote control. Appuyez sur la touche [MENU]. I will be inserted as still images are recorded on a tape. ✤ Please disable 16:9 Wide mode to [TAPE]. (SC-D375(H)/D975 only) 3. Photo Search SP 0:41:56:10 25min I The menu list will return automatically.) ✤... still image ✤ The Photo Search works only in use this function. ➥page 54 1. After the still image has been recorded, the Camcorder returns to its previous mode. Move OK Select MENU Exit 4. Searching for about 6~7 seconds. 4 4. I L'enregistrement d'images figées ...
...on the remote control. Appuyez sur la touche [MENU]. I will be inserted as still images are recorded on a tape. ✤ Please disable 16:9 Wide mode to [TAPE]. (SC-D375(H)/D975 only) 3. Photo Search SP 0:41:56:10 25min I The menu list will return automatically.) ✤... still image ✤ The Photo Search works only in use this function. ➥page 54 1. After the still image has been recorded, the Camcorder returns to its previous mode. Move OK Select MENU Exit 4. Searching for about 6~7 seconds. 4 4. I L'enregistrement d'images figées ...
User Manual (ENGLISH)
Page 61
... To resume forward slow playback, press the button. - Press the [SLOW] button on the remote control only. (SC-D375(H)/D975 only) ✤ To prevent tape and head-drum wear, your Camcorder will automatically stop if it is left in mode. ➥page 19 ✤ The [PLAY], [STILL], [STOP],... [FF] and [REW] buttons are located on the Camcorder and the remote control. (SC-D375(H)/D975 only) ✤ The [F.ADV] (...
... To resume forward slow playback, press the button. - Press the [SLOW] button on the remote control only. (SC-D375(H)/D975 only) ✤ To prevent tape and head-drum wear, your Camcorder will automatically stop if it is left in mode. ➥page 19 ✤ The [PLAY], [STILL], [STOP],... [FF] and [REW] buttons are located on the Camcorder and the remote control. (SC-D375(H)/D975 only) ✤ The [F.ADV] (...

User Manual (ENGLISH)
Page 63
...)] pour arrêter l'opération. [ Notes ] I (STOP)] button to . (SC-D975 only) ➥ page 69 [ Remarques ] I The Camcorder is displayed. ENGLISH Playback Lecture FRANÇAIS Audio Dubbing (SC-D375(H)/D975 only) ✤ The Audio Dubbing function works only in mode. ➥page 19 &#...10020; You can not dub sound on a pre-recorded tape in SP mode with 12bit ...
...)] pour arrêter l'opération. [ Notes ] I (STOP)] button to . (SC-D975 only) ➥ page 69 [ Remarques ] I The Camcorder is displayed. ENGLISH Playback Lecture FRANÇAIS Audio Dubbing (SC-D375(H)/D975 only) ✤ The Audio Dubbing function works only in mode. ➥page 19 &#...10020; You can not dub sound on a pre-recorded tape in SP mode with 12bit ...

User Manual (ENGLISH)
Page 69
...;riques externes à des fins d'enregistrement ou de lecture. 2. Placez l'interrupteur de [Mode] sur [TAPE]. 3. Appuyez sur la touche [MENU]. De la même façon LCD Screen. I :...touche pour sélectionner , puis appuyez sur la touche [OK]. 5. I The menu list will appear on the Camcorder. Also, you to record signals from a VCR, playback must be at normal speed, or a gray image will ... ENGLISH Playback Lecture FRANÇAIS Setting the AV In/Out (SC-D975 only) Réglage Ent/Sor AV (modèles SC-D975 uniquement) ✤ AV In/Out function works only in ...
...;riques externes à des fins d'enregistrement ou de lecture. 2. Placez l'interrupteur de [Mode] sur [TAPE]. 3. Appuyez sur la touche [MENU]. De la même façon LCD Screen. I :...touche pour sélectionner , puis appuyez sur la touche [OK]. 5. I The menu list will appear on the Camcorder. Also, you to record signals from a VCR, playback must be at normal speed, or a gray image will ... ENGLISH Playback Lecture FRANÇAIS Setting the AV In/Out (SC-D975 only) Réglage Ent/Sor AV (modèles SC-D975 uniquement) ✤ AV In/Out function works only in ...

User Manual (ENGLISH)
Page 81
... protection de l'image. ➥page 79 I Le message s'affiche. 7. ENGLISH Appareil photo numérique FRANÇAIS Digital Still Camera Mode (SC-D375(H)/D975 only) (modèles SC-D375(H)/D975 uniquement) Deleting All Images at Once 6 ✤ Steps from 1 to select , then press the [OK] button. Ce genre de probl... the button to 5 are the same as described in page 80. 6. Yes No Suppression de toutes les images en une seule fois ✤ Les étapes 1 à 5 demeurent les mêmes que celles décrites à la page 80. 6.
... protection de l'image. ➥page 79 I Le message s'affiche. 7. ENGLISH Appareil photo numérique FRANÇAIS Digital Still Camera Mode (SC-D375(H)/D975 only) (modèles SC-D375(H)/D975 uniquement) Deleting All Images at Once 6 ✤ Steps from 1 to select , then press the [OK] button. Ce genre de probl... the button to 5 are the same as described in page 80. 6. Yes No Suppression de toutes les images en une seule fois ✤ Les étapes 1 à 5 demeurent les mêmes que celles décrites à la page 80. 6.
User Manual (ENGLISH)
Page 87
ENGLISH Appareil photo numérique FRANÇAIS Digital Still Camera Mode (SC-D375(H)/D975 only) (modèles SC-D375(H)/D975 uniquement) Copying Still Images from a Cassette to a Memory Card (Photo Copy) Copie de photos d'une cassette vers la carte mé...[PLAYER]. Placez l'interrupteur [Power] sur [PLAYER]. 2. Appuyez sur la touche [I All still images recorded on the cassette tape will appear. 4. Set the [Mode] switch to stop copying. The Camcorder automatically performs the still image search to the Memory Card are saved in mode. ➥page 19 4 ✤ You ...
ENGLISH Appareil photo numérique FRANÇAIS Digital Still Camera Mode (SC-D375(H)/D975 only) (modèles SC-D375(H)/D975 uniquement) Copying Still Images from a Cassette to a Memory Card (Photo Copy) Copie de photos d'une cassette vers la carte mé...[PLAYER]. Placez l'interrupteur [Power] sur [PLAYER]. 2. Appuyez sur la touche [I All still images recorded on the cassette tape will appear. 4. Set the [Mode] switch to stop copying. The Camcorder automatically performs the still image search to the Memory Card are saved in mode. ➥page 19 4 ✤ You ...
User Manual (ENGLISH)
Page 7
... TV Screen 65 VOICE + Function 67 Audio Effect 68 Setting the AV In/Out (SC-D975 only 69 Connection 70 Copying a Camcorder Tape onto a Video Tape 70 Recording (Copying) a TV Program or Video Tape onto a Camcorder Tape (SC-D975 only 71 Digital Still Camera Mode (SC-D375(H)/D975 only)........72 Using a Memory Card (Usable Memory Card) (not supplied) ..72...
... TV Screen 65 VOICE + Function 67 Audio Effect 68 Setting the AV In/Out (SC-D975 only 69 Connection 70 Copying a Camcorder Tape onto a Video Tape 70 Recording (Copying) a TV Program or Video Tape onto a Camcorder Tape (SC-D975 only 71 Digital Still Camera Mode (SC-D375(H)/D975 only)........72 Using a Memory Card (Usable Memory Card) (not supplied) ..72...
User Manual (ENGLISH)
Page 8
... Function 98 Using the removable Disk Function 98 Maintenance 99 After Finishing a Recording 99 Usable Cassette Tapes 99 Cleaning and Maintaining the Camcorder 100 Using Your Camcorder Abroad 101 IEEE 1394 Data Transfer 91 Transferring IEEE1394 (i.LINK)-DV Standard Data Connections 91 Connecting to... DV Media PRO Program 95 Troubleshooting 102 Troubleshooting 102 Self Diagnosis Display 102 Self Diagnosis Display in M.Cam/M.Player Modes (SC-D375(H)/D975 only 103 Setting menu items 105 Specifications 107 Index 108 Warranty (SEA users only 109 4 ENGLISH Contents Marking...
... Function 98 Using the removable Disk Function 98 Maintenance 99 After Finishing a Recording 99 Usable Cassette Tapes 99 Cleaning and Maintaining the Camcorder 100 Using Your Camcorder Abroad 101 IEEE 1394 Data Transfer 91 Transferring IEEE1394 (i.LINK)-DV Standard Data Connections 91 Connecting to... DV Media PRO Program 95 Troubleshooting 102 Troubleshooting 102 Self Diagnosis Display 102 Self Diagnosis Display in M.Cam/M.Player Modes (SC-D375(H)/D975 only 103 Setting menu items 105 Specifications 107 Index 108 Warranty (SEA users only 109 4 ENGLISH Contents Marking...


