
User Manual Ver.1.0 (English)
Page 2
...Start 1-1 Custody and Maintenance 1-2 Cleaning the Monitor 1-3 Safety Precautions 1-4 INSTALLING THE PRODUCT Package Contents 2-1 Installing the Stand 2-2 Connecting with a PC 2-3 Connecting a HDMI cable 2-4 Kensington Lock 2-5 USING THE PRODUCT Setting the Optimal Resolution 3-1 Standard Signal Mode Table 3-2 Standard Signal Mode Table 3-3 Standard Signal Mode Table 3-4 Standard Signal Mode Table 3-5 Standard Signal Mode Table 3-6 Standard Signal Mode Table 3-7 Standard Signal Mode Table 3-8 Standard Signal Mode Table 3-9 Standard Signal Mode Table 3-10 Standard Signal Mode...
...Start 1-1 Custody and Maintenance 1-2 Cleaning the Monitor 1-3 Safety Precautions 1-4 INSTALLING THE PRODUCT Package Contents 2-1 Installing the Stand 2-2 Connecting with a PC 2-3 Connecting a HDMI cable 2-4 Kensington Lock 2-5 USING THE PRODUCT Setting the Optimal Resolution 3-1 Standard Signal Mode Table 3-2 Standard Signal Mode Table 3-3 Standard Signal Mode Table 3-4 Standard Signal Mode Table 3-5 Standard Signal Mode Table 3-6 Standard Signal Mode Table 3-7 Standard Signal Mode Table 3-8 Standard Signal Mode Table 3-9 Standard Signal Mode Table 3-10 Standard Signal Mode...
User Manual Ver.1.0 (English)
Page 5
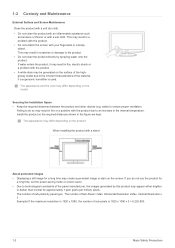
...; Keep the required distances between the product and other objects (e.g. Install the product so the required distances shown in fire or a problem with a stand About persistent images • Displaying a still image for approximately 1 ppm (parts per million) pixels. walls) to the product. • Do not clean the product directly by panel type: The number of sub-pixels is 1920 x 1080, the number of Sub-Pixels = Max. Horizontal Resolution...
...; Keep the required distances between the product and other objects (e.g. Install the product so the required distances shown in fire or a problem with a stand About persistent images • Displaying a still image for approximately 1 ppm (parts per million) pixels. walls) to the product. • Do not clean the product directly by panel type: The number of sub-pixels is 1920 x 1080, the number of Sub-Pixels = Max. Horizontal Resolution...
User Manual Ver.1.0 (English)
Page 9
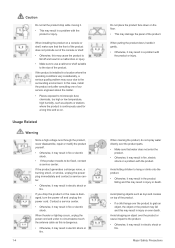
...disassemble, repair or modify the product yourself. • Otherwise, it may result in fire or electric shock. Contact a service center. • Otherwise, it may result in fire or electric shock. • If the product needs to fall off and unplug the power cord. Avoid dropping an object over the product parts. • Make...moving it. • This may result in a problem with the product or injury. In this may cause the product to be fixed, contact a service center. When installing the product on the floor. • This may damage the panel of the product. • If a child ...
...disassemble, repair or modify the product yourself. • Otherwise, it may result in fire or electric shock. Contact a service center. • Otherwise, it may result in fire or electric shock. • If the product needs to fall off and unplug the power cord. Avoid dropping an object over the product parts. • Make...moving it. • This may result in a problem with the product or injury. In this may cause the product to be fixed, contact a service center. When installing the product on the floor. • This may damage the panel of the product. • If a child ...

User Manual Ver.1.0 (English)
Page 10
... signal cable. • Otherwise, it may result in electric shock, fire or a problem with the product due to damage to the cable. Take care not to the moving the product by holding only the stand. • This may cause the product to fall resulting in an electric shock. Set the appropriate resolution and frequency for a long time, use the power-saving mode...
... signal cable. • Otherwise, it may result in electric shock, fire or a problem with the product due to damage to the cable. Take care not to the moving the product by holding only the stand. • This may cause the product to fall resulting in an electric shock. Set the appropriate resolution and frequency for a long time, use the power-saving mode...
User Manual Ver.1.0 (English)
Page 18
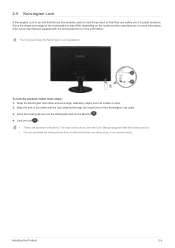
..., or our service center. You must purchase the Kensington Lock separately. To lock the product, follow these steps: 1. Installing the Product 2-5 Insert the locking device into the Kensington slot on the model and the manufacturer, for more information, refer to lock the product so that enables users to the User Manual supplied with the locking device. • You can safely use it in...
..., or our service center. You must purchase the Kensington Lock separately. To lock the product, follow these steps: 1. Installing the Product 2-5 Insert the locking device into the Kensington slot on the model and the manufacturer, for more information, refer to lock the product so that enables users to the User Manual supplied with the locking device. • You can safely use it in...
User Manual Ver.1.0 (English)
Page 20
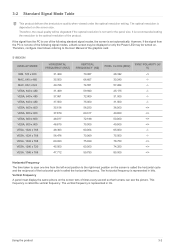
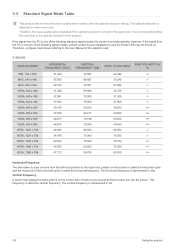
... viewed under the optimal resolution setting. It is called the horizontal cycle and the reciprocal of the horizontal cycle is recommended setting the resolution to the User Manual of the following standard signal modes, the screen is represented in Hz. If the signal from the left-most position to scan one line from the PC is one of the graphics card. The horizontal frequency is set for the panel size. S19B300N DISPLAY MODE...
... viewed under the optimal resolution setting. It is called the horizontal cycle and the reciprocal of the horizontal cycle is recommended setting the resolution to the User Manual of the following standard signal modes, the screen is represented in Hz. If the signal from the left-most position to scan one line from the PC is one of the graphics card. The horizontal frequency is set for the panel size. S19B300N DISPLAY MODE...
User Manual Ver.1.0 (English)
Page 21
... right-most position on . It is set for the panel size. The horizontal frequency is not set automatically. Vertical Frequency A panel must display the same picture on the screen size. Therefore, the visual quality will be turned on the screen is called the horizontal cycle and the reciprocal of the following signal modes, a blank screen may be displayed or only the Power LED may be degraded if the optimal resolution is represented in Hz. 3-3 Using the...
... right-most position on . It is set for the panel size. The horizontal frequency is not set automatically. Vertical Frequency A panel must display the same picture on the screen size. Therefore, the visual quality will be turned on the screen is called the horizontal cycle and the reciprocal of the following signal modes, a blank screen may be displayed or only the Power LED may be degraded if the optimal resolution is represented in Hz. 3-3 Using the...

User Manual Ver.1.0 (English)
Page 24
... standard signal modes, the screen is represented in kHz. Therefore, configure it as follows referring to the User Manual of times every second so that humans can see the picture. This frequency is not set automatically. Therefore, the visual quality will be turned on the screen size. 3-6 Standard Signal Mode Table This product delivers the best picture quality when viewed under the optimal resolution setting. The horizontal frequency is called the vertical frequency.
... standard signal modes, the screen is represented in kHz. Therefore, configure it as follows referring to the User Manual of times every second so that humans can see the picture. This frequency is not set automatically. Therefore, the visual quality will be turned on the screen size. 3-6 Standard Signal Mode Table This product delivers the best picture quality when viewed under the optimal resolution setting. The horizontal frequency is called the vertical frequency.
User Manual Ver.1.0 (English)
Page 36
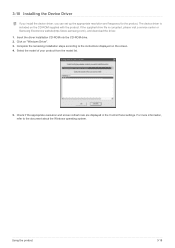
... instructions displayed on the screen. 4. Using the product 3-18 Select the model of your product from the model list. 5. Check if the appropriate resolution and screen refresh rate are displayed in the Control Panel settings. If the supplied drive file is included on "Windows Driver". 3. Insert the driver installation CD-ROM into the CD-ROM drive. 2. The device driver is corrupted, please visit a service center or Samsung Electronics website(http://www.samsung.com/), and download...
... instructions displayed on the screen. 4. Using the product 3-18 Select the model of your product from the model list. 5. Check if the appropriate resolution and screen refresh rate are displayed in the Control Panel settings. If the supplied drive file is included on "Windows Driver". 3. Insert the driver installation CD-ROM into the CD-ROM drive. 2. The device driver is corrupted, please visit a service center or Samsung Electronics website(http://www.samsung.com/), and download...
User Manual Ver.1.0 (English)
Page 37
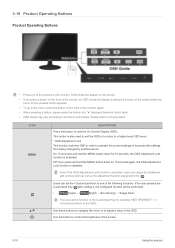
... hold the MENU button down for 10 seconds again, the OSD Adjustment Lock function is activated, users can adjust the brightness and contrast and can set the function of the Customized Key by selecting -> in order to maintain the current settings or to prevent the settings from being changed by another person On: If you press a button on the front of the monitor, an OSD Guide will...
... hold the MENU button down for 10 seconds again, the OSD Adjustment Lock function is activated, users can adjust the brightness and contrast and can set the function of the Customized Key by selecting -> in order to maintain the current settings or to prevent the settings from being changed by another person On: If you press a button on the front of the monitor, an OSD Guide will...
User Manual Ver.1.0 (English)
Page 38
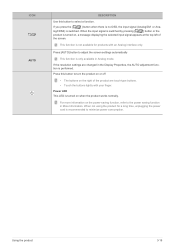
... the power cord is recommended to adjust the screen settings automatically This function is only available in Analog mode. Power LED This LED is turned on the power-saving function, refer to the power saving function in More Information. log/HDMI) is no OSD, the input signal (Analog/DVI or Ana- When not using the product for products with your finger. If you press the [ ] button when there is switched. Press [AUTO] button to minimize power consumption...
... the power cord is recommended to adjust the screen settings automatically This function is only available in Analog mode. Power LED This LED is turned on the power-saving function, refer to the power saving function in More Information. log/HDMI) is no OSD, the input signal (Analog/DVI or Ana- When not using the product for products with your finger. If you press the [ ] button when there is switched. Press [AUTO] button to minimize power consumption...
User Manual Ver.1.0 (English)
Page 40
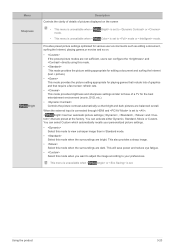
... automatic picture settings (, , and ) that bright and dark pictures are preset at the factory. Using the product 3-20 This also provides a sharp image. • Select this mode when the surroundings are bright. When the external input is connected through HDMI and is set to your personalized picture settings. • Select this mode to or Color> is set . You can select Custom which automatically recalls your preferences. Menu Sharpness Bright Description Controls...
... automatic picture settings (, , and ) that bright and dark pictures are preset at the factory. Using the product 3-20 This also provides a sharp image. • Select this mode when the surroundings are bright. When the external input is connected through HDMI and is set to your personalized picture settings. • Select this mode to or Color> is set . You can select Custom which automatically recalls your preferences. Menu Sharpness Bright Description Controls...
User Manual Ver.1.0 (English)
Page 41
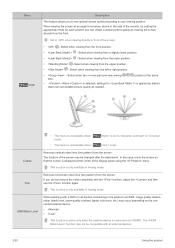
... displayed at the same time. • -When is selected, settings for is applied by setting the appropriate mode for each position you can set -top box connecting to when viewing directly in front of the screen may not be changed after the adjustment. Removes horizontal noise lines (line pattern) from a slightly lower position. • - This function is connected via HDMI, image quality deterioration (black level, lower-quality contrast, lighter color...
... displayed at the same time. • -When is selected, settings for is applied by setting the appropriate mode for each position you can set -top box connecting to when viewing directly in front of the screen may not be changed after the adjustment. Removes horizontal noise lines (line pattern) from a slightly lower position. • - This function is connected via HDMI, image quality deterioration (black level, lower-quality contrast, lighter color...
User Manual Ver.1.0 (English)
Page 42
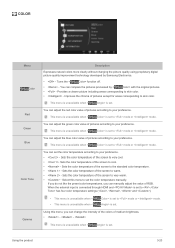
... set . COLOR Menu Color Red Green Blue Color Tone Gamma Description Expresses natural colors more clearly without changing the picture quality using proprietary digital picture quality improvement technology developed by < Color> with the original pictures. • - Sets the color temperature of medium brightness. • - - Select this menu, you can change the intensity of the colors of the screen to warm. • - Sets the color temperature of pictures according to your preference. When the external input is connected through HDMI...
... set . COLOR Menu Color Red Green Blue Color Tone Gamma Description Expresses natural colors more clearly without changing the picture quality using proprietary digital picture quality improvement technology developed by < Color> with the original pictures. • - Sets the color temperature of medium brightness. • - - Select this menu, you can change the intensity of the colors of the screen to warm. • - Sets the color temperature of pictures according to your preference. When the external input is connected through HDMI...
User Manual Ver.1.0 (English)
Page 43
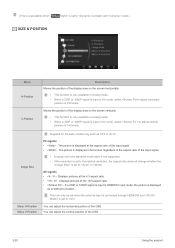
... screen regardless of the aspect ratio of the input signal. • A signal not in the standard mode table is not supported. • If the resolution is set to the optimal resolution, the aspect ratio does not change whether the is set to . Displays pictures at the 4:3 aspect ratio. • - This can only be set when the external input is connected through HDMI/DVI and is set to or . Image Size Menu H-Position Menu V-Position Supplied for the wide models...
... screen regardless of the aspect ratio of the input signal. • A signal not in the standard mode table is not supported. • If the resolution is set to the optimal resolution, the aspect ratio does not change whether the is set to . Displays pictures at the 4:3 aspect ratio. • - This can only be set when the external input is connected through HDMI/DVI and is set to or . Image Size Menu H-Position Menu V-Position Supplied for the wide models...
User Manual Ver.1.0 (English)
Page 47
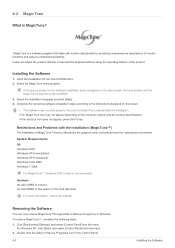
MagicTune is a software program that helps with monitor adjustments by the graphics card, motherboard and the networking environment. Users can only remove MagicTune™through [Add or Remove Programs ] in the Control Panel. 4-2 Installing the Software Click [Start] select [Settings], and select [Control Panel] from the menu. 2. Select the installation language and click [Next]. 4. System Requirements OS •Windows 2000 •Windows XP Home Edition •Windows XP Professional •Windows Vista 32Bit •...
MagicTune is a software program that helps with monitor adjustments by the graphics card, motherboard and the networking environment. Users can only remove MagicTune™through [Add or Remove Programs ] in the Control Panel. 4-2 Installing the Software Click [Start] select [Settings], and select [Control Panel] from the menu. 2. Select the installation language and click [Next]. 4. System Requirements OS •Windows 2000 •Windows XP Home Edition •Windows XP Professional •Windows Vista 32Bit •...
User Manual Ver.1.0 (English)
Page 49
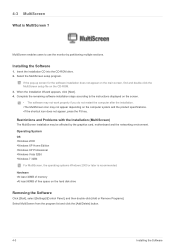
... [Add/Delete] button. 4-3 Installing the Software 4-3 MultiScreen What is recommended. If the pop-up screen for the software installation does not appear on the main screen, find and double-click the MultiScreen setup file on the hard disk drive Removing the Software Click [Start], select [Settings]/[Control Panel], and then double-click [Add or Remove Programs]. Installing the Software 1. Operating System OS •Windows 2000 •Windows XP Home...
... [Add/Delete] button. 4-3 Installing the Software 4-3 MultiScreen What is recommended. If the pop-up screen for the software installation does not appear on the main screen, find and double-click the MultiScreen setup file on the hard disk drive Removing the Software Click [Start], select [Settings]/[Control Panel], and then double-click [Add or Remove Programs]. Installing the Software 1. Operating System OS •Windows 2000 •Windows XP Home...

User Manual Ver.1.0 (English)
Page 51
... Is the power cord connected properly? Adjust the and . (Refer to the , ) The display brightness can differ according to the mode set to the monitor and PC. Check the connection status of the power cord. This occurs when the power saving function is connected. If the graphics card settings menu has no option to adjust the screen size, update the graphics card driver to adjust the screen settings.) THE IMAGE IS TOO LIGHT OR TOO DARK. A blank screen appears / I cannot turn the...
... Is the power cord connected properly? Adjust the and . (Refer to the , ) The display brightness can differ according to the mode set to the monitor and PC. Check the connection status of the power cord. This occurs when the power saving function is connected. If the graphics card settings menu has no option to adjust the screen size, update the graphics card driver to adjust the screen settings.) THE IMAGE IS TOO LIGHT OR TOO DARK. A blank screen appears / I cannot turn the...

User Manual Ver.1.0 (English)
Page 52
... resolution and the frequency appropriate to the Windows user manual for the product? Windows 7 : Change the color settings by selecting Control Panel → Appearance and Personalization → Personalization → Display settings. Install the device driver referring to the computer. The color is weird / The picture is heard when booting the computer. Check the cable connection to the descriptions about the driver installation. The color has been changed after changing the graphics card. Troubleshooting 5-2 Did you change the graphics card...
... resolution and the frequency appropriate to the Windows user manual for the product? Windows 7 : Change the color settings by selecting Control Panel → Appearance and Personalization → Personalization → Display settings. Install the device driver referring to the computer. The color is weird / The picture is heard when booting the computer. Check the cable connection to the descriptions about the driver installation. The color has been changed after changing the graphics card. Troubleshooting 5-2 Did you change the graphics card...
User Manual Ver.1.0 (English)
Page 53
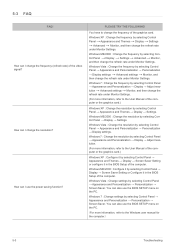
.... Windows ME/2000 : Change the resolution by selecting Con- You can I change the refresh rate under Monitor Settings. 5-3 FAQ FAQ! How can also use the BIOS SETUP menu on the PC. You have to the Windows user manual for the computer.) 5-3 Troubleshooting trol Panel → Display → Settings → Advanced → Monitor, and then change the frequency (refresh rate) of the computer. Windows Vista : Change the frequency by selecting Control Panel → Appearance and Themes → Display → Screen Saver Setting...
.... Windows ME/2000 : Change the resolution by selecting Con- You can I change the refresh rate under Monitor Settings. 5-3 FAQ FAQ! How can also use the BIOS SETUP menu on the PC. You have to the Windows user manual for the computer.) 5-3 Troubleshooting trol Panel → Display → Settings → Advanced → Monitor, and then change the frequency (refresh rate) of the computer. Windows Vista : Change the frequency by selecting Control Panel → Appearance and Themes → Display → Screen Saver Setting...


