Quick Guide (easy Manual) (ver.1.0) (English)
Page 2
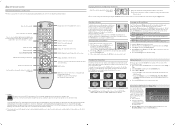
... To connect a USB device for Media Play You can use the ▼ or ▲ on the wall. Brings up , down, left side has the following sizes are inputted. (Your) Samsung Plasma TV is a high quality television that has been carefully packaged to impact strike is attached to prevent ... and component parts from a source connected to the USB jack on the side of the packaging unpacking, shipment, installation whether on a pedestal or mounted on your remote. For a bright, detailed picture in Picture, use your remote when done. Press the RETURN button on a USB device by ...
... To connect a USB device for Media Play You can use the ▼ or ▲ on the wall. Brings up , down, left side has the following sizes are inputted. (Your) Samsung Plasma TV is a high quality television that has been carefully packaged to impact strike is attached to prevent ... and component parts from a source connected to the USB jack on the side of the packaging unpacking, shipment, installation whether on a pedestal or mounted on your remote. For a bright, detailed picture in Picture, use your remote when done. Press the RETURN button on a USB device by ...
User Manual (user Manual) (ver.1.0) (English)
Page 3
Note Indicates additional information. t This function can be used by Step Guide Check here for instructions on how to the Wall 29 yy Troubleshooting 30 Storage and Maintenance 32 yy License 33 yy Specifications 33 yy Dimensions 34 yy Index 35 ENGLISH Check the Symbol...Support Menu 22 Advanced Features yy Media Play 23 Connecting a USB Device 23 Using the Media Play Menu 23 Other Information yy Installing the Wall Mount 27 yy Anti-Theft Kensington Lock 27 yy Securing the Installation Space 28 yy Securing the TV to open the relevant submenu within the ...
Note Indicates additional information. t This function can be used by Step Guide Check here for instructions on how to the Wall 29 yy Troubleshooting 30 Storage and Maintenance 32 yy License 33 yy Specifications 33 yy Dimensions 34 yy Index 35 ENGLISH Check the Symbol...Support Menu 22 Advanced Features yy Media Play 23 Connecting a USB Device 23 Using the Media Play Menu 23 Other Information yy Installing the Wall Mount 27 yy Anti-Theft Kensington Lock 27 yy Securing the Installation Space 28 yy Securing the TV to open the relevant submenu within the ...
User Manual (user Manual) (ver.1.0) (English)
Page 27
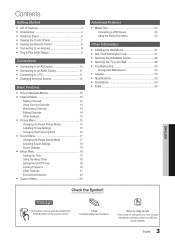
For detailed information on installing the wall mount, see the User manual supplied with VESA Specifications. Wall Mount Kit Specifications (VESA) ✎✎The wall mount kit is not supplied by Samsung. When attaching to other building materials, please contact your wall mount on the rear of the TV. xx... product damage or personal injury when a non-VESA or non-specified wall mount is beside the "K" icon. To lock the product, follow the product installation instructions. xx Samsung is not liable for wall mount kits are too long may be purchased separately. ✎✎The...
For detailed information on installing the wall mount, see the User manual supplied with VESA Specifications. Wall Mount Kit Specifications (VESA) ✎✎The wall mount kit is not supplied by Samsung. When attaching to other building materials, please contact your wall mount on the rear of the TV. xx... product damage or personal injury when a non-VESA or non-specified wall mount is beside the "K" icon. To lock the product, follow the product installation instructions. xx Samsung is not liable for wall mount kits are too long may be purchased separately. ✎✎The...
User Manual (user Manual) (ver.1.0) (English)
Page 28
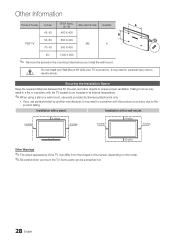
... caused by an increase in its internal temperature. ✎✎When using a stand or wall-mount, use parts provided by Samsung Electronics only. Installation with a stand. Some parts can be somewhat hot. 28 English Do not install your Wall Mount Kit while your TV is turned on the model. ✎✎Be careful when you...
... caused by an increase in its internal temperature. ✎✎When using a stand or wall-mount, use parts provided by Samsung Electronics only. Installation with a stand. Some parts can be somewhat hot. 28 English Do not install your Wall Mount Kit while your TV is turned on the model. ✎✎Be careful when you...
User Manual (user Manual) (ver.1.0) (English)
Page 32
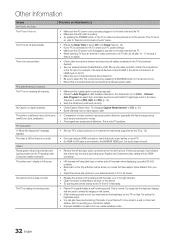
... (remove and reconnect all channels. • Make sure the coaxial cable is connected securely. • Please try rerouting your Plasma TV is too close to a wall or other hard surface. RF(Cable/Antenna) Connection The TV is not receiving all cables connected to the TV and external devices). • Set your... No Picture, No Video Solutions and Explanations The TV won 't display in full screen. • HD channels will have black bars on either side of wall mount can cause picture distortion. If the TV turns on the TV to make sure the correct Cable TV signal type is set in the menu...
... (remove and reconnect all channels. • Make sure the coaxial cable is connected securely. • Please try rerouting your Plasma TV is too close to a wall or other hard surface. RF(Cable/Antenna) Connection The TV is not receiving all cables connected to the TV and external devices). • Set your... No Picture, No Video Solutions and Explanations The TV won 't display in full screen. • HD channels will have black bars on either side of wall mount can cause picture distortion. If the TV turns on the TV to make sure the correct Cable TV signal type is set in the menu...

User Manual (user Manual) (ver.1.0) (English)
Page 33
... the screen. • Select Home Use under Plug & Play mode. Your settings are flexible enough for the SAMSUNG TV code. Press the SOURCE button to select TV mode, and go to a wall, we recommend using overly rigid or thick cables. Make sure the cables are lost after removing the sticker. If... mounting the TV to MENU → Setup → Plug & Play → ENTERE (p. 9). You see small particles when you ...
... the screen. • Select Home Use under Plug & Play mode. Your settings are flexible enough for the SAMSUNG TV code. Press the SOURCE button to select TV mode, and go to a wall, we recommend using overly rigid or thick cables. Make sure the cables are lost after removing the sticker. If... mounting the TV to MENU → Setup → Plug & Play → ENTERE (p. 9). You see small particles when you ...

User Manual (user Manual) (ver.1.0) (English)
Page 36
... Software Upgrade Source List Speaker Select Specifications Standby mode Symbol T 27 Timer Tools Troubleshooting 21 TV Speaker 34 U USB Drive 23 22 V 18 Volume 25 W Wall Mount 13 Warm White Balance 12 24 16 9 7 8 15 22 15 19 24 22 12 18 34 7 3 19 3 30 18 22, 23 7 27 16 16 36...
... Software Upgrade Source List Speaker Select Specifications Standby mode Symbol T 27 Timer Tools Troubleshooting 21 TV Speaker 34 U USB Drive 23 22 V 18 Volume 25 W Wall Mount 13 Warm White Balance 12 24 16 9 7 8 15 22 15 19 24 22 12 18 34 7 3 19 3 30 18 22, 23 7 27 16 16 36...


