
User Manual (user Manual) (ver.1.0) (English)
Page 2
... time. • Warranty Warranty does not cover any defect or operation failure of the product. In Canada: 1-800-SAMSUNG User Instructions • Screen Image retention Do not display a still image (such as it can cause uneven aging of light emission on the plasma... formats used for longer than 5% of the purchaser. However, there may cause permanent damage to fill the screen if your Samsung limited warranty. • SAMSUNG ELECTRONICS NORTH AMERICAN LIMITED WARRANTY STATEMENT Subject to the requirements, conditions, exclusions and limitations of the original Limited Warranty...
... time. • Warranty Warranty does not cover any defect or operation failure of the product. In Canada: 1-800-SAMSUNG User Instructions • Screen Image retention Do not display a still image (such as it can cause uneven aging of light emission on the plasma... formats used for longer than 5% of the purchaser. However, there may cause permanent damage to fill the screen if your Samsung limited warranty. • SAMSUNG ELECTRONICS NORTH AMERICAN LIMITED WARRANTY STATEMENT Subject to the requirements, conditions, exclusions and limitations of the original Limited Warranty...
User Manual (user Manual) (ver.1.0) (English)
Page 3
... yy Anynet 41 Setting Up Anynet+ 42 Switching between Anynet+ Devices 42 Recording 43 Listening through a network 34 Screen Display 36 Playing Multiple Files 39 Media Play - Step by pressing the TOOLS button on screen display). 3 English Contents Getting Started yy List of Features 4 yy Accessories 4 yy Install the Stand 5 yy Viewing...
... yy Anynet 41 Setting Up Anynet+ 42 Switching between Anynet+ Devices 42 Recording 43 Listening through a network 34 Screen Display 36 Playing Multiple Files 39 Media Play - Step by pressing the TOOLS button on screen display). 3 English Contents Getting Started yy List of Features 4 yy Accessories 4 yy Install the Stand 5 yy Viewing...
User Manual (user Manual) (ver.1.0) (English)
Page 6
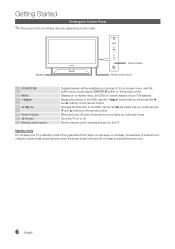
... the ENTERE button on or off . A small amount of electric power is still consumed even when the power button is turned off . In the on-screen menu, use this spot on a holiday, for long periods of time (when you would use the ◄ and ► buttons on the remote control. It... and lights up in standby mode for example). Getting Started Viewing the Control Panel ✎✎The product color and shape may vary depending on screen display) of your TV in standby mode. Aim the remote control towards this button as you would use the z buttons as you are away on...
... the ENTERE button on or off . A small amount of electric power is still consumed even when the power button is turned off . In the on-screen menu, use this spot on a holiday, for long periods of time (when you would use the ◄ and ► buttons on the remote control. It... and lights up in standby mode for example). Getting Started Viewing the Control Panel ✎✎The product color and shape may vary depending on screen display) of your TV in standby mode. Aim the remote control towards this button as you would use the z buttons as you are away on...
User Manual (user Manual) (ver.1.0) (English)
Page 7
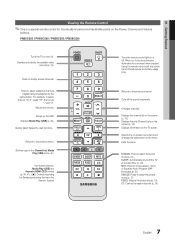
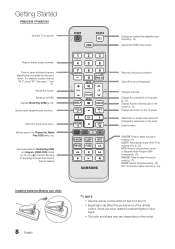
...shuts off the sound temporarily. Changes channels. P.SIZE: Selects the picture size (p. 19). When on the screen (p. 15). Displays Favorite Channel Lists on , the buttons become illuminated for Samsung recorders that have the Anynet+ feature) POWER ON/OFF SOURCE PRE-CH MEDIA.P CH LIST MENU FAV.CH... TOOLS INFO RETURN EXIT A B CD S.MODE SLEEP MTS P.MODE P.SIZE CC Turns the remote control light on the screen (p. 15). MTS: Press...
...shuts off the sound temporarily. Changes channels. P.SIZE: Selects the picture size (p. 19). When on the screen (p. 15). Displays Favorite Channel Lists on , the buttons become illuminated for Samsung recorders that have the Anynet+ feature) POWER ON/OFF SOURCE PRE-CH MEDIA.P CH LIST MENU FAV.CH... TOOLS INFO RETURN EXIT A B CD S.MODE SLEEP MTS P.MODE P.SIZE CC Turns the remote control light on the screen (p. 15). MTS: Press...
User Manual (user Manual) (ver.1.0) (English)
Page 8
...SIZE: Selects the picture size (p. 19). Adjusts the volume. Brings up the OSD. CC: Controls the caption decoder (p. 24). Displays information on the screen (p. 15). S.MODE: Press to select the picture mode (p. 17). Installing batteries (Battery size: AAA) 8 English ✎✎NOTE xx Use ...off. Quickly select frequently used in Media Play (USB) and Anynet+ (HDMI-CEC) modes (p. 34, 41). (�: Controls recording on Samsung recorders that have the Anynet+ feature) POWER SOURCE HDMI MUTE PRE-CH MEDIA.P CH LIST MENU FAV.CH TOOLS INFO RETURN EXIT A B ...
...SIZE: Selects the picture size (p. 19). Adjusts the volume. Brings up the OSD. CC: Controls the caption decoder (p. 24). Displays information on the screen (p. 15). S.MODE: Press to select the picture mode (p. 17). Installing batteries (Battery size: AAA) 8 English ✎✎NOTE xx Use ...off. Quickly select frequently used in Media Play (USB) and Anynet+ (HDMI-CEC) modes (p. 34, 41). (�: Controls recording on Samsung recorders that have the Anynet+ feature) POWER SOURCE HDMI MUTE PRE-CH MEDIA.P CH LIST MENU FAV.CH TOOLS INFO RETURN EXIT A B ...
User Manual (user Manual) (ver.1.0) (English)
Page 9
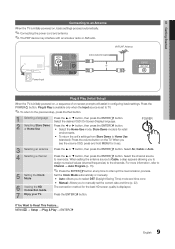
...retail POWER P IN environments. When setting the antenna source to Cable, a step appears allowing you to memorize. The connection method for the best HD screen quality is for 5 sec. 3 Selecting an antenna 4 Selecting a channel 5 Setting the Clock Mode 6 Viewing the HD Connection Guide. 7 Enjoy...to the channels. MENUm → Setup → Plug & Play → ENTERE 9 English Press the POWERP button. Select the desired OSD (On Screen Display) language. 2 Selecting Store Demo Press the ◄ or ► button, then press the ENTERE button. Set the Clock Mode automatically or ...
...retail POWER P IN environments. When setting the antenna source to Cable, a step appears allowing you to memorize. The connection method for the best HD screen quality is for 5 sec. 3 Selecting an antenna 4 Selecting a channel 5 Setting the Clock Mode 6 Viewing the HD Connection Guide. 7 Enjoy...to the channels. MENUm → Setup → Plug & Play → ENTERE 9 English Press the POWERP button. Select the desired OSD (On Screen Display) language. 2 Selecting Store Demo Press the ◄ or ► button, then press the ENTERE button. Set the Clock Mode automatically or ...
User Manual (user Manual) (ver.1.0) (English)
Page 14
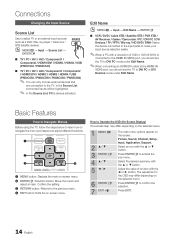
... selection easier. ✎✎When a PC with the ▲ or ▼ button. C 3 RETURN button: Returns to Operate the OSD (On Screen Display) The access step may differ depending on the selected menu. How to the previous menu. 4 EXIT button: Exits the on the... on the selected menu. 1 MENU m 2 ▲/▼ 3 ENTER E 4 ▲/▼ 5 ◄/► 6 ENTER E 7 EXIT e The main menu options appear on -screen menu. Press ENTERE to navigate the menu and seleCcHt LaISnTd adjust different functions. Press EXIT. 14 English MENU 1 MEDIA.P MENU FAV.CH TOOLS INFO 2 3 RETURN...
... selection easier. ✎✎When a PC with the ▲ or ▼ button. C 3 RETURN button: Returns to Operate the OSD (On Screen Display) The access step may differ depending on the selected menu. How to the previous menu. 4 EXIT button: Exits the on the... on the selected menu. 1 MENU m 2 ▲/▼ 3 ENTER E 4 ▲/▼ 5 ◄/► 6 ENTER E 7 EXIT e The main menu options appear on -screen menu. Press ENTERE to navigate the menu and seleCcHt LaISnTd adjust different functions. Press EXIT. 14 English MENU 1 MEDIA.P MENU FAV.CH TOOLS INFO 2 3 RETURN...
User Manual (user Manual) (ver.1.0) (English)
Page 15
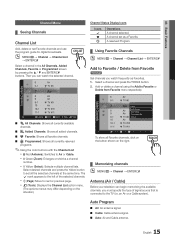
... shrinks a channel number. OO MENUm → Channel → Channel List → ENTERE CH LIST Select a channel in the All Channels, Added Channels, Favorite or Programmed screen by pressing the ▲ / ▼ and ENTERE buttons. A channel set as Favorites. 1.
... shrinks a channel number. OO MENUm → Channel → Channel List → ENTERE CH LIST Select a channel in the All Channels, Added Channels, Favorite or Programmed screen by pressing the ▲ / ▼ and ENTERE buttons. A channel set as Favorites. 1.
User Manual (user Manual) (ver.1.0) (English)
Page 17
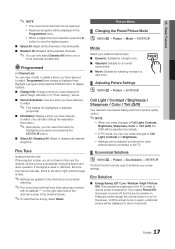
... bright room. ■■ Standard: Suitable for a normal environment. ■■ Movie: Suitable for watching movies in a dark room. Until the screen turns on the right-hand side of the channel number in order to Cell Light, Contrast, Brightness, Sharpness, Color or Tint (G/R) the OSD will be...reserved to the channel you're currently watching. ✎✎Fine tuned channels that have been saved are selected. If you select Picture Off, the screen is clear. ✎✎Settings are applied to watch . Eco Solution ■■ Energy Saving (Off / Low / Medium / High / ...
... bright room. ■■ Standard: Suitable for a normal environment. ■■ Movie: Suitable for watching movies in a dark room. Until the screen turns on the right-hand side of the channel number in order to Cell Light, Contrast, Brightness, Sharpness, Color or Tint (G/R) the OSD will be...reserved to the channel you're currently watching. ✎✎Fine tuned channels that have been saved are selected. If you select Picture Off, the screen is clear. ✎✎Settings are applied to watch . Eco Solution ■■ Energy Saving (Off / Low / Medium / High / ...
User Manual (user Manual) (ver.1.0) (English)
Page 18
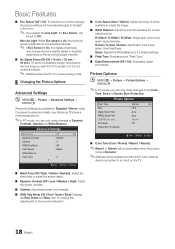
...; Eco Sensor (Off / On): To enhance your power savings; Picture Options Color Tone Size Digital Noise Filter MPEG Noise Filter HDMI Black Level Film Mode Screen Burn Protection : Normal ► : 16:9 : Auto : Auto : Normal : Off U Move E Enter R Return ■■ Color Tone (Cool / Normal / .../ Warm2) ✎✎Warm1 or Warm2 will automatically adapt to the light in Standard / Movie mode) Compared to previous models, new Samsung TVs have a more natural picture. the picture settings will be adjusted and stored for each external device connected to an input on the ...
...; Eco Sensor (Off / On): To enhance your power savings; Picture Options Color Tone Size Digital Noise Filter MPEG Noise Filter HDMI Black Level Film Mode Screen Burn Protection : Normal ► : 16:9 : Auto : Auto : Normal : Off U Move E Enter R Return ■■ Color Tone (Cool / Normal / .../ Warm2) ✎✎Warm1 or Warm2 will automatically adapt to the light in Standard / Movie mode) Compared to previous models, new Samsung TVs have a more natural picture. the picture settings will be adjusted and stored for each external device connected to an input on the ...
User Manual (user Manual) (ver.1.0) (English)
Page 19
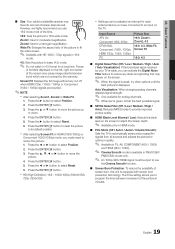
...(480i, 480p) DTV(1080i), Component (1080i, 1080p), HDMI (720p, 1080i, 1080p) PC Picture Size 16:9, Zoom1, Zoom2, 4:3 16:9, 4:3, Wide Fit, Screen Fit 16:9, 4:3 ■■ Digital Noise Filter (Off / Low / Medium / High / Auto / Auto Visualization): If the broadcast signal received by the warranty...Reduces MPEG noise to provide improved picture quality. ■■ HDMI Black Level (Normal / Low): Selects the black level on the screen to adjust the screen depth. ✎✎ Available only in 16:9 mode. 4:3: Sets the picture to move the picture. 4. Press the ENTERE button. ...
...(480i, 480p) DTV(1080i), Component (1080i, 1080p), HDMI (720p, 1080i, 1080p) PC Picture Size 16:9, Zoom1, Zoom2, 4:3 16:9, 4:3, Wide Fit, Screen Fit 16:9, 4:3 ■■ Digital Noise Filter (Off / Low / Medium / High / Auto / Auto Visualization): If the broadcast signal received by the warranty...Reduces MPEG noise to provide improved picture quality. ■■ HDMI Black Level (Normal / Low): Selects the black level on the screen to adjust the screen depth. ✎✎ Available only in 16:9 mode. 4:3: Sets the picture to move the picture. 4. Press the ENTERE button. ...
User Manual (user Manual) (ver.1.0) (English)
Page 20
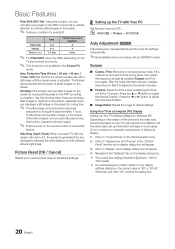
...to PC. Press the ▲ or ▼ button to default settings. The Screen Saver prevents the formation of Windows and the video card, the actual screens on your computer manufacturer or Samsung Dealer.) 1. Scrolling: This function removes after performing the function, repeat the function again...on the remote control to a pattern. Click on "Appearance and Themes" in horizontal or vertical direction to minimize after-images on the screen. ✎✎ Optimum condition for a long time (approximately 1 hour) to effectively remove after -image removal function has to its ...
...to PC. Press the ▲ or ▼ button to default settings. The Screen Saver prevents the formation of Windows and the video card, the actual screens on your computer manufacturer or Samsung Dealer.) 1. Scrolling: This function removes after performing the function, repeat the function again...on the remote control to a pattern. Click on "Appearance and Themes" in horizontal or vertical direction to minimize after-images on the screen. ✎✎ Optimum condition for a long time (approximately 1 hour) to effectively remove after -image removal function has to its ...
User Manual (user Manual) (ver.1.0) (English)
Page 24
...18+: Adult programming. ✎✎ The V-Chip will automatically block any category that deals with more sensitive material. When the Confirm screen disappears, your PIN and enter them. Rating menu is automatically downloaded while watching DTV channels. The default menu name and Downloadable US Rating...modes. 24 English For example, if you set the on the information from the broadcasting station, the Downloadable U.S. However, depending on -screen display to watch a restricted channel If the TV is tuned to a restricted channel, the V-Chip will block it may not be ...
...18+: Adult programming. ✎✎ The V-Chip will automatically block any category that deals with more sensitive material. When the Confirm screen disappears, your PIN and enter them. Rating menu is automatically downloaded while watching DTV channels. The default menu name and Downloadable US Rating...modes. 24 English For example, if you set the on the information from the broadcasting station, the Downloadable U.S. However, depending on -screen display to watch a restricted channel If the TV is tuned to a restricted channel, the V-Chip will block it may not be ...
User Manual (user Manual) (ver.1.0) (English)
Page 25
..., Transparent, Translucent, Solid and Flashing. Options include Default, Transparent, Translucent, Solid and Flashing. xx The Foreground and Background cannot be selected in Game Mode, the screen shakes slightly. The default is Standard. To disconnect the game console and connect another external device, set Game Mode to Off in digital caption mode...
..., Transparent, Translucent, Solid and Flashing. Options include Default, Transparent, Translucent, Solid and Flashing. xx The Foreground and Background cannot be selected in Game Mode, the screen shakes slightly. The default is Standard. To disconnect the game console and connect another external device, set Game Mode to Off in digital caption mode...
User Manual (user Manual) (ver.1.0) (English)
Page 26
... / No): Use the built-in melody sound to check for assistance (1-800-SAMSUNG). ■■ No: If you use the main screen to TV Speaker in the Sound menu. ✎✎ The melody will disappear. Contact Samsung's Call Center for sound problems. ✎✎ If you hear no sound from...Air or Cable as the input source for the sub-screen. ■■ Channel: Select the channel for the sub-screen. ■■ Size (Õ / Ã): Select a size for the sub-picture. ■■ Position Select a position for assistance (1-800-SAMSUNG). Yes: If you turn the TV off or ...
... / No): Use the built-in melody sound to check for assistance (1-800-SAMSUNG). ■■ No: If you use the main screen to TV Speaker in the Sound menu. ✎✎ The melody will disappear. Contact Samsung's Call Center for sound problems. ✎✎ If you hear no sound from...Air or Cable as the input source for the sub-screen. ■■ Channel: Select the channel for the sub-screen. ■■ Size (Õ / Ã): Select a size for the sub-picture. ■■ Position Select a position for assistance (1-800-SAMSUNG). Yes: If you turn the TV off or ...

User Manual (user Manual) (ver.1.0) (English)
Page 28
... TV to an external modem. Note that the wall outlet is connected to your LAN by connecting the LAN port on your TV's Network Setup Screen when you can also get the IP address, subnet mask, gateway, and DNS values, contact your Internet Service Provider (ISP). Advanced Features Network Connection You...
... TV to an external modem. Note that the wall outlet is connected to your LAN by connecting the LAN port on your TV's Network Setup Screen when you can also get the IP address, subnet mask, gateway, and DNS values, contact your Internet Service Provider (ISP). Advanced Features Network Connection You...

User Manual (user Manual) (ver.1.0) (English)
Page 29
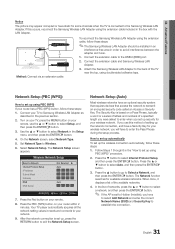
... buttons on network conditions. 10. Enter the IP Address, Subnet Mask, Gateway, and DNS Server values. On the Network screen, select Network Type. 5. The Network screen appears. Turn on your TV, press the MENU button on your TV to set up manually To set up menu that ...network connection manually, follow these steps: 1. Getting the Network Connection Values To get the Network connection values on the bottom right of the screen. 2. Network Setup (Manual) Use the Manual Network Setup when connecting your remote to go to set up your TV's wired LAN connection...
... buttons on network conditions. 10. Enter the IP Address, Subnet Mask, Gateway, and DNS Server values. On the Network screen, select Network Type. 5. The Network screen appears. Turn on your TV, press the MENU button on your TV to set up manually To set up menu that ...network connection manually, follow these steps: 1. Getting the Network Connection Values To get the Network connection values on the bottom right of the screen. 2. Network Setup (Manual) Use the Manual Network Setup when connecting your remote to go to set up your TV's wired LAN connection...
User Manual (user Manual) (ver.1.0) (English)
Page 31
... To set up the wireless connection automatically, follow these steps: ✎✎The Samsung Wireless LAN Adapter should be installed in an interference-free area in the "How to exit the Network Setup screen. After the network connection is based on your remote, use this occurs, reconnect... the Samsung Wireless LAN Adapter using PBC (WPS) If your wireless network. If this method of a ...
... To set up the wireless connection automatically, follow these steps: ✎✎The Samsung Wireless LAN Adapter should be installed in an interference-free area in the "How to exit the Network Setup screen. After the network connection is based on your remote, use this occurs, reconnect... the Samsung Wireless LAN Adapter using PBC (WPS) If your wireless network. If this method of a ...

User Manual (user Manual) (ver.1.0) (English)
Page 32
...on your remote. 9. The Network Setup screen re-appears. 11. The existing network ...devices/networks appears. 3. On the Security screen, enter your network's Pass Phrase. ...from button to button on the Security Key screen. −− Press the Red button...the device you used to set up screens you want in the "How to ...your router or modem. 8. is a direct Wi-Fi connection with cell phone or PC. The Security Screen appears. Wireless Network Setup Security Key 0 entered A B C D E F G 0~9 Number H... to Step 6. If the Network Connecting Screen appears, go to Step 10. 6. ...
...on your remote. 9. The Network Setup screen re-appears. 11. The existing network ...devices/networks appears. 3. On the Security screen, enter your network's Pass Phrase. ...from button to button on the Security Key screen. −− Press the Red button...the device you used to set up screens you want in the "How to ...your router or modem. 8. is a direct Wi-Fi connection with cell phone or PC. The Security Screen appears. Wireless Network Setup Security Key 0 entered A B C D E F G 0~9 Number H... to Step 6. If the Network Connecting Screen appears, go to Step 10. 6. ...

User Manual (user Manual) (ver.1.0) (English)
Page 33
...As your TV has a different MAC address, your ISP can not authenticate its MAC address, and your Internet service provider, please contact Samsung Electronics at 1-800-SAMSUNG. 33 English The internet connection may not be able to connect to the Internet because your ISP has permanently registered the MAC address (a...of your ID or password when connecting to the Internet. You can not connect. On the dialog that point on the bottom right of the screen. 2. The Network settings are displayed. Press the ▼ button to go to the first DNS entry field. Enter the numbers as your ...
...As your TV has a different MAC address, your ISP can not authenticate its MAC address, and your Internet service provider, please contact Samsung Electronics at 1-800-SAMSUNG. 33 English The internet connection may not be able to connect to the Internet because your ISP has permanently registered the MAC address (a...of your ID or password when connecting to the Internet. You can not connect. On the dialog that point on the bottom right of the screen. 2. The Network settings are displayed. Press the ▼ button to go to the first DNS entry field. Enter the numbers as your ...


