Quick Guide (ENGLISH)
Page 6
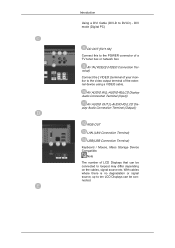
... With cables where there is no degradation or signal source, up to DVI-D) - AV AUDIO IN [L-AUDIO-R](LCD Display Audio Connection Terminal (Input)) AV AUDIO OUT [L-AUDIO-R] (LCD Display Audio Connection Terminal (Output)) RGB OUT LAN (LAN Connection Terminal) USB(USB Connection Terminal) Keyboard / Mouse... Connect this to the POWER connector of LCD Displays that can be connected to the video output terminal of the external device using a VIDEO cable. AV IN [VIDEO] (VIDEO Connection Terminal) Connect the [ VIDEO ] terminal of your monitor to loopout may differ depending on the cables...
... With cables where there is no degradation or signal source, up to DVI-D) - AV AUDIO IN [L-AUDIO-R](LCD Display Audio Connection Terminal (Input)) AV AUDIO OUT [L-AUDIO-R] (LCD Display Audio Connection Terminal (Output)) RGB OUT LAN (LAN Connection Terminal) USB(USB Connection Terminal) Keyboard / Mouse... Connect this to the POWER connector of LCD Displays that can be connected to the video output terminal of the external device using a VIDEO cable. AV IN [VIDEO] (VIDEO Connection Terminal) Connect the [ VIDEO ] terminal of your monitor to loopout may differ depending on the cables...

Quick Guide (ENGLISH)
Page 7
... proper use. Remote Control Note The performance of the Kensington Lock may be affected by a TV or other electronic device operating near the LCD Display , causing a malfunction due to physically fix the system when using it in a public place. Fix the Kensington Lock to be ...on the manufacturer. Using the Anti-Theft Kensington Lock 1. Note The location of the remote control may differ from the illustration depending on the Monitor and turn it in the locking direction . 2. The locking device has to a desk or a heavy stationary object. Introduction Kensington Lock ...
... proper use. Remote Control Note The performance of the Kensington Lock may be affected by a TV or other electronic device operating near the LCD Display , causing a malfunction due to physically fix the system when using it in a public place. Fix the Kensington Lock to be ...on the manufacturer. Using the Anti-Theft Kensington Lock 1. Note The location of the remote control may differ from the illustration depending on the Monitor and turn it in the locking direction . 2. The locking device has to a desk or a heavy stationary object. Introduction Kensington Lock ...
Quick Guide (ENGLISH)
Page 9
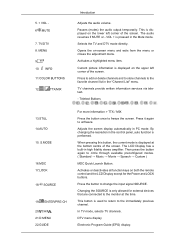
... 14.AUTO 15. SOURCE 19. TV/DTV 8. This is displayed on both the remote control and the LCD Display except for external devices that are connected to the monitor at the bottom centre of the screen. Opens the on the lower left corner of the screen. Then ...SOURCE. Pauses (mutes) the audio output temporarily. ENTER/PRE-CH 20. 5. + VOL 6. TV channels provide written information services via teletext. - The LCD Display has a built-in the control panel, auto function is used to return to freeze the screen. DTV menu display Electronic Program Guide (EPG) display...
... 14.AUTO 15. SOURCE 19. TV/DTV 8. This is displayed on both the remote control and the LCD Display except for external devices that are connected to the monitor at the bottom centre of the screen. Opens the on the lower left corner of the screen. Then ...SOURCE. Pauses (mutes) the audio output temporarily. ENTER/PRE-CH 20. 5. + VOL 6. TV channels provide written information services via teletext. - The LCD Display has a built-in the control panel, auto function is used to return to freeze the screen. DTV menu display Electronic Program Guide (EPG) display...
User Manual (ENGLISH)
Page 3
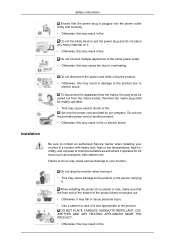
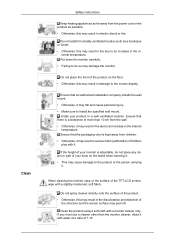
... may result in fire or electric shock. Do not use the provided power cord of a size appropriate to the product. Do not drop the monitor when moving it. • This may result in damage to the product due to the product or the person carrying it operates for 24 hours...may result in a location with heavy dust, high or low temperatures, high humidity, and exposed to your monitor in fire. Installation Be sure to contact an authorized Service Center when installing your monitor. To disconnect the apparatus from the mains, the plug must be pulled out from the mains socket, therefore...
... may result in fire or electric shock. Do not use the provided power cord of a size appropriate to the product. Do not drop the monitor when moving it. • This may result in damage to the product due to the product or the person carrying it operates for 24 hours...may result in a location with heavy dust, high or low temperatures, high humidity, and exposed to your monitor in fire. Installation Be sure to contact an authorized Service Center when installing your monitor. To disconnect the apparatus from the mains, the plug must be pulled out from the mains socket, therefore...
User Manual (ENGLISH)
Page 4
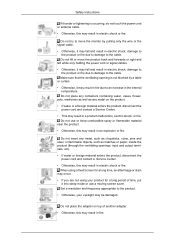
...the floor. • Otherwise, this may result in damage to an increase in the in fire due to the screen display. Put down the monitor carefully. • Failing to the product or the person carrying it . • This may cause damage to do not place any object or...cm from the wall. • Otherwise, it with water at a ratio of the TFT-LCD screen, wipe with a monitor cleaner only. ternal temperature. Ensure that the packaging vinyl is a clearance of more than the monitor cleaner, dilute it may result in the internal temperature. Clean Safety Instructions Keep heating appliances ...
...the floor. • Otherwise, this may result in damage to an increase in the in fire due to the screen display. Put down the monitor carefully. • Failing to the product or the person carrying it . • This may cause damage to do not place any object or...cm from the wall. • Otherwise, it with water at a ratio of the TFT-LCD screen, wipe with a monitor cleaner only. ternal temperature. Ensure that the packaging vinyl is a clearance of more than the monitor cleaner, dilute it may result in the internal temperature. Clean Safety Instructions Keep heating appliances ...
User Manual (ENGLISH)
Page 6
... using a fixed screen for a long period of another adapter. • Otherwise, this may result in electric shock or fire. Do not lift or move the monitor by a table or curtain. • Otherwise, it into sleep mode or use or keep combustible spray or flammable material near the product. • Otherwise, this...
... using a fixed screen for a long period of another adapter. • Otherwise, this may result in electric shock or fire. Do not lift or move the monitor by a table or curtain. • Otherwise, it into sleep mode or use or keep combustible spray or flammable material near the product. • Otherwise, this...
User Manual (ENGLISH)
Page 7
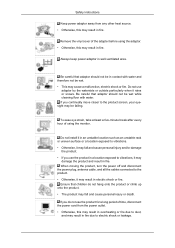
... the product and result in fire. To ease eye strain, take at least a five-minute break after every hour of the adapter before using the monitor.
... the product and result in fire. To ease eye strain, take at least a five-minute break after every hour of the adapter before using the monitor.
User Manual (ENGLISH)
Page 9
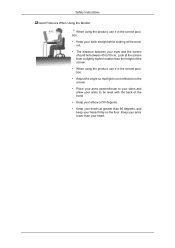
... perpendicular to your sides and allow your arms to 50 cm. Keep your arms lower than your heart. Safety Instructions Good Postures When Using the Monitor When using the product, use it in the correct position. • Keep your back straight while looking at greater than 90 degrees, and keep your...
... perpendicular to your sides and allow your arms to 50 cm. Keep your arms lower than your heart. Safety Instructions Good Postures When Using the Monitor When using the product, use it in the correct position. • Keep your back straight while looking at greater than 90 degrees, and keep your...
User Manual (ENGLISH)
Page 10
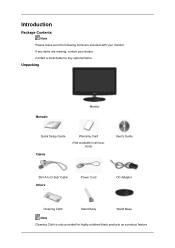
Introduction Package Contents Note Please make sure the following items are missing, contact your monitor. Contact a local dealer to buy optional items. Unpacking Manuals Monitor Quick Setup Guide Cables Warranty Card (Not available in all locations) User's Guide 'DVI-A to D-Sub' Cable Others Power Cord DC-Adapter Cleaning Cloth Stand Body Stand Base Note Cleaning Cloth is only provided for highly polished black products as a product feature. If any items are included with your dealer.
Introduction Package Contents Note Please make sure the following items are missing, contact your monitor. Contact a local dealer to buy optional items. Unpacking Manuals Monitor Quick Setup Guide Cables Warranty Card (Not available in all locations) User's Guide 'DVI-A to D-Sub' Cable Others Power Cord DC-Adapter Cleaning Cloth Stand Body Stand Base Note Cleaning Cloth is only provided for highly polished black products as a product feature. If any items are included with your dealer.
User Manual (ENGLISH)
Page 11
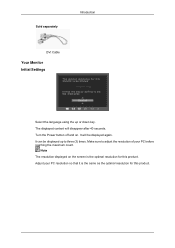
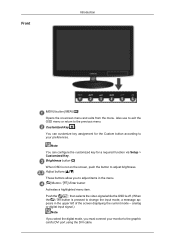
It can be displayed again. The displayed content will be displayed up or down key. It will disappear after 40 seconds. Note The resolution displayed on . Turn the Power button off and on the screen is the same as the optimal resolution for this product. Sold separately Introduction DVI Cable Your Monitor Initial Settings Select the language using the up to adjust the resolution of your PC resolution so that it is the optimal resolution for this product. Make sure to three (3) times. Adjust your PC before reaching the maximum count.
It can be displayed again. The displayed content will be displayed up or down key. It will disappear after 40 seconds. Note The resolution displayed on . Turn the Power button off and on the screen is the same as the optimal resolution for this product. Sold separately Introduction DVI Cable Your Monitor Initial Settings Select the language using the up to adjust the resolution of your PC resolution so that it is the optimal resolution for this product. Make sure to three (3) times. Adjust your PC before reaching the maximum count.
User Manual (ENGLISH)
Page 12
Adjust buttons [ ] These buttons allow you must connect your monitor to your preferences. Push the ' / ', then selects the video signal while the OSD is off. (When the / button is not on -screen menu and exits ...
Adjust buttons [ ] These buttons allow you must connect your monitor to your preferences. Push the ' / ', then selects the video signal while the OSD is off. (When the / button is not on -screen menu and exits ...
User Manual (ENGLISH)
Page 13
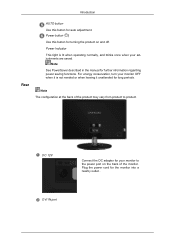
...not needed or when leaving it is lit when operating normally, and blinks once when your monitor to product. Plug the power cord for auto adjustment. For energy conservation, turn your monitor OFF when it unattended for your adjustments are saved. Introduction Rear AUTO button Use this button... for further information regarding power saving functions. DVI IN port Power button [ ] Use this button for the monitor into a nearby outlet. . Note The configuration at the back of the product may vary from product to the power port on and off....
...not needed or when leaving it is lit when operating normally, and blinks once when your monitor to product. Plug the power cord for auto adjustment. For energy conservation, turn your monitor OFF when it unattended for your adjustments are saved. Introduction Rear AUTO button Use this button... for further information regarding power saving functions. DVI IN port Power button [ ] Use this button for the monitor into a nearby outlet. . Note The configuration at the back of the product may vary from product to the power port on and off....

User Manual (ENGLISH)
Page 14
... the Anti-Theft Kensington Lock 1. Refer to the manual provided with the Kensington Lock for further information regarding cable connections. Note The location of your monitor. Connect the Kensington Lock cable. 3. Introduction Connect the 'DVI-A to D-Sub' Cable to the DVI-I port on the... Monitor ( ) and turn it in the locking direction ( ). 2. Insert the locking device into the Kensington slot on the back of the Kensington Lock may differ from ...
... the Anti-Theft Kensington Lock 1. Refer to the manual provided with the Kensington Lock for further information regarding cable connections. Note The location of your monitor. Connect the Kensington Lock cable. 3. Introduction Connect the 'DVI-A to D-Sub' Cable to the DVI-I port on the... Monitor ( ) and turn it in the locking direction ( ). 2. Insert the locking device into the Kensington slot on the back of the Kensington Lock may differ from ...
User Manual (ENGLISH)
Page 15
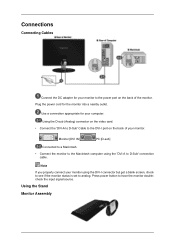
Connections Connecting Cables Connect the DC adapter for your monitor to the power port on the back of your monitor. Monitor [DVI IN] PC [D-sub] Connected to a Macintosh. • Connect the monitor to the Macintosh computer using the DVI-I port on the video card. • Connect the 'DVI-A to D-Sub' Cable ...to the DVI-I connector but get a blank screen, check to see if the monitor status is set to analog. Using the Stand Monitor Assembly Note If you properly connect your computer. Using the D-sub (Analog) connector on the back of the...
Connections Connecting Cables Connect the DC adapter for your monitor to the power port on the back of your monitor. Monitor [DVI IN] PC [D-sub] Connected to a Macintosh. • Connect the monitor to the Macintosh computer using the DVI-I port on the video card. • Connect the 'DVI-A to D-Sub' Cable ...to the DVI-I connector but get a blank screen, check to see if the monitor status is set to analog. Using the Stand Monitor Assembly Note If you properly connect your computer. Using the D-sub (Analog) connector on the back of the...
User Manual (ENGLISH)
Page 16
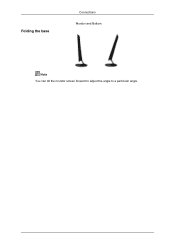
Folding the base Connections Monitor and Bottom Note You can tilt the monitor screen forward to adjust the angle to a particular angle.
Folding the base Connections Monitor and Bottom Note You can tilt the monitor screen forward to adjust the angle to a particular angle.

User Manual (ENGLISH)
Page 17
...Follow the directions appropriate for the monitor driver, insert the CDROM included with this monitor. Prepare a blank disk and download the driver program file at the Internet web site shown here. Internet web site : http://www.samsung.com/ (Worldwide) Installing the Monitor Driver (Automatic) 1. Click "Windows...". 3. Using the Software Monitor Driver Note When prompted by the operating system for the operating system you can see...
...Follow the directions appropriate for the monitor driver, insert the CDROM included with this monitor. Prepare a blank disk and download the driver program file at the Internet web site shown here. Internet web site : http://www.samsung.com/ (Worldwide) Installing the Monitor Driver (Automatic) 1. Click "Windows...". 3. Using the Software Monitor Driver Note When prompted by the operating system for the operating system you can see...
User Manual (ENGLISH)
Page 18
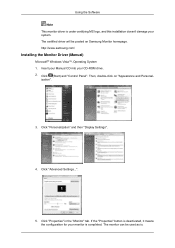
......". 5. ization". 3. Click "Personalization" and then "Display Settings". 4. Click "Properties" in the "Monitor" tab. The monitor can be posted on "Appearance and Personal- http://www.samsung.com/ Installing the Monitor Driver (Manual) Microsoft® Windows Vista™, Operating System 1. Using the Software Note This monitor driver is . Click (Start) and "Control Panel". If the "Properties" button...
......". 5. ization". 3. Click "Personalization" and then "Display Settings". 4. Click "Properties" in the "Monitor" tab. The monitor can be posted on "Appearance and Personal- http://www.samsung.com/ Installing the Monitor Driver (Manual) Microsoft® Windows Vista™, Operating System 1. Using the Software Note This monitor driver is . Click (Start) and "Control Panel". If the "Properties" button...
User Manual (ENGLISH)
Page 19
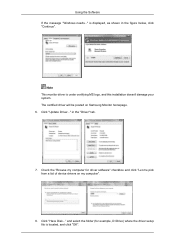
The certified driver will be posted on my computer". 8. Note This monitor driver is displayed, as shown in the "Driver" tab. 7. in the figure below, click "Continue". Click "Have Disk..." Check the "Browse my computer for example, D:\...'t damage your system. Click "Update Driver..." and select the folder (for driver software" checkbox and click "Let me pick from a list of device drivers on Samsung Monitor homepage. 6. Using the Software If the message "Windows needs..."
The certified driver will be posted on my computer". 8. Note This monitor driver is displayed, as shown in the "Driver" tab. 7. in the figure below, click "Continue". Click "Have Disk..." Check the "Browse my computer for example, D:\...'t damage your system. Click "Update Driver..." and select the folder (for driver software" checkbox and click "Let me pick from a list of device drivers on Samsung Monitor homepage. 6. Using the Software If the message "Windows needs..."
User Manual (ENGLISH)
Page 20
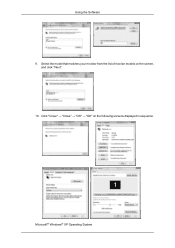
Click "Close" → "Close" → "OK" → "OK" on the screen, and click "Next". 10. Microsoft® Windows® XP Operating System Using the Software 9. Select the model that matches your monitor from the list of monitor models on the following screens displayed in sequence.
Click "Close" → "Close" → "OK" → "OK" on the screen, and click "Next". 10. Microsoft® Windows® XP Operating System Using the Software 9. Select the model that matches your monitor from the list of monitor models on the following screens displayed in sequence.
User Manual (ENGLISH)
Page 21
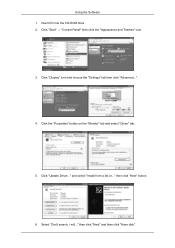
then click "Next" and then click "Have disk". and select "Install from a list or..." Select "Don't search, I will..." Click the "Properties" button on the "Monitor" tab and select "Driver" tab. 5. Click "Display" icon and choose the "Settings" tab then click "Advanced...". 4. Click "Start" → "Control Panel" then click the "Appearance and Themes" icon. 3. Insert CD into the CD-ROM drive. 2. Click "Update Driver..." Using the Software 1. then click "Next" button. 6.
then click "Next" and then click "Have disk". and select "Install from a list or..." Select "Don't search, I will..." Click the "Properties" button on the "Monitor" tab and select "Driver" tab. 5. Click "Display" icon and choose the "Settings" tab then click "Advanced...". 4. Click "Start" → "Control Panel" then click the "Appearance and Themes" icon. 3. Insert CD into the CD-ROM drive. 2. Click "Update Driver..." Using the Software 1. then click "Next" button. 6.


