User Manual Ver.1.0 (English)
Page 9
... In Playback mode...42 Viewing photos ...42 Playing videos ...42 Changing the information displayed 43 Lenses ...44 Lens layout...44 Locking or unlocking the lens 45 Lens markings ...47 Accessories 48 External flash layout 48 Connecting the external flash 49 GPS module layout (optional 51 Attaching the GPS module 51 Shooting modes 53 t Smart Auto mode 54 P Program mode...56 Program Shift ...56 A Aperture Priority mode 57 S Shutter Priority mode 58 M Manual mode ...59 Framing mode ...59 Using...
... In Playback mode...42 Viewing photos ...42 Playing videos ...42 Changing the information displayed 43 Lenses ...44 Lens layout...44 Locking or unlocking the lens 45 Lens markings ...47 Accessories 48 External flash layout 48 Connecting the external flash 49 GPS module layout (optional 51 Attaching the GPS module 51 Shooting modes 53 t Smart Auto mode 54 P Program mode...56 Program Shift ...56 A Aperture Priority mode 57 S Shutter Priority mode 58 M Manual mode ...59 Framing mode ...59 Using...

User Manual Ver.1.0 (English)
Page 11
... 108 Viewing files by category 109 Viewing files as a folder 109 Protecting files ...110 Lock/Unlock all files 110 Deleting files ...111 Deleting a single file 111 Deleting multiple files 111 Deleting all files...112 Viewing photos 113 Enlarging a photo 113 Viewing a slide show 113 Auto rotating ...114 Creating a print order (DPOF 114 Playing videos 115 Trimming a video during playback 115 Capturing an image during playback 116 Editing photos 117 Cropping a photo 117 Rotating a photo ...118 Resizing photos...118 Adjusting your photos 119 Retouching faces ...120 Reducing red-eye...
... 108 Viewing files by category 109 Viewing files as a folder 109 Protecting files ...110 Lock/Unlock all files 110 Deleting files ...111 Deleting a single file 111 Deleting multiple files 111 Deleting all files...112 Viewing photos 113 Enlarging a photo 113 Viewing a slide show 113 Auto rotating ...114 Creating a print order (DPOF 114 Playing videos 115 Trimming a video during playback 115 Capturing an image during playback 116 Editing photos 117 Cropping a photo 117 Rotating a photo ...118 Resizing photos...118 Adjusting your photos 119 Retouching faces ...120 Reducing red-eye...

User Manual Ver.1.0 (English)
Page 31
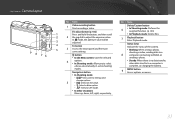
...; i: Lens Priority mode (p. 60) 9 • s: Smart mode (p. 64) • B: Wi-Fi (p. 122) 10 Jog dial • In the Menu screen: Move to a desired menu item. • In the Smart panel: Adjust a selected option. • In Shooting mode: Adjust shutter 2 speed or aperture value in some shooting modes or change the size of a focus area. • In Playback mode: View thumbnails, enlarge or reduce a photo, or open or close a folder of continuous or burst shots in Playback mode. 3 DIRECT LINK button: Start...
...; i: Lens Priority mode (p. 60) 9 • s: Smart mode (p. 64) • B: Wi-Fi (p. 122) 10 Jog dial • In the Menu screen: Move to a desired menu item. • In the Smart panel: Adjust a selected option. • In Shooting mode: Adjust shutter 2 speed or aperture value in some shooting modes or change the size of a focus area. • In Playback mode: View thumbnails, enlarge or reduce a photo, or open or close a folder of continuous or burst shots in Playback mode. 3 DIRECT LINK button: Start...
User Manual Ver.1.0 (English)
Page 32
... be adjusted. 4 Fn button 5 3 Access the Smart panel and fine-tune some shooting modes. I: Select an ISO value. - o button • In the Menu screen: Save the selected 4 options. • In Shooting mode: Allow you to a computer is complete, or charging the battery. 9 MENU button Access options or menus. 31 D: View camera settings and change options. 5 - My Camera > Camera layout 9 8 76 No. Name Delete/Custom button 6 • In Shooting mode: Perform the assigned function. (p. 150) • In Playback mode: Delete files. 7 Playback button...
... be adjusted. 4 Fn button 5 3 Access the Smart panel and fine-tune some shooting modes. I: Select an ISO value. - o button • In the Menu screen: Save the selected 4 options. • In Shooting mode: Allow you to a computer is complete, or charging the battery. 9 MENU button Access options or menus. 31 D: View camera settings and change options. 5 - My Camera > Camera layout 9 8 76 No. Name Delete/Custom button 6 • In Shooting mode: Perform the assigned function. (p. 150) • In Playback mode: Delete files. 7 Playback button...

User Manual Ver.1.0 (English)
Page 64
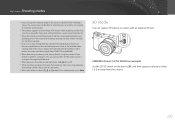
... Camera > Shooting modes Using Z The Z allows you to zoom in on the maximum resolution at each image ratio. 4 Half-press [Shutter] to focus, and then press [Shutter] to capture the photo. • Z is not available when you capture burst shots. • Z is not available when you capture photos in the RAW file format. • Z is deactivated when you record videos by rotating the zoom ring. 1 Rotate the mode...
... Camera > Shooting modes Using Z The Z allows you to zoom in on the maximum resolution at each image ratio. 4 Half-press [Shutter] to focus, and then press [Shutter] to capture the photo. • Z is not available when you capture burst shots. • Z is not available when you capture photos in the RAW file format. • Z is deactivated when you record videos by rotating the zoom ring. 1 Rotate the mode...
User Manual Ver.1.0 (English)
Page 70
My Camera > Shooting modes • If you change in the capacity of the camera suddenly while shooting a movie, the camera may be darker than taking a photo. If you format on another camera or a PC, you use a slow writing memory card, the recording of your movie can capture 3D photos or videos with a faster memory card or reduce the video size (for example, from the subject. 69 You cannot use any other focus area setting functions, such as Face Detection...
My Camera > Shooting modes • If you change in the capacity of the camera suddenly while shooting a movie, the camera may be darker than taking a photo. If you format on another camera or a PC, you use a slow writing memory card, the recording of your movie can capture 3D photos or videos with a faster memory card or reduce the video size (for example, from the subject. 69 You cannot use any other focus area setting functions, such as Face Detection...

User Manual Ver.1.0 (English)
Page 71
... as a display, sunglasses, or a polarizing filter, or use the polarizing material with an optional HDMI cable. My Camera > Shooting modes • 3D mode is set shooting options automatically depending on shooting conditions in 3D mode, press [m] → 1 → 3D Auto Mode → On. • To change the 3D recording option, press [m] → 6 → 3D REC Mode → a desired option. Capture images with the 3D function are saved in JPEG...
... as a display, sunglasses, or a polarizing filter, or use the polarizing material with an optional HDMI cable. My Camera > Shooting modes • 3D mode is set shooting options automatically depending on shooting conditions in 3D mode, press [m] → 1 → 3D Auto Mode → On. • To change the 3D recording option, press [m] → 6 → 3D REC Mode → a desired option. Capture images with the 3D function are saved in JPEG...

User Manual Ver.1.0 (English)
Page 90
... by the vibration of light taken in, which can prevent this occurs, turn it on again. • Use the OIS function only when needed because the function consumes more battery power. • To set an OIS option on the menu, set OIS options, In Shooting mode, press [m] → 1 → OIS (Anti-Shake) → an option. In such cases, the camera uses slower shutter speeds in order to...
... by the vibration of light taken in, which can prevent this occurs, turn it on again. • Use the OIS function only when needed because the function consumes more battery power. • To set an OIS option on the menu, set OIS options, In Shooting mode, press [m] → 1 → OIS (Anti-Shake) → an option. In such cases, the camera uses slower shutter speeds in order to...
User Manual Ver.1.0 (English)
Page 127
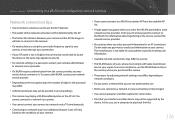
...; The camera may display a WLAN enabled printer on the AP List. Do not enter any problem caused by entering such information. • Available network connections may differ by country. • The WLAN feature of your camera must insert a memory card to use the Wi-Fi features. • The quality of the network connection will be determined by some modes. • Files that...
...; The camera may display a WLAN enabled printer on the AP List. Do not enter any problem caused by entering such information. • Available network connections may differ by country. • The WLAN feature of your camera must insert a memory card to use the Wi-Fi features. • The quality of the network connection will be determined by some modes. • Files that...
User Manual Ver.1.0 (English)
Page 129
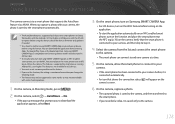
... a memory card to use this feature. • If you set this function, the setting is maintained even when you change the Shooting mode. • This feature may not be supported in some modes or may not be available with Samsung camera models manufactured in Shooting mode, press [m]. 2 On the camera, select 1 → AutoShare → On. • If the pop-up message that the smart phone is connected to the camera...
... a memory card to use this feature. • If you set this function, the setting is maintained even when you change the Shooting mode. • This feature may not be supported in some modes or may not be available with Samsung camera models manufactured in Shooting mode, press [m]. 2 On the camera, select 1 → AutoShare → On. • If the pop-up message that the smart phone is connected to the camera...

User Manual Ver.1.0 (English)
Page 144
... take some time to load your photos or videos and complete the initial set-up process. • While viewing photos or videos on the AllShare Play device, continuously using the device's remote or performing additional operations on the device may prevent this feature only with your camera. • The range of the wireless connection between your camera and an AllShare Play device may vary depending on the specifications...
... take some time to load your photos or videos and complete the initial set-up process. • While viewing photos or videos on the AllShare Play device, continuously using the device's remote or performing additional operations on the device may prevent this feature only with your camera. • The range of the wireless connection between your camera and an AllShare Play device may vary depending on the specifications...

User Manual Ver.1.0 (English)
Page 150
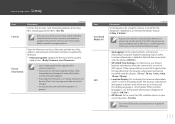
Camera settings menu > User settings Distortion Correct You can correct lens distortion that can be available with some lenses. Set to adjust the zoom ratio. Set to adjust the exposure value. Set to display icons on an i-Function lens. This feature may not be adjusted when you press [i-Function] on the right in Shooting mode. 149 Description 1 Date & Time Set to display the date and time. 2 Icons Set to adjust the White Balance. Option Aperture Shutter Speed EV ISO White Balance Z Description Set to adjust ISO sensitivity. Set to adjust the aperture value....
Camera settings menu > User settings Distortion Correct You can correct lens distortion that can be available with some lenses. Set to adjust the zoom ratio. Set to adjust the exposure value. Set to display icons on an i-Function lens. This feature may not be adjusted when you press [i-Function] on the right in Shooting mode. 149 Description 1 Date & Time Set to display the date and time. 2 Icons Set to adjust the White Balance. Option Aperture Shutter Speed EV ISO White Balance Z Description Set to adjust ISO sensitivity. Set to adjust the aperture value....
User Manual Ver.1.0 (English)
Page 156
...the screen in Korea and the display language is set to capture photos. Camera settings menu > Setting Item Format Description * Default Format the memory card. Formatting deletes all existing files including protected files. (Yes, No) Errors can download firmware upgrades from www.samsung.com. • You cannot run a firmware upgrade without a fully charged battery. Device Information View the firmware version of the body and the lens, Mac address, and network certification number, or update the firmware. • Firmware Update: Update the firmware of camera, a memory card reader...
...the screen in Korea and the display language is set to capture photos. Camera settings menu > Setting Item Format Description * Default Format the memory card. Formatting deletes all existing files including protected files. (Yes, No) Errors can download firmware upgrades from www.samsung.com. • You cannot run a firmware upgrade without a fully charged battery. Device Information View the firmware version of the body and the lens, Mac address, and network certification number, or update the firmware. • Firmware Update: Update the firmware of camera, a memory card reader...

User Manual Ver.1.0 (English)
Page 157
Also, make sure to attach the lens cap to the factory defaults. (Date, time, language, and video output settings do not change.) (Yes, No) View open source licenses. 156 Reset Open Source Licenses Reset the setup menu and shooting options to the lens when not using it on. (Off*, On) As this product uses interchangeable lenses, the sensor can lead to change lenses. It is recommended not to dust particles appearing in a particularly...
Also, make sure to attach the lens cap to the factory defaults. (Date, time, language, and video output settings do not change.) (Yes, No) View open source licenses. 156 Reset Open Source Licenses Reset the setup menu and shooting options to the lens when not using it on. (Off*, On) As this product uses interchangeable lenses, the sensor can lead to change lenses. It is recommended not to dust particles appearing in a particularly...

User Manual Ver.1.0 (English)
Page 170
Error messages Lens is locked Card Error Low Battery No Image File File Error Memory Full Card Locked Suggested remedies The lens is locked. Delete the damaged file or contact a service center. Transfer the files on again. • Remove your memory card and insert it again. • Format your camera, remove the battery, and insert again. If the message still appears, contact a service center. 169 Unlock the card when shooting. (p. 173) Error messages Folder and file number are max values. Capture photos or insert a memory card that contains photos. Delete unnecessary ...
Error messages Lens is locked Card Error Low Battery No Image File File Error Memory Full Card Locked Suggested remedies The lens is locked. Delete the damaged file or contact a service center. Transfer the files on again. • Remove your memory card and insert it again. • Format your camera, remove the battery, and insert again. If the message still appears, contact a service center. 169 Unlock the card when shooting. (p. 173) Error messages Folder and file number are max values. Capture photos or insert a memory card that contains photos. Delete unnecessary ...

User Manual Ver.1.0 (English)
Page 183
... are using a supported operating system. Select the proper White Balance option to suit the light source. (p. 76) Your photo is overexposed or underexposed. • Adjust the aperture value or the shutter speed. • Adjust the ISO sensitivity. (p. 75) • Turn off your camera, and then turn it on again. • Remove your memory card, and then insert it again. 182 Photos are distorted Playback screen does not appear on a Windows XP computer, download and update...
... are using a supported operating system. Select the proper White Balance option to suit the light source. (p. 76) Your photo is overexposed or underexposed. • Adjust the aperture value or the shutter speed. • Adjust the ISO sensitivity. (p. 75) • Turn off your camera, and then turn it on again. • Remove your memory card, and then insert it again. 182 Photos are distorted Playback screen does not appear on a Windows XP computer, download and update...

User Manual Ver.1.0 (English)
Page 186
... Step: Auto, ISO 100, ISO 200, ISO 400, ISO 800, ISO 1600, ISO 3200, ISO 6400, ISO 12800, ISO 25600 • 1/3 Step: Auto, ISO 100, ISO 125, ISO 160, ISO 200, ISO 250, ISO 320, ISO 400, ISO 500, ISO 640, ISO 800, ISO 1000, ISO 1250, ISO 1600, ISO 2000, ISO 2500, ISO 3200, ISO 4000, ISO 5000, ISO 6400, ISO 8000, ISO 10000, ISO 12800, ISO 16000, ISO 20000, ISO 25600 Drive Mode Mode Continuous shooting Burst shooting Bracket shooting Self-timer Shutter release Flash Type Mode Guide number Angle of view Sync speed Single, Continuous, Burst (5M only), Timer, Bracket (Auto Exposure, White Balance...
... Step: Auto, ISO 100, ISO 200, ISO 400, ISO 800, ISO 1600, ISO 3200, ISO 6400, ISO 12800, ISO 25600 • 1/3 Step: Auto, ISO 100, ISO 125, ISO 160, ISO 200, ISO 250, ISO 320, ISO 400, ISO 500, ISO 640, ISO 800, ISO 1000, ISO 1250, ISO 1600, ISO 2000, ISO 2500, ISO 3200, ISO 4000, ISO 5000, ISO 6400, ISO 8000, ISO 10000, ISO 12800, ISO 16000, ISO 20000, ISO 25600 Drive Mode Mode Continuous shooting Burst shooting Bracket shooting Self-timer Shutter release Flash Type Mode Guide number Angle of view Sync speed Single, Continuous, Burst (5M only), Timer, Bracket (Auto Exposure, White Balance...

User Manual Ver.1.0 (English)
Page 190
... (Auto Focus) A system that reaches the camera's sensor. 189 Appendix Glossary AP (Access Point) An access point is used in consumer electronics. AEB (Auto Exposure Bracket) This feature automatically captures several images at different exposures to easily edit photos on the subject. Aperture The aperture controls the amount of colors helps you to help you lock the exposure or focus on which you capture a properly-exposed image. This display needs a separate...
... (Auto Focus) A system that reaches the camera's sensor. 189 Appendix Glossary AP (Access Point) An access point is used in consumer electronics. AEB (Auto Exposure Bracket) This feature automatically captures several images at different exposures to easily edit photos on the subject. Aperture The aperture controls the amount of colors helps you to help you lock the exposure or focus on which you capture a properly-exposed image. This display needs a separate...
User Manual Ver.1.0 (English)
Page 198
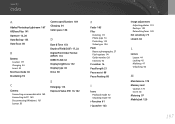
..., 102 F Fader 105 Files Deleting 111 Photo type 74 Protecting 110 Video type 104 Flash Bounce photography 27 Flash options 94 Guide number 26 Intensity 95 F-number 16 Focal length 21 Focus assist 88 Focus Peaking 88 I Icons Playback mode 42 Shooting mode 40 i-Function 61 i-Launcher 163 Image adjustment Adjusting photos 119 Red-eye 120 Retouching faces 120 ISO sensitivity 75 i-Zoom 63 L Lenses Layout 44 Locking 45 Markings 47 Unlocking 46 M Maintenance 170 Memory card Caution 173 Insert...
..., 102 F Fader 105 Files Deleting 111 Photo type 74 Protecting 110 Video type 104 Flash Bounce photography 27 Flash options 94 Guide number 26 Intensity 95 F-number 16 Focal length 21 Focus assist 88 Focus Peaking 88 I Icons Playback mode 42 Shooting mode 40 i-Function 61 i-Launcher 163 Image adjustment Adjusting photos 119 Red-eye 120 Retouching faces 120 ISO sensitivity 75 i-Zoom 63 L Lenses Layout 44 Locking 45 Markings 47 Unlocking 46 M Maintenance 170 Memory card Caution 173 Insert...
User Manual Ver.1.0 (English)
Page 199
... 3D TV 159 Viewing on camera 108 Viewing on HDTV 158 Picture Wizard 79 Posture 13 Power save mode 153 R Red-eye effect Playback mode 120 Shooting mode 95 Remote Viewfinder 131 Resolution Playback mode 118 Shooting mode (Movie) 104 Shooting mode (Photo) 73 Retouching faces 120 Rotating 118 Rule of thirds 24 S Service center 181 Settings 152 Shooting modes Aperture Priority 57 Lens Priority 60 Manual 59 Program 56 Recording 68 Shutter Priority 58 Smart 64 Smart Auto 54 Shutter speed 18, 20...
... 3D TV 159 Viewing on camera 108 Viewing on HDTV 158 Picture Wizard 79 Posture 13 Power save mode 153 R Red-eye effect Playback mode 120 Shooting mode 95 Remote Viewfinder 131 Resolution Playback mode 118 Shooting mode (Movie) 104 Shooting mode (Photo) 73 Retouching faces 120 Rotating 118 Rule of thirds 24 S Service center 181 Settings 152 Shooting modes Aperture Priority 57 Lens Priority 60 Manual 59 Program 56 Recording 68 Shutter Priority 58 Smart 64 Smart Auto 54 Shutter speed 18, 20...


