
User Manual Xp/vista/windows7 Ver.1.5 (English)
Page 23
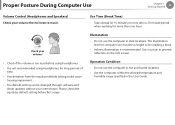
... for long periods of the monitor. • Keep the line from your eyes by the figure. • Adjust the height of the monitor and the LCD screen so that its top height is equal to or lower than your eyes. • Avoid setting the monitor and... LCD excessively bright. • Keep the monitor and LCD screen clean. • If you wear glasses, clean them before using the computer. • When entering contents printed on a paper into the computer, use a static paper...
... for long periods of the monitor. • Keep the line from your eyes by the figure. • Adjust the height of the monitor and the LCD screen so that its top height is equal to or lower than your eyes. • Avoid setting the monitor and... LCD excessively bright. • Keep the monitor and LCD screen clean. • If you wear glasses, clean them before using the computer. • When entering contents printed on a paper into the computer, use a static paper...
User Manual Xp/vista/windows7 Ver.1.5 (English)
Page 24
... for computer use must be changed through software and driver updates without your intervention. Check your volume first to listen to prevent reflection on the LCD screen. Illumination • Do not use the computer in hot and humid locations. • Use the computer within the allowed temperature and humidity range specified in...
... for computer use must be changed through software and driver updates without your intervention. Check your volume first to listen to prevent reflection on the LCD screen. Illumination • Do not use the computer in hot and humid locations. • Use the computer within the allowed temperature and humidity range specified in...

User Manual Xp/vista/windows7 Ver.1.5 (English)
Page 25
The corresponding operating LED is lit when the corresponding function operates. 8 Microphone (Optional) You can take still pictures and record video. 2 LCD The screen images are those of the representative model of the computer. Therefore the colors and appearance of the pictures may differ from the pictures used for ...
The corresponding operating LED is lit when the corresponding function operates. 8 Microphone (Optional) You can take still pictures and record video. 2 LCD The screen images are those of the representative model of the computer. Therefore the colors and appearance of the pictures may differ from the pictures used for ...
User Manual Xp/vista/windows7 Ver.1.5 (English)
Page 32
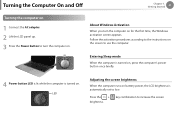
Follow the activation procedures according to the instructions on the screen to increase the screen Turning the Computer On and Off Chapter 1. Entering Sleep mode When the computer is turned on, press the computer's power button once briefly. 4 Power ...Activation When you turn the computer on for the first time, the Windows activation screen appears. LED Adjusting the screen brightness When the computer runs on battery power, the LCD brightness is turned on 1 Connect the AC adapter. 2 Lift the LCD panel up. 3 Press the Power button to low. Getting Started 31 Turning ...
Follow the activation procedures according to the instructions on the screen to increase the screen Turning the Computer On and Off Chapter 1. Entering Sleep mode When the computer is turned on, press the computer's power button once briefly. 4 Power ...Activation When you turn the computer on for the first time, the Windows activation screen appears. LED Adjusting the screen brightness When the computer runs on battery power, the LCD brightness is turned on 1 Connect the AC adapter. 2 Lift the LCD panel up. 3 Press the Power button to low. Getting Started 31 Turning ...

User Manual Xp/vista/windows7 Ver.1.5 (English)
Page 38
... provided depending on or off. Shows the remaining battery charge. This key may not be launched. (Optional) For some models, Samsung Magic Doctor is launched. Switches the screen output to the LCD or external monitor when an external monitor (or TV) is installed. Keyboard Chapter 2. You can only use this function when the...
... provided depending on or off. Shows the remaining battery charge. This key may not be launched. (Optional) For some models, Samsung Magic Doctor is launched. Switches the screen output to the LCD or external monitor when an external monitor (or TV) is installed. Keyboard Chapter 2. You can only use this function when the...

User Manual Xp/vista/windows7 Ver.1.5 (English)
Page 53
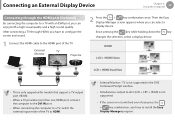
...detailed information, refer to a monitor, TV or projector with the monitor cable (15 pin). 3 Press the + key combination once. LCD + CRT DualView • If the screen is not switched even if you press the + key combination, you can select a display device. Connecting an External Display Device Chapter... on. Since pressing the key while holding down the key changes the selection, select a display device. Then the Easy Display Manager screen appears where you have to install the Easy Display Manager program. • Alternatively, to set dual view. Using the computer 52 ...
...detailed information, refer to a monitor, TV or projector with the monitor cable (15 pin). 3 Press the + key combination once. LCD + CRT DualView • If the screen is not switched even if you press the + key combination, you can select a display device. Connecting an External Display Device Chapter... on. Since pressing the key while holding down the key changes the selection, select a display device. Then the Easy Display Manager screen appears where you have to install the Easy Display Manager program. • Alternatively, to set dual view. Using the computer 52 ...
User Manual Xp/vista/windows7 Ver.1.5 (English)
Page 54
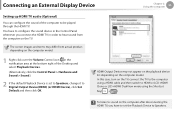
...key while holding down the key changes the selection, select a display device. HDMI LCD + HDMI Clone LCD + HDMI DualView • This is not switched even if you press the + key combination, you have to configure the screen and sound. 1 Connect the HDMI cable to the HDMI port of the TV ... HDMI. • External Monitor / TV is not supported in the DOS Command Prompt window. • Simultaneous output to all 3 (LCD + CRT + HDMI) is not supported. • If the screen is only supported for models that support a TV output port (HDMI). • When a TV provides more than one HDMI port,...
...key while holding down the key changes the selection, select a display device. HDMI LCD + HDMI Clone LCD + HDMI DualView • This is not switched even if you press the + key combination, you have to configure the screen and sound. 1 Connect the HDMI cable to the HDMI port of the TV ... HDMI. • External Monitor / TV is not supported in the DOS Command Prompt window. • Simultaneous output to all 3 (LCD + CRT + HDMI) is not supported. • If the screen is only supported for models that support a TV output port (HDMI). • When a TV provides more than one HDMI port,...
User Manual Xp/vista/windows7 Ver.1.5 (English)
Page 56
The screen images and terms may not appear on the playback device list depending on the TV. In this case, turn on the computer after disconnecting the ... select Playback Devices. (Alternatively, click the Control Panel > Hardware and Sound > Sound.) 2 If the default Playback Device is set the Playback Device to HDMI or LCD+HDMI Clone or LCD+HDMI DualView mode using a HDMI cable and then switch to Speakers.
The screen images and terms may not appear on the playback device list depending on the TV. In this case, turn on the computer after disconnecting the ... select Playback Devices. (Alternatively, click the Control Panel > Hardware and Sound > Sound.) 2 If the default Playback Device is set the Playback Device to HDMI or LCD+HDMI Clone or LCD+HDMI DualView mode using a HDMI cable and then switch to Speakers.

User Manual Xp/vista/windows7 Ver.1.5 (English)
Page 77
...to the brightest level (brightness level 8) when AC power is connected and the brightness is running on the screen to enter the BIOS Setup. 2. Controlling the Brightness Using the Keyboard Adjust the LCD brightness by using the brightness control keys or through the Power Options, follow the procedures below. ► ... item to User Control. 3. Click Control Panel > Hardware and Sound > Power Options. 2. Turn the computer on and press the F2 key when the SAMSUNG logo appears on battery power to extend the battery use time. The LCD brightness can adjust the LCD brightness in 8 levels.
...to the brightest level (brightness level 8) when AC power is connected and the brightness is running on the screen to enter the BIOS Setup. 2. Controlling the Brightness Using the Keyboard Adjust the LCD brightness by using the brightness control keys or through the Power Options, follow the procedures below. ► ... item to User Control. 3. Click Control Panel > Hardware and Sound > Power Options. 2. Turn the computer on and press the F2 key when the SAMSUNG logo appears on battery power to extend the battery use time. The LCD brightness can adjust the LCD brightness in 8 levels.

User Manual Xp/vista/windows7 Ver.1.5 (English)
Page 89
... Extending the Battery Usage Time Decreasing the LCD Brightness Press the + keys on battery power. Alternatively, right-click the power measuring device icon in the notification area of the taskbar and select Power Options. 2 If the following screen appears, select one of the Easy Battery... use the power options of the modes. Using Easy Battery Manager (Optional) Easy Battery Manager is appropriate for normal conditions. Samsung Optimized Samsung Optimized This mode is a power management program that enables using the system software media. It maximizes the system performance when the...
... Extending the Battery Usage Time Decreasing the LCD Brightness Press the + keys on battery power. Alternatively, right-click the power measuring device icon in the notification area of the taskbar and select Power Options. 2 If the following screen appears, select one of the Easy Battery... use the power options of the modes. Using Easy Battery Manager (Optional) Easy Battery Manager is appropriate for normal conditions. Samsung Optimized Samsung Optimized This mode is a power management program that enables using the system software media. It maximizes the system performance when the...


