User Manual Ver.1.0 (English)
Page 9
... Sharpness, Contrast, or Saturation) f 81 Applying effects to videos • Movie Filter mode f 52 Reducing camera shake • Optical Image Stabilization (OIS) f 34 • Viewing files by category in Smart Album f 91 • Viewing files as thumbnails f 92 • Deleting all files on... the memory f 94 • Viewing files as a slide show f 96 • Viewing files on a TV (HDTV, 3D TV) f 104 • Connecting your camera to a computer f...
... Sharpness, Contrast, or Saturation) f 81 Applying effects to videos • Movie Filter mode f 52 Reducing camera shake • Optical Image Stabilization (OIS) f 34 • Viewing files by category in Smart Album f 91 • Viewing files as thumbnails f 92 • Deleting all files on... the memory f 94 • Viewing files as a slide show f 96 • Viewing files on a TV (HDTV, 3D TV) f 104 • Connecting your camera to a computer f...
User Manual Ver.1.0 (English)
Page 10
Contents Basic functions 13 Unpacking 14 Camera layout 15 Using the screen 17 Using the Smart Link button 18 Inserting the battery and memory card 19 Charging the battery and turning on your camera ...... 20 Charging the battery 20 Turning on your camera 20 Performing the initial setup 21 Learning icons ... Setting Wallpaper 29 Using the Help mode 30 Capturing photos 31 Zooming 32 Reducing camera shake (OIS 34 Tips for getting a clearer photo 35 Extended functions 37 Using shooting modes 38 Using the Smart Auto mode 38 Using the Program mode 39 Using the Movie mode 41 Using ...
Contents Basic functions 13 Unpacking 14 Camera layout 15 Using the screen 17 Using the Smart Link button 18 Inserting the battery and memory card 19 Charging the battery and turning on your camera ...... 20 Charging the battery 20 Turning on your camera 20 Performing the initial setup 21 Learning icons ... Setting Wallpaper 29 Using the Help mode 30 Capturing photos 31 Zooming 32 Reducing camera shake (OIS 34 Tips for getting a clearer photo 35 Extended functions 37 Using shooting modes 38 Using the Smart Auto mode 38 Using the Program mode 39 Using the Movie mode 41 Using ...

User Manual Ver.1.0 (English)
Page 11
... the timer 64 Shooting in the dark 65 Preventing red-eye 65 Using the flash 65 Adjusting the ISO sensitivity 67 Changing the camera's focus 68 Using macro 68 Using tracking auto focus 69 Using One Touch Shot 70 Adjusting the focus area 70 Using Face Detection 71 ...Detecting faces 71 Capturing a smile shot 71 Detecting eye blinking 72 Using Smart Face Recognition 72 Registering faces as your favorites (My Star 73 Detecting faces Tips 75 Adjusting brightness and color 76 Adjusting the exposure manually (...
... the timer 64 Shooting in the dark 65 Preventing red-eye 65 Using the flash 65 Adjusting the ISO sensitivity 67 Changing the camera's focus 68 Using macro 68 Using tracking auto focus 69 Using One Touch Shot 70 Adjusting the focus area 70 Using Face Detection 71 ...Detecting faces 71 Capturing a smile shot 71 Detecting eye blinking 72 Using Smart Face Recognition 72 Registering faces as your favorites (My Star 73 Detecting faces Tips 75 Adjusting brightness and color 76 Adjusting the exposure manually (...
User Manual Ver.1.0 (English)
Page 14
... the screen 17 Using the Smart Link button 18 Inserting the battery and memory card ... 19 Charging the battery and turning on your camera 20 Charging the battery 20 Turning on your camera's layout, icons, and basic functions for getting a clearer photo 35 Basic functions Learn about your camera 20 Performing the initial setup... Home screen 26 Browsing the Home screen 28 Rearranging icons 29 Setting Wallpaper 29 Using the Help mode 30 Capturing photos 31 Zooming 32 Reducing camera shake (OIS 34 Tips for shooting.
... the screen 17 Using the Smart Link button 18 Inserting the battery and memory card ... 19 Charging the battery and turning on your camera 20 Charging the battery 20 Turning on your camera's layout, icons, and basic functions for getting a clearer photo 35 Basic functions Learn about your camera 20 Performing the initial setup... Home screen 26 Browsing the Home screen 28 Rearranging icons 29 Setting Wallpaper 29 Using the Help mode 30 Capturing photos 31 Zooming 32 Reducing camera shake (OIS 34 Tips for shooting.
User Manual Ver.1.0 (English)
Page 17
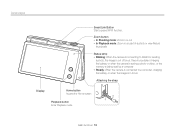
... or out • In Playback mode: Zoom in on part of a photo or view files as thumbnails Status lamp • Blinking: When the camera is connecting to WLAN or sending a photo, the image is out of focus, there is a problem charging the battery, or when the... is being read by a computer • Steady: When the camera is connected to a computer, charging the battery, or when the image is in focus Attaching the strap Display Home button Access the Home screen Playback button Enter Playback mode y x Basic functions 16 Camera layout Smart Link Button Start a preset Wi-Fi function.
... or out • In Playback mode: Zoom in on part of a photo or view files as thumbnails Status lamp • Blinking: When the camera is connecting to WLAN or sending a photo, the image is out of focus, there is a problem charging the battery, or when the... is being read by a computer • Steady: When the camera is connected to a computer, charging the battery, or when the image is in focus Attaching the strap Display Home button Access the Home screen Playback button Enter Playback mode y x Basic functions 16 Camera layout Smart Link Button Start a preset Wi-Fi function.

User Manual Ver.1.0 (English)
Page 18
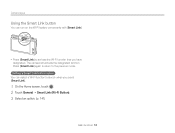
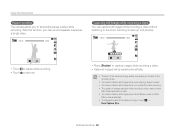
.... 3 Touch the frame area on the screen. • After 3 seconds from being focused, the camera automatically release the shutter. 180˚ Shutter button Using the Self Shot mode In Smart Auto mode and Program mode, flip the screen upward and capture a self portrait while looking at... yourself on the back of the camera. Otherwise, it may break. • When the camera is flipped upward, use . • Please...
.... 3 Touch the frame area on the screen. • After 3 seconds from being focused, the camera automatically release the shutter. 180˚ Shutter button Using the Self Shot mode In Smart Auto mode and Program mode, flip the screen upward and capture a self portrait while looking at... yourself on the back of the camera. Otherwise, it may break. • When the camera is flipped upward, use . • Please...
User Manual Ver.1.0 (English)
Page 19
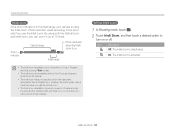
The camera will activate the designated function. Camera layout Using the Smart Link button You can select a Wi-Fi function to launch when you have designated. Setting a Smart Link button option You can turn on the Wi-Fi feature conveniently with [Smart Link]. • Press [Smart Link] to the previous mode. Press [Smart Link] again to return to activate the Wi-Fi function that you press [Smart Link]. 1 On the Home screen, touch . 2 Touch General “ Smart Link (Wi-Fi Button). 3 Select an option. (p. 141) Basic functions 18
The camera will activate the designated function. Camera layout Using the Smart Link button You can select a Wi-Fi function to launch when you have designated. Setting a Smart Link button option You can turn on the Wi-Fi feature conveniently with [Smart Link]. • Press [Smart Link] to the previous mode. Press [Smart Link] again to return to activate the Wi-Fi function that you press [Smart Link]. 1 On the Home screen, touch . 2 Touch General “ Smart Link (Wi-Fi Button). 3 Select an option. (p. 141) Basic functions 18
User Manual Ver.1.0 (English)
Page 24
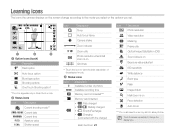
... type option m Shooting options One Touch Shooting option* * The icon appears only in Smart Auto mode. 2 Status icons Icon Description Current shooting mode** Current date Current time Aperture value Shutter speed Icon Description Timer Auto focus frame Camera shake Zoom indicator Zoom ratio Photo resolution when Intelli zoom is on Grid lines...
... type option m Shooting options One Touch Shooting option* * The icon appears only in Smart Auto mode. 2 Status icons Icon Description Current shooting mode** Current date Current time Aperture value Shutter speed Icon Description Timer Auto focus frame Camera shake Zoom indicator Zoom ratio Photo resolution when Intelli zoom is on Grid lines...
User Manual Ver.1.0 (English)
Page 27
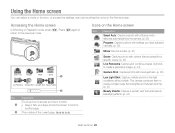
... a series of the current page. ( ) Icons on the Home screen. Accessing the Home screen In Shooting or Playback mode, press [h]. The camera combines them to create a panoramic image. (p. 44) Gesture Shot: Capture photos with options that is brighter and has less blurring. (p. 47) ... can select a mode or function, or access the settings menu by touching the icons on the Home screen Icon Description Smart Auto: Capture a photo with a Scene mode selected automatically by the camera. (p. 38) Program: Capture a photo with settings you have adjusted manually. (p. 39) Movie: Record a video....
... a series of the current page. ( ) Icons on the Home screen. Accessing the Home screen In Shooting or Playback mode, press [h]. The camera combines them to create a panoramic image. (p. 44) Gesture Shot: Capture photos with options that is brighter and has less blurring. (p. 47) ... can select a mode or function, or access the settings menu by touching the icons on the Home screen Icon Description Smart Auto: Capture a photo with a Scene mode selected automatically by the camera. (p. 38) Program: Capture a photo with settings you have adjusted manually. (p. 39) Movie: Record a video....
User Manual Ver.1.0 (English)
Page 28
Using the Home screen Icon Description MobileLink: Send photos or videos to a smart phone. (p. 120) Remote Viewfinder: Use a smart phone as a remote shutter release and see a preview on your smart phone of an image from your camera. (p. 121) Social Sharing: Upload photos or videos to file sharing... websites. (p. 123) Email: Send photos or videos stored on the camera via email. (p. 125) AllShare Play: Upload photos ...
Using the Home screen Icon Description MobileLink: Send photos or videos to a smart phone. (p. 120) Remote Viewfinder: Use a smart phone as a remote shutter release and see a preview on your smart phone of an image from your camera. (p. 121) Social Sharing: Upload photos or videos to file sharing... websites. (p. 123) Email: Send photos or videos stored on the camera via email. (p. 125) AllShare Play: Upload photos ...

User Manual Ver.1.0 (English)
Page 29
Basic functions 28 Touch a page to display all the pages of the Home screen. Using the Home screen Icon Description Album: View files by category in Smart album. (p. 91) Photo Editor: Edit photos with various effects. (p. 99) Wallpapers: Set wallpaper for the Home screen with a desired image. (p. 29) Help: View the help and learn how to use the camera. (p. 30) Settings: Adjust settings to match your preferences. (p. 138) Browsing the Home screen On the Home screen, rotate [Zoom] to the left to display it in full screen view.
Basic functions 28 Touch a page to display all the pages of the Home screen. Using the Home screen Icon Description Album: View files by category in Smart album. (p. 91) Photo Editor: Edit photos with various effects. (p. 99) Wallpapers: Set wallpaper for the Home screen with a desired image. (p. 29) Help: View the help and learn how to use the camera. (p. 30) Settings: Adjust settings to match your preferences. (p. 138) Browsing the Home screen On the Home screen, rotate [Zoom] to the left to display it in full screen view.

User Manual Ver.1.0 (English)
Page 33
... inconsistently. Optical range Zoom indicator Digital range • The Digital zoom is available only in When you capture a photo with the One Touch shooting and Smart Touch AF options. • If you rotate the zoom button, the zoom ratio shown on a subject in Shooting mode and the zoom indicator is in...-up to 25 times. By using the Digital zoom. Capturing photos Zooming You can zoom in up photos by default in the digital range, your camera is using both the 5X Optical zoom and 5X Digital zoom, you zoom in on the screen may be lower than normal.
... inconsistently. Optical range Zoom indicator Digital range • The Digital zoom is available only in When you capture a photo with the One Touch shooting and Smart Touch AF options. • If you rotate the zoom button, the zoom ratio shown on a subject in Shooting mode and the zoom indicator is in...-up to 25 times. By using the Digital zoom. Capturing photos Zooming You can zoom in up photos by default in the digital range, your camera is using both the 5X Optical zoom and 5X Digital zoom, you zoom in on the screen may be lower than normal.
User Manual Ver.1.0 (English)
Page 34
... both the Optical zoom and Intelli zoom, you use the Optical zoom. • The Intelli zoom is not available with the One Touch shooting and Smart Touch AF options. • The Intelli zoom helps you set a 4:3 resolution ratio. Setting Intelli zoom 1 In Shooting mode, touch m. 2 Touch ... Zoom, and then touch a desired option to 10 times. Capturing photos Intelli zoom If the zoom indicator is in the Intelli range, your camera is deactivated. Zoom indicator Optical range Photo resolution when the Intelli zoom is on Intelli range • The Intelli zoom is available only in ...
... both the Optical zoom and Intelli zoom, you use the Optical zoom. • The Intelli zoom is not available with the One Touch shooting and Smart Touch AF options. • The Intelli zoom helps you set a 4:3 resolution ratio. Setting Intelli zoom 1 In Shooting mode, touch m. 2 Touch ... Zoom, and then touch a desired option to 10 times. Capturing photos Intelli zoom If the zoom indicator is in the Intelli range, your camera is deactivated. Zoom indicator Optical range Photo resolution when the Intelli zoom is on Intelli range • The Intelli zoom is available only in ...
User Manual Ver.1.0 (English)
Page 39
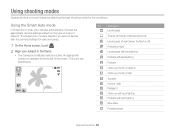
...best shooting mode for various scenes. 1 On the Home screen, touch . 2 Align your camera automatically chooses the appropriate camera settings based on the type of scene it detects. The Smart Auto mode is off) Portraits at night Landscapes with backlighting Portraits with backlighting Portraits Close-up photos... icon appears at night (when the flash is helpful if you are listed below. Icon Description Landscapes Scenes with the camera settings for the conditions. The icons are not familiar with bright white backgrounds Landscapes at the top left of text Sunsets Indoors,...
...best shooting mode for various scenes. 1 On the Home screen, touch . 2 Align your camera automatically chooses the appropriate camera settings based on the type of scene it detects. The Smart Auto mode is off) Portraits at night Landscapes with backlighting Portraits with backlighting Portraits Close-up photos... icon appears at night (when the flash is helpful if you are listed below. Icon Description Landscapes Scenes with the camera settings for the conditions. The icons are not familiar with bright white backgrounds Landscapes at the top left of text Sunsets Indoors,...
User Manual Ver.1.0 (English)
Page 40
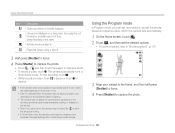
... touch . • While recording a video, touch to pause or touch to resume. • If the camera does not recognize an appropriate scene mode, it uses the default settings for Smart Auto mode. • Even if it changes settings often to select appropriate scenes. Using the Program mode In... Program mode, you use a tripod, the camera may not detect the mode if the subject is moving. • In Smart Auto mode, the camera consumes more battery power, because it detects a face, the camera may not select a portrait mode depending on the subject's position or ...
... touch . • While recording a video, touch to pause or touch to resume. • If the camera does not recognize an appropriate scene mode, it uses the default settings for Smart Auto mode. • Even if it changes settings often to select appropriate scenes. Using the Program mode In... Program mode, you use a tripod, the camera may not detect the mode if the subject is moving. • In Smart Auto mode, the camera consumes more battery power, because it detects a face, the camera may not select a portrait mode depending on the subject's position or ...
User Manual Ver.1.0 (English)
Page 43
Capturing still images while recording a video You can record separate scenes as a single video. Using shooting modes Pause recording The camera allows you pause the video recording. • The quality of images captured while recording a video may be saved automatically. • The ... to capture images while recording a video. • Captured images will be lower than those captured normally. • You cannot capture still images when Smart Movie mode or Movie Filter mode is selected. • To change the size of the recorded video. • You cannot capture still images while ...
Capturing still images while recording a video You can record separate scenes as a single video. Using shooting modes Pause recording The camera allows you pause the video recording. • The quality of images captured while recording a video may be saved automatically. • The ... to capture images while recording a video. • Captured images will be lower than those captured normally. • You cannot capture still images when Smart Movie mode or Movie Filter mode is selected. • To change the size of the recorded video. • You cannot capture still images while ...

User Manual Ver.1.0 (English)
Page 62
...how to set the options in the dark 65 Preventing red-eye 65 Using the flash 65 Adjusting the ISO sensitivity 67 Changing the camera's focus 68 Using macro 68 Using tracking auto focus 69 Using One Touch Shot 70 Adjusting the focus area 70 Using Face Detection 71 ...Detecting faces 71 Capturing a smile shot 71 Detecting eye blinking 72 Using Smart Face Recognition 72 Registering faces as your favorites (My Star 73 Detecting faces Tips 75 Adjusting brightness and color 76 Adjusting the exposure manually (...
...how to set the options in the dark 65 Preventing red-eye 65 Using the flash 65 Adjusting the ISO sensitivity 67 Changing the camera's focus 68 Using macro 68 Using tracking auto focus 69 Using One Touch Shot 70 Adjusting the focus area 70 Using Face Detection 71 ...Detecting faces 71 Capturing a smile shot 71 Detecting eye blinking 72 Using Smart Face Recognition 72 Registering faces as your favorites (My Star 73 Detecting faces Tips 75 Adjusting brightness and color 76 Adjusting the exposure manually (...
User Manual Ver.1.0 (English)
Page 70
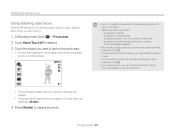
...the subject to track. • If the camera fails to focus, the focus frame will appear in the center of the screen. • Tracking a subject may fail when: - the subject is backlit or you are moving. 1 In Shooting mode, touch m “ Focus Area. 2 Touch Smart Touch AF to select it. 3 Touch ...the subject you want to track in the touch area. • A focus frame appears on the subject and follows the subject as you move the camera. • If you do not select a focus area, the focus...
...the subject to track. • If the camera fails to focus, the focus frame will appear in the center of the screen. • Tracking a subject may fail when: - the subject is backlit or you are moving. 1 In Shooting mode, touch m “ Focus Area. 2 Touch Smart Touch AF to select it. 3 Touch ...the subject you want to track in the touch area. • A focus frame appears on the subject and follows the subject as you move the camera. • If you do not select a focus area, the focus...

User Manual Ver.1.0 (English)
Page 71
...the subject and capture a photo by selecting an appropriate focus area according to capture a photo. If you use this function, you touch on a subject, the camera focuses on the subject automatically and capture a photo. 1 In Shooting mode, touch m “ Focus Area. 2 Touch One Touch Shooting to select it. 3... Touch the subject to your finger. Changing the camera's focus Using One Touch Shot You can get clearer photos by touching the image on the screen. (p. 70) Smart Touch AF: Focus on and track the subject that you touch on the screen. (p. 69) ...
...the subject and capture a photo by selecting an appropriate focus area according to capture a photo. If you use this function, you touch on a subject, the camera focuses on the subject automatically and capture a photo. 1 In Shooting mode, touch m “ Focus Area. 2 Touch One Touch Shooting to select it. 3... Touch the subject to your finger. Changing the camera's focus Using One Touch Shot You can get clearer photos by touching the image on the screen. (p. 70) Smart Touch AF: Focus on and track the subject that you touch on the screen. (p. 69) ...

User Manual Ver.1.0 (English)
Page 72
... options you selected, Face Detection options may not be available. When your subject smiles broadly, your camera can automatically detect a human face. Using Face Detection If you use Smart Face Recognition to register faces and prioritize the focus on them. You can also use Face Detection... options, your camera can detect the smile more easily. Capturing a smile shot The camera automatically releases the shutter when it detects a smiling...
... options you selected, Face Detection options may not be available. When your subject smiles broadly, your camera can automatically detect a human face. Using Face Detection If you use Smart Face Recognition to register faces and prioritize the focus on them. You can also use Face Detection... options, your camera can detect the smile more easily. Capturing a smile shot The camera automatically releases the shutter when it detects a smiling...


