
User Manual Ver.1.0 (English)
Page 1
Click a topic Basic troubleshooting Quick reference Contents Basic functions Extended functions Shooting options Playback/Editing Wireless network Settings Appendixes Index MV900F This user manual includes detailed usage instructions for your camera. Please read this manual thoroughly.
Click a topic Basic troubleshooting Quick reference Contents Basic functions Extended functions Shooting options Playback/Editing Wireless network Settings Appendixes Index MV900F This user manual includes detailed usage instructions for your camera. Please read this manual thoroughly.
User Manual Ver.1.0 (English)
Page 2
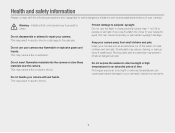
...sunlight or high temperatures for an extended period of small children and animals. Do not handle your camera with the following precautions and usage tips to your camera. Small parts may present physical dangers as well. Moving parts and accessories may cause choking or ...cause permanent damage to avoid dangerous situations and ensure peak performance of your camera's internal components. 1 Keep your camera near the camera. Prolonged exposure to subjects' eyesight. If you use your camera and all accessories out of the reach of time. Health and safety ...
...sunlight or high temperatures for an extended period of small children and animals. Do not handle your camera with the following precautions and usage tips to your camera. Small parts may present physical dangers as well. Moving parts and accessories may cause choking or ...cause permanent damage to avoid dangerous situations and ensure peak performance of your camera's internal components. 1 Keep your camera near the camera. Prolonged exposure to subjects' eyesight. If you use your camera and all accessories out of the reach of time. Health and safety ...
User Manual Ver.1.0 (English)
Page 3
... any reason to avoid potential interference, as the battery or charger, and then contact a Samsung service center. Do not handle the power supply cord or go near medical equipment. Comply with other medical device, turn off your camera when directed by the manufacturer and the independent research group, Wireless Technology Research. Follow...
... any reason to avoid potential interference, as the battery or charger, and then contact a Samsung service center. Do not handle the power supply cord or go near medical equipment. Comply with other medical device, turn off your camera when directed by the manufacturer and the independent research group, Wireless Technology Research. Follow...
User Manual Ver.1.0 (English)
Page 4
... may leak or corrode over time and cause serious damage to come in use. Do not allow the AC charger to your camera, or cause injury. • Samsung is very hot when fired and may result in fire or electric shock. This may cause a fire... or heated batteries may cause a fire or electric shock. Do not drop or subject the camera to the AC charger. Installed batteries may result in fire or electric shock. Use only Samsung-approved batteries, chargers, cables and accessories. • Using unauthorized batteries, chargers, cables or accessories can...
... may leak or corrode over time and cause serious damage to come in use. Do not allow the AC charger to your camera, or cause injury. • Samsung is very hot when fired and may result in fire or electric shock. This may cause a fire... or heated batteries may cause a fire or electric shock. Do not drop or subject the camera to the AC charger. Installed batteries may result in fire or electric shock. Use only Samsung-approved batteries, chargers, cables and accessories. • Using unauthorized batteries, chargers, cables or accessories can...
User Manual Ver.1.0 (English)
Page 5
...sensitive data in public areas or on open networks. • The camera manufacturer is not responsible for any interference problems you experience. If the glass or acrylic parts are broken, visit a Samsung Electronics Service Center to malfunction. Check that infringe on copyrights, trademarks,... public decency ordinances. 4 Data transference and your electronic devices to solve any data transfers that the camera is operating properly before use only Samsung-approved devices or accessories. Information stored on the card may result in or near magnetic fields. Your...
...sensitive data in public areas or on open networks. • The camera manufacturer is not responsible for any interference problems you experience. If the glass or acrylic parts are broken, visit a Samsung Electronics Service Center to malfunction. Check that infringe on copyrights, trademarks,... public decency ordinances. 4 Data transference and your electronic devices to solve any data transfers that the camera is operating properly before use only Samsung-approved devices or accessories. Information stored on the card may result in or near magnetic fields. Your...

User Manual Ver.1.0 (English)
Page 6
...any part of this manual without prior notice due to set the options in this manual are the property of their respective owners. • Camera specifications or contents of this manual may be changed without prior permission. Shooting options 61 Learn how to upgrade of... logo are registered trademarks of the Wi-Fi Alliance. • Trademarks and trade names used in Shooting mode. Playback/Editing 86 Learn how to your camera's layout, icons, and basic functions for shooting. Appendixes 144 Get information about your computer or TV (HDTV, 3D TV). Also, learn how to ...
...any part of this manual without prior notice due to set the options in this manual are the property of their respective owners. • Camera specifications or contents of this manual may be changed without prior permission. Shooting options 61 Learn how to upgrade of... logo are registered trademarks of the Wi-Fi Alliance. • Trademarks and trade names used in Shooting mode. Playback/Editing 86 Learn how to your camera's layout, icons, and basic functions for shooting. Appendixes 144 Get information about your computer or TV (HDTV, 3D TV). Also, learn how to ...
User Manual Ver.1.0 (English)
Page 7
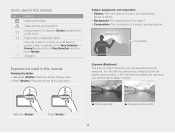
By altering the exposure, your camera determines the exposure. Annotation Expressions used in this manual Pressing the shutter • Half-press [Shutter]: Press the shutter halfway down • Press [... all the way down Subject, background, and composition • Subject: The main object in this manual Icon [] () “ * Function Additional information Safety warnings and precautions Camera buttons. Half-press [Shutter] Press [Shutter] S Normal exposure S Overexposure (too bright) 6 For example, [Shutter] represents the shutter button. You can alter the exposure...
By altering the exposure, your camera determines the exposure. Annotation Expressions used in this manual Pressing the shutter • Half-press [Shutter]: Press the shutter halfway down • Press [... all the way down Subject, background, and composition • Subject: The main object in this manual Icon [] () “ * Function Additional information Safety warnings and precautions Camera buttons. Half-press [Shutter] Press [Shutter] S Normal exposure S Overexposure (too bright) 6 For example, [Shutter] represents the shutter button. You can alter the exposure...

User Manual Ver.1.0 (English)
Page 8
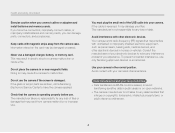
...Set ISO sensitivity options. (p. 67) Photos are blurred when shooting at night. Subjects come out too dark because of the frame. (p. 77) 7 As the camera tries to Spot if a subject is in the edit menu. (p. 102) Photos have dust spots. When the light source is behind the subject or when... there is a high contrast between light and dark areas, the subject may result in camera shake. • Use the Low Light Shot mode. (p. 47) • Turn on the flash. (p. 65) • Set ISO sensitivity options. (p. 67) •...
...Set ISO sensitivity options. (p. 67) Photos are blurred when shooting at night. Subjects come out too dark because of the frame. (p. 77) 7 As the camera tries to Spot if a subject is in the edit menu. (p. 102) Photos have dust spots. When the light source is behind the subject or when... there is a high contrast between light and dark areas, the subject may result in camera shake. • Use the Low Light Shot mode. (p. 47) • Turn on the flash. (p. 65) • Set ISO sensitivity options. (p. 67) •...
User Manual Ver.1.0 (English)
Page 9
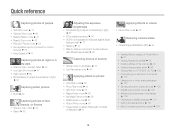
... mode f 58 • Image Adjust (to adjust Sharpness, Contrast, or Saturation) f 81 Applying effects to videos • Movie Filter mode f 52 Reducing camera shake • Optical Image Stabilization (OIS) f 34 • Viewing files by category in Smart Album f 91 • Viewing files as thumbnails...• Viewing files as a slide show f 96 • Viewing files on a TV (HDTV, 3D TV) f 104 • Connecting your camera to a computer f 107 • Using photo or video sharing websites f 123 • Sending photos or videos via email f 126 • Adjusting sound and ...
... mode f 58 • Image Adjust (to adjust Sharpness, Contrast, or Saturation) f 81 Applying effects to videos • Movie Filter mode f 52 Reducing camera shake • Optical Image Stabilization (OIS) f 34 • Viewing files by category in Smart Album f 91 • Viewing files as thumbnails...• Viewing files as a slide show f 96 • Viewing files on a TV (HDTV, 3D TV) f 104 • Connecting your camera to a computer f 107 • Using photo or video sharing websites f 123 • Sending photos or videos via email f 126 • Adjusting sound and ...
User Manual Ver.1.0 (English)
Page 10
... Using the Smart Link button 18 Inserting the battery and memory card 19 Charging the battery and turning on your camera ...... 20 Charging the battery 20 Turning on your camera 20 Performing the initial setup 21 Learning icons 23 Using the touch screen 24 Using the Home screen 26 Accessing...Home screen 26 Browsing the Home screen 28 Rearranging icons 29 Setting Wallpaper 29 Using the Help mode 30 Capturing photos 31 Zooming 32 Reducing camera shake (OIS 34 Tips for getting a clearer photo 35 Extended functions 37 Using shooting modes 38 Using the Smart Auto mode 38 Using ...
... Using the Smart Link button 18 Inserting the battery and memory card 19 Charging the battery and turning on your camera ...... 20 Charging the battery 20 Turning on your camera 20 Performing the initial setup 21 Learning icons 23 Using the touch screen 24 Using the Home screen 26 Accessing...Home screen 26 Browsing the Home screen 28 Rearranging icons 29 Setting Wallpaper 29 Using the Help mode 30 Capturing photos 31 Zooming 32 Reducing camera shake (OIS 34 Tips for getting a clearer photo 35 Extended functions 37 Using shooting modes 38 Using the Smart Auto mode 38 Using ...

User Manual Ver.1.0 (English)
Page 11
... Using the timer 64 Shooting in the dark 65 Preventing red-eye 65 Using the flash 65 Adjusting the ISO sensitivity 67 Changing the camera's focus 68 Using macro 68 Using tracking auto focus 69 Using One Touch Shot 70 Adjusting the focus area 70 Using Face Detection 71 Detecting...
... Using the timer 64 Shooting in the dark 65 Preventing red-eye 65 Using the flash 65 Adjusting the ISO sensitivity 67 Changing the camera's focus 68 Using macro 68 Using tracking auto focus 69 Using One Touch Shot 70 Adjusting the focus area 70 Using Face Detection 71 Detecting...
User Manual Ver.1.0 (English)
Page 13
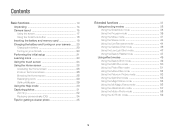
Contents Settings 137 Settings menu 138 Accessing the settings menu 138 Sound 139 Display 139 Connectivity 140 General 141 Appendixes 144 Error messages 145 Camera maintenance 147 Cleaning your camera 147 Using or storing the camera 148 About memory cards 149 About the battery 152 Before contacting a service center 156 Camera specifications 159 Glossary 163 Index 168 12
Contents Settings 137 Settings menu 138 Accessing the settings menu 138 Sound 139 Display 139 Connectivity 140 General 141 Appendixes 144 Error messages 145 Camera maintenance 147 Cleaning your camera 147 Using or storing the camera 148 About memory cards 149 About the battery 152 Before contacting a service center 156 Camera specifications 159 Glossary 163 Index 168 12
User Manual Ver.1.0 (English)
Page 14
...23 Using the touch screen 24 Using the Home screen 26 Accessing the Home screen 26 Icons on your camera's layout, icons, and basic functions for getting a clearer photo 35 Unpacking 14 Camera layout 15 Using the screen 17 Using the Smart Link button 18 Inserting the battery and memory card ...... 19 Charging the battery and turning on your camera 20 Charging the battery 20 Turning on the Home screen 26 Browsing the Home screen 28 Rearranging icons 29 Setting Wallpaper 29 Using the Help...
...23 Using the touch screen 24 Using the Home screen 26 Accessing the Home screen 26 Icons on your camera's layout, icons, and basic functions for getting a clearer photo 35 Unpacking 14 Camera layout 15 Using the screen 17 Using the Smart Link button 18 Inserting the battery and memory card ...... 19 Charging the battery and turning on your camera 20 Charging the battery 20 Turning on the Home screen 26 Browsing the Home screen 28 Rearranging icons 29 Setting Wallpaper 29 Using the Help...
User Manual Ver.1.0 (English)
Page 15
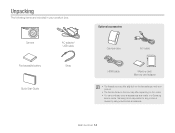
Unpacking The following items are included in the box may differ depending on the model. • You can purchase optional accessories at a retailer or a Samsung service center. Basic functions 14 Samsung is not responsible for any problems caused by using unauthorized accessories. Camera Rechargeable battery AC adapter/ USB cable Strap Quick Start Guide Optional accessories Camera case A/V cable HDMI cable Memory card/ Memory card adapter • The illustrations may differ slightly from the items shipped with your product. • The items included in your product box.
Unpacking The following items are included in the box may differ depending on the model. • You can purchase optional accessories at a retailer or a Samsung service center. Basic functions 14 Samsung is not responsible for any problems caused by using unauthorized accessories. Camera Rechargeable battery AC adapter/ USB cable Strap Quick Start Guide Optional accessories Camera case A/V cable HDMI cable Memory card/ Memory card adapter • The illustrations may differ slightly from the items shipped with your product. • The items included in your product box.
User Manual Ver.1.0 (English)
Page 16
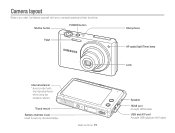
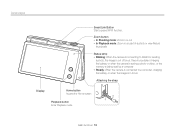
Shutter button POWER button Flash Internal antenna* * Avoid contact with your camera's parts and their functions. Tripod mount Battery chamber cover Insert a memory card and battery Basic functions 15 Microphone AF-assist light/Timer lamp Lens Speaker HDMI port Accepts HDMI cable USB and A/V port Accepts USB cable and A/V cable Camera layout Before you start, familiarize yourself with the internal antenna while using the wireless network.
Shutter button POWER button Flash Internal antenna* * Avoid contact with your camera's parts and their functions. Tripod mount Battery chamber cover Insert a memory card and battery Basic functions 15 Microphone AF-assist light/Timer lamp Lens Speaker HDMI port Accepts HDMI cable USB and A/V port Accepts USB cable and A/V cable Camera layout Before you start, familiarize yourself with the internal antenna while using the wireless network.
User Manual Ver.1.0 (English)
Page 17
... in or out • In Playback mode: Zoom in on part of a photo or view files as thumbnails Status lamp • Blinking: When the camera is connecting to WLAN or sending a photo, the image is out of focus, there is a problem charging the battery, or when the... camera is saving a photo or video, or the memory is being read by a computer • Steady: When the camera is connected to a computer, charging the battery, or when the image is in focus Attaching the strap...
... in or out • In Playback mode: Zoom in on part of a photo or view files as thumbnails Status lamp • Blinking: When the camera is connecting to WLAN or sending a photo, the image is out of focus, there is a problem charging the battery, or when the... camera is saving a photo or video, or the memory is being read by a computer • Steady: When the camera is connected to a computer, charging the battery, or when the image is in focus Attaching the strap...

User Manual Ver.1.0 (English)
Page 18
...screen You can flip 180 degrees upward. 3 Touch the frame area on the screen. • After 3 seconds from being focused, the camera automatically release the shutter. 180˚ Shutter button Using the Self Shot mode In Smart Auto mode and Program mode, flip the screen upward... and capture a self portrait while looking at yourself on the back of the camera. Otherwise, it may cause damage to your camera. Basic functions 17 The screen can take a self-portrait while looking at yourself on the screen by hands and the screen...
...screen You can flip 180 degrees upward. 3 Touch the frame area on the screen. • After 3 seconds from being focused, the camera automatically release the shutter. 180˚ Shutter button Using the Self Shot mode In Smart Auto mode and Program mode, flip the screen upward... and capture a self portrait while looking at yourself on the back of the camera. Otherwise, it may cause damage to your camera. Basic functions 17 The screen can take a self-portrait while looking at yourself on the screen by hands and the screen...
User Manual Ver.1.0 (English)
Page 19
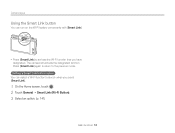
Press [Smart Link] again to return to activate the Wi-Fi function that you press [Smart Link]. 1 On the Home screen, touch . 2 Touch General “ Smart Link (Wi-Fi Button). 3 Select an option. (p. 141) Basic functions 18 Camera layout Using the Smart Link button You can select a Wi-Fi function to launch when you have designated. The camera will activate the designated function. Setting a Smart Link button option You can turn on the Wi-Fi feature conveniently with [Smart Link]. • Press [Smart Link] to the previous mode.
Press [Smart Link] again to return to activate the Wi-Fi function that you press [Smart Link]. 1 On the Home screen, touch . 2 Touch General “ Smart Link (Wi-Fi Button). 3 Select an option. (p. 141) Basic functions 18 Camera layout Using the Smart Link button You can select a Wi-Fi function to launch when you have designated. The camera will activate the designated function. Setting a Smart Link button option You can turn on the Wi-Fi feature conveniently with [Smart Link]. • Press [Smart Link] to the previous mode.

User Manual Ver.1.0 (English)
Page 20
Removing the battery and memory card Push the card gently until it disengages from the camera, and then pull it out of the slot. Battery lock Slide the lock up . Rechargeable battery Rechargeable battery Basic functions 19 Inserting the battery and memory card Learn how to release the battery. Memory card Memory card Insert the battery with the gold-colored contacts facing up. Insert a memory card with the Samsung logo facing up to insert the battery and an optional memory card into the camera.
Removing the battery and memory card Push the card gently until it disengages from the camera, and then pull it out of the slot. Battery lock Slide the lock up . Rechargeable battery Rechargeable battery Basic functions 19 Inserting the battery and memory card Learn how to release the battery. Memory card Memory card Insert the battery with the gold-colored contacts facing up. Insert a memory card with the Samsung logo facing up to insert the battery and an optional memory card into the camera.
User Manual Ver.1.0 (English)
Page 21
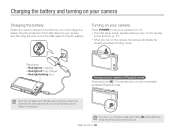
... cable into the AC adapter. If you must charge the battery. Turning on your camera Press [POWER] to turn your camera on or off : Fully charged • Red light blinking: Error Turning on your camera in Playback mode Press and hold [p]. Basic functions 20 Status lamp • Red ...8226; Red light off . • The initial setup screen appears when you turn on your camera by pressing and holding [p] until the status lamp blinks, the camera does not emit any sounds. The camera turns on the camera, the camera will display the recently accessed shooting mode. If you turn on the...
... cable into the AC adapter. If you must charge the battery. Turning on your camera Press [POWER] to turn your camera on or off : Fully charged • Red light blinking: Error Turning on your camera in Playback mode Press and hold [p]. Basic functions 20 Status lamp • Red ...8226; Red light off . • The initial setup screen appears when you turn on your camera by pressing and holding [p] until the status lamp blinks, the camera does not emit any sounds. The camera turns on the camera, the camera will display the recently accessed shooting mode. If you turn on the...


