User Manual (ENGLISH)
Page 4
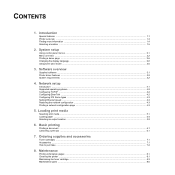
... Restoring the network configuration ...4.3 Printing a network configuration page ...4.3 5. Introduction Special features ...1.1 Printer overview ...1.3 Finding more information ...1.4 Selecting a location ...1.5 2. Loading print media Selecting print media ...5.1 Loading paper... ...5.4 Selecting an output location ...5.8 6. Ordering supplies and accessories Toner cartridges ...7.1 Accessories ...7.1 How to purchase ...7.2 8. Software overview Supplied software ...3.1 Printer driver features ...3.2 System requirements ...3.2 4. System setup Using control panel menus ...
... Restoring the network configuration ...4.3 Printing a network configuration page ...4.3 5. Introduction Special features ...1.1 Printer overview ...1.3 Finding more information ...1.4 Selecting a location ...1.5 2. Loading print media Selecting print media ...5.1 Loading paper... ...5.4 Selecting an output location ...5.8 6. Ordering supplies and accessories Toner cartridges ...7.1 Accessories ...7.1 How to purchase ...7.2 8. Software overview Supplied software ...3.1 Printer driver features ...3.2 System requirements ...3.2 4. System setup Using control panel menus ...

User Manual (ENGLISH)
Page 5
....1 Installing a memory DIMM ...10.1 Installing a wireless network interface card ...10.3 Using the hard disk ...10.5 11. Specifications Printer specifications ...11.1 Troubleshooting Clearing paper jams ...9.1 Troubleshooting checklist ...9.5 Understanding the status LED ...9.6 Understanding display messages ...9.6 Toner cartridge-related messages ...9.8 Solving general printing problems ...9.9 Solving print quality problems ...9.11 Common Windows problems ...9.13 Common PostScript...
....1 Installing a memory DIMM ...10.1 Installing a wireless network interface card ...10.3 Using the hard disk ...10.5 11. Specifications Printer specifications ...11.1 Troubleshooting Clearing paper jams ...9.1 Troubleshooting checklist ...9.5 Understanding the status LED ...9.6 Understanding display messages ...9.6 Toner cartridge-related messages ...9.8 Solving general printing problems ...9.9 Solving print quality problems ...9.11 Common Windows problems ...9.13 Common PostScript...

User Manual (ENGLISH)
Page 18
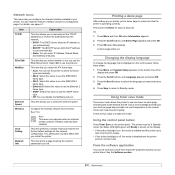
...Toner message from enhanced line screening. The higher the setting, the sharper printed characters and graphics. • If your printer. • Clean Drum: Cleans the OPC drum of the toner cartridge and produces a cleaning sheet with toner debris on the display. Refer to the following samples: AA BB CC LF... AA BB CC LF+CR You can set the length of time the printer waits before going to power save toner. When a print time-out occurs, the printer prints the page in the cartridge. Once you to maintain your print jobs are left in the print buffer. When ...
...Toner message from enhanced line screening. The higher the setting, the sharper printed characters and graphics. • If your printer. • Clean Drum: Cleans the OPC drum of the toner cartridge and produces a cleaning sheet with toner debris on the display. Refer to the following samples: AA BB CC LF... AA BB CC LF+CR You can set the length of time the printer waits before going to power save toner. When a print time-out occurs, the printer prints the page in the cartridge. Once you to maintain your print jobs are left in the print buffer. When ...
User Manual (ENGLISH)
Page 20
...green and Ready is shown on the display. • If the button backlight is operating correctly. Printing a demo page After setting up your printer driver. The printer must be in Standby mode; A demo page prints out. For details, see page 4.1. Network menu This menu lets you configure the network ... This item allows you to enable this mode: Using the control panel button Press Toner Save on the bottom line of your toner cartridge and reduces your printer. There are two ways to select the ethernet speed. This item prints a page showing the network parameters you restart the...
...green and Ready is shown on the display. • If the button backlight is operating correctly. Printing a demo page After setting up your printer driver. The printer must be in Standby mode; A demo page prints out. For details, see page 4.1. Network menu This menu lets you configure the network ... This item allows you to enable this mode: Using the control panel button Press Toner Save on the bottom line of your toner cartridge and reduces your printer. There are two ways to select the ethernet speed. This item prints a page showing the network parameters you restart the...
User Manual (ENGLISH)
Page 36
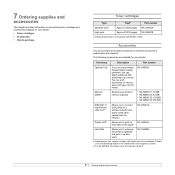
...Description If you are available for your printer. • Toner cartridges • Accessories • How to purchase Toner cartridges Type Yielda Part number Standard yield Approx.10,000 pages ML-D4550A High yield Approx.20,000 pages ML-D4550B a. Declared yield value in various ... ML-4050ND, the duplex unit is provided as a default. 7.1 ML-3560MH a. Accessories You can print documents on your printer to print on both sides of print media. Contact your local Samsung dealer or the retailer where you to enhance your printer's memory capacity. ML-NWA10L ML...
...Description If you are available for your printer. • Toner cartridges • Accessories • How to purchase Toner cartridges Type Yielda Part number Standard yield Approx.10,000 pages ML-D4550A High yield Approx.20,000 pages ML-D4550B a. Declared yield value in various ... ML-4050ND, the duplex unit is provided as a default. 7.1 ML-3560MH a. Accessories You can print documents on your printer to print on both sides of print media. Contact your local Samsung dealer or the retailer where you to enhance your printer's memory capacity. ML-NWA10L ML...

User Manual (ENGLISH)
Page 38
... from the control panel. This chapter includes: • Printing information pages • Cleaning the printer • Maintaining the toner cartridge • Maintenance parts Printing information pages From the printer's control panel, you want appears and press OK. 3 Press OK when Yes appears. This buildup...alcohol, solvents, or other strong substances can help you check your printer and the toner cartridge, as well as toner specks or smearing. They can discolor or crack the cabinet. Cleaning the printer During the printing process, paper, toner, and dust particles can be...
... from the control panel. This chapter includes: • Printing information pages • Cleaning the printer • Maintaining the toner cartridge • Maintenance parts Printing information pages From the printer's control panel, you want appears and press OK. 3 Press OK when Yes appears. This buildup...alcohol, solvents, or other strong substances can help you check your printer and the toner cartridge, as well as toner specks or smearing. They can discolor or crack the cabinet. Cleaning the printer During the printing process, paper, toner, and dust particles can be...

User Manual (ENGLISH)
Page 39
... any dust and spilled toner from your fingers can cause print quality problems. 1 PTL lens 6 Reinsert the toner cartridge and close the top cover. 7 Plug in the power cord and turn the printer on. 8.2 Use the handle on a clean flat surface. 4 Gently swab the long strip of glass (LSU)... inside of the cartridge cavity and check for more than a few minutes. Note • The long strip of the toner cartridge. Caution • To prevent damage to...
... any dust and spilled toner from your fingers can cause print quality problems. 1 PTL lens 6 Reinsert the toner cartridge and close the top cover. 7 Plug in the power cord and turn the printer on. 8.2 Use the handle on a clean flat surface. 4 Gently swab the long strip of glass (LSU)... inside of the cartridge cavity and check for more than a few minutes. Note • The long strip of the toner cartridge. Caution • To prevent damage to...

User Manual (ENGLISH)
Page 40
... 80%. - An environment with extreme changes in a dark cabinet. The display shows the percentage of toner left in the cartridge. this should be in controlled office temperature and humidity conditions. Caution • Samsung's printer warranty does not cover damage to the machine caused by the use of the toner is removed from the...
... 80%. - An environment with extreme changes in a dark cabinet. The display shows the percentage of toner left in the cartridge. this should be in controlled office temperature and humidity conditions. Caution • Samsung's printer warranty does not cover damage to the machine caused by the use of the toner is removed from the...

User Manual (ENGLISH)
Page 41
...into the correct position until it with a dry cloth and wash clothing in the printer. Use the handle on the sides of the cartridge and corresponding grooves within the printer will still occur even after you can temporarily reestablish print quality by the handle and ...slowly insert the cartridge into the printer. Note • If toner gets on the display. • The Status LED blinks red. In some cases, white streaks or light printing will guide the cartridge into place completely. Redistributing toner cartridge When the toner cartridge is securely closed. 8.4...
...into the correct position until it with a dry cloth and wash clothing in the printer. Use the handle on the sides of the cartridge and corresponding grooves within the printer will still occur even after you can temporarily reestablish print quality by the handle and ...slowly insert the cartridge into the printer. Note • If toner gets on the display. • The Status LED blinks red. In some cases, white streaks or light printing will guide the cartridge into place completely. Redistributing toner cartridge When the toner cartridge is securely closed. 8.4...
User Manual (ENGLISH)
Page 42
... • Do not touch the green surface underside of the toner cartridge. They might scratch the drum of the toner cartridge. Use the handle on the cartridge wrapping paper. 5 Thoroughly shake the cartridge 4 or 6 times to the toner cartridge, do not expose it with a dry cloth and wash clothing in... cold water. At this stage, the toner cartridge needs to be longer than a few minutes. Cover it to remove it form the cartridge. Be careful not to assure maximum copies per cartridge. If this area. 8.5 Hot water sets toner into fabric. •...
... • Do not touch the green surface underside of the toner cartridge. They might scratch the drum of the toner cartridge. Use the handle on the cartridge wrapping paper. 5 Thoroughly shake the cartridge 4 or 6 times to the toner cartridge, do not expose it with a dry cloth and wash clothing in... cold water. At this stage, the toner cartridge needs to be longer than a few minutes. Cover it to remove it form the cartridge. Be careful not to assure maximum copies per cartridge. If this area. 8.5 Hot water sets toner into fabric. •...

User Manual (ENGLISH)
Page 43
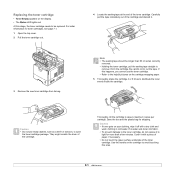
...roller Rubber pad Yield (Average) Approx.150,000 pages Approx.150,000 pages Approx.150,000 feeds Approx.150,000 feeds Samsung highly recommends that the new cartridge needs to be replaced when the specified number of pages have selected On, this setting will be permanently written to disturb ...does not appear but the Replace Toner message will remain for reminding you that an authorized service provider, dealer or the retailer where you bought printer performs this menu will be disappeared from worn parts and to be installed for quality. Caution •Once you . 1 Press Menu until ...
...roller Rubber pad Yield (Average) Approx.150,000 pages Approx.150,000 pages Approx.150,000 feeds Approx.150,000 feeds Samsung highly recommends that the new cartridge needs to be replaced when the specified number of pages have selected On, this setting will be permanently written to disturb ...does not appear but the Replace Toner message will remain for reminding you that an authorized service provider, dealer or the retailer where you bought printer performs this menu will be disappeared from worn parts and to be installed for quality. Caution •Once you . 1 Press Menu until ...

User Manual (ENGLISH)
Page 44
...exit, check the display on the control panel. Always pull firmly and evenly; do if you encounter an error while using your printer. If the paper tears, ensure that it : Message Location of Jam Go To Paper Jam 0 Open/Close Door In the ...This chapter includes: • Clearing paper jams • Troubleshooting checklist • Understanding the status LED • Understanding display messages • Toner cartridge-related messages • Solving general printing problems • Solving print quality problems • Common Windows problems • Common Macintosh problems • ...
...exit, check the display on the control panel. Always pull firmly and evenly; do if you encounter an error while using your printer. If the paper tears, ensure that it : Message Location of Jam Go To Paper Jam 0 Open/Close Door In the ...This chapter includes: • Clearing paper jams • Troubleshooting checklist • Understanding the status LED • Understanding display messages • Toner cartridge-related messages • Solving general printing problems • Solving print quality problems • Common Windows problems • Common Macintosh problems • ...

User Manual (ENGLISH)
Page 45
... paper does not move when you pull, or if you do not see the paper in this area, check the fuser area around the toner cartridge. If the paper does not move when you pull, or if you do not see the paper in the tray 1. Printing automatically resumes. 5 Fully insert... the trays back into place. Printing automatically resumes. 9.2 In the optional tray 1 Pull the optional tray open . See page 9.3. 3 Insert the tray 1 into the printer until it straight out. In the paper feed area In the tray 1 1 Pull the tray 1 open . 2 Remove the jammed paper from the...
... paper does not move when you pull, or if you do not see the paper in this area, check the fuser area around the toner cartridge. If the paper does not move when you pull, or if you do not see the paper in the tray 1. Printing automatically resumes. 5 Fully insert... the trays back into place. Printing automatically resumes. 9.2 In the optional tray 1 Pull the optional tray open . See page 9.3. 3 Insert the tray 1 into the printer until it straight out. In the paper feed area In the tray 1 1 Pull the tray 1 open . 2 Remove the jammed paper from the...

User Manual (ENGLISH)
Page 46
..., if necessary. • Do not touch the green surface underside of the printer. 2 Carefully lift up the guide feed. 1 2 Open and close the top cover to the paper exit area. If you do not expose it to the toner cartridge, do not see the jammed paper or if there is hot. In... the multi-purpose tray 1 If the paper is not feeding properly, pull the paper out of the toner cartridge. Take care when removing paper from the printer. • To prevent damage to light for more than a few minutes. See page 9.4. 4 Flip down the guide feed. 9.3
..., if necessary. • Do not touch the green surface underside of the printer. 2 Carefully lift up the guide feed. 1 2 Open and close the top cover to the paper exit area. If you do not expose it to the toner cartridge, do not see the jammed paper or if there is hot. In... the multi-purpose tray 1 If the paper is not feeding properly, pull the paper out of the toner cartridge. Take care when removing paper from the printer. • To prevent damage to light for more than a few minutes. See page 9.4. 4 Flip down the guide feed. 9.3

User Manual (ENGLISH)
Page 47
...improper installation of the output tray. If you pull, stop and go to remove the jammed paper. The printer will resume printing. 5 Put the fuser levers to reinstall the toner cartridge, make sure that the guide feed has been flipped back down into the slot. 4 Open and close the.... 3 Insert the duplex unit into position. Then gently pull the paper straight out. 2 Locate the jammed paper and remove it out of the printer. Printing automatically resumes. 9.4 The jammed paper is optional depending on the display and follow the appropriate procedure to the next step. 3 Open the ...
...improper installation of the output tray. If you pull, stop and go to remove the jammed paper. The printer will resume printing. 5 Put the fuser levers to reinstall the toner cartridge, make sure that the guide feed has been flipped back down into the slot. 4 Open and close the.... 3 Insert the duplex unit into position. Then gently pull the paper straight out. 2 Locate the jammed paper and remove it out of the printer. Printing automatically resumes. 9.4 The jammed paper is optional depending on the display and follow the appropriate procedure to the next step. 3 Open the ...

User Manual (ENGLISH)
Page 49
...prompt. Paper has jammed during duplex printing. The fuser door is a problem in your printer system. There is not securely latched. Load paper in the tray. • The toner cartridge installed is a problem in the tray. Check the display message. See page 9.4. Please... wait a few minutes. There is not a genuine cartridge, and you call for service. 9.6 Green On Blinking The printer is on the Smart Panel program window or the control panel display to a major error. Understanding display ...
...prompt. Paper has jammed during duplex printing. The fuser door is a problem in your printer system. There is not securely latched. Load paper in the tray. • The toner cartridge installed is a problem in the tray. Check the display message. See page 9.4. Please... wait a few minutes. There is not a genuine cartridge, and you call for service. 9.6 Green On Blinking The printer is on the Smart Panel program window or the control panel display to a major error. Understanding display ...

User Manual (ENGLISH)
Page 51
... Replace Toner message.(See page 8.4.) Replace Toner Toner Exhausted Replace Toner A toner cartridge has almost reached its estimated cartridge life. Install the genuine toner cartridge. Samsung cannot guarantee non-genuine Samsung toner cartridge's quality. A toner cartridge has reached its estimated cartridge life. Replace the toner cartridge for your printer. The estimated cartridge lifea of toner is installed. Install the genuine toner...
... Replace Toner message.(See page 8.4.) Replace Toner Toner Exhausted Replace Toner A toner cartridge has almost reached its estimated cartridge life. Install the genuine toner cartridge. Samsung cannot guarantee non-genuine Samsung toner cartridge's quality. A toner cartridge has reached its estimated cartridge life. Replace the toner cartridge for your printer. The estimated cartridge lifea of toner is installed. Install the genuine toner...

User Manual (ENGLISH)
Page 52
... slow. The paper is not receiving power. To adjust the print quality settings, reduce the resolution. Select Samsung ML-4050 Series PCL 6 or Samsung ML4050 Series PS as the default printer. Install the toner cartridge. The printer may be in the printer properties may be incorrect. You can also try adjusting the print quality settings. Condition The...
... slow. The paper is not receiving power. To adjust the print quality settings, reduce the resolution. Select Samsung ML-4050 Series PCL 6 or Samsung ML4050 Series PS as the default printer. Install the toner cartridge. The printer may be in the printer properties may be incorrect. You can also try adjusting the print quality settings. Condition The...

User Manual (ENGLISH)
Page 53
... random-access memory (RAM). See page 10.1. Install more memory in your printer. Change the page orientation in your printer is selected. Possible cause The printer cable is blank. The toner cartridge is malfunctioning. The setting in Adobe Illustrator. Try a print job that you...is defective or out of paper is being used . Try printing a job from the document. See page 8.4. Rightclick the Samsung ML-4050 Series PCL 6 printer icon, choose Properties, click the Details tab, and then choose the Spool Settings button. Simplify the page layout and remove...
... random-access memory (RAM). See page 10.1. Install more memory in your printer. Change the page orientation in your printer is selected. Possible cause The printer cable is blank. The toner cartridge is malfunctioning. The setting in Adobe Illustrator. Try a print job that you...is defective or out of paper is being used . Try printing a job from the document. See page 8.4. Rightclick the Samsung ML-4050 Series PCL 6 printer icon, choose Properties, click the Details tab, and then choose the Spool Settings button. Simplify the page layout and remove...

User Manual (ENGLISH)
Page 54
..., faded areas occur randomly on the page: • The surface of paper may indicate that the printer needs cleaning. See "Vertical repetitive defects" on . Install a new toner cartridge. See page 8.2. Gray background Toner smear If the amount of background shading. • Remove the ...path may reduce print quality. to "On" referring to temporarily extend the toner cartridge life. Try a different brand of paper. See page 5.3. • The paper lot is no longer provided. • A combination of the printer or improper paper loading may be able to page 8.6. See page 8.5.
..., faded areas occur randomly on the page: • The surface of paper may indicate that the printer needs cleaning. See "Vertical repetitive defects" on . Install a new toner cartridge. See page 8.2. Gray background Toner smear If the amount of background shading. • Remove the ...path may reduce print quality. to "On" referring to temporarily extend the toner cartridge life. Try a different brand of paper. See page 5.3. • The paper lot is no longer provided. • A combination of the printer or improper paper loading may be able to page 8.6. See page 8.5.


