
User Manual (ENGLISH)
Page 7
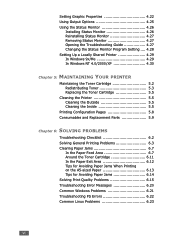
... In Windows 9x/Me 4.29 In Windows NT 4.0/2000/XP 4.30 Chapter 5: MAINTAINING YOUR PRINTER Maintaining the Toner Cartridge 5.2 Redistributing Toner 5.3 Replacing the Toner Cartridge 5.5 Cleaning the Printer 5.5 Cleaning the Outside 5.5 Cleaning the Inside 5.5 Printing Configuration Pages 5.8 Consumables and Replacement Parts 5.9 Chapter 6: SOLVING PROBLEMS Troubleshooting Checklist 6.2 Solving General Printing Problems 6.3 Clearing Paper Jams 6.7 In the...
... In Windows 9x/Me 4.29 In Windows NT 4.0/2000/XP 4.30 Chapter 5: MAINTAINING YOUR PRINTER Maintaining the Toner Cartridge 5.2 Redistributing Toner 5.3 Replacing the Toner Cartridge 5.5 Cleaning the Printer 5.5 Cleaning the Outside 5.5 Cleaning the Inside 5.5 Printing Configuration Pages 5.8 Consumables and Replacement Parts 5.9 Chapter 6: SOLVING PROBLEMS Troubleshooting Checklist 6.2 Solving General Printing Problems 6.3 Clearing Paper Jams 6.7 In the...
User Manual (ENGLISH)
Page 10
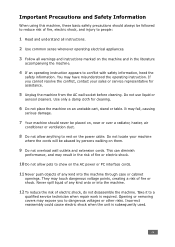
... with safety information, heed the safety information. If you to dangerous voltages or other risks. ix Do not locate your sales or service representative for cleaning. 6 Do not place the machine on an unstable cart, stand or table. Incorrect reassembly could cause electric shock when the unit is required. Important Precautions... interface cords. 11 Never push objects of fire or shock. Use only a damp cloth for assistance. 5 Unplug the machine from the AC wall socket before cleaning.
... with safety information, heed the safety information. If you to dangerous voltages or other risks. ix Do not locate your sales or service representative for cleaning. 6 Do not place the machine on an unstable cart, stand or table. Incorrect reassembly could cause electric shock when the unit is required. Important Precautions... interface cords. 11 Never push objects of fire or shock. Use only a damp cloth for assistance. 5 Unplug the machine from the AC wall socket before cleaning.
User Manual (ENGLISH)
Page 27
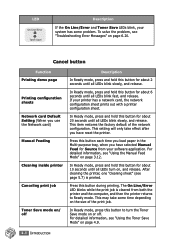
...In Ready mode, press and hold this button for about 10 seconds until all LEDs turn the Toner Save mode on page 6.20. After cleaning the printer, one "cleaning sheet" (see "Troubleshooting Error Messages" on or off Description In Ready mode, press and hold this button for about 6 seconds until all ... to turn on the size of the network configuration. This may take effect after you use the Network card) Manual Feeding Cleaning inside printer Canceling print job Toner Save mode on/ off . If your system has some time depending on , and release. This item restores the ...
...In Ready mode, press and hold this button for about 10 seconds until all LEDs turn the Toner Save mode on page 6.20. After cleaning the printer, one "cleaning sheet" (see "Troubleshooting Error Messages" on or off Description In Ready mode, press and hold this button for about 6 seconds until all ... to turn on the size of the network configuration. This may take effect after you use the Network card) Manual Feeding Cleaning inside printer Canceling print job Toner Save mode on/ off . If your system has some time depending on , and release. This item restores the ...
User Manual (ENGLISH)
Page 32
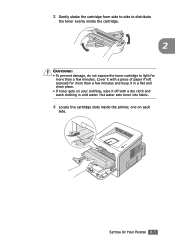
Cover it in a flat and clean place. • If toner gets on each side. Hot water sets toner into fabric. 4 Locate the cartridge slots inside the cartridge. 2 CAUTIONS: • To prevent damage, do not expose the toner cartridge to distribute the toner evenly inside the printer, one on your clothing, wipe it off with a piece of paper if left exposed for more than a few minutes and keep it with a dry cloth and wash clothing in cold water. SETTING UP YOUR PRINTER 2.5 3 Gently shake the cartridge from side to side to light for more than a few minutes.
Cover it in a flat and clean place. • If toner gets on each side. Hot water sets toner into fabric. 4 Locate the cartridge slots inside the cartridge. 2 CAUTIONS: • To prevent damage, do not expose the toner cartridge to distribute the toner evenly inside the printer, one on your clothing, wipe it off with a piece of paper if left exposed for more than a few minutes and keep it with a dry cloth and wash clothing in cold water. SETTING UP YOUR PRINTER 2.5 3 Gently shake the cartridge from side to side to light for more than a few minutes.
User Manual (ENGLISH)
Page 108
This chapter includes: • Maintaining the Toner Cartridge • Cleaning the Printer • Printing Configuration Pages • Consumables and Replacement Parts 5 MAINTAINING YOUR PRINTER This chapter provides suggestions for high-quality and economical printing and information for maintaining the toner cartridge and the printer.
This chapter includes: • Maintaining the Toner Cartridge • Cleaning the Printer • Printing Configuration Pages • Consumables and Replacement Parts 5 MAINTAINING YOUR PRINTER This chapter provides suggestions for high-quality and economical printing and information for maintaining the toner cartridge and the printer.
User Manual (ENGLISH)
Page 110
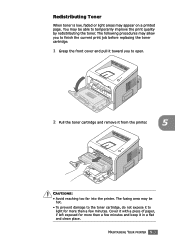
MAINTAINING YOUR PRINTER 5.3 The fusing area may be hot. • To prevent damage to the toner cartridge, do not expose it to light for more than a few minutes. .... 2 Pull the toner cartridge and remove it with a piece of paper, if left exposed for more than a few minutes and keep it in a flat and clean place. Cover it from the printer. 5 CAUTIONS: • Avoid reaching too far into the printer. The following procedures may appear on a printed page.
MAINTAINING YOUR PRINTER 5.3 The fusing area may be hot. • To prevent damage to the toner cartridge, do not expose it to light for more than a few minutes. .... 2 Pull the toner cartridge and remove it with a piece of paper, if left exposed for more than a few minutes and keep it in a flat and clean place. Cover it from the printer. 5 CAUTIONS: • Avoid reaching too far into the printer. The following procedures may appear on a printed page.
User Manual (ENGLISH)
Page 112
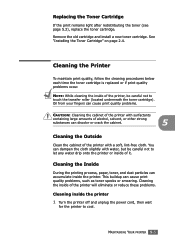
... dust particles can discolor or crack the cabinet. 5 Cleaning the Outside Clean the cabinet of the printer will eliminate or reduce these problems. Cleaning inside the printer 1 Turn the printer off and unplug the power cord, then wait for the printer to cool. This buildup can dampen the cloth slightly ...but be careful not to let any water drip onto the printer or inside the printer. Oil from your fingers can cause print quality problems. CAUTION: Cleaning the cabinet of the printer with a soft, lint-free cloth. Cleaning the inside of it. See "Installing the Toner Cartridge" on...
... dust particles can discolor or crack the cabinet. 5 Cleaning the Outside Clean the cabinet of the printer will eliminate or reduce these problems. Cleaning inside the printer 1 Turn the printer off and unplug the power cord, then wait for the printer to cool. This buildup can dampen the cloth slightly ...but be careful not to let any water drip onto the printer or inside the printer. Oil from your fingers can cause print quality problems. CAUTION: Cleaning the cabinet of the printer with a soft, lint-free cloth. Cleaning the inside of it. See "Installing the Toner Cartridge" on...
User Manual (ENGLISH)
Page 113
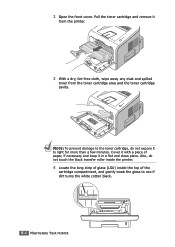
Pull the toner cartridge and remove it in a flat and clean place. Cover it with a piece of the cartridge compartment, and gently swab the glass to see if dirt turns the white cotton black. 5.6 MAINTAINING YOUR PRINTER NOTE: To prevent damage to light for more than a few minutes. Also, do not expose ...it to the toner cartridge, do not touch the black transfer roller inside the printer. 4 Locate the long strip of glass (LSU) inside the top of paper, if necessary and keep it from the printer. 3 With a dry, lint-free cloth, wipe away any dust and spilled toner from the ...
Pull the toner cartridge and remove it in a flat and clean place. Cover it with a piece of the cartridge compartment, and gently swab the glass to see if dirt turns the white cotton black. 5.6 MAINTAINING YOUR PRINTER NOTE: To prevent damage to light for more than a few minutes. Also, do not expose ...it to the toner cartridge, do not touch the black transfer roller inside the printer. 4 Locate the long strip of glass (LSU) inside the top of paper, if necessary and keep it from the printer. 3 With a dry, lint-free cloth, wipe away any dust and spilled toner from the ...
User Manual (ENGLISH)
Page 114
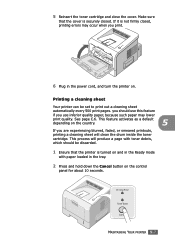
... , printing errors may lower print quality. See page C.6. MAINTAINING YOUR PRINTER 5.7 This process will clean the drum inside the toner cartridge. 5 Reinsert the toner cartridge and close the cover. you should be set to print out a cleaning sheet automatically every 500 print pages. This feature activates as a default... paper may occur when you print. 6 Plug in the tray. 2 Press and hold down the Cancel button on . Make sure that the printer is not firmly closed . If it is turned on the country. 5 If you use this feature if you are experiencing blurred, faded, or...
... , printing errors may lower print quality. See page C.6. MAINTAINING YOUR PRINTER 5.7 This process will clean the drum inside the toner cartridge. 5 Reinsert the toner cartridge and close the cover. you should be set to print out a cleaning sheet automatically every 500 print pages. This feature activates as a default... paper may occur when you print. 6 Plug in the tray. 2 Press and hold down the Cancel button on . Make sure that the printer is not firmly closed . If it is turned on the country. 5 If you use this feature if you are experiencing blurred, faded, or...
User Manual (ENGLISH)
Page 115
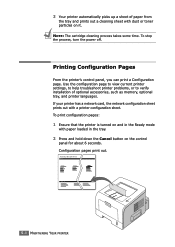
Samsung ML-2250 Series 5.8 MAINTAINING YOUR PRINTER To stop the process, turn the power off. Printing Configuration Pages From the printer's control panel, you can print a Configuration page. Configuration pages print out. To print configuration pages: 1 Ensure that the printer is turned on and in the tray. 2 ...the Cancel button on it. Use the configuration page to view current printer settings, to help troubleshoot printer problems, or to verify installation of paper from the tray and prints out a cleaning sheet with paper loaded in the Ready mode with dust or toner ...
Samsung ML-2250 Series 5.8 MAINTAINING YOUR PRINTER To stop the process, turn the power off. Printing Configuration Pages From the printer's control panel, you can print a Configuration page. Configuration pages print out. To print configuration pages: 1 Ensure that the printer is turned on and in the tray. 2 ...the Cancel button on it. Use the configuration page to view current printer settings, to help troubleshoot printer problems, or to verify installation of paper from the tray and prints out a cleaning sheet with paper loaded in the Ready mode with dust or toner ...
User Manual (ENGLISH)
Page 128
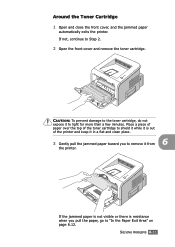
If the jammed paper is not visible or there is out of the printer and keep it to remove it from 6 the printer. SOLVING PROBLEMS 6.11 Place a piece of paper over the top of the toner cartridge to shield ...it while it is resistance when you to light for more than a few minutes. CAUTION: To prevent damage to the toner cartridge, do not expose it in a flat and clean...12. Around the Toner Cartridge 1 Open and close the front cover, and the jammed paper automatically exits the printer.
If the jammed paper is not visible or there is out of the printer and keep it to remove it from 6 the printer. SOLVING PROBLEMS 6.11 Place a piece of paper over the top of the toner cartridge to shield ...it while it is resistance when you to light for more than a few minutes. CAUTION: To prevent damage to the toner cartridge, do not expose it in a flat and clean...12. Around the Toner Cartridge 1 Open and close the front cover, and the jammed paper automatically exits the printer.
User Manual (ENGLISH)
Page 132
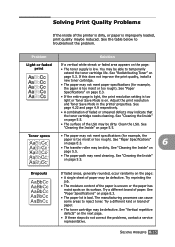
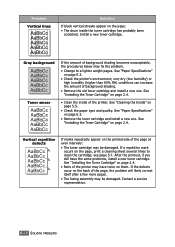
... is too light or Toner Save Mode is uneven or the paper has moist spots on page E.3. 6 • The transfer roller may need cleaning. See "Cleaning the Inside" on . Try reprinting the job. • The moisture content of the paper is on page 5.5. • The paper path ...paper is improperly loaded, print quality maybe reduced. See "Cleaning the Inside" on page 5.5. See "Cleaning the Inside" on page 5.5. • The surface of the LSU may be dirty. Clean the LSU. Solving Print Quality Problems If the inside of the printer is dirty, or paper is too moist or too rough...
... is too light or Toner Save Mode is uneven or the paper has moist spots on page E.3. 6 • The transfer roller may need cleaning. See "Cleaning the Inside" on . Try reprinting the job. • The moisture content of the paper is on page 5.5. • The paper path ...paper is improperly loaded, print quality maybe reduced. See "Cleaning the Inside" on page 5.5. See "Cleaning the Inside" on page 5.5. • The surface of the LSU may be dirty. Clean the LSU. Solving Print Quality Problems If the inside of the printer is dirty, or paper is too moist or too rough...
User Manual (ENGLISH)
Page 133
...toner cartridge and install a new one . If a repetitive mark occurs on page E.3. • Check the printer's environment; See "Installing the Toner Cartridge" on page 2.4. • Clean the inside the toner cartridge has probably been scratched. See "Installing the Toner Cartridge" on page 2.4. •...; Parts of the printer may be damaged. See "Paper Specifications" on the page, print a cleaning sheet several times to a lighter weight pages. See "Installing the Toner Cartridge" on page 5.5. ...
...toner cartridge and install a new one . If a repetitive mark occurs on page E.3. • Check the printer's environment; See "Installing the Toner Cartridge" on page 2.4. • Clean the inside the toner cartridge has probably been scratched. See "Installing the Toner Cartridge" on page 2.4. •...; Parts of the printer may be damaged. See "Paper Specifications" on the page, print a cleaning sheet several times to a lighter weight pages. See "Installing the Toner Cartridge" on page 5.5. ...
User Manual (ENGLISH)
Page 135
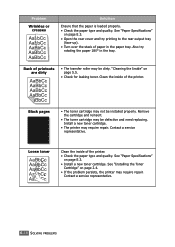
...; Turn over the stack of printouts are dirty • The transfer roller may be installed properly. Loose toner Clean the inside of the printer. • Check the paper type and quality. Clean the inside of the printer. Black pages A • The toner cartridge may require repair. Contact a service representative. 6.18 SOLVING PROBLEMS Contact a service...
...; Turn over the stack of printouts are dirty • The transfer roller may be installed properly. Loose toner Clean the inside of the printer. • Check the paper type and quality. Clean the inside of the printer. Black pages A • The toner cartridge may require repair. Contact a service representative. 6.18 SOLVING PROBLEMS Contact a service...
User Manual (ENGLISH)
Page 165
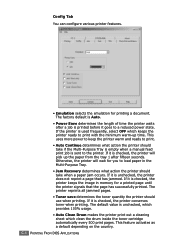
...500 print pages. Otherwise, the printer will pick up time. This feature activates as a default depending on the country. If it is unchecked, which provides 100% usage. • Auto Clean Drum makes the printer print out a cleaning sheet which keeps the printer ready to print with the minimum... warm-up the paper from the tray 1 after a job is unchecked, the printer does not reprint a page that the page has successfully ...
...500 print pages. Otherwise, the printer will pick up time. This feature activates as a default depending on the country. If it is unchecked, which provides 100% usage. • Auto Clean Drum makes the printer print out a cleaning sheet which keeps the printer ready to print with the minimum... warm-up the paper from the tray 1 after a job is unchecked, the printer does not reprint a page that the page has successfully ...
User Manual (ENGLISH)
Page 194
...cleaning sheet, print 5.7 components 1.5 configuration page, print 5.8 connect Ethernet D.10 parallel 2.11 power cord 2.15 USB 2.12 control panel,use 1.7 custom-sized materials, prnt 3.21 D demo page, print 2.16 E envelopes, print 3.14 error, solve 6.20 Ethernet cable, print D.10 F face down output tray 3.5 face up output tray 3.6 Favorite setting, use 4.6 features printer 1.2 printer... N network interface card, install D.7 network printing cable/antenna, connect 2.13 card, install D.7 locally shared printer, set 4.29 n-up printing 4.11 O option, install memory DIMM D.3 paper tray 2 D.11 PS DIMM...
...cleaning sheet, print 5.7 components 1.5 configuration page, print 5.8 connect Ethernet D.10 parallel 2.11 power cord 2.15 USB 2.12 control panel,use 1.7 custom-sized materials, prnt 3.21 D demo page, print 2.16 E envelopes, print 3.14 error, solve 6.20 Ethernet cable, print D.10 F face down output tray 3.5 face up output tray 3.6 Favorite setting, use 4.6 features printer 1.2 printer... N network interface card, install D.7 network printing cable/antenna, connect 2.13 card, install D.7 locally shared printer, set 4.29 n-up printing 4.11 O option, install memory DIMM D.3 paper tray 2 D.11 PS DIMM...
User Manual (ENGLISH)
Page 195
...printing 4.14 PostScript driver access, in Windows A.4 errors 6.22 install, in Windows A.2 preprinted paper, print 3.23 print cleaning sheet 5.7 configuration page 5.8 demo page 2.16 print order, set 4.25 print quality problems 6.15 print quality problems, solve 6.15 ... Remote Control Panel install C.2 start C.4 tabs C.5 S software install 2.19 overview 2.17 reinstall 2.22 system requirements 2.19 uninstall 2.23 specification paper E.3 printer E.2 status monitor, use 4.26 system requirements for Linux B.2 for Windows 2.19 T toner install 2.4 life 5.2 redistribute 5.3 replace 5.5 Toner Save mode,...
...printing 4.14 PostScript driver access, in Windows A.4 errors 6.22 install, in Windows A.2 preprinted paper, print 3.23 print cleaning sheet 5.7 configuration page 5.8 demo page 2.16 print order, set 4.25 print quality problems 6.15 print quality problems, solve 6.15 ... Remote Control Panel install C.2 start C.4 tabs C.5 S software install 2.19 overview 2.17 reinstall 2.22 system requirements 2.19 uninstall 2.23 specification paper E.3 printer E.2 status monitor, use 4.26 system requirements for Linux B.2 for Windows 2.19 T toner install 2.4 life 5.2 redistribute 5.3 replace 5.5 Toner Save mode,...

User Manual (KOREAN)
Page 50
Premium Copy A4 TYPE 6000 PAPER Xerox HA4, Xerox XA4 Clean Copy OHP 필름 : 3M (CG3800 또는 3360 P-POST AVERY 53xx 시리즈 Carbonless Tracing 50
Premium Copy A4 TYPE 6000 PAPER Xerox HA4, Xerox XA4 Clean Copy OHP 필름 : 3M (CG3800 또는 3360 P-POST AVERY 53xx 시리즈 Carbonless Tracing 50


