
User Manual (ENGLISH)
Page 8
... certified as a Class I level during normal operation, user maintenance, or prescribed service condition. WARNING Never operate or service the printer with the protective cover removed from Laser/ Scanner assembly. The reflected beam, although invisible, can damage your eyes. to conform to the requirements of fire, electric shock, and injury to reduce risk...
... certified as a Class I level during normal operation, user maintenance, or prescribed service condition. WARNING Never operate or service the printer with the protective cover removed from Laser/ Scanner assembly. The reflected beam, although invisible, can damage your eyes. to conform to the requirements of fire, electric shock, and injury to reduce risk...

User Manual (ENGLISH)
Page 79
These envelopes may severely damage the printer. 1 Open the Multi-Purpose Tray and slide the extender to its full-length position. 2 Open the rear output tray and pull the extender. 4.14 USING PRINT MATERIALS Before loading envelopes in the Multi-Purpose Tray, make sure that they are undamaged and are not stuck together. • Do not feed stamped envelopes. • Never use envelopes recommended for laser printers. Printing on Envelopes Guidelines • Only use envelopes with clasps, snaps, windows, coated lining, or self-stick adhesives.
These envelopes may severely damage the printer. 1 Open the Multi-Purpose Tray and slide the extender to its full-length position. 2 Open the rear output tray and pull the extender. 4.14 USING PRINT MATERIALS Before loading envelopes in the Multi-Purpose Tray, make sure that they are undamaged and are not stuck together. • Do not feed stamped envelopes. • Never use envelopes recommended for laser printers. Printing on Envelopes Guidelines • Only use envelopes with clasps, snaps, windows, coated lining, or self-stick adhesives.
User Manual (ENGLISH)
Page 82
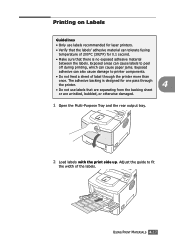
...can also cause damage to fit the width of 200°C (392°F) for 0.1 second. • Make sure that there is designed for laser printers. • Verify that are separating from the backing sheet or are wrinkled, bubbled, or otherwise damaged. 1 Open the Multi-Purpose Tray and the...material between the labels. USING PRINT MATERIALS 4.17 Adjust the guide to printer components. • Do not feed a sheet of label through the printer. 4 • Do not use labels recommended for one pass through the printer more than once. Exposed areas can cause labels to peel off during ...
...can also cause damage to fit the width of 200°C (392°F) for 0.1 second. • Make sure that there is designed for laser printers. • Verify that are separating from the backing sheet or are wrinkled, bubbled, or otherwise damaged. 1 Open the Multi-Purpose Tray and the...material between the labels. USING PRINT MATERIALS 4.17 Adjust the guide to printer components. • Do not feed a sheet of label through the printer. 4 • Do not use labels recommended for one pass through the printer more than once. Exposed areas can cause labels to peel off during ...

User Manual (ENGLISH)
Page 84
... Tray and the rear output tray. 2 Load transparencies with the print side up, and the top with the adhesive strip entering the printer first. Oils deposited on the transparency can cause print quality problems. • Be careful not to fit the width of the transparencies.... Adjust the guide to scratch or leave fingerprints on Transparencies Guidelines • Only use transparencies recommended for use in laser printers. • Ensure that transparencies are not wrinkled, curled, or have any torn edges. • Hold the transparencies by the edges and...
... Tray and the rear output tray. 2 Load transparencies with the print side up, and the top with the adhesive strip entering the printer first. Oils deposited on the transparency can cause print quality problems. • Be careful not to fit the width of the transparencies.... Adjust the guide to scratch or leave fingerprints on Transparencies Guidelines • Only use transparencies recommended for use in laser printers. • Ensure that transparencies are not wrinkled, curled, or have any torn edges. • Hold the transparencies by the edges and...
User Manual (ENGLISH)
Page 157
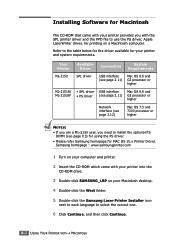
...Samsung Laser Printer Installer icon next to each language to select the correct one. 6 Click Continue, and then click Continue. A.2 USING YOUR PRINTER WITH A MACINTOSH Samsung homepage : www.samsungprinter.com 1 Turn on your computer and printer. 2 Insert the CD-ROM which came with your printer... provides you need to install the optional PS DIMM (see page 2.12) Mac OS 7.5 and 7200 processor or higher NOTES: • If you are a ML-2150...
...Samsung Laser Printer Installer icon next to each language to select the correct one. 6 Click Continue, and then click Continue. A.2 USING YOUR PRINTER WITH A MACINTOSH Samsung homepage : www.samsungprinter.com 1 Turn on your computer and printer. 2 Insert the CD-ROM which came with your printer... provides you need to install the optional PS DIMM (see page 2.12) Mac OS 7.5 and 7200 processor or higher NOTES: • If you are a ML-2150...

User Manual (ENGLISH)
Page 158
7 The Samsung Laser Printer Installer window opens. The window provides two options for opening the User's Guide. 8 Click Install. Click Continue to choose which components will be installed, the ... operating, the alert message appears. If other programmes, and install the software. 9 After the installation is completed, click Restart. Select the installation type. A USING YOUR PRINTER WITH A MACINTOSH A.3
7 The Samsung Laser Printer Installer window opens. The window provides two options for opening the User's Guide. 8 Click Install. Click Continue to choose which components will be installed, the ... operating, the alert message appears. If other programmes, and install the software. 9 After the installation is completed, click Restart. Select the installation type. A USING YOUR PRINTER WITH A MACINTOSH A.3

User Manual (ENGLISH)
Page 208
This chapter includes: • Precautions When Installing Printer Options • Installing Memory and PostScript DIMMs • Installing a Network or Serial Interface Card • Installing an Optional Paper Tray F PROGRAMME INSTALLING PRINTER OPTIONS Your printer is a full-featured laser printer that each user may have different requirements, however, Samsung makes several options available to meet most of your printing needs. Recognizing that has been optimised to enhance the printer's capabilities.
This chapter includes: • Precautions When Installing Printer Options • Installing Memory and PostScript DIMMs • Installing a Network or Serial Interface Card • Installing an Optional Paper Tray F PROGRAMME INSTALLING PRINTER OPTIONS Your printer is a full-featured laser printer that each user may have different requirements, however, Samsung makes several options available to meet most of your printing needs. Recognizing that has been optimised to enhance the printer's capabilities.

User Manual (ENGLISH)
Page 229
...The adhesive material should be able to printing, labels must be stable at 200 °C (392 °F), the printer's fusing temperature. • Arrangement: Only use the rear output tray. • Never print on the same ... See "Printing on Labels" on page 4.19. G.10 SPECIFICATIONS CAUTION: To avoid damaging the printer, use only transparencies recommended for laser printers. • To prevent serious jams, always use the Multi-Purpose Tray to print labels and ... in any direction. • Condition: Do not use in laser printers. See "Printing on Transparencies" on page 4.17.
...The adhesive material should be able to printing, labels must be stable at 200 °C (392 °F), the printer's fusing temperature. • Arrangement: Only use the rear output tray. • Never print on the same ... See "Printing on Labels" on page 4.19. G.10 SPECIFICATIONS CAUTION: To avoid damaging the printer, use only transparencies recommended for laser printers. • To prevent serious jams, always use the Multi-Purpose Tray to print labels and ... in any direction. • Condition: Do not use in laser printers. See "Printing on Transparencies" on page 4.17.


