Universal Print Driver Guide (ENGLISH)
Page 4
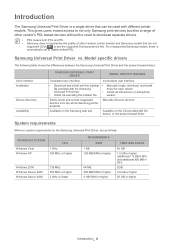
... Universal Print Driver. • Install via CD autorun or Add printer • Install via executing the installer file. Easily locate and access suggested devices from the whole Samsung printer products. Available on the Samsung web site. Available on the CD provided with the device, or... GB or higher Introduction_ 4 Inconsistent user interface. • Download and install with the installer • Manually locate, download, and install file provided with different printer models. wizard. The Samsung Universal Print Driver is automatically set to see the supported...
... Universal Print Driver. • Install via CD autorun or Add printer • Install via executing the installer file. Easily locate and access suggested devices from the whole Samsung printer products. Available on the Samsung web site. Available on the CD provided with the device, or... GB or higher Introduction_ 4 Inconsistent user interface. • Download and install with the installer • Manually locate, download, and install file provided with different printer models. wizard. The Samsung Universal Print Driver is automatically set to see the supported...
User Manual (ENGLISH)
Page 2
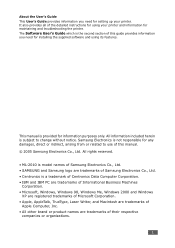
All rights reserved. • ML-2010 is model names of Samsung Electronics Co., Ltd. • SAMSUNG and Samsung logo are trademarks of Samsung Electronics Co., Ltd. • Centronics is subject to use of this guide provides information you need for information purposes only. This manual is provided for installing the supplied software and using your printer. The Software User...
All rights reserved. • ML-2010 is model names of Samsung Electronics Co., Ltd. • SAMSUNG and Samsung logo are trademarks of Samsung Electronics Co., Ltd. • Centronics is subject to use of this guide provides information you need for information purposes only. This manual is provided for installing the supplied software and using your printer. The Software User...
User Manual (ENGLISH)
Page 5
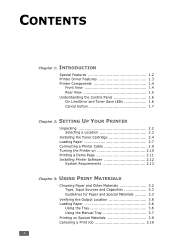
... Paper 2.7 Connecting a Printer Cable 2.9 Turning the Printer on 2.10 Printing a Demo Page 2.11 Installing Printer Software 2.12 System Requirements 2.13 Chapter 3: USING PRINT MATERIALS Choosing Paper and Other Materials 3.2 Type, Input Sources and Capacities 3.3 Guidelines for Paper and Special Materials .......... 3.3 Verifying the Output Location 3.6 Loading Paper 3.6 Using the Tray 3.6 Using the Manual Tray 3.7 Printing...
... Paper 2.7 Connecting a Printer Cable 2.9 Turning the Printer on 2.10 Printing a Demo Page 2.11 Installing Printer Software 2.12 System Requirements 2.13 Chapter 3: USING PRINT MATERIALS Choosing Paper and Other Materials 3.2 Type, Input Sources and Capacities 3.3 Guidelines for Paper and Special Materials .......... 3.3 Verifying the Output Location 3.6 Loading Paper 3.6 Using the Tray 3.6 Using the Manual Tray 3.7 Printing...
User Manual (ENGLISH)
Page 6
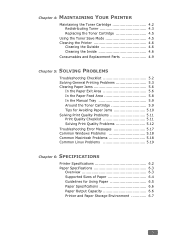
... Cartridge 4.5 Using the Toner Save Mode 4.5 Cleaning the Printer 4.6 Cleaning the Outside 4.6 Cleaning the Inside 4.6 Consumables and Replacement Parts 4.9 Chapter 5: SOLVING PROBLEMS Troubleshooting Checklist 5.2 Solving General Printing Problems 5.3 Clearing Paper Jams 5.6 In the Paper Exit Area 5.6 In the Paper Feed Area 5.8 In the Manual Tray 5.9 Around the Toner Cartridge 5.9 Tips for Avoiding...
... Cartridge 4.5 Using the Toner Save Mode 4.5 Cleaning the Printer 4.6 Cleaning the Outside 4.6 Cleaning the Inside 4.6 Consumables and Replacement Parts 4.9 Chapter 5: SOLVING PROBLEMS Troubleshooting Checklist 5.2 Solving General Printing Problems 5.3 Clearing Paper Jams 5.6 In the Paper Exit Area 5.6 In the Paper Feed Area 5.8 In the Manual Tray 5.9 Around the Toner Cartridge 5.9 Tips for Avoiding...

User Manual (ENGLISH)
Page 15
...; Allows you to form a poster. For details, see Software User's Guide. For details, see Software User's Guide. • This printer meets Energy Star guidelines for energy efficiency. Handle paper flexibly • Manual tray supports one single sheet of paper. For details, See Software User's Guide. • Print Posters. Special Features Dear ABC...
...; Allows you to form a poster. For details, see Software User's Guide. For details, see Software User's Guide. • This printer meets Energy Star guidelines for energy efficiency. Handle paper flexibly • Manual tray supports one single sheet of paper. For details, See Software User's Guide. • Print Posters. Special Features Dear ABC...

User Manual (ENGLISH)
Page 16
... Win 98/Me/ 2000/XP Linux Macintosh Toner Save Y Y N Print quality option Y Y Y Poster printing Y N N Double-sided printing (Manual Duplex) a Y N N Multiple pages per sheet (N-up to page printing Y Y N Scale printing Y Y Y Watermark Y N N Overlay Y N N a. Printer Driver Features Your printer drivers will support the following standard 1 features: • Paper source selection • Paper size, orientation and media...
... Win 98/Me/ 2000/XP Linux Macintosh Toner Save Y Y N Print quality option Y Y Y Poster printing Y N N Double-sided printing (Manual Duplex) a Y N N Multiple pages per sheet (N-up to page printing Y Y N Scale printing Y Y Y Watermark Y N N Overlay Y N N a. Printer Driver Features Your printer drivers will support the following standard 1 features: • Paper source selection • Paper size, orientation and media...
User Manual (ENGLISH)
Page 17
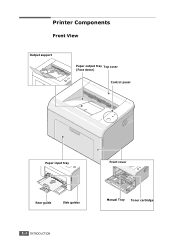
Printer Components Front View Output support Paper output tray Top cover (Face down) Control panel Paper input tray Front cover Rear guide Side guides Manual Tray Toner cartridge 1.4 INTRODUCTION
Printer Components Front View Output support Paper output tray Top cover (Face down) Control panel Paper input tray Front cover Rear guide Side guides Manual Tray Toner cartridge 1.4 INTRODUCTION

User Manual (ENGLISH)
Page 19
If you press the Cancel button while the printer is receiving data, the On Line/Error LED slowly blinks green. Load paper into the tray and the LED stops blinking. See "Troubleshooting Error Messages" on page 5.17. In Manual Feed mode, if there is experiencing an error, such as jammed paper, no paper... in the tray, the On Line/Error LED blinks red. If the On Line/Error lights red, the printer is no paper, the open top or front cover...
If you press the Cancel button while the printer is receiving data, the On Line/Error LED slowly blinks green. Load paper into the tray and the LED stops blinking. See "Troubleshooting Error Messages" on page 5.17. In Manual Feed mode, if there is experiencing an error, such as jammed paper, no paper... in the tray, the On Line/Error LED blinks red. If the On Line/Error lights red, the printer is no paper, the open top or front cover...

User Manual (ENGLISH)
Page 20
... release. This may take some problems. To solve the problem, see "Using the Manual Tray" on page 5.17 Cancel button Function Description Printing demo page In Ready mode, press and hold this button for Source from both the printer and the computer, and then return to turn the Toner Save mode on... page 3.7. Toner Save mode on/off In Ready mode, press this button to Ready mode. Manual feeding Press this LED is cleared from your system has some...
... release. This may take some problems. To solve the problem, see "Using the Manual Tray" on page 5.17 Cancel button Function Description Printing demo page In Ready mode, press and hold this button for Source from both the printer and the computer, and then return to turn the Toner Save mode on... page 3.7. Toner Save mode on/off In Ready mode, press this button to Ready mode. Manual feeding Press this LED is cleared from your system has some...
User Manual (ENGLISH)
Page 35
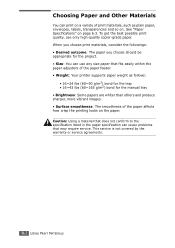
... be appropriate for the project. • Size: You can cause problems that fits easily within the paper adjusters of the paper feeder. • Weight: Your printer supports paper weight as follows: • 16~24 lbs (60~90 g/m2) bond for the tray • 16~43 lbs (60~165 g/m2) bond for... the manual tray • Brightness: Some papers are whiter than others and produce sharper, more vibrant images. • Surface smoothness: The smoothness of print materials, such as...
... be appropriate for the project. • Size: You can cause problems that fits easily within the paper adjusters of the paper feeder. • Weight: Your printer supports paper weight as follows: • 16~24 lbs (60~90 g/m2) bond for the tray • 16~43 lbs (60~165 g/m2) bond for... the manual tray • Brightness: Some papers are whiter than others and produce sharper, more vibrant images. • Surface smoothness: The smoothness of print materials, such as...
User Manual (ENGLISH)
Page 36
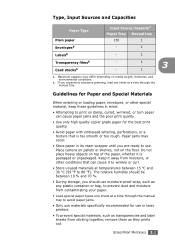
...paper for Paper and Special Materials When selecting or loading paper, envelopes, or other special material, keep these guidelines in laser printers. • To prevent special materials, such as transparencies and label sheets from sticking together, remove them as any plastic ...from moisture, or other conditions that is packaged or unpackaged. Type, Input Sources and Capacities Paper Type Plain paper Input Source/Capacitya Paper Tray Manual tray 150 1 Envelopesb - 1 Labelsb - 1 Transparency filmsb - 1 Card stocksb - 1 a. Paper jams may differ depending on the floor...
...paper for Paper and Special Materials When selecting or loading paper, envelopes, or other special material, keep these guidelines in laser printers. • To prevent special materials, such as transparencies and label sheets from sticking together, remove them as any plastic ...from moisture, or other conditions that is packaged or unpackaged. Type, Input Sources and Capacities Paper Type Plain paper Input Source/Capacitya Paper Tray Manual tray 150 1 Envelopesb - 1 Labelsb - 1 Transparency filmsb - 1 Card stocksb - 1 a. Paper jams may differ depending on the floor...
User Manual (ENGLISH)
Page 38
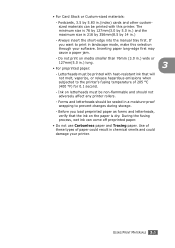
... on media smaller than 76mm (3.0 in.) wide or 127mm(5.0 in landscape mode, make this printer. USING PRINT MATERIALS 3.5 Always insert the short-edge into the manual tray first. Letterheads must be printed with this selection through your printer. If you load preprinted paper as forms and letterheads, verify that will not melt, vaporize...
... on media smaller than 76mm (3.0 in.) wide or 127mm(5.0 in landscape mode, make this printer. USING PRINT MATERIALS 3.5 Always insert the short-edge into the manual tray first. Letterheads must be printed with this selection through your printer. If you load preprinted paper as forms and letterheads, verify that will not melt, vaporize...

User Manual (ENGLISH)
Page 40
...3 Press the Cancel button on the printer to be helpful when you can be printed. USING PRINT MATERIALS 3.7 Note: If you don't press the button after a pause, the paper will be automatically fed into the manual tray. 1 Load the print material in the manual tray with the print side up. ...Manual Feed in the Source option, you want to check the print quality after the first page prints out, and press the Cancel button. Manually loading paper can manually load paper in the manual tray. Repeat this step for Source from the manual tray, load one sheet of paper at a time into the printer...
...3 Press the Cancel button on the printer to be helpful when you can be printed. USING PRINT MATERIALS 3.7 Note: If you don't press the button after a pause, the paper will be automatically fed into the manual tray. 1 Load the print material in the manual tray with the print side up. ...Manual Feed in the Source option, you want to check the print quality after the first page prints out, and press the Cancel button. Manually loading paper can manually load paper in the manual tray. Repeat this step for Source from the manual tray, load one sheet of paper at a time into the printer...

User Manual (ENGLISH)
Page 41
... are printed out. 3.8 USING PRINT MATERIALS Cautions: If you print 20 envelopes in succession, the surface of print material. •Load the envelopes in the manual tray with the flap side down. Note: To prevent labels from sticking to load each other, do not let the printed label sheets stack up... . See the following directions to each type of the top cover may become hot. Please exercise caution. •Load labels in the manual tray. Do not mix types. The stamp area is on Special Materials 1 Open the paper input tray. 2 Load the print material in the...
... are printed out. 3.8 USING PRINT MATERIALS Cautions: If you print 20 envelopes in succession, the surface of print material. •Load the envelopes in the manual tray with the flap side down. Note: To prevent labels from sticking to load each other, do not let the printed label sheets stack up... . See the following directions to each type of the top cover may become hot. Please exercise caution. •Load labels in the manual tray. Do not mix types. The stamp area is on Special Materials 1 Open the paper input tray. 2 Load the print material in the...

User Manual (ENGLISH)
Page 42
...Notes: If you experience jams with print side up as they are printed out. • Place transparencies on a flat surface after removing them from the printer. • Do not use transparencies that are separating from sticking to each other, do not let the printed sheets stack up , short edge first ...and center of the manual tray. •Load transparencies in the manual tray with print side up, and the top with the adhesive strip going first. 3 Notes: • To prevent transparencies from...
...Notes: If you experience jams with print side up as they are printed out. • Place transparencies on a flat surface after removing them from the printer. • Do not use transparencies that are separating from sticking to each other, do not let the printed sheets stack up , short edge first ...and center of the manual tray. •Load transparencies in the manual tray with print side up, and the top with the adhesive strip going first. 3 Notes: • To prevent transparencies from...

User Manual (ENGLISH)
Page 43
...print job from the software application, and then select the correct paper size and type. If more than one print job is moving through the printer and delete the rest of the material. 4 When you must be pressed once for Source from the Control Panel Press the Cancel button on ...special material, you print on the control panel. Pressing the Cancel button cancels only the current job in the printer memory, the Cancel button must select Manual Feed for each job. 3.10 USING PRINT MATERIALS Canceling a Print Job There are two ways to start feeding. •Load ...
...print job from the software application, and then select the correct paper size and type. If more than one print job is moving through the printer and delete the rest of the material. 4 When you must be pressed once for Source from the Control Panel Press the Cancel button on ...special material, you print on the control panel. Pressing the Cancel button cancels only the current job in the printer memory, the Cancel button must select Manual Feed for each job. 3.10 USING PRINT MATERIALS Canceling a Print Job There are two ways to start feeding. •Load ...
User Manual (ENGLISH)
Page 44
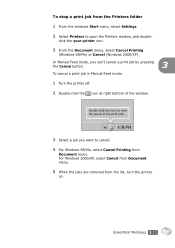
...of the print jobs. 3 Select a job you can't cancel a print job by pressing the Cancel button. 3 To cancel a print job in Manual Feed mode: 1 Turn the printer off. 2 Double-click the icon at right bottom of the window. For Windows 2000/XP, select Cancel from Document menu. 5 When the jobs... are removed from Document menu. In Manual Feed mode, you want to open the Printers window, and double- click the your printer icon. 3 From the Document menu, select Cancel Printing (Windows 98/Me) or Cancel (Windows 2000/XP).
...of the print jobs. 3 Select a job you can't cancel a print job by pressing the Cancel button. 3 To cancel a print job in Manual Feed mode: 1 Turn the printer off. 2 Double-click the icon at right bottom of the window. For Windows 2000/XP, select Cancel from Document menu. 5 When the jobs... are removed from Document menu. In Manual Feed mode, you want to open the Printers window, and double- click the your printer icon. 3 From the Document menu, select Cancel Printing (Windows 98/Me) or Cancel (Windows 2000/XP).
User Manual (ENGLISH)
Page 51
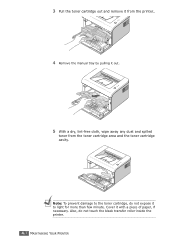
3 Pull the toner cartridge out and remove it from the printer.. 4 Remove the manual tray by pulling it with a piece of paper, if necessary. Also, do not expose it to the toner cartridge, do not touch the black transfer roller inside the printer. 4.7 MAINTAINING YOUR PRINTER Cover it out. 5 With a dry, lint-free cloth, wipe away any dust and spilled toner from the toner cartridge area and the toner cartridge cavity. Note: To prevent damage to light for more than few minute.
3 Pull the toner cartridge out and remove it from the printer.. 4 Remove the manual tray by pulling it with a piece of paper, if necessary. Also, do not expose it to the toner cartridge, do not touch the black transfer roller inside the printer. 4.7 MAINTAINING YOUR PRINTER Cover it out. 5 With a dry, lint-free cloth, wipe away any dust and spilled toner from the toner cartridge area and the toner cartridge cavity. Note: To prevent damage to light for more than few minute.
User Manual (ENGLISH)
Page 52
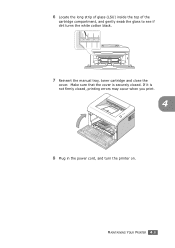
Make sure that the cover is not firmly closed . If it is securely closed , printing errors may occur when you print. 4 8 Plug in the power cord, and turn the printer on. 6 Locate the long strip of glass (LSU) inside the top of the cartridge compartment, and gently swab the glass to see if dirt turns the white cotton black. 7 Reinsert the manual tray, toner cartridge and close the cover. MAINTAINING YOUR PRINTER 4.8
Make sure that the cover is not firmly closed . If it is securely closed , printing errors may occur when you print. 4 8 Plug in the power cord, and turn the printer on. 6 Locate the long strip of glass (LSU) inside the top of the cartridge compartment, and gently swab the glass to see if dirt turns the white cotton black. 7 Reinsert the manual tray, toner cartridge and close the cover. MAINTAINING YOUR PRINTER 4.8
User Manual (ENGLISH)
Page 56
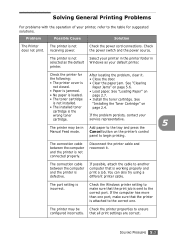
... Jams" on • The installed toner page 2.4. The connection cable between the computer and the printer is not selected as your printer, refer to the tray and press the Manual Feed mode. Select your printer in the printer folder in Add paper to the table for After locating the problem, clear it . cartridge is incorrect...
... Jams" on • The installed toner page 2.4. The connection cable between the computer and the printer is not selected as your printer, refer to the tray and press the Manual Feed mode. Select your printer in the printer folder in Add paper to the table for After locating the problem, clear it . cartridge is incorrect...


