
Universal Print Driver Guide (ENGLISH)
Page 4
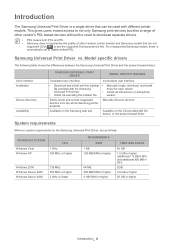
... devices from the whole Samsung printer products. Available on the Samsung web site. Model specific drivers The following table shows the differences between the Samsung Universal Print Driver and the product based drivers: User interface Installation Device discovery Availability SAMSUNG UNIVERSAL PRINT DRIVER MODEL SPECIFIC DRIVERS Consistent user interface. Manually discover devices. Samsung Universal Print Driver vs...
... devices from the whole Samsung printer products. Available on the Samsung web site. Model specific drivers The following table shows the differences between the Samsung Universal Print Driver and the product based drivers: User interface Installation Device discovery Availability SAMSUNG UNIVERSAL PRINT DRIVER MODEL SPECIFIC DRIVERS Consistent user interface. Manually discover devices. Samsung Universal Print Driver vs...
User Manual (ENGLISH)
Page 2
All rights reserved. • ML-1740 Series and Samsung logo are trademarks of this manual. © 2004 Samsung Electronics Co., Ltd. i All information included herein is a trademark of Centronics Data Computer Corporation. • IBM and IBM PC are ...Corporation. • All other brand or product names are trademarks of Samsung Electronics Co., Ltd. • Centronics is subject to use of their respective companies or organizations. This manual is not responsible for information purposes only. Samsung Electronics is provided for any damages, direct or indirect, arising from...
All rights reserved. • ML-1740 Series and Samsung logo are trademarks of this manual. © 2004 Samsung Electronics Co., Ltd. i All information included herein is a trademark of Centronics Data Computer Corporation. • IBM and IBM PC are ...Corporation. • All other brand or product names are trademarks of Samsung Electronics Co., Ltd. • Centronics is subject to use of their respective companies or organizations. This manual is not responsible for information purposes only. Samsung Electronics is provided for any damages, direct or indirect, arising from...
User Manual (ENGLISH)
Page 4
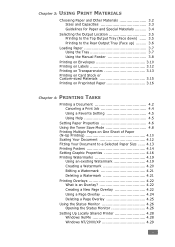
... Output Location 3.5 Printing to the Top Output Tray (Face down) ...... 3.5 Printing to the Rear Output Tray (Face up) ......... 3.6 Loading Paper 3.7 Using the Tray 3.7 Using the Manual Feeder 3.8 Printing on Envelopes 3.10 Printing on Labels 3.12 Printing on Transparencies 3.13 Printing on Card Stock or Custom-sized Materials 3.15 Printing on Preprinted... Page Overlay 4.22 Using a Page Overlay 4.24 Deleting a Page Overlay 4.25 Using the Status Monitor 4.26 Opening the Status Monitor 4.26 Setting Up Locally Shared Printer 4.28 Windows 9x/Me 4.28 Windows NT/2000/XP 4.29 iii
... Output Location 3.5 Printing to the Top Output Tray (Face down) ...... 3.5 Printing to the Rear Output Tray (Face up) ......... 3.6 Loading Paper 3.7 Using the Tray 3.7 Using the Manual Feeder 3.8 Printing on Envelopes 3.10 Printing on Labels 3.12 Printing on Transparencies 3.13 Printing on Card Stock or Custom-sized Materials 3.15 Printing on Preprinted... Page Overlay 4.22 Using a Page Overlay 4.24 Deleting a Page Overlay 4.25 Using the Status Monitor 4.26 Opening the Status Monitor 4.26 Setting Up Locally Shared Printer 4.28 Windows 9x/Me 4.28 Windows NT/2000/XP 4.29 iii

User Manual (ENGLISH)
Page 11
... document has printed, trim off the white edges of each page of each sheet. See page 4.14. 1.2 INTRODUCTION Special Features Your new printer is equipped with excellent quality and high speed • You can print at 600 dots per -minute(A4 size). The text and pictures ...with special features that improve the print quality, giving you a competitive edge. Handle paper flexibly • Standard 250-sheet tray and a 1-sheet Manual Feeder support various sizes and types of paper. You can customize your document are magnified and printed across the selected sheet of paper. • ...
... document has printed, trim off the white edges of each page of each sheet. See page 4.14. 1.2 INTRODUCTION Special Features Your new printer is equipped with excellent quality and high speed • You can print at 600 dots per -minute(A4 size). The text and pictures ...with special features that improve the print quality, giving you a competitive edge. Handle paper flexibly • Standard 250-sheet tray and a 1-sheet Manual Feeder support various sizes and types of paper. You can customize your document are magnified and printed across the selected sheet of paper. • ...

User Manual (ENGLISH)
Page 13
Printer Components Front View Output Support Top output tray (Face down) Control Panel Front Cover Manual Feeder guide Manual Feeder Tray Power switch Paper level indicator 1.4 INTRODUCTION
Printer Components Front View Output Support Top output tray (Face down) Control Panel Front Cover Manual Feeder guide Manual Feeder Tray Power switch Paper level indicator 1.4 INTRODUCTION

User Manual (ENGLISH)
Page 15
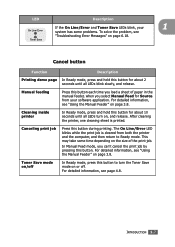
... On Line/ Error LED blinks green fast. If the printer is ready to cancel printing. See "Troubleshooting Error Messages" on and the Toner Save mode is enabled. If you press this button once again, this LED is on page 6.18. In Manual Feed mode, if there is no paper in Ready mode.../Error LED slowly blinks green. If the On Line/Error lights red, the printer is disabled. 1.6 INTRODUCTION If the printer is receiving data, the On Line/Error LED blinks red to print. If you press the Cancel button in the Manual Feeder, the On Line/Error LED blinks red. Load paper into the...
... On Line/ Error LED blinks green fast. If the printer is ready to cancel printing. See "Troubleshooting Error Messages" on and the Toner Save mode is enabled. If you press this button once again, this LED is on page 6.18. In Manual Feed mode, if there is no paper in Ready mode.../Error LED slowly blinks green. If the On Line/Error lights red, the printer is disabled. 1.6 INTRODUCTION If the printer is receiving data, the On Line/Error LED blinks red to print. If you press the Cancel button in the Manual Feeder, the On Line/Error LED blinks red. Load paper into the...
User Manual (ENGLISH)
Page 16
..., press and hold this button each time you load a sheet of the print job. Manual feeding Press this button for about 2 seconds until all LEDs blink slowly, and release. After cleaning the printer, one cleaning sheet is cleared from your 1 system has some time depending on the size... of paper in the manual feeder, when you can't cancel the print job by pressing this button during printing. Cleaning inside printer In Ready mode, press and hold this button to Ready mode. Toner Save mode on/off...
..., press and hold this button each time you load a sheet of the print job. Manual feeding Press this button for about 2 seconds until all LEDs blink slowly, and release. After cleaning the printer, one cleaning sheet is cleared from your 1 system has some time depending on the size... of paper in the manual feeder, when you can't cancel the print job by pressing this button during printing. Cleaning inside printer In Ready mode, press and hold this button to Ready mode. Toner Save mode on/off...

User Manual (ENGLISH)
Page 39
When you choose print materials, consider the followings: • Desired outcome: The paper you choose should be appropriate for the manual feeder • Brightness: Some papers are whiter than others and produce sharper, more vibrant images. • Surface smoothness: The smoothness of the paper affects how ... require service. Choosing Paper and Other Materials You can cause problems that fits easily within the paper adjusters of the paper feeder. • Weight: Your printer supports paper weight as plain paper, envelopes, labels, transparencies and so on.
When you choose print materials, consider the followings: • Desired outcome: The paper you choose should be appropriate for the manual feeder • Brightness: Some papers are whiter than others and produce sharper, more vibrant images. • Surface smoothness: The smoothness of the paper affects how ... require service. Choosing Paper and Other Materials You can cause problems that fits easily within the paper adjusters of the paper feeder. • Weight: Your printer supports paper weight as plain paper, envelopes, labels, transparencies and so on.

User Manual (ENGLISH)
Page 40
..., the maximum capacity may be reduced. b. If you are experiencing excessive jamming, feed one sheet at a time through the manual feeder. USING PRINT MATERIALS 3.3 Sizes and Capacities Size Input Source/Capacitya Tray Manual Feeder Plain Paper Letter (8.5 x 11 in.) 250 Legal (8.5 x 14 in.) 250 Executive (7.25 x 10.5 in.) 250 Folio (8.5 x 13 in...
..., the maximum capacity may be reduced. b. If you are experiencing excessive jamming, feed one sheet at a time through the manual feeder. USING PRINT MATERIALS 3.3 Sizes and Capacities Size Input Source/Capacitya Tray Manual Feeder Plain Paper Letter (8.5 x 11 in.) 250 Legal (8.5 x 14 in.) 250 Executive (7.25 x 10.5 in.) 250 Folio (8.5 x 13 in...

User Manual (ENGLISH)
Page 43
...-up ) The printer always prints to the rear output tray provides the straight paper path. The cover functions as the output tray. Note: Please be careful when you open the rear output tray: 1 Open the rear door by pulling it down from the Manual Feeder to the rear output tray ...if it falls down . Opening the rear output tray might improve the output quality with the following: • envelopes • labels • transparencies To open the rear cover. Printing from the printer.
...-up ) The printer always prints to the rear output tray provides the straight paper path. The cover functions as the output tray. Note: Please be careful when you open the rear output tray: 1 Open the rear door by pulling it down from the Manual Feeder to the rear output tray ...if it falls down . Opening the rear output tray might improve the output quality with the following: • envelopes • labels • transparencies To open the rear cover. Printing from the printer.

User Manual (ENGLISH)
Page 45
... page 4.6. 3 Press the Cancel button on the printer to check the print quality after the first page prints out, and press the Cancel button. Manually loading paper can manually load paper in the manual feeder with the print side up. Using the Manual Feeder If you select Manual Feed in the Source option, you experience a paper... bending the paper. 2 When you print a document, you are printing multiple pages, load the next sheet after each page is started. 5 If you must select Manual Feed for Source from the tray, load one sheet of paper at a time into the...
... page 4.6. 3 Press the Cancel button on the printer to check the print quality after the first page prints out, and press the Cancel button. Manually loading paper can manually load paper in the manual feeder with the print side up. Using the Manual Feeder If you select Manual Feed in the Source option, you experience a paper... bending the paper. 2 When you print a document, you are printing multiple pages, load the next sheet after each page is started. 5 If you must select Manual Feed for Source from the tray, load one sheet of paper at a time into the...

User Manual (ENGLISH)
Page 46
USING PRINT MATERIALS 3.9 Turn the printer on. To cancel a print job in Manual Feed mode: 1 Turn the printer off. 2 Double-click the icon at right bottom of the print jobs. 3 3 Select a job you can't cancel a print job by pressing the Cancel button. In Manual Feed mode, you want to view the queue of the window. For Windows NT/2000/XP, select Cancel from Document menu. 5 When the jobs are removed from Document menu. Double-click this icon to cancel. 4 For Windows 9x/Me, select Cancel Printing from the list.
USING PRINT MATERIALS 3.9 Turn the printer on. To cancel a print job in Manual Feed mode: 1 Turn the printer off. 2 Double-click the icon at right bottom of the print jobs. 3 3 Select a job you can't cancel a print job by pressing the Cancel button. In Manual Feed mode, you want to view the queue of the window. For Windows NT/2000/XP, select Cancel from Document menu. 5 When the jobs are removed from Document menu. Double-click this icon to cancel. 4 For Windows 9x/Me, select Cancel Printing from the list.

User Manual (ENGLISH)
Page 47
These envelopes may severely damage the printer. 1 Open the rear output tray. Load the envelopes into the manual feeder with clasps, snaps, windows, coated lining, or self-stick adhesives. Printing on the left side and the end of the envelope with the ... 3.10 USING PRINT MATERIALS The stamp area is on Envelopes Guidelines • Only use envelopes with the flap side down. Before loading envelopes in the manual feeder, make sure that they are undamaged and are not stuck together. • Do not feed stamped envelopes. • Never use envelopes recommended for laser printers.
These envelopes may severely damage the printer. 1 Open the rear output tray. Load the envelopes into the manual feeder with clasps, snaps, windows, coated lining, or self-stick adhesives. Printing on the left side and the end of the envelope with the ... 3.10 USING PRINT MATERIALS The stamp area is on Envelopes Guidelines • Only use envelopes with the flap side down. Before loading envelopes in the manual feeder, make sure that they are undamaged and are not stuck together. • Do not feed stamped envelopes. • Never use envelopes recommended for laser printers.

User Manual (ENGLISH)
Page 48
Note: Please be careful when you must select Manual Feed for Source from the software application, and then select the correct paper size and type. Close the rear output tray after the 3 printing is started. USING PRINT MATERIALS 3.11 The inside of the printer maybe hot. 5 Printing is completed. For details, see page 4.6. 4 Press the Cancel button to start feeding. 3 When you print on envelopes, you open the rear cover.
Note: Please be careful when you must select Manual Feed for Source from the software application, and then select the correct paper size and type. Close the rear output tray after the 3 printing is started. USING PRINT MATERIALS 3.11 The inside of the printer maybe hot. 5 Printing is completed. For details, see page 4.6. 4 Press the Cancel button to start feeding. 3 When you print on envelopes, you open the rear cover.

User Manual (ENGLISH)
Page 49
Printing on Labels Guidelines • Only use labels recommended for laser printers. • Verify that the labels' adhesive material can also cause damage to printer components. • Do not feed a sheet of label through the printer. • Do not use labels that there is designed for 0.1 second. &#...8226; Make sure that are separating from the backing sheet or are wrinkled, bubbled, or otherwise damaged. 1 Open the rear output tray. Load labels in the manual feeder with print side...
Printing on Labels Guidelines • Only use labels recommended for laser printers. • Verify that the labels' adhesive material can also cause damage to printer components. • Do not feed a sheet of label through the printer. • Do not use labels that there is designed for 0.1 second. &#...8226; Make sure that are separating from the backing sheet or are wrinkled, bubbled, or otherwise damaged. 1 Open the rear output tray. Load labels in the manual feeder with print side...

User Manual (ENGLISH)
Page 50
Note: Please be careful when you must select Manual Feed for use in the manual feeder with the adhesive strip going first. Note: To prevent labels from the software... Open the rear output tray. 3 When you print on labels, you open the rear cover. The inside of the printer maybe hot. 4 Press the Cancel button to scratch or leave fingerprints on Transparencies Guidelines • Only use transparencies recommended for...the edges and avoid touching the print side. USING PRINT MATERIALS 3.13 Load transparencies in laser printers. • Ensure that transparencies are printed out.
Note: Please be careful when you must select Manual Feed for use in the manual feeder with the adhesive strip going first. Note: To prevent labels from the software... Open the rear output tray. 3 When you print on labels, you open the rear cover. The inside of the printer maybe hot. 4 Press the Cancel button to scratch or leave fingerprints on Transparencies Guidelines • Only use transparencies recommended for...the edges and avoid touching the print side. USING PRINT MATERIALS 3.13 Load transparencies in laser printers. • Ensure that transparencies are printed out.

User Manual (ENGLISH)
Page 51
2 Adjust the guide to fit the width of the printer maybe hot. 4 Press the Cancel button to each other, do not let the printed sheets stack up as they are printed out. • Place transparencies ... from the software application, and then select the correct paper size and type. For details, see page 4.6. Note: Please be careful when you must select Manual Feed for Source from the printer. 3.14 USING PRINT MATERIALS
2 Adjust the guide to fit the width of the printer maybe hot. 4 Press the Cancel button to each other, do not let the printed sheets stack up as they are printed out. • Place transparencies ... from the software application, and then select the correct paper size and type. For details, see page 4.6. Note: Please be careful when you must select Manual Feed for Source from the printer. 3.14 USING PRINT MATERIALS

User Manual (ENGLISH)
Page 52
... material. Inserting paper long-edge first may cause a paper jam. • Do not print on 76mm x 127mm sized media with loading into the Manual Feeder first. Guidelines 3 • Always insert the short-edge into the tray, open the rear output tray. 1 Open the rear output tray. ...USING PRINT MATERIALS 3.15 If you print on media smaller than 76mm (3.0 in.) wide or 127mm(5.0 in landscape mode, make this printer. Load print material with this selection through your software. The minimum size is 76 by 127mm(3.0 by 5.0 in.) and the maximum size is ...
... material. Inserting paper long-edge first may cause a paper jam. • Do not print on 76mm x 127mm sized media with loading into the Manual Feeder first. Guidelines 3 • Always insert the short-edge into the tray, open the rear output tray. 1 Open the rear output tray. ...USING PRINT MATERIALS 3.15 If you print on media smaller than 76mm (3.0 in.) wide or 127mm(5.0 in landscape mode, make this printer. Load print material with this selection through your software. The minimum size is 76 by 127mm(3.0 by 5.0 in.) and the maximum size is ...

User Manual (ENGLISH)
Page 53
... size and type. Printing on Preprinted Paper Preprinted paper is paper that has some type of printing placed on it before it may cause the printer a mechanical trouble. 3.16 USING PRINT MATERIALS During the fusing process, wet ink can come off preprinted paper. 3 When you print on card...with heat-resistant ink that has a preprinted logo at the top of the printer driver properties, click Add Custom button and set the size manually. Note: Please avoice using carbon paper because it is sent through the printer (paper that will not melt, vaporize, or release hazardous emissions when subjected ...
... size and type. Printing on Preprinted Paper Preprinted paper is paper that has some type of printing placed on it before it may cause the printer a mechanical trouble. 3.16 USING PRINT MATERIALS During the fusing process, wet ink can come off preprinted paper. 3 When you print on card...with heat-resistant ink that has a preprinted logo at the top of the printer driver properties, click Add Custom button and set the size manually. Note: Please avoice using carbon paper because it is sent through the printer (paper that will not melt, vaporize, or release hazardous emissions when subjected ...

User Manual (ENGLISH)
Page 62
... is set the paper type to Thick for the best printing. If you use cotton paper, set to Auto Select, the printer automatically selects paper from the Manual Feeder first and then from 20lb to 24lb, or other colored paper, select Color Paper. For further information on print materials,... one sheet at a time into the the printer. PRINTING TASKS 4.7 Make sure the Type is set to the corresponding paper tray. If you use recycled paper, which weights from the Tray. To use the Manual Feeder to print using special materials. Manual Feed source is used when you load a ...
... is set the paper type to Thick for the best printing. If you use cotton paper, set to Auto Select, the printer automatically selects paper from the Manual Feeder first and then from 20lb to 24lb, or other colored paper, select Color Paper. For further information on print materials,... one sheet at a time into the the printer. PRINTING TASKS 4.7 Make sure the Type is set to the corresponding paper tray. If you use recycled paper, which weights from the Tray. To use the Manual Feeder to print using special materials. Manual Feed source is used when you load a ...

