
User Guide
Page 3
Contents 1 Introduction Special Features 1.1 Printer Components 1.3 2 Setting Up Your Printer STEP 1: Unpack Your Printer 2.1 STEP 2: Install the Toner Cartridge 2.2 STEP 3: Loading Paper 2.4 STEP 4: Connect to the Computer with a Parallel Cable - 2.6 STEP 5: Turn on the Printer 2.7 STEP 6: Print a Demo Page 2.7 STEP 7: Install the Printer Software 2.8 Installing USB driver in Windows 2.13 3 Using Control Panel Control Panel Buttons 3.1 Control...
Contents 1 Introduction Special Features 1.1 Printer Components 1.3 2 Setting Up Your Printer STEP 1: Unpack Your Printer 2.1 STEP 2: Install the Toner Cartridge 2.2 STEP 3: Loading Paper 2.4 STEP 4: Connect to the Computer with a Parallel Cable - 2.6 STEP 5: Turn on the Printer 2.7 STEP 6: Print a Demo Page 2.7 STEP 7: Install the Printer Software 2.8 Installing USB driver in Windows 2.13 3 Using Control Panel Control Panel Buttons 3.1 Control...

User Guide
Page 4
... 5.9 Setting Graphic Properties 5.11 Printing Watermarks 5.13 Using Page Overlay 5.16 Reprinting the Last Page 5.20 Printing in a Network Environment 5.21 6 Maintaining Your Printer Maintaining the Toner Cartridge 6.1 Cleaning the Printer 6.4 7 Problem Solving Troubleshooting Checklist 7.1 Solving General Printing Problems 7.2 Clearing Paper Jams 7.6 Solving Print Quality Problems 7.11 Troubleshooting Error Messages 7.17 Common Windows...
... 5.9 Setting Graphic Properties 5.11 Printing Watermarks 5.13 Using Page Overlay 5.16 Reprinting the Last Page 5.20 Printing in a Network Environment 5.21 6 Maintaining Your Printer Maintaining the Toner Cartridge 6.1 Cleaning the Printer 6.4 7 Problem Solving Troubleshooting Checklist 7.1 Solving General Printing Problems 7.2 Clearing Paper Jams 7.6 Solving Print Quality Problems 7.11 Troubleshooting Error Messages 7.17 Common Windows...

User Guide
Page 15
N STEP 7: Install the Printer Software Installing USB driver in this chapter are: N STEP 1: Unpack Your Printer N STEP 2: Install the Toner Cartridge N STEP 3: Load Paper N STEP 4: Connect to the Computer with a Parallel Cable N STEP 5: Turn on setting up your printer. 2CHAPTER Setting Up Your Printer This chapter provides step by step information on the Printer N STEP 6: Print a Demo Page! Topics included in Windows
N STEP 7: Install the Printer Software Installing USB driver in this chapter are: N STEP 1: Unpack Your Printer N STEP 2: Install the Toner Cartridge N STEP 3: Load Paper N STEP 4: Connect to the Computer with a Parallel Cable N STEP 5: Turn on setting up your printer. 2CHAPTER Setting Up Your Printer This chapter provides step by step information on the Printer N STEP 6: Print a Demo Page! Topics included in Windows

User Guide
Page 16
SETTING UP YOUR PRINTER 2.1 Toner cartridge CD-ROM Power cord Paper Output Support Setup Guide 2 Carefully remove all accessories from the printer. 3 Attach the supplied paper output support as shown. Unpack Your Printer 1 Remove the printer and all packing tapes from the packing carton. Make sure that your printer has been packed with the following items: Notes...
SETTING UP YOUR PRINTER 2.1 Toner cartridge CD-ROM Power cord Paper Output Support Setup Guide 2 Carefully remove all accessories from the printer. 3 Attach the supplied paper output support as shown. Unpack Your Printer 1 Remove the printer and all packing tapes from the packing carton. Make sure that your printer has been packed with the following items: Notes...

User Guide
Page 17
... pull it toward you to open. 2 Remove the toner cartridge from side to side to light for more than a few minutes. Hot water sets toner into fabric. 2.2 SETTING UP YOUR PRINTER Discard the paper. 3 Gently shake the cartridge from its bag and remove the paper covering the toner... cartridge completely out of the cartridge. Cover it off with a piece of paper, if left exposed for more than a...
... pull it toward you to open. 2 Remove the toner cartridge from side to side to light for more than a few minutes. Hot water sets toner into fabric. 2.2 SETTING UP YOUR PRINTER Discard the paper. 3 Gently shake the cartridge from its bag and remove the paper covering the toner... cartridge completely out of the cartridge. Cover it off with a piece of paper, if left exposed for more than a...

User Guide
Page 18
Note: When printing text at 5% coverage, you can expect a toner cartridge life of approximately 2,500 pages (1,000 pages for the toner cartridge that the cover is shipped with the printer). Make sure that is securely closed. SETTING UP YOUR PRINTER 2.3 4 Locate the cartridge slots inside the printer, one on each side. Install the Toner Cartridge 5 Grasp the handle and insert the cartridge in the printer until it snaps into place. 6 Close the front cover.
Note: When printing text at 5% coverage, you can expect a toner cartridge life of approximately 2,500 pages (1,000 pages for the toner cartridge that the cover is shipped with the printer). Make sure that is securely closed. SETTING UP YOUR PRINTER 2.3 4 Locate the cartridge slots inside the printer, one on each side. Install the Toner Cartridge 5 Grasp the handle and insert the cartridge in the printer until it snaps into place. 6 Close the front cover.

User Guide
Page 59
...3 Click OK. See below. You have the following options: • Printer Setting: If you don't need to use less toner on the control panel of your toner cartridge and reduce your software application, access the printer properties. Note: To enable or disable the Toner Save mode from the ...control panel, the Toner Save Mode option in print quality. See page 5.1 to Printer Setting. The printer must be in Ready mode ...
...3 Click OK. See below. You have the following options: • Printer Setting: If you don't need to use less toner on the control panel of your toner cartridge and reduce your software application, access the printer properties. Note: To enable or disable the Toner Save mode from the ...control panel, the Toner Save Mode option in print quality. See page 5.1 to Printer Setting. The printer must be in Ready mode ...

User Guide
Page 79
6CHAPTER Maintaining Your Printer This chapter provides suggestions for maintaining the toner cartridge and printer. Topics included in this chapter are: N Maintaining the Toner Cartridge N Cleaning the Printer
6CHAPTER Maintaining Your Printer This chapter provides suggestions for maintaining the toner cartridge and printer. Topics included in this chapter are: N Maintaining the Toner Cartridge N Cleaning the Printer

User Guide
Page 80
..." on page 5.6. When printing text at 5% coverage, a new toner cartridge lasts an average of 2,500 pages. (The original toner cartridge supplied with the printer lasts an average of the toner cartridge and reduce your cost per page, but will reduce print quality. The ... pages.) Recycling toner After installing a new toner cartridge (see page 2.2), follow the cartridge instructions included in the printer properties. Selecting this option will be lit. Toner cartridge life expectancy The life of the toner cartridge depends on the printer control panel. Refer to light for use. &#...
..." on page 5.6. When printing text at 5% coverage, a new toner cartridge lasts an average of 2,500 pages. (The original toner cartridge supplied with the printer lasts an average of the toner cartridge and reduce your cost per page, but will reduce print quality. The ... pages.) Recycling toner After installing a new toner cartridge (see page 2.2), follow the cartridge instructions included in the printer properties. Selecting this option will be lit. Toner cartridge life expectancy The life of the toner cartridge depends on the printer control panel. Refer to light for use. &#...
User Guide
Page 81
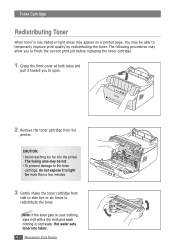
...the toner. You may appear on your clothing, wipe it to light for more than a few minutes. 3 Gently shake the toner cartridge from the printer. The following procedures may be able to temporarily improve print quality by redistributing the toner. CAUTION: • Avoid reaching too far into ...fabric. 6.2 MAINTAINING YOUR PRINTER Note: If the toner gets on a printed page. Toner Cartridge Redistributing Toner When toner is low, faded or light areas may be hot. • To prevent damage to...
...the toner. You may appear on your clothing, wipe it to light for more than a few minutes. 3 Gently shake the toner cartridge from the printer. The following procedures may be able to temporarily improve print quality by redistributing the toner. CAUTION: • Avoid reaching too far into ...fabric. 6.2 MAINTAINING YOUR PRINTER Note: If the toner gets on a printed page. Toner Cartridge Redistributing Toner When toner is low, faded or light areas may be hot. • To prevent damage to...
User Guide
Page 82
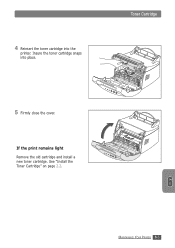
See "Install the Toner Cartridge" on page 2.2. MAINTAINING YOUR PRINTER 6.3 Insure the toner cartridge snaps into the printer. 4 Reinsert the toner cartridge into place. Toner Cartridge 5 Firmly close the cover. If the print remains light Remove the old cartridge and install a new toner cartridge.
See "Install the Toner Cartridge" on page 2.2. MAINTAINING YOUR PRINTER 6.3 Insure the toner cartridge snaps into the printer. 4 Reinsert the toner cartridge into place. Toner Cartridge 5 Firmly close the cover. If the print remains light Remove the old cartridge and install a new toner cartridge.
User Guide
Page 83
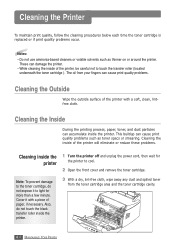
... Open the front cover and remove the toner cartridge. The oil from the toner cartridge area and the toner cartridge cavity. 6.4 MAINTAINING YOUR PRINTER Note: To prevent damage to light for the printer to touch the transfer roller (located underneath the toner cartridge ). Also, do not expose it with ...dust and spilled toner from your fingers can damage the printer. • While cleaning the inside the printer. Cleaning the Printer To maintain print quality, follow the cleaning procedures below each time the toner cartridge is replaced or if print quality problems occur. Cleaning ...
... Open the front cover and remove the toner cartridge. The oil from the toner cartridge area and the toner cartridge cavity. 6.4 MAINTAINING YOUR PRINTER Note: To prevent damage to light for the printer to touch the transfer roller (located underneath the toner cartridge ). Also, do not expose it with ...dust and spilled toner from your fingers can damage the printer. • While cleaning the inside the printer. Cleaning the Printer To maintain print quality, follow the cleaning procedures below each time the toner cartridge is replaced or if print quality problems occur. Cleaning ...
User Guide
Page 84
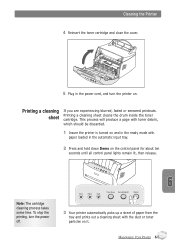
... debris, which should be discarded. 1 Insure the printer is turned on and in the ready mode with the dust or toner particles on it. MAINTAINING YOUR PRINTER 6.5 Printing a cleaning sheet cleans the drum inside the toner cartridge. Printing a cleaning sheet If you are experiencing blurred..., faded or smeared printouts. Note: The cartridge cleaning process takes some time. To stop the printing, turn the printer on. Cleaning the Printer 4 Reinsert the toner cartridge and close the cover. 5 Plug in the automatic input tray. 2 Press and...
... debris, which should be discarded. 1 Insure the printer is turned on and in the ready mode with the dust or toner particles on it. MAINTAINING YOUR PRINTER 6.5 Printing a cleaning sheet cleans the drum inside the toner cartridge. Printing a cleaning sheet If you are experiencing blurred..., faded or smeared printouts. Note: The cartridge cleaning process takes some time. To stop the printing, turn the printer on. Cleaning the Printer 4 Reinsert the toner cartridge and close the cover. 5 Plug in the automatic input tray. 2 Press and...
User Guide
Page 87
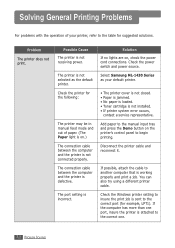
... power source. Disconnect the printer cable and reconnect it. Possible Cause The printer is incorrect. The connection cable between the computer and the printer is not connected properly. Select Samsung ML-1430 Series as your printer, refer to the correct one port, insure the printer is attached to the table...; Paper is jammed. • No paper is loaded. • Toner cartridge is not selected as the default printer. Add paper to the manual input tray and press the Demo button on the printer's control panel to another computer that is working properly and print a job....
... power source. Disconnect the printer cable and reconnect it. Possible Cause The printer is incorrect. The connection cable between the computer and the printer is not connected properly. Select Samsung ML-1430 Series as your printer, refer to the correct one port, insure the printer is attached to the table...; Paper is jammed. • No paper is loaded. • Toner cartridge is not selected as the default printer. Add paper to the manual input tray and press the Demo button on the printer's control panel to another computer that is working properly and print a job....
User Guide
Page 90
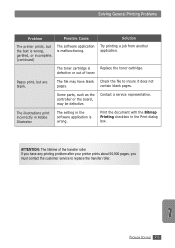
... The printer prints, but are blank. The toner cartridge is wrong. Pages print, but the text is wrong, garbled, or incomplete. (continued) The software application is malfunctioning. Some parts, such as the controller or the board, may have any printing problem after your printer prints ...about 50,000 pages, you have blank Check the file to replace the transfer roller. Solution Try printing a job from another application. contain blank pages. The setting in the software application is Replace the toner cartridge. PROBLEM SOLVING 7.5 The...
... The printer prints, but are blank. The toner cartridge is wrong. Pages print, but the text is wrong, garbled, or incomplete. (continued) The software application is malfunctioning. Some parts, such as the controller or the board, may have any printing problem after your printer prints ...about 50,000 pages, you have blank Check the file to replace the transfer roller. Solution Try printing a job from another application. contain blank pages. The setting in the software application is Replace the toner cartridge. PROBLEM SOLVING 7.5 The...
User Guide
Page 92
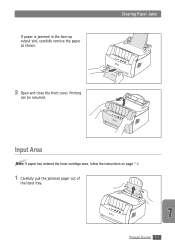
Printing can be resumed. PROBLEM SOLVING 7.7 Input Area Note: If paper has entered the toner cartridge area, follow the instructions on page 7.8. 1 Carefully pull the jammed paper out of the input tray. Clearing Paper Jams 2 Open and close the front cover. 5 If paper is jammed in the face-up output slot, carefully remove the paper as shown.
Printing can be resumed. PROBLEM SOLVING 7.7 Input Area Note: If paper has entered the toner cartridge area, follow the instructions on page 7.8. 1 Carefully pull the jammed paper out of the input tray. Clearing Paper Jams 2 Open and close the front cover. 5 If paper is jammed in the face-up output slot, carefully remove the paper as shown.
User Guide
Page 94
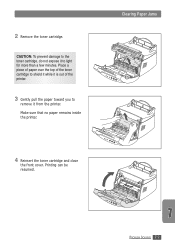
CAUTION: To prevent damage to light for more than a few minutes. Place a piece of paper over the top of the toner cartridge to shield it while it is out of the printer. 3 Gently pull the paper toward you to remove it to the toner cartridge, do not expose it from the printer. 2 Remove the toner cartridge. Printing can be resumed. Make sure that no paper remains inside the printer. 4 Reinsert the toner cartridge and close the front cover. Clearing Paper Jams PROBLEM SOLVING 7.9
CAUTION: To prevent damage to light for more than a few minutes. Place a piece of paper over the top of the toner cartridge to shield it while it is out of the printer. 3 Gently pull the paper toward you to remove it to the toner cartridge, do not expose it from the printer. 2 Remove the toner cartridge. Printing can be resumed. Make sure that no paper remains inside the printer. 4 Reinsert the toner cartridge and close the front cover. Clearing Paper Jams PROBLEM SOLVING 7.9

User Guide
Page 96
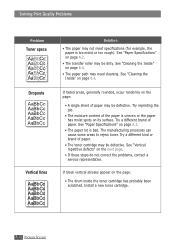
...page 5.6 and 5.11 respectively. • A combination of faded or smeared defects may be able to temporarily extend the toner cartridge life. Clean the LSU. See "Cleaning the Printer" on . PROBLEM SOLVING 7.11 Adjust the print resolution and Toner Save Mode in the toner... is low. You may indicate that the toner cartridge needs cleaning. Solving Print Quality Problems Print Quality Checklist Print quality problems can be resolved by following the checklist below. • Redistribute the toner in the printer properties. Solving Print Quality Problems Problem Light or faded...
...page 5.6 and 5.11 respectively. • A combination of faded or smeared defects may be able to temporarily extend the toner cartridge life. Clean the LSU. See "Cleaning the Printer" on . PROBLEM SOLVING 7.11 Adjust the print resolution and Toner Save Mode in the toner... is low. You may indicate that the toner cartridge needs cleaning. Solving Print Quality Problems Print Quality Checklist Print quality problems can be resolved by following the checklist below. • Redistribute the toner in the printer properties. Solving Print Quality Problems Problem Light or faded...
User Guide
Page 97
... defects" on page 6.4. If black vertical streaks appear on page A.2. • The paper lot is bad. Install a new toner cartridge. 7.12 PROBLEM SOLVING Try a different kind or brand of paper. • The toner cartridge may be defective. Scee "Paper Specifications" on the page: • The drum inside the toner... cartridge has probably been scratched. See "Cleaning the Inside" on page A.2. See "Paper Specifications" on page 6.4. AaBbCc If faded areas, generally rounded, ...
... defects" on page 6.4. If black vertical streaks appear on page A.2. • The paper lot is bad. Install a new toner cartridge. 7.12 PROBLEM SOLVING Try a different kind or brand of paper. • The toner cartridge may be defective. Scee "Paper Specifications" on the page: • The drum inside the toner... cartridge has probably been scratched. See "Cleaning the Inside" on page A.2. See "Paper Specifications" on page 6.4. AaBbCc If faded areas, generally rounded, ...
User Guide
Page 98
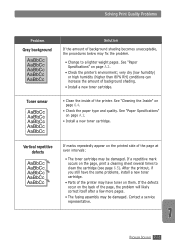
... a new toner cAaartrBidbgeC. If a repetitive mark occurs on page A.2. • Check the printer's eAnaviBronbmCecnt; PROBLEM SOLVING 7.13 See "Cleaning the Inside" on page A.2. • Install a new toner cartridge. c AaBbCc • Clean the inside of background shading becomes unacceptable, the procedures below may... AaBbCc AIfamBarbkCs rcepeatedly appear on the printed side of the printer may have the same problems, install a new toner cartridge. • Parts of the page at even intervals: • The toner cartridge may be damaged. After the printout, if you still ...
... a new toner cAaartrBidbgeC. If a repetitive mark occurs on page A.2. • Check the printer's eAnaviBronbmCecnt; PROBLEM SOLVING 7.13 See "Cleaning the Inside" on page A.2. • Install a new toner cartridge. c AaBbCc • Clean the inside of background shading becomes unacceptable, the procedures below may... AaBbCc AIfamBarbkCs rcepeatedly appear on the printed side of the printer may have the same problems, install a new toner cartridge. • Parts of the page at even intervals: • The toner cartridge may be damaged. After the printout, if you still ...


