
User Guide
Page 2
...are trademarks of Adobe Systems. • All other brand or product names are trademarks of Microsoft Corporation. • GNU Ghostscript software, Copyright (C) 1999. All information included herein is a trademark of Centronics Data Computer Corporation. • IBM and IBM PC are...Windows Me, Windows NT, Windows 2000 and XP are trademarks of this manual. © 2002 Samsung Electronics Co., Ltd. All rights reserved. • ML-1430 Series and Samsung logo are trademarks of Samsung Electronics Co., Ltd. • Centronics is subject to use of their respective companies or organizations....
...are trademarks of Adobe Systems. • All other brand or product names are trademarks of Microsoft Corporation. • GNU Ghostscript software, Copyright (C) 1999. All information included herein is a trademark of Centronics Data Computer Corporation. • IBM and IBM PC are...Windows Me, Windows NT, Windows 2000 and XP are trademarks of this manual. © 2002 Samsung Electronics Co., Ltd. All rights reserved. • ML-1430 Series and Samsung logo are trademarks of Samsung Electronics Co., Ltd. • Centronics is subject to use of their respective companies or organizations....

User Guide
Page 3
... 2: Install the Toner Cartridge 2.2 STEP 3: Loading Paper 2.4 STEP 4: Connect to the Computer with a Parallel Cable - 2.6 STEP 5: Turn on the Printer 2.7 STEP 6: Print a Demo Page 2.7 STEP 7: Install the Printer Software 2.8 Installing USB driver in Windows 2.13 3 Using Control Panel Control Panel Buttons 3.1 Control Panel Lights 3.3 4 Print Media Choosing Paper and Other Media 4.1 Selecting the...
... 2: Install the Toner Cartridge 2.2 STEP 3: Loading Paper 2.4 STEP 4: Connect to the Computer with a Parallel Cable - 2.6 STEP 5: Turn on the Printer 2.7 STEP 6: Print a Demo Page 2.7 STEP 7: Install the Printer Software 2.8 Installing USB driver in Windows 2.13 3 Using Control Panel Control Panel Buttons 3.1 Control Panel Lights 3.3 4 Print Media Choosing Paper and Other Media 4.1 Selecting the...

User Guide
Page 15
2CHAPTER Setting Up Your Printer This chapter provides step by step information on the Printer N STEP 6: Print a Demo Page! Topics included in Windows N STEP 7: Install the Printer Software Installing USB driver in this chapter are: N STEP 1: Unpack Your Printer N STEP 2: Install the Toner Cartridge N STEP 3: Load Paper N STEP 4: Connect to the Computer with a Parallel Cable N STEP 5: Turn on setting up your printer.
2CHAPTER Setting Up Your Printer This chapter provides step by step information on the Printer N STEP 6: Print a Demo Page! Topics included in Windows N STEP 7: Install the Printer Software Installing USB driver in this chapter are: N STEP 1: Unpack Your Printer N STEP 2: Install the Toner Cartridge N STEP 3: Load Paper N STEP 4: Connect to the Computer with a Parallel Cable N STEP 5: Turn on setting up your printer.
User Guide
Page 23
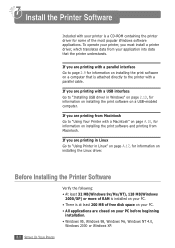
..." on page 2.13, for information on a USB-enabled computer. Install the Printer Software Included with your printer is at least 200 MB of the most popular Windows software applications. To operate your printer, you are printing in Linux" on page A.17, for information on installing the... print software on installing the Linux driver. If you must install a printer driver, which translates data from Macintosh. Before Installing the Printer Software Verify the following: • At least 32 MB(Windows 9x/Me/NT...
..." on page 2.13, for information on a USB-enabled computer. Install the Printer Software Included with your printer is at least 200 MB of the most popular Windows software applications. To operate your printer, you are printing in Linux" on page A.17, for information on installing the... print software on installing the Linux driver. If you must install a printer driver, which translates data from Macintosh. Before Installing the Printer Software Verify the following: • At least 32 MB(Windows 9x/Me/NT...

User Guide
Page 24
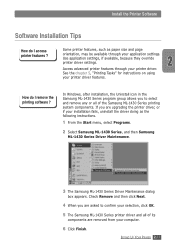
... your PC. If the CD-ROM drive does not automatically run: Select Run from the CD-ROM SAMSUNG ML-143 0 1 Place the CD-ROM in the CD-ROM drive. Install the Printer Software Installing the Printer Software from the Start menu, and type x:\cdsetup.exe in the Open box (where x is the drive letter for the...
... your PC. If the CD-ROM drive does not automatically run: Select Run from the CD-ROM SAMSUNG ML-143 0 1 Place the CD-ROM in the CD-ROM drive. Install the Printer Software Installing the Printer Software from the Start menu, and type x:\cdsetup.exe in the Open box (where x is the drive letter for the...

User Guide
Page 25
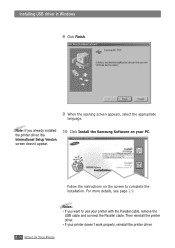
Install the Printer Software 4 The Welcome window opens. Click Next. 5 The files are copied into the appropriate directory. 6 Click Finish. 2.10 SETTING UP YOUR PRINTER
Install the Printer Software 4 The Welcome window opens. Click Next. 5 The files are copied into the appropriate directory. 6 Click Finish. 2.10 SETTING UP YOUR PRINTER
User Guide
Page 26
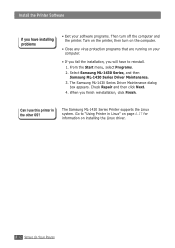
... then Samsung ML-1430 Series Driver Maintenance. 3 The Samsung ML-1430 Series Driver Maintenance dialog box appears. In Windows, after installation, the Uninstall icon in the Samsung ML-1430 Series program group allows you to confirm your selection, click OK. 5 The Samsung ML-1430 Series printer driver and all of its components are upgrading the printer driver, or if your application settings. Install the Printer Software Software...
... then Samsung ML-1430 Series Driver Maintenance. 3 The Samsung ML-1430 Series Driver Maintenance dialog box appears. In Windows, after installation, the Uninstall icon in the Samsung ML-1430 Series program group allows you to confirm your selection, click OK. 5 The Samsung ML-1430 Series printer driver and all of its components are upgrading the printer driver, or if your application settings. Install the Printer Software Software...
User Guide
Page 27
.... 2.12 SETTING UP YOUR PRINTER The Samsung ML-1430 Series Driver Maintenance dialog box appears. Select Samsung ML-1430 Series, and then Samsung ML-1430 Series Driver Maintenance. 3. The Samsung ML-1430 Series Printer supports the Linux system. When you finish reinstallation, click Finish. Go to reinstall. 1. Check Repair and then click Next. 4. Install the Printer Software If you have to "Using Printer in the other OS...
.... 2.12 SETTING UP YOUR PRINTER The Samsung ML-1430 Series Driver Maintenance dialog box appears. Select Samsung ML-1430 Series, and then Samsung ML-1430 Series Driver Maintenance. 3. The Samsung ML-1430 Series Printer supports the Linux system. When you finish reinstallation, click Finish. Go to reinstall. 1. Check Repair and then click Next. 4. Install the Printer Software If you have to "Using Printer in the other OS...
User Guide
Page 31
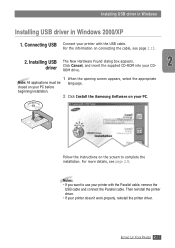
..., the International Setup Version screen doesn't appear. 10 Click Install the Samsung Software on the screen to use your printer doesn't work properly, reinstall the printer driver. 2.16 SETTING UP YOUR PRINTER Then reinstall the printer driver. • If your printer with the Parallel cable, remove the USB cable and connect the Parallel cable. Installing USB driver...
..., the International Setup Version screen doesn't appear. 10 Click Install the Samsung Software on the screen to use your printer doesn't work properly, reinstall the printer driver. 2.16 SETTING UP YOUR PRINTER Then reinstall the printer driver. • If your printer with the Parallel cable, remove the USB cable and connect the Parallel cable. Installing USB driver...
User Guide
Page 32
... cable, see page 2.9. SAMSUNG ML-143 0 Follow the instructions on your printer with the USB cable. Then reinstall the printer driver. • If your CDROM drive. 1 When the opening screen appears, select the appropriate Note: All applications must be language. closed on your PC before beginning installation. 2 Click Install the Samsung Software on the screen to...
... cable, see page 2.9. SAMSUNG ML-143 0 Follow the instructions on your printer with the USB cable. Then reinstall the printer driver. • If your CDROM drive. 1 When the opening screen appears, select the appropriate Note: All applications must be language. closed on your PC before beginning installation. 2 Click Install the Samsung Software on the screen to...

User Guide
Page 33
..., and move devices. If you can connect your computer. (If you decide to switch to remove and reinstall the printer software. ) 2.18 SETTING UP YOUR PRINTER Also, insure the cable connections are firm. (USB hubs are hardware devices into which you have multiple hubs on enabling...listed, refer to your computer's USB port is properly enabled. If your computer's documentation or contact the manufacturer for connecting devices like printers, modems, scanners, and digital cameras. USB uses a standard port and plug combination for more information on the USB chain, try connecting...
..., and move devices. If you can connect your computer. (If you decide to switch to remove and reinstall the printer software. ) 2.18 SETTING UP YOUR PRINTER Also, insure the cable connections are firm. (USB hubs are hardware devices into which you have multiple hubs on enabling...listed, refer to your computer's USB port is properly enabled. If your computer's documentation or contact the manufacturer for connecting devices like printers, modems, scanners, and digital cameras. USB uses a standard port and plug combination for more information on the USB chain, try connecting...
User Guide
Page 34
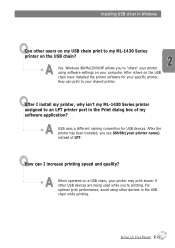
... YOUR PRINTER 2.19 A Yes. After others on a USB chain, your specific printer, they can I install my printer, why isn't my ML-1430 Series printer assigned to your shared printer. A USB uses a different naming convention for your printer may print slower if other users on my USB chain print to my ML-1430 Series printer on your printer name) instead of my software application...
... YOUR PRINTER 2.19 A Yes. After others on a USB chain, your specific printer, they can I install my printer, why isn't my ML-1430 Series printer assigned to your shared printer. A USB uses a different naming convention for your printer may print slower if other users on my USB chain print to my ML-1430 Series printer on your printer name) instead of my software application...

User Guide
Page 36
..., see page 6.5. Error Paper Data Toner Save Cancel/Reprint Demo Demo Print demo page Press and hold Demo for Paper Source from your software application, you should press Demo each time you select Manual for about 2 seconds until the control panel lights remain lit. Start manual feeding When... you load a sheet of the printer Press and hold Demo for about 10 seconds until the control panel lights blink slowly to print a demo page. USING THE CONTROL PANEL 3.1 ...
..., see page 6.5. Error Paper Data Toner Save Cancel/Reprint Demo Demo Print demo page Press and hold Demo for Paper Source from your software application, you should press Demo each time you select Manual for about 2 seconds until the control panel lights remain lit. Start manual feeding When... you load a sheet of the printer Press and hold Demo for about 10 seconds until the control panel lights blink slowly to print a demo page. USING THE CONTROL PANEL 3.1 ...

User Guide
Page 45
... printed pages will not stack in the face-down to open the face-up output slot, you must select Manual for Paper Source from the software application, and then select the correct paper size and type. After you finish using the face-up output slot. 3 When you print a document, you must...
... printed pages will not stack in the face-down to open the face-up output slot, you must select Manual for Paper Source from the software application, and then select the correct paper size and type. After you finish using the face-up output slot. 3 When you print a document, you must...

User Guide
Page 47
Note: If you select Auto Select in the Paper Source and load the envelope one by one, you print on envelopes, configure the paper source, type and size properly in the software application. For details, see page 5.3. 6 Press Demo to start feeding. Printing on Envelopes 4 Push the output lever down. 5 When you need not press the Demo button. 7 Print the document. 8 After printing, push the output lever up. 4.8 PRINT MEDIA
Note: If you select Auto Select in the Paper Source and load the envelope one by one, you print on envelopes, configure the paper source, type and size properly in the software application. For details, see page 5.3. 6 Press Demo to start feeding. Printing on Envelopes 4 Push the output lever down. 5 When you need not press the Demo button. 7 Print the document. 8 After printing, push the output lever up. 4.8 PRINT MEDIA
User Guide
Page 48
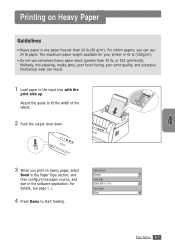
... section, and then configure the paper source, and size in the input tray with the print side up. The maximum paper weight available for your printer is any paper heavier than 43 lb, or 163 g/m2 bond). Misfeeds, mis-stacking, media jams, poor toner fusing, poor print quality, and excessive mechanical... details, see page 5.3. 4 Press Demo to fit the width of the labels. 2 Push the output lever down. 3 When you can result. 1 Load paper in the software application. PRINT MEDIA 4.9
... section, and then configure the paper source, and size in the input tray with the print side up. The maximum paper weight available for your printer is any paper heavier than 43 lb, or 163 g/m2 bond). Misfeeds, mis-stacking, media jams, poor toner fusing, poor print quality, and excessive mechanical... details, see page 5.3. 4 Press Demo to fit the width of the labels. 2 Push the output lever down. 3 When you can result. 1 Load paper in the software application. PRINT MEDIA 4.9

User Guide
Page 49
...sticking, do not let the printed label sheets stack up as they are wrinkled, bubbled, or otherwise damaged. 1 Load labels in the software application. Note: To prevent labels from the backing sheet or are printed out. 4.10 PRINT MEDIA Printing on labels, configure the paper source... during printing, cause paper jams. Exposed adhesive can tolerate a fusing temperature of 200°C (392°F) for laser printers. • Verify that the labels' adhesive material can also cause damage to printer components. • Do not feed a sheet of the labels. 2 Push the output lever down. 3 To ...
...sticking, do not let the printed label sheets stack up as they are wrinkled, bubbled, or otherwise damaged. 1 Load labels in the software application. Note: To prevent labels from the backing sheet or are printed out. 4.10 PRINT MEDIA Printing on labels, configure the paper source... during printing, cause paper jams. Exposed adhesive can tolerate a fusing temperature of 200°C (392°F) for laser printers. • Verify that the labels' adhesive material can also cause damage to printer components. • Do not feed a sheet of the labels. 2 Push the output lever down. 3 To ...

User Guide
Page 50
... transparencies in the input tray with the adhesive strip going first. Notes: • To prevent transparencies from the printer. Printing on a flat surface after removing them from sticking, do not let the printed sheets stack up , ... are printed out. • Place transparencies on Transparencies Guidelines • Only use transparencies recommended for use in laser printers. • Insure transparencies are not wrinkled, curled, or have any torn edges. • Hold the transparencies..., configure the paper source, type and size in the software application. PRINT MEDIA 4.11
... transparencies in the input tray with the adhesive strip going first. Notes: • To prevent transparencies from the printer. Printing on a flat surface after removing them from sticking, do not let the printed sheets stack up , ... are printed out. • Place transparencies on Transparencies Guidelines • Only use transparencies recommended for use in laser printers. • Insure transparencies are not wrinkled, curled, or have any torn edges. • Hold the transparencies..., configure the paper source, type and size in the software application. PRINT MEDIA 4.11

User Guide
Page 51
...as forms and letterhead, verify that will not melt, vaporize, or release hazardous emissions when subjected to the printer's fusing temperature of the paper stack. 2 To print on the paper is dry. For details, see ... Preprinted Paper Guidelines • Letterhead must be printed with the design face up, bottom edge toward the printer. During the fusing process, wet ink can come off preprinted paper. 1 Load letterhead into the input... must be non-flammable and should not adversely affect any printer rollers. • Forms and letterhead should be sealed in the software application.
...as forms and letterhead, verify that will not melt, vaporize, or release hazardous emissions when subjected to the printer's fusing temperature of the paper stack. 2 To print on the paper is dry. For details, see ... Preprinted Paper Guidelines • Letterhead must be printed with the design face up, bottom edge toward the printer. During the fusing process, wet ink can come off preprinted paper. 1 Load letterhead into the input... must be non-flammable and should not adversely affect any printer rollers. • Forms and letterhead should be sealed in the software application.

User Guide
Page 52
... tray and 95 X 127 mm (3.8" X 5") for the automatic input tray, and the maximum size is too small or too large. To print in the printer driver's properties (see page 5.3) and print. 4 Press Demo to start feeding. Printing on card stock that is 216 X 356 mm (8.5" X 14"). &#...Configure the paper source, type in landscape mode, make this selection through the software. Adjust the guide to fit the width of the media in the software application. 1 Load print media in the input tray with the Samsung ML-1430 Series printer. Guidelines • Insert the short-edge first into the input tray.
... tray and 95 X 127 mm (3.8" X 5") for the automatic input tray, and the maximum size is too small or too large. To print in the printer driver's properties (see page 5.3) and print. 4 Press Demo to start feeding. Printing on card stock that is 216 X 356 mm (8.5" X 14"). &#...Configure the paper source, type in landscape mode, make this selection through the software. Adjust the guide to fit the width of the media in the software application. 1 Load print media in the input tray with the Samsung ML-1430 Series printer. Guidelines • Insert the short-edge first into the input tray.

